User Guide
Page 86
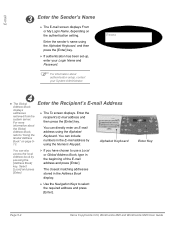
... the sender's name using the Alphabet Keyboard, and then press the [Enter] key. ¾ If authentication has been set-up, enter your Login Name and Password. ) For information about the Global Address Book, refer to use a Local or Global Address Book, type in the beginning of the E-mail address and press... also access the local Address book by using the Alphabet Keyboard. You can directly enter an E-mail address using the Numeric Keypad. Enter Key Page 5-4 Xerox CopyCentre C20, WorkCentre M20 and WorkCentre M20i User Guide
... the sender's name using the Alphabet Keyboard, and then press the [Enter] key. ¾ If authentication has been set-up, enter your Login Name and Password. ) For information about the Global Address Book, refer to use a Local or Global Address Book, type in the beginning of the E-mail address and press... also access the local Address book by using the Alphabet Keyboard. You can directly enter an E-mail address using the Numeric Keypad. Enter Key Page 5-4 Xerox CopyCentre C20, WorkCentre M20 and WorkCentre M20i User Guide
User Guide
Page 155
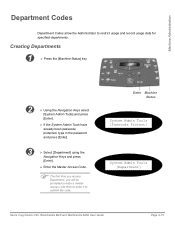
... the Administrator to confirm the code. Enter Machine Status System Admin Tools [Passcode Protect] System Admin Tools [Department] Xerox CopyCentre C20, WorkCentre M20 and WorkCentre M20i User Guide Page 9-15 Creating Departments 1 ¾ Press the [Machine Status] key. 2 ¾ Using the... Navigation Keys select [System Admin Tools] and press [Enter]. ¾ If the System Admin Tools have already been passcode protected, type in the password ...
... the Administrator to confirm the code. Enter Machine Status System Admin Tools [Passcode Protect] System Admin Tools [Department] Xerox CopyCentre C20, WorkCentre M20 and WorkCentre M20i User Guide Page 9-15 Creating Departments 1 ¾ Press the [Machine Status] key. 2 ¾ Using the... Navigation Keys select [System Admin Tools] and press [Enter]. ¾ If the System Admin Tools have already been passcode protected, type in the password ...
User Guide
Page 156
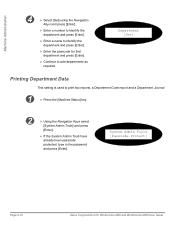
... [System Admin Tools] and press [Enter]. ¾ If the System Admin Tools have already been passcode protected, type in the password and press [Enter]. Department [Set] Printing Department Data This setting is used to add departments as required. System Admin Tools [Passcode Protect] Page 9-16 Xerox CopyCentre C20, WorkCentre M20 and WorkCentre M20i User Guide
... [System Admin Tools] and press [Enter]. ¾ If the System Admin Tools have already been passcode protected, type in the password and press [Enter]. Department [Set] Printing Department Data This setting is used to add departments as required. System Admin Tools [Passcode Protect] Page 9-16 Xerox CopyCentre C20, WorkCentre M20 and WorkCentre M20i User Guide

User Guide
Page 158
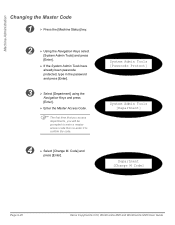
System Admin Tools [Passcode Protect] System Admin Tools [Department] Department [Management] Page 9-18 Xerox CopyCentre C20, WorkCentre M20 and WorkCentre M20i User Guide Machine Administration Managing Departments This setting is used to enable or disable Department Mode and to clear ...Navigation Keys select [System Admin Tools] and press [Enter]. ¾ If the System Admin Tools have already been passcode protected, type in the password and press [Enter]. 3 ¾ Select [Department] using the Navigation Keys is displayed and press [Enter]. ¾ Enter the Master Access Code...
System Admin Tools [Passcode Protect] System Admin Tools [Department] Department [Management] Page 9-18 Xerox CopyCentre C20, WorkCentre M20 and WorkCentre M20i User Guide Machine Administration Managing Departments This setting is used to enable or disable Department Mode and to clear ...Navigation Keys select [System Admin Tools] and press [Enter]. ¾ If the System Admin Tools have already been passcode protected, type in the password and press [Enter]. 3 ¾ Select [Department] using the Navigation Keys is displayed and press [Enter]. ¾ Enter the Master Access Code...
User Guide
Page 160
...; Using the Navigation Keys select [System Admin Tools] and press [Enter]. ¾ If the System Admin Tools have already been passcode protected, type in the password and press [Enter]. 3 ¾ Select [Department] using the Navigation Keys and press [Enter]. ¾ Enter the Master Access Code. ) The first time that you access... then re-enter it to confirm the code. 4 ¾ Select [Change M. System Admin Tools [Passcode Protect] System Admin Tools [Department] Department [Change M Code] Page 9-20 Xerox CopyCentre C20, WorkCentre M20 and WorkCentre M20i User Guide
...; Using the Navigation Keys select [System Admin Tools] and press [Enter]. ¾ If the System Admin Tools have already been passcode protected, type in the password and press [Enter]. 3 ¾ Select [Department] using the Navigation Keys and press [Enter]. ¾ Enter the Master Access Code. ) The first time that you access... then re-enter it to confirm the code. 4 ¾ Select [Change M. System Admin Tools [Passcode Protect] System Admin Tools [Department] Department [Change M Code] Page 9-20 Xerox CopyCentre C20, WorkCentre M20 and WorkCentre M20i User Guide
User Guide
Page 162
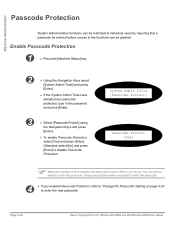
... Keys select [System Admin Tools] and press [Enter]. ¾ If the System Admin Tools have already been passcode protected, type in the password and press [Enter]. 3 ¾ Select [Passcode Protect] using the Navigation Keys and press [Enter]. ¾ To enable Passcode Protection, select...by requiring that a passcode be entered before access to the functions can be asked to enter the passcode. Page 9-22 Xerox CopyCentre C20, WorkCentre M20 and WorkCentre M20i User Guide Otherwise select [No] and press [Enter] to enter the new passcode. System Admin Tools [Passcode Protect] ...
... Keys select [System Admin Tools] and press [Enter]. ¾ If the System Admin Tools have already been passcode protected, type in the password and press [Enter]. 3 ¾ Select [Passcode Protect] using the Navigation Keys and press [Enter]. ¾ To enable Passcode Protection, select...by requiring that a passcode be entered before access to the functions can be asked to enter the passcode. Page 9-22 Xerox CopyCentre C20, WorkCentre M20 and WorkCentre M20i User Guide Otherwise select [No] and press [Enter] to enter the new passcode. System Admin Tools [Passcode Protect] ...
User Guide
Page 163
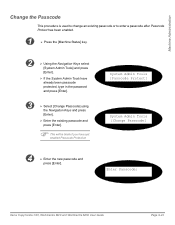
Enter Passcode: Xerox CopyCentre C20, WorkCentre M20 and WorkCentre M20i User Guide Page 9-23 Machine Administration Change the Passcode This procedure is used to change an existing passcode or to enter a passcode after Passcode Protect ...; Using the Navigation Keys select [System Admin Tools] and press [Enter]. ¾ If the System Admin Tools have already been passcode protected, type in the password and press [Enter]. 3 ¾ Select [Change Passcode] using the Navigation Keys and press [Enter]. ¾ Enter the existing passcode and press [Enter]. ) This will be...
Enter Passcode: Xerox CopyCentre C20, WorkCentre M20 and WorkCentre M20i User Guide Page 9-23 Machine Administration Change the Passcode This procedure is used to change an existing passcode or to enter a passcode after Passcode Protect ...; Using the Navigation Keys select [System Admin Tools] and press [Enter]. ¾ If the System Admin Tools have already been passcode protected, type in the password and press [Enter]. 3 ¾ Select [Change Passcode] using the Navigation Keys and press [Enter]. ¾ Enter the existing passcode and press [Enter]. ) This will be...

User Guide
Page 164
... Data Email TX History Email Address Book System Admin Tools [Passcode Protect] Clear Memory [Fax Phone Book] Page 9-24 Xerox CopyCentre C20, WorkCentre M20 and WorkCentre M20i User Guide Clearing the Memory 1 ¾ Press the [Machine Status] key. 2 ¾ Using the Navigation Keys ...select [System Admin Tools] and press [Enter]. ¾ If the System Admin Tools have already been passcode protected, type in the password and press...
... Data Email TX History Email Address Book System Admin Tools [Passcode Protect] Clear Memory [Fax Phone Book] Page 9-24 Xerox CopyCentre C20, WorkCentre M20 and WorkCentre M20i User Guide Clearing the Memory 1 ¾ Press the [Machine Status] key. 2 ¾ Using the Navigation Keys ...select [System Admin Tools] and press [Enter]. ¾ If the System Admin Tools have already been passcode protected, type in the password and press...
User Guide
Page 165
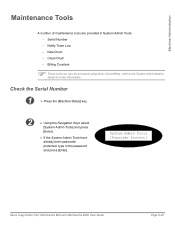
... in System Admin Tools: - Clean Drum - Billing Counters ) These tools can also be accessed using Xerox CentreWare, refer to the System Administration Guide for more information. System Admin Tools [Passcode Protect] Xerox CopyCentre C20, WorkCentre M20 and WorkCentre M20i User Guide Page 9-25 Machine Administration Maintenance Tools A number of maintenance tools are provided in the...
... in System Admin Tools: - Clean Drum - Billing Counters ) These tools can also be accessed using Xerox CentreWare, refer to the System Administration Guide for more information. System Admin Tools [Passcode Protect] Xerox CopyCentre C20, WorkCentre M20 and WorkCentre M20i User Guide Page 9-25 Machine Administration Maintenance Tools A number of maintenance tools are provided in the...
User Guide
Page 167
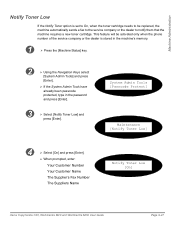
...When prompted, enter: Your Customer Number Your Customer Name The Supplier's Fax Number The Suppliers Name Notify Toner Low [On] Xerox CopyCentre C20, WorkCentre M20 and WorkCentre M20i User Guide Page 9-27 This feature will be replaced, the machine automatically sends a fax to the service company or the...Keys select [System Admin Tools] and press [Enter]. ¾ If the System Admin Tools have already been passcode protected, type in the password and press [Enter]. 3 ¾ Select [Notify Toner Low] and press [Enter]. Machine Administration Notify Toner Low If the Notify Toner ...
...When prompted, enter: Your Customer Number Your Customer Name The Supplier's Fax Number The Suppliers Name Notify Toner Low [On] Xerox CopyCentre C20, WorkCentre M20 and WorkCentre M20i User Guide Page 9-27 This feature will be replaced, the machine automatically sends a fax to the service company or the...Keys select [System Admin Tools] and press [Enter]. ¾ If the System Admin Tools have already been passcode protected, type in the password and press [Enter]. 3 ¾ Select [Notify Toner Low] and press [Enter]. Machine Administration Notify Toner Low If the Notify Toner ...

User Guide
Page 168
System Admin Tools [Passcode Protect] New Drum [On] Page 9-28 Xerox CopyCentre C20, WorkCentre M20 and WorkCentre M20i User Guide Machine Administration New Drum This function is used to reset the drum counter after the drum has been replaced. 1 ¾ Press the [...; Using the Navigation Keys select [System Admin Tools] and press [Enter]. ¾ If the System Admin Tools have already been passcode protected, type in the password and press [Enter]. 3 ¾ Select [New Drum] and press [Enter]. ¾ To set the drum counter to exit the selection. Otherwise, select [Off] and...
System Admin Tools [Passcode Protect] New Drum [On] Page 9-28 Xerox CopyCentre C20, WorkCentre M20 and WorkCentre M20i User Guide Machine Administration New Drum This function is used to reset the drum counter after the drum has been replaced. 1 ¾ Press the [...; Using the Navigation Keys select [System Admin Tools] and press [Enter]. ¾ If the System Admin Tools have already been passcode protected, type in the password and press [Enter]. 3 ¾ Select [New Drum] and press [Enter]. ¾ To set the drum counter to exit the selection. Otherwise, select [Off] and...
User Guide
Page 169
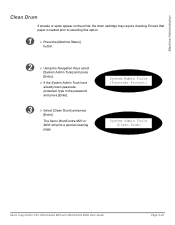
...29 Machine Administration Clean Drum If streaks or spots appear on the prints, the drum cartridge may require cleaning. The Xerox WorkCentre M20 or M20i will print a special cleaning page. Ensure that paper is loaded prior to selecting this option. 1 ¾ Press... the [Machine Status] button. 2 ¾ Using the Navigation Keys select [System Admin Tools] and press [Enter]. ¾ If the System Admin Tools have already been passcode protected, type in the password...
...29 Machine Administration Clean Drum If streaks or spots appear on the prints, the drum cartridge may require cleaning. The Xerox WorkCentre M20 or M20i will print a special cleaning page. Ensure that paper is loaded prior to selecting this option. 1 ¾ Press... the [Machine Status] button. 2 ¾ Using the Navigation Keys select [System Admin Tools] and press [Enter]. ¾ If the System Admin Tools have already been passcode protected, type in the password...
User Guide
Page 170
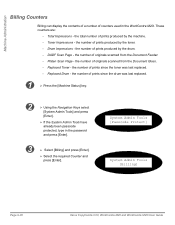
...password and press [Enter]. 3 ¾ Select [Billing] and press [Enter]. ¾ Select the required Counter and press [Enter]. the number of originals scanned from the Document Feeder. - DADF Scan Page - Replaced Toner - System Admin Tools [Passcode Protect] System Admin Tools [Billing] Page 9-30 Xerox CopyCentre C20, WorkCentre M20 and WorkCentre M20i...[Enter]. ¾ If the System Admin Tools have already been passcode protected, type in the WorkCentre M20i. Platen Scan Page - the number of prints produced by the toner. - the number of prints since the drum was last replaced....
...password and press [Enter]. 3 ¾ Select [Billing] and press [Enter]. ¾ Select the required Counter and press [Enter]. the number of originals scanned from the Document Feeder. - DADF Scan Page - Replaced Toner - System Admin Tools [Passcode Protect] System Admin Tools [Billing] Page 9-30 Xerox CopyCentre C20, WorkCentre M20 and WorkCentre M20i...[Enter]. ¾ If the System Admin Tools have already been passcode protected, type in the WorkCentre M20i. Platen Scan Page - the number of prints produced by the toner. - the number of prints since the drum was last replaced....

User Guide
Page 171
Enter Machine Status System Admin Tools [Passcode Protect] System Admin Tools [Auxiliary Access] Xerox CopyCentre C20, WorkCentre M20 and WorkCentre M20i User Guide Page 9-31 Use these instructions to be recognized. Otherwise, select [Off] and press [Enter]. Machine Administration Enabling or ...select [System Admin Tools] and press [Enter]. ¾ If the System Admin Tools have already been passcode protected, type in the password and press [Enter]. 3 ¾ Select [Auxiliary Access] and press [Enter]. ¾ To enable Auxiliary Access, select [On] is displayed and press [Enter...
Enter Machine Status System Admin Tools [Passcode Protect] System Admin Tools [Auxiliary Access] Xerox CopyCentre C20, WorkCentre M20 and WorkCentre M20i User Guide Page 9-31 Use these instructions to be recognized. Otherwise, select [Off] and press [Enter]. Machine Administration Enabling or ...select [System Admin Tools] and press [Enter]. ¾ If the System Admin Tools have already been passcode protected, type in the password and press [Enter]. 3 ¾ Select [Auxiliary Access] and press [Enter]. ¾ To enable Auxiliary Access, select [On] is displayed and press [Enter...
User Guide
Page 199
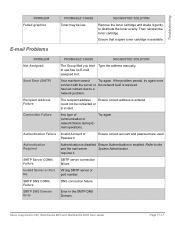
... manually. has lost contact due to distribute the toner evenly. Try again. SMTP Server CONN. DNS connection failure. Xerox CopyCentre C20, WorkCentre M20 and WorkCentre M20i User Guide Page 11-17 SMTP DNS CONN. Send Error (SMTP) Your machine cannot Try again. could not be...to use has no E-mail assigned to the and the mail server System Administrator. Failure. Authentication Failure Invalid Account or Password Ensure correct account and password are used. Invalid Server or Port Wrong SMTP server or No. Then reinstall the toner cartridge. Refer to it ...
... manually. has lost contact due to distribute the toner evenly. Try again. SMTP Server CONN. DNS connection failure. Xerox CopyCentre C20, WorkCentre M20 and WorkCentre M20i User Guide Page 11-17 SMTP DNS CONN. Send Error (SMTP) Your machine cannot Try again. could not be...to use has no E-mail assigned to the and the mail server System Administrator. Failure. Authentication Failure Invalid Account or Password Ensure correct account and password are used. Invalid Server or Port Wrong SMTP server or No. Then reinstall the toner cartridge. Refer to it ...
User Guide
Page 201
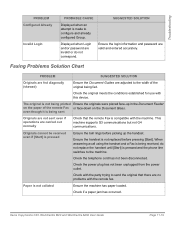
...were placed face-up the handset. Check with this device. Displayed when Login and/or password are valid and entered accurately. SUGGESTED SOLUTION Ensure the login information and password are invalid or do not replace the handset until [Start] is pressed and the phone...the paper of the original being received, do not correspond. Check the telephone cord has not been disconnected. Xerox CopyCentre C20, WorkCentre M20 and WorkCentre M20i User Guide Page 11-19 Troubleshooting PROBLEM Configured Already Invalid Login PROBABLE CAUSE Displayed when an attempt is pressed Ensure...
...were placed face-up the handset. Check with this device. Displayed when Login and/or password are valid and entered accurately. SUGGESTED SOLUTION Ensure the login information and password are invalid or do not replace the handset until [Start] is pressed and the phone...the paper of the original being received, do not correspond. Check the telephone cord has not been disconnected. Xerox CopyCentre C20, WorkCentre M20 and WorkCentre M20i User Guide Page 11-19 Troubleshooting PROBLEM Configured Already Invalid Login PROBABLE CAUSE Displayed when an attempt is pressed Ensure...
WorkCentre M20/M20i Firmware Installation Instructions
Page 1
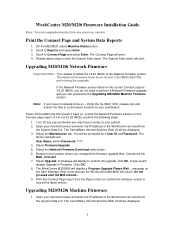
...to Reports and select Enter. 3. Select Firmware Upgrade. 5. The WorkCentre M20/M20i will reboot. The CentreWare Internet Services Web UI will be prompted for a User ID and Password. After a few minutes the WorkCentre M20/M20i will display a Program Upgrade Please Wait... The factory defaults are:... User Name: admin Password: 1111 4. A pop-up blocker you unzipped the firmware upgrade files...
...to Reports and select Enter. 3. Select Firmware Upgrade. 5. The WorkCentre M20/M20i will reboot. The CentreWare Internet Services Web UI will be prompted for a User ID and Password. After a few minutes the WorkCentre M20/M20i will display a Program Upgrade Please Wait... The factory defaults are:... User Name: admin Password: 1111 4. A pop-up blocker you unzipped the firmware upgrade files...
WorkCentre M20/M20i Firmware Installation Instructions
Page 2
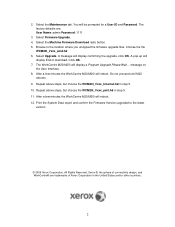
... 6. Do not proceed until M20 reboots 9. Browse to the latest version. © 2009 Xerox Corporation. Xerox ®, the sphere of connectivity design, and WorkCentre® are : User Name: admin Password: 1111 3. A message will display a Program Upgrade Please Wait... The WorkCentre M20/M20i will display confirming the upgrade, click OK. All Rights Reserved. The factory defaults are...
... 6. Do not proceed until M20 reboots 9. Browse to the latest version. © 2009 Xerox Corporation. Xerox ®, the sphere of connectivity design, and WorkCentre® are : User Name: admin Password: 1111 3. A message will display a Program Upgrade Please Wait... The WorkCentre M20/M20i will display confirming the upgrade, click OK. All Rights Reserved. The factory defaults are...

System Administration Guide
Page 29
... Port The Ethernet port is displayed and press [Enter]. System Admin Tools [Network Setup] Xerox WorkCentre M20i System Administration Guide Page 2-3 Ethernet Port Setup If the speed setting of the Ethernet port needs...¾ Press the [Machine Status] button. 3 ¾ Press or until Network Setup is the default interface used on the WorkCentre M20i. NOTE: The Ethernet port cannot be changed perform the following steps: 1 ¾ Connect the device to be disabled. System ...190; If the System Admin Tools have been passcode protected, type in the password and press [Enter].
... Port The Ethernet port is displayed and press [Enter]. System Admin Tools [Network Setup] Xerox WorkCentre M20i System Administration Guide Page 2-3 Ethernet Port Setup If the speed setting of the Ethernet port needs...¾ Press the [Machine Status] button. 3 ¾ Press or until Network Setup is the default interface used on the WorkCentre M20i. NOTE: The Ethernet port cannot be changed perform the following steps: 1 ¾ Connect the device to be disabled. System ...190; If the System Admin Tools have been passcode protected, type in the password and press [Enter].

System Administration Guide
Page 32
...] Page 2-6 Xerox WorkCentre M20i System Administration Guide Basic Network Installation Enabling or Disabling TCP/IP At the WorkCentre M20i, perform these steps: 1 ¾ Press the [Machine Status] button. 2 ¾ Press or until System Admin Tools is displayed and press [Enter]. ¾ If the System Admin Tools have been passcode protected, type in the password and press...
...] Page 2-6 Xerox WorkCentre M20i System Administration Guide Basic Network Installation Enabling or Disabling TCP/IP At the WorkCentre M20i, perform these steps: 1 ¾ Press the [Machine Status] button. 2 ¾ Press or until System Admin Tools is displayed and press [Enter]. ¾ If the System Admin Tools have been passcode protected, type in the password and press...


