WorkCentre M15/M15i User Guide
Page 3
... Local ID and Name (M15i Only 2-13 Setting the Date and Time (M15i Only 2-15 Installing Software 2-16 3 Product Overview 3-1 Overview of Features 3-2 Machine Overview 3-4 Control Panel Overview 3-7 Overview of Contents 1 Welcome 1-1 Introduction 1-2 About This Guide 1-3 Related Information Sources 1-4 Customer Support 1-5 Safety ...1-6 Regulatory Information 1-9 Regulations - Table of Modes 3-10 Xerox WorkCentre M15/M15i User Guide Page i Europe...
... Local ID and Name (M15i Only 2-13 Setting the Date and Time (M15i Only 2-15 Installing Software 2-16 3 Product Overview 3-1 Overview of Features 3-2 Machine Overview 3-4 Control Panel Overview 3-7 Overview of Contents 1 Welcome 1-1 Introduction 1-2 About This Guide 1-3 Related Information Sources 1-4 Customer Support 1-5 Safety ...1-6 Regulatory Information 1-9 Regulations - Table of Modes 3-10 Xerox WorkCentre M15/M15i User Guide Page i Europe...

WorkCentre M15/M15i User Guide
Page 20
Modification, connection to external control software or to be compatible with other country networks. Page 1-14 Xerox WorkCentre M15/M15i User Guide This product has been tested to use on analogue-switched telephone networks in accordance with TBR21, a technical specification for...loop disconnect (pulse) or DTMF (tone) signaling it is recommended that it needs to be configured to external control apparatus not authorized by Xerox for use DTMF signaling. The product may be reconnected to the analogue public switched telephone network (PSTN) in the European Economic Area. ...
Modification, connection to external control software or to be compatible with other country networks. Page 1-14 Xerox WorkCentre M15/M15i User Guide This product has been tested to use on analogue-switched telephone networks in accordance with TBR21, a technical specification for...loop disconnect (pulse) or DTMF (tone) signaling it is recommended that it needs to be configured to external control apparatus not authorized by Xerox for use DTMF signaling. The product may be reconnected to the analogue public switched telephone network (PSTN) in the European Economic Area. ...
WorkCentre M15/M15i User Guide
Page 25
2 Getting Started Ø Unpacking 2-2 Ø Making Connections 2-4 Ø Installing Drum and Toner Cartridges 2-6 Ø Loading Paper 2-8 Ø Setting the Language (M15 only 2-11 Ø Setting the Language and Country (M15i only) . . 2-12 Ø Setting the Local ID and Name (M15i Only) . . . . 2-13 Ø Setting the Date and Time (M15i Only 2-15 Ø Installing Software 2-16 Xerox WorkCentre M15/M15i User Guide Page 2-1
2 Getting Started Ø Unpacking 2-2 Ø Making Connections 2-4 Ø Installing Drum and Toner Cartridges 2-6 Ø Loading Paper 2-8 Ø Setting the Language (M15 only 2-11 Ø Setting the Language and Country (M15i only) . . 2-12 Ø Setting the Local ID and Name (M15i Only) . . . . 2-13 Ø Setting the Date and Time (M15i Only 2-15 Ø Installing Software 2-16 Xerox WorkCentre M15/M15i User Guide Page 2-1
WorkCentre M15/M15i User Guide
Page 27
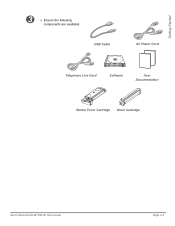
Getting Started 3 Ø Ensure the following components are available: USB Cable AC Power Cord Telephone Line Cord Software User Documentation Starter Toner Cartridge Drum Cartridge Xerox WorkCentre M15/M15i User Guide Page 2-3
Getting Started 3 Ø Ensure the following components are available: USB Cable AC Power Cord Telephone Line Cord Software User Documentation Starter Toner Cartridge Drum Cartridge Xerox WorkCentre M15/M15i User Guide Page 2-3
WorkCentre M15/M15i User Guide
Page 40
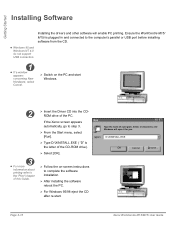
... and Windows will enable PC printing. Open: D:\XINSTALL.EXE OK Cancel Browse... Ø Follow the on the PC and start . Page 2-16 Xerox WorkCentre M15/M15i User Guide l Windows 95 and Windows NT 4.0 do not support USB connection. 1 l If a window appears concerning New Hardware, select Cancel.... Ø Switch on -screen instructions to complete the software installation. Ø After installing the software reboot the PC. Ø For Windows 95/98 eject the CD after re-start Windows. 2 3 l For more information...
... and Windows will enable PC printing. Open: D:\XINSTALL.EXE OK Cancel Browse... Ø Follow the on the PC and start . Page 2-16 Xerox WorkCentre M15/M15i User Guide l Windows 95 and Windows NT 4.0 do not support USB connection. 1 l If a window appears concerning New Hardware, select Cancel.... Ø Switch on -screen instructions to complete the software installation. Ø After installing the software reboot the PC. Ø For Windows 95/98 eject the CD after re-start Windows. 2 3 l For more information...
WorkCentre M15/M15i User Guide
Page 43
Fax Documents (M15i Only) The WorkCentre M15i allows documents to Create Electronic Files (M15i Only) The WorkCentre M15i is equipped with information about items such as speed dialing, delayed send and polling are also a number of fax reports available which provide users with ..., stored fax numbers and transmissions. There are available. Product Overview Scan Documents to be placed on a PC and the images manipulated using an appropriate software package e.g. PaperPort. Xerox WorkCentre M15/M15i User Guide Page 3-3 Documents scanned can be faxed via a telephone line.
Fax Documents (M15i Only) The WorkCentre M15i allows documents to Create Electronic Files (M15i Only) The WorkCentre M15i is equipped with information about items such as speed dialing, delayed send and polling are also a number of fax reports available which provide users with ..., stored fax numbers and transmissions. There are available. Product Overview Scan Documents to be placed on a PC and the images manipulated using an appropriate software package e.g. PaperPort. Xerox WorkCentre M15/M15i User Guide Page 3-3 Documents scanned can be faxed via a telephone line.
WorkCentre M15/M15i User Guide
Page 69
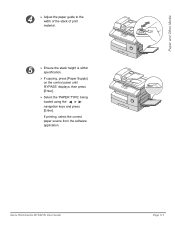
Xerox WorkCentre M15/M15i User Guide Page 5-7 Paper and Other Media 34 Ø Adjust the paper guide to the width of the stack of print material. 5 Ø Ensure the stack height is within specification. Ø If copying, press [Paper Supply] on the control panel until 'BYPASS' displays, then press [Enter]. Ø Select the 'PAPER TYPE' being loaded using the or navigation keys and press [Enter]. If printing, select the correct paper source from the software application.
Xerox WorkCentre M15/M15i User Guide Page 5-7 Paper and Other Media 34 Ø Adjust the paper guide to the width of the stack of print material. 5 Ø Ensure the stack height is within specification. Ø If copying, press [Paper Supply] on the control panel until 'BYPASS' displays, then press [Enter]. Ø Select the 'PAPER TYPE' being loaded using the or navigation keys and press [Enter]. If printing, select the correct paper source from the software application.
WorkCentre M15/M15i User Guide
Page 98
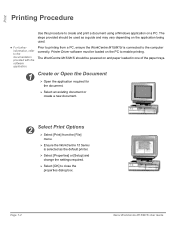
.... Ø Select [Properties] or [Setup] and change the settings required. Ø Select [OK] to the computer correctly. Page 7-2 Xerox WorkCentre M15/M15i User Guide Print Printing Procedure Use this procedure to enable printing. Printer Driver software must be powered on and paper loaded in one of the paper trays. 1 Create or Open the Document Ø...
.... Ø Select [Properties] or [Setup] and change the settings required. Ø Select [OK] to the computer correctly. Page 7-2 Xerox WorkCentre M15/M15i User Guide Print Printing Procedure Use this procedure to enable printing. Printer Driver software must be powered on and paper loaded in one of the paper trays. 1 Create or Open the Document Ø...
WorkCentre M15/M15i User Guide
Page 100
Print Printing Options The WorkCentre M15/M15i can be made in the application usually override settings selected in the printer driver. Selections made to the printer settings prior to be used with all operations. Windows software applications allow changes to printing. Page 7-4 Xerox WorkCentre M15/M15i User Guide Ensure the WorkCentre 15 Series has been set as paper size, paper orientation and margin settings. This includes options such as the default printer for all the Windows 95/98/2000/Me/XP and Windows NT 4.0 applications.
Print Printing Options The WorkCentre M15/M15i can be made in the application usually override settings selected in the printer driver. Selections made to the printer settings prior to be used with all operations. Windows software applications allow changes to printing. Page 7-4 Xerox WorkCentre M15/M15i User Guide Ensure the WorkCentre 15 Series has been set as paper size, paper orientation and margin settings. This includes options such as the default printer for all the Windows 95/98/2000/Me/XP and Windows NT 4.0 applications.

WorkCentre M15/M15i User Guide
Page 106
...) TWAIN Scanner Program The WorkCentre M15i TWAIN Scanner program is used to "Installing Software" on page 2-16. PaperPort is an advanced software program that is provided with the machine. Documents can be fed from a PC, both of which require ...software CD provided with the WorkCentre M15i. The TWAIN Scanner settings are two methods for color scanning is provided on the Document Glass. This software allows users to use PaperPort. A simple TWAIN Scanner program is to convert scanned graphics and images into various "usable" formats. Page 8-2 Xerox WorkCentre M15/M15i ...
...) TWAIN Scanner Program The WorkCentre M15i TWAIN Scanner program is used to "Installing Software" on page 2-16. PaperPort is an advanced software program that is provided with the machine. Documents can be fed from a PC, both of which require ...software CD provided with the WorkCentre M15i. The TWAIN Scanner settings are two methods for color scanning is provided on the Document Glass. This software allows users to use PaperPort. A simple TWAIN Scanner program is to convert scanned graphics and images into various "usable" formats. Page 8-2 Xerox WorkCentre M15/M15i ...
WorkCentre M15/M15i User Guide
Page 108
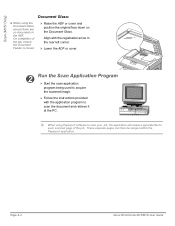
... the original face down on the Document Glass. On completion of the job. These separate pages can then be merged within the Paperport application. Scan (M15i Only) Document Glass: l When using Paperport software to scan the document and retrieve it at the PC. Page 8-4 Xerox WorkCentre M15/M15i User Guide
... the original face down on the Document Glass. On completion of the job. These separate pages can then be merged within the Paperport application. Scan (M15i Only) Document Glass: l When using Paperport software to scan the document and retrieve it at the PC. Page 8-4 Xerox WorkCentre M15/M15i User Guide

WorkCentre M15/M15i User Guide
Page 128
... Enter [Xerox WorkCentre M15/M15i], then [ControlCentre 5.0]. Ø The Xerox WorkCentre M15/M15i ControlCentre 5.0 screen appears. Running ControlCentre 5.0 Use the following instructions to the machine. Page 9-20 Xerox WorkCentre M15/M15i User Guide i WorkCentre M15 can only use the full funtionality of ControlCentre 5.0. Installing ControlCentre 5.0 When Xerox WorkCentre M15/M15i software is installed the Xerox WorkCentre M15/M15i ControlCentre 5.0 utility is installed automatically. Machine Administration ControlCentre 5.0 Using the Xerox WorkCentre M15/M15i ControlCentre...
... Enter [Xerox WorkCentre M15/M15i], then [ControlCentre 5.0]. Ø The Xerox WorkCentre M15/M15i ControlCentre 5.0 screen appears. Running ControlCentre 5.0 Use the following instructions to the machine. Page 9-20 Xerox WorkCentre M15/M15i User Guide i WorkCentre M15 can only use the full funtionality of ControlCentre 5.0. Installing ControlCentre 5.0 When Xerox WorkCentre M15/M15i software is installed the Xerox WorkCentre M15/M15i ControlCentre 5.0 utility is installed automatically. Machine Administration ControlCentre 5.0 Using the Xerox WorkCentre M15/M15i ControlCentre...
WorkCentre M15/M15i User Guide
Page 133
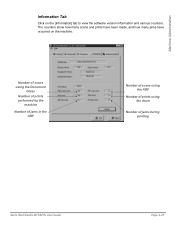
Number of scans using the Document Glass Number of prints performed by the machine Number of jams in the ADF Number of scans using the ADF Number of prints using the drum Number of jams during printing Xerox WorkCentre M15/M15i User Guide Page 9-25 Machine Administration Information Tab Click on the machine. The counters show how many scans and prints have been made, and how many jams have occurred on the [Information] tab to view the software version information and various counters.
Number of scans using the Document Glass Number of prints performed by the machine Number of jams in the ADF Number of scans using the ADF Number of prints using the drum Number of jams during printing Xerox WorkCentre M15/M15i User Guide Page 9-25 Machine Administration Information Tab Click on the machine. The counters show how many scans and prints have been made, and how many jams have occurred on the [Information] tab to view the software version information and various counters.
WorkCentre M15/M15i User Guide
Page 163
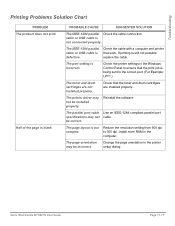
... Control Panel to 300 dpi. The printer driver may not be incorrect. Reinstall the software. Reduce the resolution setting from 600 dpi to ensure that the print job is defective. The page orientation may not be correct. Xerox WorkCentre M15/M15i User Guide Page 11-17 Use an IEEE-1284 compliant parallel port cable. The...
... Control Panel to 300 dpi. The printer driver may not be incorrect. Reinstall the software. Reduce the resolution setting from 600 dpi to ensure that the print job is defective. The page orientation may not be correct. Xerox WorkCentre M15/M15i User Guide Page 11-17 Use an IEEE-1284 compliant parallel port cable. The...

WorkCentre M15/M15i User Guide
Page 178
... Sources 1-4 Information Tab 9-25 Inserting a Pause 3-12 Installing ControlCentre 5.0 9-20 Installing Drum and Toner Cartridges 2-6 Installing Software 2-16 Introduction 1-2 K Keypad Character Assignment 3-12 Keypad Dialing 6-14 L Laser Safety 1-10 LCD Error Messages 11-13 Page Index-2 Xerox WorkCentre M15/M15i User Guide Index D Date and Time, setting up 2-15, 9-11 Delay RX Poll / RX Poll 6-10...
... Sources 1-4 Information Tab 9-25 Inserting a Pause 3-12 Installing ControlCentre 5.0 9-20 Installing Drum and Toner Cartridges 2-6 Installing Software 2-16 Introduction 1-2 K Keypad Character Assignment 3-12 Keypad Dialing 6-14 L Laser Safety 1-10 LCD Error Messages 11-13 Page Index-2 Xerox WorkCentre M15/M15i User Guide Index D Date and Time, setting up 2-15, 9-11 Delay RX Poll / RX Poll 6-10...

WorkCentre M15/M15i User Guide
Page 180
Index copy 4-7 Setups Regulations 1-6, 1-9 Overview 9-2 Regulatory Information 1-9 Software Installation 2-16 Related Information Sources 1-4 Solutions, Copier Problems 11-15 Replacing the Drum Cartridge 10-9 Solutions, Faxing Problems 11-19 Replacing the Toner Cartridge 10-5, ... 11-15 Installing ControlCentre 5.0 9-20 Fault Clearance 11-3 System Data Options 9-3 Faxing Problems Solution Chart 11-19 Settings Tab 9-22 General Problems 11-2 Page Index-4 Xerox WorkCentre M15/M15i User Guide
Index copy 4-7 Setups Regulations 1-6, 1-9 Overview 9-2 Regulatory Information 1-9 Software Installation 2-16 Related Information Sources 1-4 Solutions, Copier Problems 11-15 Replacing the Drum Cartridge 10-9 Solutions, Faxing Problems 11-19 Replacing the Toner Cartridge 10-5, ... 11-15 Installing ControlCentre 5.0 9-20 Fault Clearance 11-3 System Data Options 9-3 Faxing Problems Solution Chart 11-19 Settings Tab 9-22 General Problems 11-2 Page Index-4 Xerox WorkCentre M15/M15i User Guide
Xerox WorkCentre M15/M15i Quick Start Guide
Page 2
... ©2003 by statutory or judicial law or hereinafter granted, including without limitations, material generated from the software programs which are displayed on your new machine please refer to Your WorkCentre M15/M15i Thank you get started. Xerox®, The Document Company®, the digital X® and all forms and matters of the features available...
... ©2003 by statutory or judicial law or hereinafter granted, including without limitations, material generated from the software programs which are displayed on your new machine please refer to Your WorkCentre M15/M15i Thank you get started. Xerox®, The Document Company®, the digital X® and all forms and matters of the features available...
Xerox WorkCentre M15/M15i Quick Start Guide
Page 3
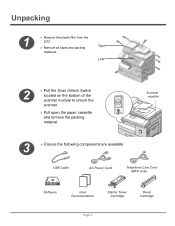
Unpacking 1 Ø Remove the plastic film from the LCD. Ø Remove all tapes and packing materials. Scanner module 3 Ø Ensure the following components are available: USB Cable AC Power Cord Telephone Line Cord (M15i only) Software User Documentation Starter Toner Cartridge Drum Cartridge Page 3 Tape LCD 2 Ø Pull the Scan Unlock Switch located on the bottom of the scanner module to unlock the scanner. Ø Pull open the paper cassette and remove the packing material.
Unpacking 1 Ø Remove the plastic film from the LCD. Ø Remove all tapes and packing materials. Scanner module 3 Ø Ensure the following components are available: USB Cable AC Power Cord Telephone Line Cord (M15i only) Software User Documentation Starter Toner Cartridge Drum Cartridge Page 3 Tape LCD 2 Ø Pull the Scan Unlock Switch located on the bottom of the scanner module to unlock the scanner. Ø Pull open the paper cassette and remove the packing material.
Xerox WorkCentre M15/M15i Quick Start Guide
Page 17
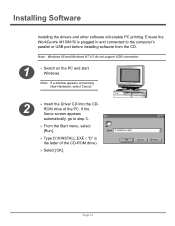
If the Xerox screen appears automatically, go to the computer's parallel or USB port before installing software from the CD. Note: Windows 95 and Windows NT 4.0 do not support USB connection. 1 Ø Switch on the PC and start Windows. OK ... window appears concerning New Hardware, select Cancel. 2 Ø Insert the Driver CD into the CDROM drive of the CD-ROM drive). Installing Software Installing the drivers and other software will enable PC printing. Run Ø From the Start menu, select [Run]. Page 17 Ensure the WorkCentre M15/M15i is the letter of the PC.
If the Xerox screen appears automatically, go to the computer's parallel or USB port before installing software from the CD. Note: Windows 95 and Windows NT 4.0 do not support USB connection. 1 Ø Switch on the PC and start Windows. OK ... window appears concerning New Hardware, select Cancel. 2 Ø Insert the Driver CD into the CDROM drive of the CD-ROM drive). Installing Software Installing the drivers and other software will enable PC printing. Run Ø From the Start menu, select [Run]. Page 17 Ensure the WorkCentre M15/M15i is the letter of the PC.

Xerox WorkCentre M15/M15i Quick Start Guide
Page 21
... created and edited and setup information can be viewed on the desktop computer. Ø From Programs, select [Xerox WorkCentre M15i], then [ControlCentre 5.0]. The ControlCentre 5.0 screen appears. Page 21 When Xerox WorkCentre M15/ M15i software is installed the Xerox WorkCentre M15i ControlCentre 5.0 utility is installed automatically. WorkCentre M15i can only use the full funtionality of ControlCentre 5.0. 1 Running ControlCentre 5.0 Ø Click the [Start] button on...
... created and edited and setup information can be viewed on the desktop computer. Ø From Programs, select [Xerox WorkCentre M15i], then [ControlCentre 5.0]. The ControlCentre 5.0 screen appears. Page 21 When Xerox WorkCentre M15/ M15i software is installed the Xerox WorkCentre M15i ControlCentre 5.0 utility is installed automatically. WorkCentre M15i can only use the full funtionality of ControlCentre 5.0. 1 Running ControlCentre 5.0 Ø Click the [Start] button on...


