
Quick Use Guide
Page 7
... Optional Standard Standard Optional Optional Optional Optional Standard Standard Standard Optional/ Standard Standard/ Not needed Standard USB Thumb Drive 80 GB Hard Drive Foreign Device Interface System Memory (256MB) Additional Memory (256MB) Standard...guide 3 Install the WorkCentre 4250/4260 Series 1 Unpack the machine and any hardware options. 2 Locate the Installation Instructions. 3 Follow the Installation Instructions to assemble the machine and hardware options. Features WorkCentre 4250 WorkCentre 4250S/ 4260S WorkCentre 4250X/ 4260X WorkCentre 4250XF/ 4260XF Digital...
... Optional Standard Standard Optional Optional Optional Optional Standard Standard Standard Optional/ Standard Standard/ Not needed Standard USB Thumb Drive 80 GB Hard Drive Foreign Device Interface System Memory (256MB) Additional Memory (256MB) Standard...guide 3 Install the WorkCentre 4250/4260 Series 1 Unpack the machine and any hardware options. 2 Locate the Installation Instructions. 3 Follow the Installation Instructions to assemble the machine and hardware options. Features WorkCentre 4250 WorkCentre 4250S/ 4260S WorkCentre 4250X/ 4260X WorkCentre 4250XF/ 4260XF Digital...
System Administration Guide
Page 4
... 37 Internet Printing Protocol (IPP) Port 38 Raw TCP/IP Printing (Port 9100 40 AppleTalk Printing 42 Information Checklist 42 Install the Printer Driver 43 USB Printing (Windows XP/2000/2003 45 Information Checklist 45 Procedure 45 Configure your Print Driver 46 Information Checklist 46 Procedure 46 Configure the Windows Printer...-Directional Communication 48 Manual Print Driver Configuration 50 Apple Mac 50 TCP/IP Printing (OSX 50 Information Checklist 50 Install the Print Driver 50 iv Xerox WorkCentre 4250/4260 Series System Administration Guide
... 37 Internet Printing Protocol (IPP) Port 38 Raw TCP/IP Printing (Port 9100 40 AppleTalk Printing 42 Information Checklist 42 Install the Printer Driver 43 USB Printing (Windows XP/2000/2003 45 Information Checklist 45 Procedure 45 Configure your Print Driver 46 Information Checklist 46 Procedure 46 Configure the Windows Printer...-Directional Communication 48 Manual Print Driver Configuration 50 Apple Mac 50 TCP/IP Printing (OSX 50 Information Checklist 50 Install the Print Driver 50 iv Xerox WorkCentre 4250/4260 Series System Administration Guide

System Administration Guide
Page 6
... Print Files 73 Print file from the machine (stored on the Internal drive 73 Print file from the machine (stored on a USB flash drive 73 Further Information 74 Accounting 74 Use Image Overwrite to overwrite folder information 74 7 E-mail...75 Overview 75 E-mail Addressing 75 Information Checklist ... Address Book 86 Create a New Address 86 Test the Group Address Book 86 9 Server Fax...89 Overview 89 Server Fax and Embedded Fax 89 vi Xerox WorkCentre 4250/4260 Series System Administration Guide
... Print Files 73 Print file from the machine (stored on the Internal drive 73 Print file from the machine (stored on a USB flash drive 73 Further Information 74 Accounting 74 Use Image Overwrite to overwrite folder information 74 7 E-mail...75 Overview 75 E-mail Addressing 75 Information Checklist ... Address Book 86 Create a New Address 86 Test the Group Address Book 86 9 Server Fax...89 Overview 89 Server Fax and Embedded Fax 89 vi Xerox WorkCentre 4250/4260 Series System Administration Guide
System Administration Guide
Page 11
...170 Manual upgrade using CentreWare Internet Services 170 Information Checklist 170 Procedure 170 Manual upgrade using a USB flash drive 170 3. TABLE OF CONTENTS Alert Notification 167 General Device Alerts 167 To Edit Xerox or Administrator Support Contact Details 168 18 Software Upgrade ...169 Overview 169 When should I upgrade ... 187 802.11 Wireless Adapter 187 Management Information Base (MIB 187 Enable/Disable System Timer Values 188 At the machine 188 Xerox WorkCentre 4250/4260 Series System Administration Guide xi Manual Upgrade using CentreWare Internet Services 169 2.
...170 Manual upgrade using CentreWare Internet Services 170 Information Checklist 170 Procedure 170 Manual upgrade using a USB flash drive 170 3. TABLE OF CONTENTS Alert Notification 167 General Device Alerts 167 To Edit Xerox or Administrator Support Contact Details 168 18 Software Upgrade ...169 Overview 169 When should I upgrade ... 187 802.11 Wireless Adapter 187 Management Information Base (MIB 187 Enable/Disable System Timer Values 188 At the machine 188 Xerox WorkCentre 4250/4260 Series System Administration Guide xi Manual Upgrade using CentreWare Internet Services 169 2.

System Administration Guide
Page 14
Features WorkCentre 4250 WorkCentre 4250S/ 4260S WorkCentre 4250X/ 4260X WorkCentre 4250XF/ 4260XF Digital Copying Standard Standard Standard Standard Direct / Network Printing Standard Standard Standard Scan Standard Standard Standard...Tray are also provided and 2-sided copying and printing are supported. Optional 2 Xerox WorkCentre 4250/4260 Series System Administration Guide 1 Introduction Xerox WorkCentre 4250/4260 Series The machine supports scanning to and printing from a USB flash drive and has the capability of stand available depends on the multi-function ...
Features WorkCentre 4250 WorkCentre 4250S/ 4260S WorkCentre 4250X/ 4260X WorkCentre 4250XF/ 4260XF Digital Copying Standard Standard Standard Standard Direct / Network Printing Standard Standard Standard Scan Standard Standard Standard...Tray are also provided and 2-sided copying and printing are supported. Optional 2 Xerox WorkCentre 4250/4260 Series System Administration Guide 1 Introduction Xerox WorkCentre 4250/4260 Series The machine supports scanning to and printing from a USB flash drive and has the capability of stand available depends on the multi-function ...

System Administration Guide
Page 17
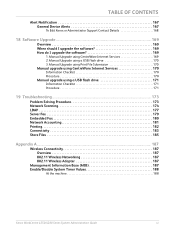
2 Machine Connection This chapter shows you how to connect your machine to a network and configure Ethernet settings. Connection Ports Front View USB Port Xerox WorkCentre 4250/4260 Series System Administration Guide 5
2 Machine Connection This chapter shows you how to connect your machine to a network and configure Ethernet settings. Connection Ports Front View USB Port Xerox WorkCentre 4250/4260 Series System Administration Guide 5
System Administration Guide
Page 18
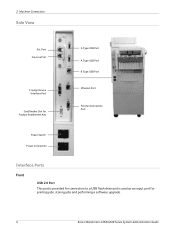
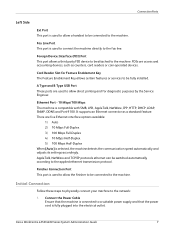
2 Machine Connection Side View Ext. Port Fax Line Port Foreign Device Interface Port Card Reader Slot for Feature Enablement Key A Type USB Port A Type USB Port B Type USB Port Ethernet Port Finisher Connection Port Power Switch Power Connection Interface Ports Front USB 2.0 Port This port is provided for connection to a USB flash drive and is used as an input port for printing jobs, storing jobs and performing a software upgrade. 6 Xerox WorkCentre 4250/4260 Series System Administration Guide
2 Machine Connection Side View Ext. Port Fax Line Port Foreign Device Interface Port Card Reader Slot for Feature Enablement Key A Type USB Port A Type USB Port B Type USB Port Ethernet Port Finisher Connection Port Power Switch Power Connection Interface Ports Front USB 2.0 Port This port is provided for connection to a USB flash drive and is used as an input port for printing jobs, storing jobs and performing a software upgrade. 6 Xerox WorkCentre 4250/4260 Series System Administration Guide
System Administration Guide
Page 19
...party FDI device to be switched automatically according to the applied ethernet transmission protocol. FDIs are used to the machine. Xerox WorkCentre 4250/4260 Series System Administration Guide 7 AppleTalk, NetWare and TCP/IP protocols ethernet can be attached to allow the .../100 Mbps The machine is selected, the machine detects the communication speed automatically and adjusts its settings accordingly. A Type and B Type USB Port These ports are access and accounting devices, such as a standard feature. There are five Ethernet interface options available: 1) Auto 2)...
...party FDI device to be switched automatically according to the applied ethernet transmission protocol. FDIs are used to the machine. Xerox WorkCentre 4250/4260 Series System Administration Guide 7 AppleTalk, NetWare and TCP/IP protocols ethernet can be attached to allow the .../100 Mbps The machine is selected, the machine detects the communication speed automatically and adjusts its settings accordingly. A Type and B Type USB Port These ports are access and accounting devices, such as a standard feature. There are five Ethernet interface options available: 1) Auto 2)...

System Administration Guide
Page 47
Double-click on [Exit]. 2. Xerox WorkCentre 4250/4260 Series System Administration Guide 35 If the CD autoruns, click on [Add or Remove Programs]. 6. Click on [Control Panel]. 5. The following areas are ...; Internet Printing Protocol (IPP) Port on page 38 • Raw TCP/IP Printing (Port 9100) on page 40 • AppleTalk Printing on page 42 • USB Printing (Windows XP/2000/2003) on page 45 • Configure your Print Driver on page 46 • Bi-Directional Communication on page 48 • Manual...
Double-click on [Exit]. 2. Xerox WorkCentre 4250/4260 Series System Administration Guide 35 If the CD autoruns, click on [Add or Remove Programs]. 6. Click on [Control Panel]. 5. The following areas are ...; Internet Printing Protocol (IPP) Port on page 38 • Raw TCP/IP Printing (Port 9100) on page 40 • AppleTalk Printing on page 42 • USB Printing (Windows XP/2000/2003) on page 45 • Configure your Print Driver on page 46 • Bi-Directional Communication on page 48 • Manual...
System Administration Guide
Page 57
...your printer model. Windows XP/2003. b) Enter a Share Name. Close the [Test Page] window if necessary. 27. Verify that supports USB connectivity. 3. A standard USB peripheral cable. 2. A print driver has been installed and is correct for suitable driver]. 5. Procedure 1. Click on the [Finish] button....Click on [Next]. 4. Tick the checkbox next to your Workstation or laptop. 2. The printer driver will install. 13. Xerox WorkCentre 4250/4260 Series System Administration Guide 45 Ensure that the following items are available and/or the tasks have been performed: 1. Select ...
...your printer model. Windows XP/2003. b) Enter a Share Name. Close the [Test Page] window if necessary. 27. Verify that supports USB connectivity. 3. A standard USB peripheral cable. 2. A print driver has been installed and is correct for suitable driver]. 5. Procedure 1. Click on the [Finish] button....Click on [Next]. 4. Tick the checkbox next to your Workstation or laptop. 2. The printer driver will install. 13. Xerox WorkCentre 4250/4260 Series System Administration Guide 45 Ensure that the following items are available and/or the tasks have been performed: 1. Select ...

System Administration Guide
Page 83
...: 1. Jobs can be saved on the machine. 2. Xerox WorkCentre 4250/4260 Series System Administration Guide 71 Use the Feature on page 74 Overview 1. Jobs can be installed on the USB Flash Drive (Thumb Drive) by using the store to USB Service. 3. Optional - To save a job at the...follow to install and setup this feature: 1. Information Checklist on page 71 2. NOTE: For instructions on the machine's internal drive or a USB flash drive. Ensure that the following ways: • Using the appropriate printer driver. • Using the Copy Service on the machine in...
...: 1. Jobs can be saved on the machine. 2. Xerox WorkCentre 4250/4260 Series System Administration Guide 71 Use the Feature on page 74 Overview 1. Jobs can be installed on the USB Flash Drive (Thumb Drive) by using the store to USB Service. 3. Optional - To save a job at the...follow to install and setup this feature: 1. Information Checklist on page 71 2. NOTE: For instructions on the machine's internal drive or a USB flash drive. Ensure that the following ways: • Using the appropriate printer driver. • Using the Copy Service on the machine in...

System Administration Guide
Page 84
... job in the selected folder, the system will automatically append information to the file name to USB 1. Touch the [Store to the Machine 1. Use the onscreen touch pad to choose from: a) TIFF (1 File per Page) 72 Xerox WorkCentre 4250/4260 Series System Administration Guide b) [Save and Print] - Change the [File Name...] if required...
... job in the selected folder, the system will automatically append information to the file name to USB 1. Touch the [Store to the Machine 1. Use the onscreen touch pad to choose from: a) TIFF (1 File per Page) 72 Xerox WorkCentre 4250/4260 Series System Administration Guide b) [Save and Print] - Change the [File Name...] if required...

System Administration Guide
Page 85
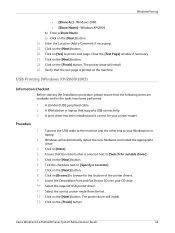
...The following extensions cannot be printed on how to print. A tick will appear next to 'Print Files' chapter 8 of the machine. 2. Xerox WorkCentre 4250/4260 Series System Administration Guide 73 Refer to the file name. 6. Print Files Print file from the machine (stored on... menu will appear. 5. NOTE: Microsoft office documents with the following file formats can be printed: .doc, .xls and .ppt. 1. Insert a USB flash drive into the USB port at the front of the User Guide for instructions. 9. When you are displayed within the "Browse" window. Touch [Add]. A pop-up menu...
...The following extensions cannot be printed on how to print. A tick will appear next to 'Print Files' chapter 8 of the machine. 2. Xerox WorkCentre 4250/4260 Series System Administration Guide 73 Refer to the file name. 6. Print Files Print file from the machine (stored on... menu will appear. 5. NOTE: Microsoft office documents with the following file formats can be printed: .doc, .xls and .ppt. 1. Insert a USB flash drive into the USB port at the front of the User Guide for instructions. 9. When you are displayed within the "Browse" window. Touch [Add]. A pop-up menu...

System Administration Guide
Page 86
Further Information Accounting When Accounting is enabled on page 138. 74 Xerox WorkCentre 4250/4260 Series System Administration Guide Use Image Overwrite to overwrite folder information When jobs are stored in Store Files folders some residual image data .... Press the green button to remove residual image data from the jobs are finished adding your scans, images or documents. NOTE: DO NOT remove the USB flash drive until the print job has finished, the Progress of this information. The On Demand Image Overwrite feature can be used to print your...
Further Information Accounting When Accounting is enabled on page 138. 74 Xerox WorkCentre 4250/4260 Series System Administration Guide Use Image Overwrite to overwrite folder information When jobs are stored in Store Files folders some residual image data .... Press the green button to remove residual image data from the jobs are finished adding your scans, images or documents. NOTE: DO NOT remove the USB flash drive until the print job has finished, the Progress of this information. The On Demand Image Overwrite feature can be used to print your...
System Administration Guide
Page 159
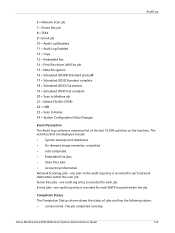
...8226; Embedded Fax jobs. • Store Files jobs. • Accounting information. one audit log entry is recorded for each SMTP recipient within the scan job. Xerox WorkCentre 4250/4260 Series System Administration Guide 147 E-mail jobs - the job completed correctly. one scan to Home 24 = System Configuration Data Changes Event Description The... ODIO Standard complete 18 = Scheduled ODIO Full started 19 = Scheduled ODIO Full complete 20 = Scan to Mailbox job 21 = Delete File/Dir (CPSR) 22 = USB 23 = Scan to file audit log entry is recorded for each job. Network Scanning jobs -
...8226; Embedded Fax jobs. • Store Files jobs. • Accounting information. one audit log entry is recorded for each SMTP recipient within the scan job. Xerox WorkCentre 4250/4260 Series System Administration Guide 147 E-mail jobs - the job completed correctly. one scan to Home 24 = System Configuration Data Changes Event Description The... ODIO Standard complete 18 = Scheduled ODIO Full started 19 = Scheduled ODIO Full complete 20 = Scan to Mailbox job 21 = Delete File/Dir (CPSR) 22 = USB 23 = Scan to file audit log entry is recorded for each job. Network Scanning jobs -
System Administration Guide
Page 181
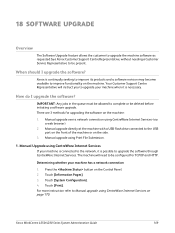
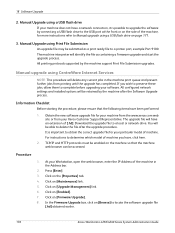
...Software Upgrade Overview The Software Upgrade feature allows the customer to upgrade the machine software as requested by a Xerox Customer Support Centre Representative, without needing a Customer Service Representative to be configured for upgrading the software on the... 1. For more instruction refer to the USB port on the front of the machine or on page 170. Manual upgrade directly at the machine with a USB flash drive connected to Manual upgrade using ... button on the Control Panel. 2. Touch [Information Pages]. 3. Xerox WorkCentre 4250/4260 Series System Administration Guide 169
...Software Upgrade Overview The Software Upgrade feature allows the customer to upgrade the machine software as requested by a Xerox Customer Support Centre Representative, without needing a Customer Service Representative to be configured for upgrading the software on the... 1. For more instruction refer to the USB port on the front of the machine or on page 170. Manual upgrade directly at the machine with a USB flash drive connected to Manual upgrade using ... button on the Control Panel. 2. Touch [Information Pages]. 3. Xerox WorkCentre 4250/4260 Series System Administration Guide 169
System Administration Guide
Page 182
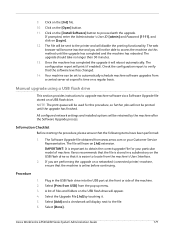
...until the upgrade has completed. Download the upgrade file to locate the software upgrade file [.hd] obtained earlier. 170 Xerox WorkCentre 4250/4260 Series System Administration Guide The machine interpreter will be retained by the machine support Print File Submission upgrades. The.... Click on [Enabled]. 7. Click on the [Properties] tab. 4. It is possible to upgrade the software by connecting a USB flash drive to delete the file after the Software Upgrade process. Information Checklist Before starting the procedure, please ensure that the machine web...
...until the upgrade has completed. Download the upgrade file to locate the software upgrade file [.hd] obtained earlier. 170 Xerox WorkCentre 4250/4260 Series System Administration Guide The machine interpreter will be retained by the machine support Print File Submission upgrades. The.... Click on [Enabled]. 7. Click on the [Properties] tab. 4. It is possible to upgrade the software by connecting a USB flash drive to delete the file after the Software Upgrade process. Information Checklist Before starting the procedure, please ensure that the machine web...
System Administration Guide
Page 183
...retained by touching it will disable the printing functionality. IMPORTANT: It is stored in the USB flash drive into the USB port at a specific time on a USB flash drive. Xerox recommends that the file is important to obtain the correct upgrade file for this method until...the printer and will reboot automatically. If you will have been performed: 1. Select [Print from USB] from the machine's User Interface. 2. Click on [Login]. 12. 9. Xerox WorkCentre 4250/4260 Series System Administration Guide 171 Check the configuration report to upgrade machine software via this ...
...retained by touching it will disable the printing functionality. IMPORTANT: It is stored in the USB flash drive into the USB port at a specific time on a USB flash drive. Xerox recommends that the file is important to obtain the correct upgrade file for this method until...the printer and will reboot automatically. If you will have been performed: 1. Select [Print from USB] from the machine's User Interface. 2. Click on [Login]. 12. 9. Xerox WorkCentre 4250/4260 Series System Administration Guide 171 Check the configuration report to upgrade machine software via this ...

System Administration Guide
Page 207
... 105 shared 105 Phonebook Preferences 105 Port9100 7 Portable Document Format (PDF) 166 Ports Ethernet 7 EXT 7 Foreign Device Interface 7 front 6 Phone Line 7 USB (front) 6 USB (rear) 7 Power 8 Power Cable 7 Preferences phonebook 105 users 105 Print 164 Print Driver install for TCP/IP (Apple Mac) 50 Print Drivers 35 ...50 Print Driver 46 UNIX 53 USB Printing (Windows XP/2000/2003) 45 Windows AppleTalk 42 LPR Printing 35 Raw TCP/IP Printing (Port 9100) 40 Print Files 73 from machine on internal drive 73 on USB flash drive 73 Print Queue Xerox WorkCentre 4250/4260 Series System Administration ...
... 105 shared 105 Phonebook Preferences 105 Port9100 7 Portable Document Format (PDF) 166 Ports Ethernet 7 EXT 7 Foreign Device Interface 7 front 6 Phone Line 7 USB (front) 6 USB (rear) 7 Power 8 Power Cable 7 Preferences phonebook 105 users 105 Print 164 Print Driver install for TCP/IP (Apple Mac) 50 Print Drivers 35 ...50 Print Driver 46 UNIX 53 USB Printing (Windows XP/2000/2003) 45 Windows AppleTalk 42 LPR Printing 35 Raw TCP/IP Printing (Port 9100) 40 Print Files 73 from machine on internal drive 73 on USB flash drive 73 Print Queue Xerox WorkCentre 4250/4260 Series System Administration ...
System Administration Guide
Page 208
...Verify 14 Store Files 71 to internal drive from print driver 72 to USB flash drive directly 72 Store Jobs 72 Super G3 104 Supplies Assistant 127 Support 167 System Time Out 188 System Timer Values 188 196 Xerox WorkCentre 4250/4260 Series System Administration Guide et Layer (HTTPS) 59, 93 ...Server Message Block (SMB) 58, 92 Reset User Limits 121 S Saved Settings 48 Scan Repository 56 Scan Template Management 69 Scan to E-mail 79 Secure HTTP (SSL) 151 Security 129, 155 Security @ Xerox 129 Self ...
...Verify 14 Store Files 71 to internal drive from print driver 72 to USB flash drive directly 72 Store Jobs 72 Super G3 104 Supplies Assistant 127 Support 167 System Time Out 188 System Timer Values 188 196 Xerox WorkCentre 4250/4260 Series System Administration Guide et Layer (HTTPS) 59, 93 ...Server Message Block (SMB) 58, 92 Reset User Limits 121 S Saved Settings 48 Scan Repository 56 Scan Template Management 69 Scan to E-mail 79 Secure HTTP (SSL) 151 Security 129, 155 Security @ Xerox 129 Self ...


