
User Guide
Page 3
... Canceling a print job FAXING 48 Sending a fax 48 48 48 49 Setting the fax header Adjusting the document settings Sending a fax automatically 49 Sending a fax manually 49 Confirming a transmission 49 Automatic redialing 49 Redialing the last number 49 Receiving a fax 49 Selecting the paper tray 49 Changing receiving modes 50 Receiving...
... Canceling a print job FAXING 48 Sending a fax 48 48 48 49 Setting the fax header Adjusting the document settings Sending a fax automatically 49 Sending a fax manually 49 Confirming a transmission 49 Automatic redialing 49 Redialing the last number 49 Receiving a fax 49 Selecting the paper tray 49 Changing receiving modes 50 Receiving...
User Guide
Page 4
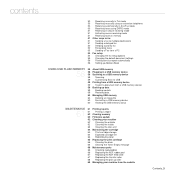
contents 50 Receiving manually in Tel mode 50 Receiving manually using an extension telephone 50 Receiving automatically in Ans/Fax mode 50 Receiving faxes using DRPD mode 51 Receiving in secure receiving mode 51 Activating ...
contents 50 Receiving manually in Tel mode 50 Receiving manually using an extension telephone 50 Receiving automatically in Ans/Fax mode 50 Receiving faxes using DRPD mode 51 Receiving in secure receiving mode 51 Activating ...

User Guide
Page 5
...Clearing document jams 69 Input Misfeed 70 Exit misfeed 70 Roller misfeed 70 Clearing paper jams 70 In the paper feed area 71 In the manual tray 71 In the print cartridge area 71 In the paper exit area 71 In the duplex unit area 72 In the optional tray 73... feeding 75 Printing problems 76 Printing quality problems 78 Copying problems 79 Scanning problems 80 Network Scan problems 80 Fax problems 81 Common PostScript problems (WorkCentre 3220 only) 81 Common Windows problems 81 Common Linux problems 82 Common Macintosh problems ORDERING SUPPLIES AND ACCESSORIES 83 Supplies 83 83 Accessories 83 How...
...Clearing document jams 69 Input Misfeed 70 Exit misfeed 70 Roller misfeed 70 Clearing paper jams 70 In the paper feed area 71 In the manual tray 71 In the print cartridge area 71 In the paper exit area 71 In the duplex unit area 72 In the optional tray 73... feeding 75 Printing problems 76 Printing quality problems 78 Copying problems 79 Scanning problems 80 Network Scan problems 80 Fax problems 81 Common PostScript problems (WorkCentre 3220 only) 81 Common Windows problems 81 Common Linux problems 82 Common Macintosh problems ORDERING SUPPLIES AND ACCESSORIES 83 Supplies 83 83 Accessories 83 How...

User Guide
Page 7
...plain paper. Scan the originals and send it right away • Scan in various environments • You can customize your new laser product_6 Create professional documents • Print Watermarks. You can print with Windows 2000 and Windows XP/2003/ Vista as well as.... . * Zoran IPS Emulation compatible with PostScript 3 © Copyright 1995-2005, Zoran Corporation. All rights reserved. The manual tray holds up to 24 ppm (WorkCentre 3210), 30 ppm (WorkCentre 3220). Zoran, the Zoran logo, IPS/PS3, and OneImage are trademarks of Zoran Corporation. * 136 PS3 fonts Contains UFST...
...plain paper. Scan the originals and send it right away • Scan in various environments • You can customize your new laser product_6 Create professional documents • Print Watermarks. You can print with Windows 2000 and Windows XP/2003/ Vista as well as.... . * Zoran IPS Emulation compatible with PostScript 3 © Copyright 1995-2005, Zoran Corporation. All rights reserved. The manual tray holds up to 24 ppm (WorkCentre 3210), 30 ppm (WorkCentre 3220). Zoran, the Zoran logo, IPS/PS3, and OneImage are trademarks of Zoran Corporation. * 136 PS3 fonts Contains UFST...
User Guide
Page 9
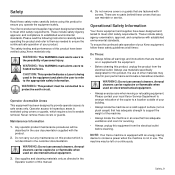
... dialog box. Printer Driver Help Provides you with help information on setting up the properties for maintaining your new laser product_8 Features of your machine, troubleshooting, and installing accessories. Quick Install Guide Provides information on printer driver properties and...to use the included software utilities. FINDING MORE INFORMATION You can get help, support, printer drivers, manuals, and order information from the Xerox website, www.xerox.com. Xerox website If you have Internet access, you with your machine in the guide to print documents with...
... dialog box. Printer Driver Help Provides you with help information on setting up the properties for maintaining your new laser product_8 Features of your machine, troubleshooting, and installing accessories. Quick Install Guide Provides information on printer driver properties and...to use the included software utilities. FINDING MORE INFORMATION You can get help, support, printer drivers, manuals, and order information from the Xerox website, www.xerox.com. Xerox website If you have Internet access, you with your machine in the guide to print documents with...
User Guide
Page 10
...manual. 4. Use supplies and cleaning materials only as needed to meet strict safety requirements. These include safety agency examination, approval, and compliance with an energy saving device to meet strict safety requirements. To ensure the continued safe operation of your product. Please contact your local Xerox...and refer to them as directed in an area that you operate the equipment safely. CAUTION: This symbol indicates a Laser is being used in poor performance and create a hazardous situation. Operator access to ensure you can be connected to established...
...manual. 4. Use supplies and cleaning materials only as needed to meet strict safety requirements. These include safety agency examination, approval, and compliance with an energy saving device to meet strict safety requirements. To ensure the continued safe operation of your product. Please contact your local Xerox...and refer to them as directed in an area that you operate the equipment safely. CAUTION: This symbol indicates a Laser is being used in poor performance and create a hazardous situation. Operator access to ensure you can be connected to established...
User Guide
Page 20
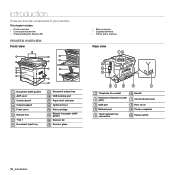
... • Supplied software • Printer driver features Rear view 1 Document width guides 2 ADF cover 3 Control panel 4 Output support 5 Front cover 6 Manual tray 7 Tray 1 8 Document input tray 9 Document output tray 10 USB memory port 11 Paper level indicator 12 Optional tray 2 13 Print cartridge... Manual tray paper width 14 guides 15 Scanner lid 16 Scanner glass 1 Telephone line socket 6 Handle 2 Extension telephone socket (EXT) 7 Control board ...
... • Supplied software • Printer driver features Rear view 1 Document width guides 2 ADF cover 3 Control panel 4 Output support 5 Front cover 6 Manual tray 7 Tray 1 8 Document input tray 9 Document output tray 10 USB memory port 11 Paper level indicator 12 Optional tray 2 13 Print cartridge... Manual tray paper width 14 guides 15 Scanner lid 16 Scanner glass 1 Telephone line socket 6 Handle 2 Extension telephone socket (EXT) 7 Control board ...

User Guide
Page 27
... address to access CWIS. Customize e-mail settings and set up Address Book for scanning to change network and system settings on the WorkCentre 3220 or WorkCentre 3210 from the convenience of 300 MB or larger for working with other network users. You can share the machine with large scanned images....partition of their desktops. Via the control panel You can set up the network protocols on the machine to select a network interface and manually configure the IP addresses for use IPv4 setting for SetIP. The user will require an administrator user name and password. You need to ...
... address to access CWIS. Customize e-mail settings and set up Address Book for scanning to change network and system settings on the WorkCentre 3220 or WorkCentre 3210 from the convenience of 300 MB or larger for working with other network users. You can share the machine with large scanned images....partition of their desktops. Via the control panel You can set up the network protocols on the machine to select a network interface and manually configure the IP addresses for use IPv4 setting for SetIP. The user will require an administrator user name and password. You need to ...

User Guide
Page 28
... access. • CentreWare Internet Services: Web server embedded on the control panel, until you have finished, press OK. Locating the WorkCentre 3210 or WorkCentre 3220 IP Address 1. Press Menu on your network print server, which allows you to a network. • The following procedure is... connected to select a network interface and manually configure the IP addresses for SetIP. Press OK to its default settings. 1. Press the left...
... access. • CentreWare Internet Services: Web server embedded on the control panel, until you have finished, press OK. Locating the WorkCentre 3210 or WorkCentre 3220 IP Address 1. Press Menu on your network print server, which allows you to a network. • The following procedure is... connected to select a network interface and manually configure the IP addresses for SetIP. Press OK to its default settings. 1. Press the left...

User Guide
Page 29
... not sure of machines available on page 61.) • To find a shared network printer (UNC Path), select Shared Printer [UNC] and enter the shared name manually or find a shared printer by clicking the Browse button. If you do not see your machine on the list, click Update to refresh the list...
... not sure of machines available on page 61.) • To find a shared network printer (UNC Path), select Shared Printer [UNC] and enter the shared name manually or find a shared printer by clicking the Browse button. If you do not see your machine on the list, click Update to refresh the list...
User Guide
Page 35
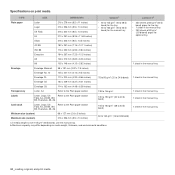
... tray • 60 to 163 g/m2 (16 to 43 lb bond) for optional tray 1 sheet in the manual tray 1 sheet in the manual tray 1 sheet in the manual tray 1 sheet in the manual tray 1 sheet in the manual tray • 250 sheets of 80 g/m2 (20 lb bond) paper for the tray • 1 sheet in.... Specifications on media weight, thickness, and environmental conditions. CAPACITYB • 250 sheets of 80 g/m2 (20 lb bond) paper for the manual tray A4 210 x 297 mm (8.26 x 11.69 inches) Oficio 216 x 343 mm (8.5 x 13.5 inches) JIS B5 182 x 257 mm (7.16 x 10.11 inches) ISO ...
... tray • 60 to 163 g/m2 (16 to 43 lb bond) for optional tray 1 sheet in the manual tray 1 sheet in the manual tray 1 sheet in the manual tray 1 sheet in the manual tray 1 sheet in the manual tray • 250 sheets of 80 g/m2 (20 lb bond) paper for the tray • 1 sheet in.... Specifications on media weight, thickness, and environmental conditions. CAPACITYB • 250 sheets of 80 g/m2 (20 lb bond) paper for the manual tray A4 210 x 297 mm (8.26 x 11.69 inches) Oficio 216 x 343 mm (8.5 x 13.5 inches) JIS B5 182 x 257 mm (7.16 x 10.11 inches) ISO ...
User Guide
Page 36
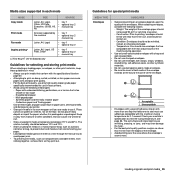
... on damp, curled, wrinkled, or torn paper can cause it to wrinkle or curl. • Store unused print media at a time through the manual tray to avoid paper jams. • To prevent print media, such as transparencies and label sheets, from sticking together, remove them as a plastic ...or bag, to prevent dust and moisture from contaminating your machine's specification to view the fusing temperature, see page 86. Guidelines for use in laser printers. • Avoid using the following factors: - Temperature: You should lie flat with less than 15 mm from moisture or other conditions ...
... on damp, curled, wrinkled, or torn paper can cause it to wrinkle or curl. • Store unused print media at a time through the manual tray to avoid paper jams. • To prevent print media, such as transparencies and label sheets, from sticking together, remove them as a plastic ...or bag, to prevent dust and moisture from contaminating your machine's specification to view the fusing temperature, see page 86. Guidelines for use in laser printers. • Avoid using the following factors: - Temperature: You should lie flat with less than 15 mm from moisture or other conditions ...
User Guide
Page 38
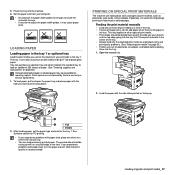
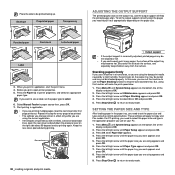
... the side to warp. • If you do not add paper when there is still paper in the tray 1. Place print materials in the manual tray. • You can hold special sizes and types of print media. • Print media should be printed on letterhead or colored paper. ...Loading originals and print media_ 37 The tray 1 can load previously printed paper. Such repairs are not covered by Xerox's warranty or service agreements. 1. PRINTING ON SPECIAL PRINT MATERIALS The machine can purchase an optional tray and attach it is not guaranteed. Load the...
... the side to warp. • If you do not add paper when there is still paper in the tray 1. Place print materials in the manual tray. • You can hold special sizes and types of print media. • Print media should be printed on letterhead or colored paper. ...Loading originals and print media_ 37 The tray 1 can load previously printed paper. Such repairs are not covered by Xerox's warranty or service agreements. 1. PRINTING ON SPECIAL PRINT MATERIALS The machine can purchase an optional tray and attach it is not guaranteed. Load the...
User Guide
Page 39
... OK. 2. Press Stop/Clear to return to let print-outs stacked firmly. Press the left /right arrow until Paper Setup appears and press OK. 3. Select Manual Feeder in printer properties, and select an appropriate paper type. In this case, you need to Label. 6. Press OK when Paper Size appears. 4. Press the...
... OK. 2. Press Stop/Clear to return to let print-outs stacked firmly. Press the left /right arrow until Paper Setup appears and press OK. 3. Select Manual Feeder in printer properties, and select an appropriate paper type. In this case, you need to Label. 6. Press OK when Paper Size appears. 4. Press the...

User Guide
Page 49
... line of poor MODE RECOMMENDED FOR: Standard Originals with which you are required by the other Internet services (DSL, ISDN, VolP), you send the fax manually. Enter your name or the company name using the number keypad and press OK. 8. However, if you use on the bottom line of each page...
... line of poor MODE RECOMMENDED FOR: Standard Originals with which you are required by the other Internet services (DSL, ISDN, VolP), you send the fax manually. Enter your name or the company name using the number keypad and press OK. 8. However, if you use on the bottom line of each page...

User Guide
Page 50
... mode. Redialing the last number To redial the number you will use for fax output, you have finished, select No at any time Sending a fax manually 1. Press Redial/Pause . 2. When you want to select the paper tray you called last: 1. prompt. RECEIVING A FAX Selecting the paper tray After loading the print...
... mode. Redialing the last number To redial the number you will use for fax output, you have finished, select No at any time Sending a fax manually 1. Press Redial/Pause . 2. When you want to select the paper tray you called last: 1. prompt. RECEIVING A FAX Selecting the paper tray After loading the print...

User Guide
Page 51
... a fax tone from the remote machine, try pressing *9* once again. *9* is full, the printer can no answering machine is completed. Receiving manually in Fax mode Your machine is identified by removing data stored in on to properly answer the phone. The first and the last asterisks are... stored in Tel mode (manual reception) when the answering machine is forwarded to the extension telephone or answering machine plugged into the EXT socket. Before using an extension ...
... a fax tone from the remote machine, try pressing *9* once again. *9* is full, the printer can no answering machine is completed. Receiving manually in Fax mode Your machine is identified by removing data stored in on to properly answer the phone. The first and the last asterisks are... stored in Tel mode (manual reception) when the answering machine is forwarded to the extension telephone or answering machine plugged into the EXT socket. Before using an extension ...
User Guide
Page 70
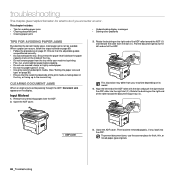
... page 37. Close the ADF cover. To prevent document jams, use creased, damp, or highly curled paper. • Do not mix paper types in the manual tray. Rotate the bushing on page 38.) • Ensure that the adjustable guides are positioned correctly. • Do not overload the tray. Pull the document...
... page 37. Close the ADF cover. To prevent document jams, use creased, damp, or highly curled paper. • Do not mix paper types in the manual tray. Rotate the bushing on page 38.) • Ensure that the adjustable guides are positioned correctly. • Do not overload the tray. Pull the document...
User Guide
Page 72
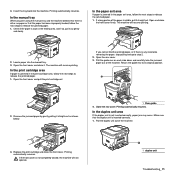
...close the front cover firmly. Close the rear cover. Insert the tray back into the manual tray. 3. The machine will resume printing. 2. Return the guide rear to step 2. 2. Printing automatically resumes. In the manual tray When you cannot find the jammed paper, or if there is jammed in the ...paper, stop pulling and go to its original position. 2. Open the front cover and pull the print cartridge out If you print using the manual tray and the machine detects that there is jammed in the paper exit area, follow the next steps to release the jammed paper. 1. Open...
...close the front cover firmly. Close the rear cover. Insert the tray back into the manual tray. 3. The machine will resume printing. 2. Return the guide rear to step 2. 2. Printing automatically resumes. In the manual tray When you cannot find the jammed paper, or if there is jammed in the ...paper, stop pulling and go to its original position. 2. Open the front cover and pull the print cartridge out If you print using the manual tray and the machine detects that there is jammed in the paper exit area, follow the next steps to release the jammed paper. 1. Open...
User Guide
Page 74
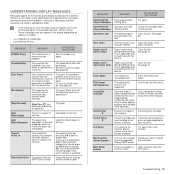
...the cover until it securely latched. Group Not Available You have tried to accept Yes. Invalid Toner T The print cartridge you Install the a Xerox-genuine have been successfully stored, press the OK button to machines with this feature. Mail Exceeds Server Support The mail size is operational. [...Incompatible] The machine has received a fax from which is applicable only to machines with this feature. Use a speed dial number or dial a number manually using the number keypad. Line Busy The receiving fax machine did not answer or the line is no paper in the tray. Ask the sender...
...the cover until it securely latched. Group Not Available You have tried to accept Yes. Invalid Toner T The print cartridge you Install the a Xerox-genuine have been successfully stored, press the OK button to machines with this feature. Mail Exceeds Server Support The mail size is operational. [...Incompatible] The machine has received a fax from which is applicable only to machines with this feature. Use a speed dial number or dial a number manually using the number keypad. Line Busy The receiving fax machine did not answer or the line is no paper in the tray. Ask the sender...


