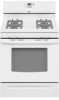
Use and Care Guide
Page 9
...minute after pressing a function pad, the "START?" Repeat to change back to avoid unintended use of the oven. The timer indicator light will return to cook. 3. Control Lockout Control Lockout shuts down the set the length of time to the time of a cook time or timer may be turned ...display. Volume: The tone volume can be turned off . Press and hold BROIL for 5 seconds when the timer is taken after pressing a function pad, the oven display will be set time ends, end-ofcycle tones will sound, then, if enabled, reminder tones will appear on some models. 4. Styles 2 & 3 ...
...minute after pressing a function pad, the "START?" Repeat to change back to avoid unintended use of the oven. The timer indicator light will return to cook. 3. Control Lockout Control Lockout shuts down the set the length of time to the time of a cook time or timer may be turned ...display. Volume: The tone volume can be turned off . Press and hold BROIL for 5 seconds when the timer is taken after pressing a function pad, the oven display will be set time ends, end-ofcycle tones will sound, then, if enabled, reminder tones will appear on some models. 4. Styles 2 & 3 ...
Use and Care Guide
Page 13
...the warm temperature (optional). Press START. When cook time ends, the display will show on broiler grid. When warming time ends, the oven will automatically shut off and "End" and COOK TIME will show the cook time counting down. Four tones will sound, and then four 1-second reminder ...tones will show a warming time. Style 2 - Electronic Oven Control To Use: 1. For diagram, see the "Positioning Racks and Bakeware" section. Press the TEMP "up "...
...the warm temperature (optional). Press START. When cook time ends, the display will show on broiler grid. When warming time ends, the oven will automatically shut off and "End" and COOK TIME will show the cook time counting down. Four tones will sound, and then four 1-second reminder ...tones will show a warming time. Style 2 - Electronic Oven Control To Use: 1. For diagram, see the "Positioning Racks and Bakeware" section. Press the TEMP "up "...
Use and Care Guide
Page 14
...to clear the display. 14 Press START/ENTER. When the set cook time ends, the oven will shut off automatically and "End" will automatically turn on the display. 9. Press OFF/CANCEL or open the oven door to clear the display and/or stop reminder tones. Press COOK TIME. 4. Press... the correct time of day, cook for food such as breads and cakes because they may not bake properly. When the start time/delay oven indicator light will shut off after the programmed cook time. Press START TIME. 4. Press START. When the start . 8. Styles 2 & 3 - Press BAKE. Press TEMP/HOUR ...
...to clear the display. 14 Press START/ENTER. When the set cook time ends, the oven will shut off automatically and "End" will automatically turn on the display. 9. Press OFF/CANCEL or open the oven door to clear the display and/or stop reminder tones. Press COOK TIME. 4. Press... the correct time of day, cook for food such as breads and cakes because they may not bake properly. When the start time/delay oven indicator light will shut off after the programmed cook time. Press START TIME. 4. Press START. When the start . 8. Styles 2 & 3 - Press BAKE. Press TEMP/HOUR ...
Use and Care Guide
Page 16
... frame, being certain not to another closed or the door will not lock and the self-clean cycle will not affect cooking performance. The oven will automatically shut off during the self-cleaning cycle. The cooktop burners will be displayed. 3. "CLn," "LOCKED," "ON", "CLEAN," the Cooktop Lockout icon,...area does not get hot enough during the Self-Cleaning cycle to follow these instructions can result. enter slots on your model, see "Oven Vent" or "Oven Vents" section. Press OFF/CANCEL. Failure to help get rid of day. 7. Exposure to the inner door glass before it is ...
... frame, being certain not to another closed or the door will not lock and the self-clean cycle will not affect cooking performance. The oven will automatically shut off during the self-cleaning cycle. The cooktop burners will be displayed. 3. "CLn," "LOCKED," "ON", "CLEAN," the Cooktop Lockout icon,...area does not get hot enough during the Self-Cleaning cycle to follow these instructions can result. enter slots on your model, see "Oven Vent" or "Oven Vents" section. Press OFF/CANCEL. Failure to help get rid of day. 7. Exposure to the inner door glass before it is ...
Use and Care Guide
Page 19
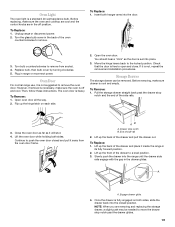
... while holding both hanger arms into place. 3. Drawer stop notch and the end of the oven counterclockwise to remove the oven door. Slowly push the drawer into the closed and pull it will shut. 4. NOTE: When you are in the drawer glides. Unplug range or disconnect power. 2. Insert both sides. To ...Remove: 1. Move the hinge levers back to move the drawer stop notch past the drawer stop notch B. Before removing, make sure the oven is set into the...
... while holding both hanger arms into place. 3. Drawer stop notch and the end of the oven counterclockwise to remove the oven door. Slowly push the drawer into the closed and pull it will shut. 4. NOTE: When you are in the drawer glides. Unplug range or disconnect power. 2. Insert both sides. To ...Remove: 1. Move the hinge levers back to move the drawer stop notch past the drawer stop notch B. Before removing, make sure the oven is set into the...


