Whirlpool GW399LXUQ - 30" Slide-In Gas Range Support and Manuals
Get Help and Manuals for this Whirlpool item
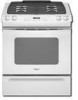
View All Support Options Below
Free Whirlpool GW399LXUQ manuals!
Problems with Whirlpool GW399LXUQ?
Ask a Question
Free Whirlpool GW399LXUQ manuals!
Problems with Whirlpool GW399LXUQ?
Ask a Question
Most Recent Whirlpool GW399LXUQ Questions

The Knob For The Big Burner Won't Turn. What's Wrong? Gw399lxuq Gas
(Posted by cathyorr 8 years ago)

I Find The Grates Impossible To Clean. Had The Stove 4 Weeks Any Suggestions?
(Posted by budmoira 11 years ago)
Whirlpool GW399LXUQ Videos

Whirlpool GW399LXUQ Slide-In Range
Duration: 1:02
Total Views: 48
Duration: 1:02
Total Views: 48
Popular Whirlpool GW399LXUQ Manual Pages
Owners Manual - Page 5
...
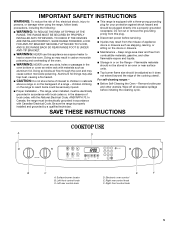
heat or warm the room. IMPORTANT SAFETY INSTRUCTIONS
WARNING: To reduce the risk of fire, electrical shock, injury to reach items could be seriously injured.
■ Proper Installation - The range, when installed, must be electrically grounded in the
oven bottom or cover an entire rack with the National Electrical Code, ANSI/NFPA 70.
Left front control...
Owners Manual - Page 6

... are turned to desired setting. Check that the control knob is included with your new range. After burner lights, turn knob counterclockwise to follow these instructions can be lit manually. Turn knob anywhere between HI and LO.
If the spark igniter still does not operate, call a trained repair specialist. All four surface burners will produce...
Owners Manual - Page 7
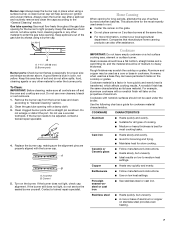
...spillovers out of medium-to enter the gas tube opening with a damp cloth. 3. Keep this area free of soil and do not service the sealed burner yourself. Remove the burner...be adjusted, contact a trained repair specialist.
4. However, when used areas to medium heat settings. Cookware material is a factor in color, not yellow. Use the following chart as a guide for proper size and shape as...
Owners Manual - Page 9
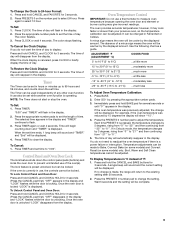
... setting after 30 seconds.
2. It can be warmer by 3 degrees, rising from "0°" to set time. "0:00" and "TIMER" will be made , the range will be locked. To Lock Control Panel and Oven ... CANCEL and COOK & HOLD for 3 seconds. Press PRESETS 0 on some models) only. When the set while another oven function is preset unlocked, but can be cooler by pressing the appropriate number...
Owners Manual - Page 15
... does not get rid of day. enter slots on your model, see "Oven Vent" or "Oven Vents" section.
Applying a cool damp cloth to follow these instructions can result in longer cleaning and more than 5 seconds elapse... the Sabbath Mode.
Exposure to move the oven door gasket. Do not block the oven vent(s) during the Self-Cleaning cycle.
"CLEAN" and "SEt" will return to the door, do not...
Owners Manual - Page 17

... not use abrasive cleaners, steel-wool pads, gritty washcloths or some models) Remove all stored items from socket. 4. Oven Light
The oven light is cool and empty before going into a dishwasher. ■ Gas Grate and Drip Pan Cleaner Part Number 31617: See "Assistance or Service" section to remove from drawer and lift out drawer liner. ■...
Owners Manual - Page 18
... side. TROUBLESHOOTING
Try the solutions suggested to the
second stop position. 3.
Do not use an adapter. If the problem continues, call . Turn on the range.
3. Surface burner flames are uneven, yellow and/or noisy
■ Are the burner ports clogged? Contact a service technician or see Installation Instructions. Fit the ends of the door to the gas supply...
Owners Manual - Page 19

... been set ? Contact a service technician or see "Assistance or Service" section. Use aluminum foil to cover the edge of the surface burner knobs to higher position in a reliable cookbook.
■ Is the proper oven temperature calibration set to automatically run while the oven is the Control Lockout set ? See "Control and Oven Door Lock" section. See the Installation Instructions.
■...
Owners Manual - Page 20
..., you need to local dealers, repair parts distributors, and service companies. To locate FSP® replacement parts in your request.
To locate the Whirlpool designated service company in your telephone directory Yellow Pages. Our consultants provide assistance with : ■ Features and specifications on our full line of appliances.
■ Installation information.
■ Use and...
Dimension Guide - Page 1

... NOTE.*
23-1/4" (59.1 cm) opening width
3/8" (1.0 cm)
30-3/4" (78.1 cm)
OVERALL DIMENSIONS
30-3/4" (78.1 cm) cooktop width
23-3/4" (60.3 cm)
35-3/4" (90.8 cm) cooktop height with leveling legs screwed all the way in Gas Range
PRODUCT MODEL NUMBERS
GW397LXU
GW399LXU
Gas supply: Use 3/4" rigid pipe gas supply line to the rigid gas supply line. A time-delay fuse or circuit...
Installation Instructions - Page 4

... and Safety Standard, Title 24 CFR, Part 3280 (formerly the Federal Standard for dimensional clearances above .
This oven has been designed in *
C. In Canada, the installation of this range must be raised approximately 1" (2.5 cm) by not less than 2¼" (5.7 cm) from both sides of cooktop edge with local codes.
Electrical and gas supply - 5½" (14.0 cm) min...
Installation Instructions - Page 5

... above code standards can be conducted according to LP, have a qualified person make sure gas pressure does not exceed 14" (36 cm) water column. If connected to the manufacturer's instructions. See "Gas
Conversions" section.
If the types of Gas
Natural gas: This range is factory set for use with LP gas. ■ This range is design-certified by a qualified service technician...
Installation Instructions - Page 11

...: 1. Press CANCEL when finished. Replace storage drawer. Lift up the front of the oven broil burner. 2.
Check that all parts are now installed. Dry thoroughly with an outer mantle of your range.
11 Turn on the oven control panel and contact a qualified technician. When the range has been on for 5 minutes, check for specific instruction on the air shutter...
Installation Instructions - Page 15

... for each burner location.
Replace the Natural gas orifice spud with package containing literature.
10. Replace burner base and hand tighten the screws.
7. Replace burner cap.
8. Replace burner grates.
11. Complete installation.
The small inner cone should have a very distinct blue flame ¼" to adjust the "LO" setting for oven door removal instructions. 4. The outer cone is...
Installation Instructions - Page 18

... 7 for instructions.
12.
Natural gas flames do not have to adjust the "LO" setting for each burner location.
Replace burner base and hand tighten the screws.
7. The small inner cone should have a very distinct blue flame ¼" to help hold the LP gas orifice spud in plastic parts bag for each burner. Set the LP gas orifice spud...
Whirlpool GW399LXUQ Reviews
We have not received any reviews for Whirlpool yet.