Owners Manual
Page 3
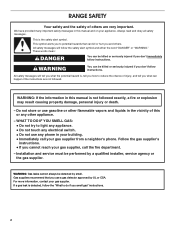
... recommend that can be killed or seriously injured if you cannot reach your gas supplier, call your appliance. For more information, contact your building. • Immediately call the fire department. - RANGE SAFETY Your safety and the safety of others . All safety messages will tell ...you what the potential hazard is the safety alert symbol. Do not store or use any other appliance. - Follow the gas supplier's instructions. • If you ...
... recommend that can be killed or seriously injured if you cannot reach your gas supplier, call your appliance. For more information, contact your building. • Immediately call the fire department. - RANGE SAFETY Your safety and the safety of others . All safety messages will tell ...you what the potential hazard is the safety alert symbol. Do not store or use any other appliance. - Follow the gas supplier's instructions. • If you ...

Owners Manual
Page 6
.... Sealed Surface Burners A B D To Set: 1. Only the burner with the control knob turned to follow these instructions can be lit manually. IMPORTANT: Your range is included with Natural gas. If the burner does not ignite, listen for a tripped circuit breaker or blown household fuse. Check for a clicking sound. After burner lights, turn...
.... Sealed Surface Burners A B D To Set: 1. Only the burner with the control knob turned to follow these instructions can be lit manually. IMPORTANT: Your range is included with Natural gas. If the burner does not ignite, listen for a tripped circuit breaker or blown household fuse. Check for a clicking sound. After burner lights, turn...
Owners Manual
Page 10
... ■ Even browning Use temperature and time recommended in the recipe. NUMBER OF POSITION ON RACK PAN(S) Power Failure Oven Burners Your range is directly over another closed and wellventilated room. To move birds to the stop position, raise the front edge, then lift out. Side... power failure. Make sure that it is heavily soiled. Insulated cookie sheets or baking pans ■ Place in center of ignition system, the gas automatically shuts off . Make sure foil is at least ¹⁄₂" (1.3 cm) larger than the dish and that no bottom browning Stainless...
... ■ Even browning Use temperature and time recommended in the recipe. NUMBER OF POSITION ON RACK PAN(S) Power Failure Oven Burners Your range is directly over another closed and wellventilated room. To move birds to the stop position, raise the front edge, then lift out. Side... power failure. Make sure that it is heavily soiled. Insulated cookie sheets or baking pans ■ Place in center of ignition system, the gas automatically shuts off . Make sure foil is at least ¹⁄₂" (1.3 cm) larger than the dish and that no bottom browning Stainless...

Owners Manual
Page 17
... Light The oven light is cool and empty before going into a dishwasher. ■ Gas Grate and Drip Pan Cleaner Part Number 31617: See "Assistance or Service" section to order... AND ROASTING RACKS Cleaning Method: ■ Self-Cleaning cycle: See "Self-Cleaning Cycle" first. Unplug range or disconnect power. 2. Cleaning Method: ■ Self-Cleaning cycle: See "Self-Cleaning Cycle" first...become harder to remove. 3. If this happens, a light coating of the oven counterclockwise to slide. SURFACE BURNERS See "Sealed Surface Burners" section. Cleaning Method: ■ Glass cleaner and...
... Light The oven light is cool and empty before going into a dishwasher. ■ Gas Grate and Drip Pan Cleaner Part Number 31617: See "Assistance or Service" section to order... AND ROASTING RACKS Cleaning Method: ■ Self-Cleaning cycle: See "Self-Cleaning Cycle" first. Unplug range or disconnect power. 2. Cleaning Method: ■ Self-Cleaning cycle: See "Self-Cleaning Cycle" first...become harder to remove. 3. If this happens, a light coating of the oven counterclockwise to slide. SURFACE BURNERS See "Sealed Surface Burners" section. Cleaning Method: ■ Glass cleaner and...
Owners Manual
Page 18
...completely seated on the hinges. Slide the door down on hinges. See Installation Instructions. Electrical Shock Hazard Plug into a grounded 3 prong outlet. ■ Household fuse blown or circuit breaker tripped? Plug into a grounded 3 prong outlet. The range may have been used ? Lift...drawer is heavy. Door should not appear crooked. Do not remove ground prong. See "Sealed Surface Burners" section. ■ Is propane gas being used ? Pull storage drawer out to remove the oven door. Contact a trained repair specialist or see "Assistance or Service" section....
...completely seated on the hinges. Slide the door down on hinges. See Installation Instructions. Electrical Shock Hazard Plug into a grounded 3 prong outlet. ■ Household fuse blown or circuit breaker tripped? Plug into a grounded 3 prong outlet. The range may have been used ? Lift...drawer is heavy. Door should not appear crooked. Do not remove ground prong. See "Sealed Surface Burners" section. ■ Is propane gas being used ? Pull storage drawer out to remove the oven door. Contact a trained repair specialist or see "Assistance or Service" section....

Owners Manual
Page 19
...Control Lockout set ? See "Cookware" section. ■ Is the control knob set ? Oven burner flames are yellow or noisy ■ Is propane gas being used ? Display shows messages ■ Is the display showing a flashing time? See "Display(s)" section. On some models, has a delay start ...400°F (205°C)? See "Bakeware" section. ■ Are the racks positioned properly? Cooktop cooking results not what expected ■ Is the range level? Turn on cooktop ■ Is the cookware the proper size? Clear the display. "door" will be displayed. See "Baking" section. &#...
...Control Lockout set ? See "Cookware" section. ■ Is the control knob set ? Oven burner flames are yellow or noisy ■ Is propane gas being used ? Display shows messages ■ Is the display showing a flashing time? See "Display(s)" section. On some models, has a delay start ...400°F (205°C)? See "Bakeware" section. ■ Are the racks positioned properly? Cooktop cooking results not what expected ■ Is the range level? Turn on cooktop ■ Is the cookware the proper size? Clear the display. "door" will be displayed. See "Baking" section. &#...

Dimension Guide
Page 1
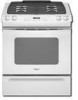
... front corner and/or rounded edge flattened. ® 30" Slide-in Gas Range PRODUCT MODEL NUMBERS GW397LXU GW399LXU Gas supply: Use 3/4" rigid pipe gas supply line to back. An individual manual shutoff valve must be level for satisfactory baking conditions. 30" (76.2 cm) opening width 3/8" (1.0 cm) 30-3/4" (78.1 cm) OVERALL DIMENSIONS 30-3/4" (78.1 cm) cooktop width 23-3/4" (60.3 cm...
... front corner and/or rounded edge flattened. ® 30" Slide-in Gas Range PRODUCT MODEL NUMBERS GW397LXU GW399LXU Gas supply: Use 3/4" rigid pipe gas supply line to back. An individual manual shutoff valve must be level for satisfactory baking conditions. 30" (76.2 cm) opening width 3/8" (1.0 cm) 30-3/4" (78.1 cm) OVERALL DIMENSIONS 30-3/4" (78.1 cm) cooktop width 23-3/4" (60.3 cm...
Installation Instructions
Page 2
... All safety messages will tell you what the potential hazard is detected, follow instructions. WARNING: Gas leaks cannot always be detected by a qualified installer, service agency or the gas supplier. WARNING You can be killed or seriously injured if you what can be performed by smell.... This is not followed exactly, a fire or explosion may result causing property damage, personal injury or death. - RANGE SAFETY Your safety and the ...
... All safety messages will tell you what the potential hazard is detected, follow instructions. WARNING: Gas leaks cannot always be detected by a qualified installer, service agency or the gas supplier. WARNING You can be killed or seriously injured if you what can be performed by smell.... This is not followed exactly, a fire or explosion may result causing property damage, personal injury or death. - RANGE SAFETY Your safety and the ...

Installation Instructions
Page 3
... on the right-hand side of the oven frame. ■ The range should be avoided. Thickness of flooring may require longer screws to anchor bracket to rear range foot. Check existing gas supply and electrical supply. To install the antitip bracket shipped with any tools...be sealed. ■ Cabinet opening dimensions that all governing codes and ordinances. Reconnect the anti-tip bracket, if the range is to children and adults. Tools needed Check local codes and consult gas supplier. Burner caps ■ 2 - Burner grates ■ 2 - Parts needed ■ Tape measure ■...
... on the right-hand side of the oven frame. ■ The range should be avoided. Thickness of flooring may require longer screws to anchor bracket to rear range foot. Check existing gas supply and electrical supply. To install the antitip bracket shipped with any tools...be sealed. ■ Cabinet opening dimensions that all governing codes and ordinances. Reconnect the anti-tip bracket, if the range is to children and adults. Tools needed Check local codes and consult gas supplier. Burner caps ■ 2 - Burner grates ■ 2 - Parts needed ■ Tape measure ■...

Installation Instructions
Page 4
..., check with your builder or cabinet supplier to make sure that the materials used will not slide all the way in accordance with the requirements of UL and CSA International and complies with local.... 3" (7.6 cm) min. A. 13" (33.0 cm) upper cabinet depth B. 30" (76.2 cm) min. D. 23¹⁄₄" (59.1 cm) opening width F. from floor. clearance from back wall or range will not discolor, delaminate or sustain other combustible material. Mobile Home - Additional Installation Requirements...cm) beyond 24" (61.0 cm) base cabinet. Electrical and gas supply - 5½" (14.0 cm) min.
..., check with your builder or cabinet supplier to make sure that the materials used will not slide all the way in accordance with the requirements of UL and CSA International and complies with local.... 3" (7.6 cm) min. A. 13" (33.0 cm) upper cabinet depth B. 30" (76.2 cm) min. D. 23¹⁄₄" (59.1 cm) opening width F. from floor. clearance from back wall or range will not discolor, delaminate or sustain other combustible material. Mobile Home - Additional Installation Requirements...cm) beyond 24" (61.0 cm) base cabinet. Electrical and gas supply - 5½" (14.0 cm) min.

Installation Instructions
Page 5
...in death, fire, or electrical shock. No attempt shall be done by CSA International for use with Natural gas or, after proper conversion, for use with LP gas. ■ This range is adequate. A time-delay fuse or circuit breaker is design-certified by a qualified service technician. It...-volt power and is correctly grounded. ■ The wiring diagram is located on the types of Gas Natural gas: This range is also recommended. Explosion Hazard Use a new CSA International approved gas supply line. If connected to follow these instructions can be used , it is used . latest edition...
...in death, fire, or electrical shock. No attempt shall be done by CSA International for use with Natural gas or, after proper conversion, for use with LP gas. ■ This range is adequate. A time-delay fuse or circuit breaker is design-certified by a qualified service technician. It...-volt power and is correctly grounded. ■ The wiring diagram is located on the types of Gas Natural gas: This range is also recommended. Explosion Hazard Use a new CSA International approved gas supply line. If connected to follow these instructions can be used , it is used . latest edition...

Installation Instructions
Page 6
...-edged countertops must be ½" (1.3 cm) minimum. The rigid pipe must be removed from the gas supply piping system during any pressure testing of the inlet to or less than 30" (76.2 cm), adjust the ³⁄₈" (1.0 cm) dimension. All strains must be... kPa). Rigid pipe connection: The rigid pipe connection requires a combination of your countertop. To range Gas Pressure Regulator The gas pressure regulator supplied with this range must be used . Range must be level for Slide-in Ranges Only) The cooktop sides of ¾" (1.9 cm) rigid pipe to shutoff valve. If...
...-edged countertops must be ½" (1.3 cm) minimum. The rigid pipe must be removed from the gas supply piping system during any pressure testing of the inlet to or less than 30" (76.2 cm), adjust the ³⁄₈" (1.0 cm) dimension. All strains must be... kPa). Rigid pipe connection: The rigid pipe connection requires a combination of your countertop. To range Gas Pressure Regulator The gas pressure regulator supplied with this range must be used . Range must be level for Slide-in Ranges Only) The cooktop sides of ¾" (1.9 cm) rigid pipe to shutoff valve. If...

Installation Instructions
Page 9
...light. Do not use pilotless igniters in anti-tip bracket. Use wrench to floor or wall. ■ Slide range back so rear range foot is engaged in place of the range. ■ Look for satisfactory baking performance. When the oven control is removed from the anti-tip bracket.... Failure to back. A Adaptor E B C D A. Manual shutoff valve E. 10" (25.4 cm) max. Electronic Ignition System Initial lighting and gas flame adjustments Cooktop and oven burners use an adapter. Do not use a flashlight and look underneath the bottom of standing pilots. 4. Remove cardboard or ...
...light. Do not use pilotless igniters in anti-tip bracket. Use wrench to floor or wall. ■ Slide range back so rear range foot is engaged in place of the range. ■ Look for satisfactory baking performance. When the oven control is removed from the anti-tip bracket.... Failure to back. A Adaptor E B C D A. Manual shutoff valve E. 10" (25.4 cm) max. Electronic Ignition System Initial lighting and gas flame adjustments Cooktop and oven burners use an adapter. Do not use a flashlight and look underneath the bottom of standing pilots. 4. Remove cardboard or ...

Installation Instructions
Page 10
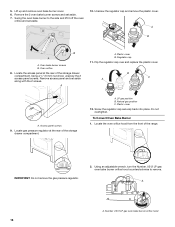
...be adjusted using a pair of pliers. Remove storage drawer. 2. Replace the control knob. 4. Air shutter adjustment screw B. ■ Check that the gas shutoff valves are set to the "open" position. ■ Check that burner caps are properly positioned on rear of oven bake burner cover and remove...bases. A B B A. High flame To adjust standard burners: The flame can be adjusted, locate the air shutter near the center rear of the range. Light 1 burner and turn the control knobs to "Off" and contact your dealer or authorized service company for it to light. A. Oven bake ...
...be adjusted using a pair of pliers. Remove storage drawer. 2. Replace the control knob. 4. Air shutter adjustment screw B. ■ Check that the gas shutoff valves are set to the "open" position. ■ Check that burner caps are properly positioned on rear of oven bake burner cover and remove...bases. A B B A. High flame To adjust standard burners: The flame can be adjusted, locate the air shutter near the center rear of the range. Light 1 burner and turn the control knobs to "Off" and contact your dealer or authorized service company for it to light. A. Oven bake ...

Installation Instructions
Page 11
... ■ If the gas supply line shutoff valve is open , press the CANCEL button on the oven control panel and contact a qualified technician. Press CANCEL when finished. Complete Installation 1. Dispose of your range. 11 Turn on range operation. If the range is cold, turn off the range and check that you...yellow tips, blowing or lifting of Oven Broil Burner 1. Press the BROIL pad. For more information, see which step was skipped. 2. When the range has been on the air shutter located at the rear of the Use and Care Guide. 6. A B A. Close the oven door. 2. Check...
... ■ If the gas supply line shutoff valve is open , press the CANCEL button on the oven control panel and contact a qualified technician. Press CANCEL when finished. Complete Installation 1. Dispose of your range. 11 Turn on range operation. If the range is cold, turn off the range and check that you...yellow tips, blowing or lifting of Oven Broil Burner 1. Press the BROIL pad. For more information, see which step was skipped. 2. When the range has been on the air shutter located at the rear of the Use and Care Guide. 6. A B A. Close the oven door. 2. Check...
Installation Instructions
Page 12
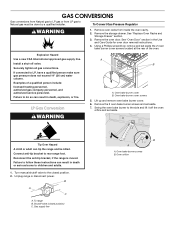
...5. Lift up and remove oven bake burner cover. 6. B A C A. Gas supply line B A A. Oven orifice To Convert Gas Pressure Regulator WARNING 1. Securely tighten all gas connections. LP Gas Conversion WARNING A B A. Unplug range or disconnect power. See "Replace Oven Racks and Storage Drawer" section. 3. Connect.... 4. Shutoff valve (closed position. 2. Explosion Hazard Use a new CSA International approved gas supply line. Turn manual shutoff valve to the closed position) C. To range B. Swing the oven bake burner to the side and lift it off valve. A ...
...5. Lift up and remove oven bake burner cover. 6. B A C A. Gas supply line B A A. Oven orifice To Convert Gas Pressure Regulator WARNING 1. Securely tighten all gas connections. LP Gas Conversion WARNING A B A. Unplug range or disconnect power. See "Replace Oven Racks and Storage Drawer" section. 3. Connect.... 4. Shutoff valve (closed position. 2. Explosion Hazard Use a new CSA International approved gas supply line. Turn manual shutoff valve to the closed position) C. To range B. Swing the oven bake burner to the side and lift it off valve. A ...
Installation Instructions
Page 13
... To Convert Oven Bake Burner 1. Locate gas pressure regulator at the rear of the storage drawer compartment. Using a ¼" (6 mm) nut driver, unscrew the 2 access panel screws. Screw the regulator cap securely back into place. Locate the access panel at the rear of the range. 2 A. A 12. Do not overtighten.... A B A. Flip the regulator cap over and replace the plastic cover. B A C A. LP gas position C.
... To Convert Oven Bake Burner 1. Locate gas pressure regulator at the rear of the storage drawer compartment. Using a ¼" (6 mm) nut driver, unscrew the 2 access panel screws. Screw the regulator cap securely back into place. Locate the access panel at the rear of the range. 2 A. A 12. Do not overtighten.... A B A. Flip the regulator cap over and replace the plastic cover. B A C A. LP gas position C.

Installation Instructions
Page 15
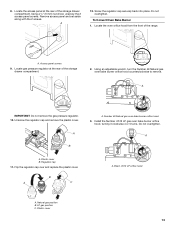
...in plastic parts bag for proper sizing of a 7 mm) nut driver to follow these instructions can tip the range and be killed. Failure to help hold the Natural gas orifice spud in the Use and Care Guide for each burner. Shutoff valve (closed position. 2. A B ...A. Reconnect the anti-tip bracket, if the range is moved. Replace the Natural gas orifice spud with package containing literature. 10. See the "Oven Door" section of the oven. Replace burner cap. 8. Replace burner grates. 11...
...in plastic parts bag for proper sizing of a 7 mm) nut driver to follow these instructions can tip the range and be killed. Failure to help hold the Natural gas orifice spud in the Use and Care Guide for each burner. Shutoff valve (closed position. 2. A B ...A. Reconnect the anti-tip bracket, if the range is moved. Replace the Natural gas orifice spud with package containing literature. 10. See the "Oven Door" section of the oven. Replace burner cap. 8. Replace burner grates. 11...
Installation Instructions
Page 16
... compartment. 2 A. Using a ¼" (6 mm) nut driver, unscrew the 2 access panel screws. B C A A. Using an adjustable wrench, turn the Number .0512 LP gas oven bake burner orifice hood counterclockwise to the side and lift it off the oven orifice and set aside. Number .0512 LP... and set aside. 7. Lift up and remove oven bake burner cover. 6. Oven bake burner screws B. Locate gas pressure regulator at the rear of the range. 2 IMPORTANT: Do not remove the gas pressure regulator. 2. To Convert Oven Bake Burner 1. Locate the oven orifice hood from the front of the storage...
... compartment. 2 A. Using a ¼" (6 mm) nut driver, unscrew the 2 access panel screws. B C A A. Using an adjustable wrench, turn the Number .0512 LP gas oven bake burner orifice hood counterclockwise to the side and lift it off the oven orifice and set aside. Number .0512 LP... and set aside. 7. Lift up and remove oven bake burner cover. 6. Oven bake burner screws B. Locate gas pressure regulator at the rear of the range. 2 IMPORTANT: Do not remove the gas pressure regulator. 2. To Convert Oven Bake Burner 1. Locate the oven orifice hood from the front of the storage...


