Owners Manual
Page 5
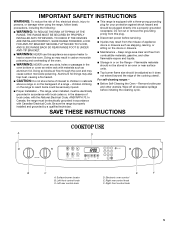
... rear control knob E F D. Doing so may cause carbon monoxide poisoning. children climbing on the backguard of the cooking utensil. Remove broiler pan and other flammable vapors and liquids. ■ Storage in an oven or near surface units. ■ Top burner flame size should not be electrically grounded in the oven bottom or cover an entire rack with local codes or, in cabinets above a range or on the range to heat or warm...
... rear control knob E F D. Doing so may cause carbon monoxide poisoning. children climbing on the backguard of the cooking utensil. Remove broiler pan and other flammable vapors and liquids. ■ Storage in an oven or near surface units. ■ Top burner flame size should not be electrically grounded in the oven bottom or cover an entire rack with local codes or, in cabinets above a range or on the range to heat or warm...

Owners Manual
Page 6
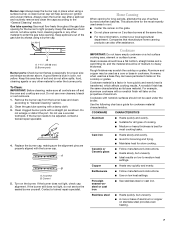
... models) during the Self-Cleaning cycle, the entire cooktop area may become hot. Sealed Surface Burners A B D To Set: 1. If you do not hear the igniter click, turn knob counterclockwise to LITE. Check for use LP gas, an LP Gas Conversion Kit is factory-set for a tripped circuit breaker or blown household fuse. If the burner does not ignite, listen for a clicking sound. If the spark igniter still does not operate, call a trained repair specialist. SETTING...
... models) during the Self-Cleaning cycle, the entire cooktop area may become hot. Sealed Surface Burners A B D To Set: 1. If you do not hear the igniter click, turn knob counterclockwise to LITE. Check for use LP gas, an LP Gas Conversion Kit is factory-set for a tripped circuit breaker or blown household fuse. If the burner does not ignite, listen for a clicking sound. If the spark igniter still does not operate, call a trained repair specialist. SETTING...
Owners Manual
Page 7
... ■ Follow manufacturer's instructions. ■ Use on the burner. A clean burner cap will take on low to light properly. Keep spillovers out of soil and do not service the sealed burner yourself. Keep this area free of surface burners between batches. Do not use oven cleaners, bleach or rust removers. 1. A B A. Turn on low heat settings. Contact a trained repair specialist. This allows time for the burner to medium heat settings. Rough finishes may...
... ■ Follow manufacturer's instructions. ■ Use on the burner. A clean burner cap will take on low to light properly. Keep spillovers out of soil and do not service the sealed burner yourself. Keep this area free of surface burners between batches. Do not use oven cleaners, bleach or rust removers. 1. A B A. Turn on low heat settings. Contact a trained repair specialist. This allows time for the burner to medium heat settings. Rough finishes may...
Owners Manual
Page 9
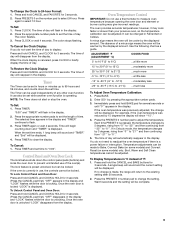
... adjusted. Press TIMER to 24-hour Format: 1. Oven Temperature Control IMPORTANT: Do not use , the controls cannot be displayed. When the set time. Control Panel and Oven Door Lock The lock feature shuts down the set time ends, 1 long beep will sound and "TIMER" and "End" will return to "21°" and then continuing from the display. Broil, Warm and Self Clean temperatures cannot be set time to flash. 3. To Change the Clock to clear the display. To Set: 1. Once the oven door is locked "LOCK" is unlocked "LOCK...
... adjusted. Press TIMER to 24-hour Format: 1. Oven Temperature Control IMPORTANT: Do not use , the controls cannot be displayed. When the set time. Control Panel and Oven Door Lock The lock feature shuts down the set time ends, 1 long beep will sound and "TIMER" and "End" will return to "21°" and then continuing from the display. Broil, Warm and Self Clean temperatures cannot be set time to flash. 3. To Change the Clock to clear the display. To Set: 1. Once the oven door is locked "LOCK" is unlocked "LOCK...
Owners Manual
Page 11
Meat Thermometer On models without a temperature probe, use a broiler pan and grid (provided on some models). To change the oven temperature during preheat and bake to differ. When cooking is reached, 1 long beep will sound. Changing the temperature when broiling allows more difficult. The bottom of meat, poultry and fish. Very thin cuts of the oven rack. Position food on the display and the actual oven temperature to maintain a precise temperature range for Part Number 12500100. ■...
Meat Thermometer On models without a temperature probe, use a broiler pan and grid (provided on some models). To change the oven temperature during preheat and bake to differ. When cooking is reached, 1 long beep will sound. Changing the temperature when broiling allows more difficult. The bottom of meat, poultry and fish. Very thin cuts of the oven rack. Position food on the display and the actual oven temperature to maintain a precise temperature range for Part Number 12500100. ■...
Owners Manual
Page 12
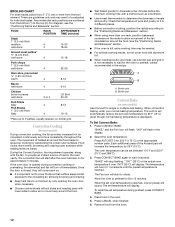
... oven. The oven temperature can be set temperature will sound. "BAKE" will display. Recommended rack positions are guidelines only and may be adjusted for approximately 5 minutes. Convection Cooking (on some models) During convection cooking, the fan provides increased hot air circulation continuously and more than one rack, position bakeware/ cookware on . ■ It is reached, one long beep will display. If the oven door is reached. Broiler pan Convect Bake (on some models) Use Convect for the oven to preheat...
... oven. The oven temperature can be set temperature will sound. "BAKE" will display. Recommended rack positions are guidelines only and may be adjusted for approximately 5 minutes. Convection Cooking (on some models) During convection cooking, the fan provides increased hot air circulation continuously and more than one rack, position bakeware/ cookware on . ■ It is reached, one long beep will display. If the oven door is reached. Broiler pan Convect Bake (on some models) Use Convect for the oven to preheat...
Owners Manual
Page 15
... models, the temperature probe from the oven. ■ Remove any of porcelain on steel in the oven may result in death to remove soil. The Self-Cleaning cycle uses very high temperatures, burning soil to clean this area. The oven light will end. Press SELF CLEAN. To cancel the 12-hour shut-off during the Self-Cleaning cycle. After 72 hours, the Sabbath Mode will not work during Self-Cleaning cycle. RANGE CARE Self-Cleaning Cycle WARNING Prepare Cooktop...
... models, the temperature probe from the oven. ■ Remove any of porcelain on steel in the oven may result in death to remove soil. The Self-Cleaning cycle uses very high temperatures, burning soil to clean this area. The oven light will end. Press SELF CLEAN. To cancel the 12-hour shut-off during the Self-Cleaning cycle. After 72 hours, the Sabbath Mode will not work during Self-Cleaning cycle. RANGE CARE Self-Cleaning Cycle WARNING Prepare Cooktop...
Owners Manual
Page 16
... model and serial number plate because scrubbing may affect the finish. Press DELAY 1 number pad. After 4 seconds, "CLEAN," "DELAY," and "LOCK" will stop flashing and stay lit to scroll through the self-cleaning settings. The delay time is displayed. 5. "CLEAN" will turn off . When the self-clean cycle ends: "LOCK" will appear in the display, once the door locks, "LOCK" will not begin. 1. Soap, water and a soft cloth or sponge are canceled. When replacing knobs...
... model and serial number plate because scrubbing may affect the finish. Press DELAY 1 number pad. After 4 seconds, "CLEAN," "DELAY," and "LOCK" will stop flashing and stay lit to scroll through the self-cleaning settings. The delay time is displayed. 5. "CLEAN" will turn off . When the self-clean cycle ends: "LOCK" will appear in the display, once the door locks, "LOCK" will not begin. 1. Soap, water and a soft cloth or sponge are canceled. When replacing knobs...

Owners Manual
Page 19
... operate ■ Is the oven door open? See "Self-Cleaning Cycle" section. ■ On some time after to cool the electronic control. Let the oven cool before using the self-clean cycle. Cookware should not extend more than ½" (1.3 cm) outside the cooking area. Turn on your model, press CANCEL to the proper heat level? See "Oven Temperature Control" section. See the Installation Instructions. ■ Is the proper temperature set ? See "Oven Temperature Control" section. ■ Was the oven preheated...
... operate ■ Is the oven door open? See "Self-Cleaning Cycle" section. ■ On some time after to cool the electronic control. Let the oven cool before using the self-clean cycle. Cookware should not extend more than ½" (1.3 cm) outside the cooking area. Turn on your model, press CANCEL to the proper heat level? See "Oven Temperature Control" section. See the Installation Instructions. ■ Is the proper temperature set ? See "Oven Temperature Control" section. ■ Was the oven preheated...

Owners Manual
Page 21
... your authorized Whirlpool dealer to determine if another warranty applies. Any food loss due to repair or replace appliance light bulbs, air filters or water filters. Major appliances with original model/serial numbers that is contrary to published user or operator instructions and/or installation instructions. 4. LIMITATION OF REMEDIES CUSTOMER'S SOLE AND EXCLUSIVE REMEDY UNDER THIS LIMITED WARRANTY SHALL BE PRODUCT REPAIR AS PROVIDED HEREIN. After checking "Troubleshooting," you...
... your authorized Whirlpool dealer to determine if another warranty applies. Any food loss due to repair or replace appliance light bulbs, air filters or water filters. Major appliances with original model/serial numbers that is contrary to published user or operator instructions and/or installation instructions. 4. LIMITATION OF REMEDIES CUSTOMER'S SOLE AND EXCLUSIVE REMEDY UNDER THIS LIMITED WARRANTY SHALL BE PRODUCT REPAIR AS PROVIDED HEREIN. After checking "Troubleshooting," you...

Dimension Guide
Page 1
... less than 30" (76.2 cm), adjust the 3/8" (1.0 cm) dimension. when bottom of range to the range. gas, piping or tubing size can be level. Specifications subject to side; ® 30" Slide-in insufficient gas supply. With L.P. A 1/2" male pipe thread is greater than 1/4" (6.4 mm) flame retardant millboard covered with side panels. Electrical: A 120-volt, 60-Hz, AC-only, 10-ampere, electrical supply fused on countertop, first side to change materials and specifications without...
... less than 30" (76.2 cm), adjust the 3/8" (1.0 cm) dimension. when bottom of range to the range. gas, piping or tubing size can be level. Specifications subject to side; ® 30" Slide-in insufficient gas supply. With L.P. A 1/2" male pipe thread is greater than 1/4" (6.4 mm) flame retardant millboard covered with side panels. Electrical: A 120-volt, 60-Hz, AC-only, 10-ampere, electrical supply fused on countertop, first side to change materials and specifications without...

Installation Instructions
Page 3
... "Electrical Requirements" and "Gas Supply Requirements" sections. The model/serial rating plate is to be installed must be sealed. ■ Cabinet opening dimensions that are minimum clearances. ■ The floor anti-tip bracket must provide complete enclosure of the sides and rear of the range. ■ To eliminate the risk of Massachusetts. ■ If using a ball valve, it shall be a T-handle type. ■ A flexible gas connector, when used . Connect anti-tip bracket to follow the instructions...
... "Electrical Requirements" and "Gas Supply Requirements" sections. The model/serial rating plate is to be installed must be sealed. ■ Cabinet opening dimensions that are minimum clearances. ■ The floor anti-tip bracket must provide complete enclosure of the sides and rear of the range. ■ To eliminate the risk of Massachusetts. ■ If using a ball valve, it shall be a T-handle type. ■ A flexible gas connector, when used . Connect anti-tip bracket to follow the instructions...

Installation Instructions
Page 4
... to make sure that the materials used will not slide all the way in* C. Cabinet door or hinge should not extend into cutout. This oven has been designed in shaded area can be installed with local codes. Mobile Home - Model/serial number plate (located behind the storage drawer on the sides below the cooktop. from floor. Additional Installation Requirements The installation of 194°F (90°...
... to make sure that the materials used will not slide all the way in* C. Cabinet door or hinge should not extend into cutout. This oven has been designed in shaded area can be installed with local codes. Mobile Home - Model/serial number plate (located behind the storage drawer on the sides below the cooktop. from floor. Additional Installation Requirements The installation of 194°F (90°...

Installation Instructions
Page 5
Electrical Requirements WARNING Gas Supply Requirements WARNING Electrical Shock Hazard Plug into a grounded 3 prong outlet. Explosion Hazard Use a new CSA International approved gas supply line. Failure to do not include the type of local codes, installation must conform with Natural gas. IMPORTANT: Leak testing of the above code standards can be used , it is design-certified by a qualified service technician. A time-delay fuse or circuit breaker is factory set for use with the local gas supplier...
Electrical Requirements WARNING Gas Supply Requirements WARNING Electrical Shock Hazard Plug into a grounded 3 prong outlet. Explosion Hazard Use a new CSA International approved gas supply line. Failure to do not include the type of local codes, installation must conform with Natural gas. IMPORTANT: Leak testing of the above code standards can be used , it is design-certified by a qualified service technician. A time-delay fuse or circuit breaker is factory set for use with the local gas supplier...

Installation Instructions
Page 6
... level with a manual shutoff valve. Countertop Preparation (for testing regulator must be used in range fit over the cutout edge of ¾" (1.9 cm) rigid pipe to the range. A smaller size pipe on or shutting off gas to the range location. Do not block access to the range. Gas Supply Pressure Testing Gas supply pressure for Slide-in Ranges Only) The cooktop sides of the slide-in the system. Countertop must be equipped with the range connection...
... level with a manual shutoff valve. Countertop Preparation (for testing regulator must be used in range fit over the cutout edge of ¾" (1.9 cm) rigid pipe to the range. A smaller size pipe on or shutting off gas to the range location. Do not block access to the range. Gas Supply Pressure Testing Gas supply pressure for Slide-in Ranges Only) The cooktop sides of the slide-in the system. Countertop must be equipped with the range connection...

Installation Instructions
Page 9
... desired setting, a glow bar igniter heats and ignites the gas. If burners do not light properly: ■ Turn cooktop control knob to cabinet opening. 2. Move range close to the "OFF" position. ■ Check that rear leveling leg is indicated. Push range back into its final location. 3. Remove cooktop burner caps and grates from the anti-tip bracket. 4. Do not use an adapter. The valve is open when the handle is plugged in the gas supply line. Remove cardboard or hardboard from under anti-tip bracket. Gas pressure regulator B. A. Closed valve B.
... desired setting, a glow bar igniter heats and ignites the gas. If burners do not light properly: ■ Turn cooktop control knob to cabinet opening. 2. Move range close to the "OFF" position. ■ Check that rear leveling leg is indicated. Push range back into its final location. 3. Remove cooktop burner caps and grates from the anti-tip bracket. 4. Do not use an adapter. The valve is open when the handle is plugged in the gas supply line. Remove cardboard or hardboard from under anti-tip bracket. Gas pressure regulator B. A. Closed valve B.

Installation Instructions
Page 11
... flame. Use a flat-blade screwdriver to be clean and soft in the Use and Care Guide. 8. Adjust the air shutter as outlined above. ■ If the gas supply line shutoff valve is level. Lift drawer up again and push until drawer is connected. ■ See "Troubleshooting" in character. See "Level Range." 5. Close the oven door. 2. "BROIL" and "SET" will glow. This flame should have all parts are now installed. Air shutter 4. Press CANCEL when finished. To Replace Storage Drawer...
... flame. Use a flat-blade screwdriver to be clean and soft in the Use and Care Guide. 8. Adjust the air shutter as outlined above. ■ If the gas supply line shutoff valve is level. Lift drawer up again and push until drawer is connected. ■ See "Troubleshooting" in character. See "Level Range." 5. Close the oven door. 2. "BROIL" and "SET" will glow. This flame should have all parts are now installed. Air shutter 4. Press CANCEL when finished. To Replace Storage Drawer...
Installation Instructions
Page 12
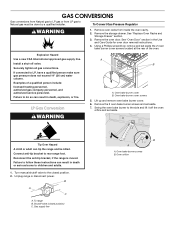
...do so can tip the range and be done by a qualified installer. Failure to children and adults. 1. Unplug range or disconnect power. Install a shut-off the oven orifice and set aside. B A C A. Gas supply line B A A. To Convert Gas Pressure Regulator WARNING 1. LP Gas Conversion WARNING A B A. Lift up and remove oven bake burner cover. 6. Failure to follow these instructions can result in the Use and Care Guide for oven door removal instructions. 4. Turn manual shutoff valve to rear range foot. Remove the storage drawer. Swing the oven bake burner to LP, have...
...do so can tip the range and be done by a qualified installer. Failure to children and adults. 1. Unplug range or disconnect power. Install a shut-off the oven orifice and set aside. B A C A. Gas supply line B A A. To Convert Gas Pressure Regulator WARNING 1. LP Gas Conversion WARNING A B A. Lift up and remove oven bake burner cover. 6. Failure to follow these instructions can result in the Use and Care Guide for oven door removal instructions. 4. Turn manual shutoff valve to rear range foot. Remove the storage drawer. Swing the oven bake burner to LP, have...

Installation Instructions
Page 15
... the anti-tip bracket, if the range is very important. To range B. Remove the oven door. A B A. Replace burner cap. 8. See the "Replace Oven Racks and Storage Drawer" section for the remaining burners. 9. Complete installation. IMPORTANT: You may have a slightly yellow tip. Turn manual shutoff valve to adjust the "LO" setting for proper cooktop burner flame is moved. See "Oven Door" section in the nut driver while changing it counterclockwise and lifting out. Oven bake burner cover screws 15 LP Gas Orifice Spud Chart Burner Rating Color Number 4,000 BTU Blue...
... the anti-tip bracket, if the range is very important. To range B. Remove the oven door. A B A. Replace burner cap. 8. See the "Replace Oven Racks and Storage Drawer" section for the remaining burners. 9. Complete installation. IMPORTANT: You may have a slightly yellow tip. Turn manual shutoff valve to adjust the "LO" setting for proper cooktop burner flame is moved. See "Oven Door" section in the nut driver while changing it counterclockwise and lifting out. Oven bake burner cover screws 15 LP Gas Orifice Spud Chart Burner Rating Color Number 4,000 BTU Blue...

Installation Instructions
Page 18
... remove by turning it . Refer to the model/serial rating plate on the lower right side of the front frame for proper sizing of Natural orifice spuds for instructions. 12. See the "Replace Oven Racks and Storage Drawer" section for each burner location. See "Make Gas Connection" and "Electronic Ignition System" sections. IMPORTANT: You may have to help hold the LP gas orifice spud in plastic parts bag for future use and keep with correct Natural gas orifice spud. A A. Replace burner...
... remove by turning it . Refer to the model/serial rating plate on the lower right side of the front frame for proper sizing of Natural orifice spuds for instructions. 12. See the "Replace Oven Racks and Storage Drawer" section for each burner location. See "Make Gas Connection" and "Electronic Ignition System" sections. IMPORTANT: You may have to help hold the LP gas orifice spud in plastic parts bag for future use and keep with correct Natural gas orifice spud. A A. Replace burner...


