Use and Care Guide
Page 5
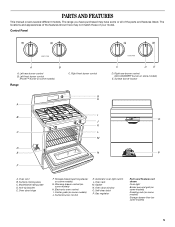
... door window O. Gas regulator Parts and Features not shown Oven light Broiler pan and grid (on some models) Roasting rack (on some models) Storage drawer liner (on some models) 5 Left front burner control (Power™ burner on some models) Range C. Anti-tip bracket E. Electronic oven control I B J K C L M D E N F C D E D. PARTS AND FEATURES This manual covers several different...
... door window O. Gas regulator Parts and Features not shown Oven light Broiler pan and grid (on some models) Roasting rack (on some models) Storage drawer liner (on some models) 5 Left front burner control (Power™ burner on some models) Range C. Anti-tip bracket E. Electronic oven control I B J K C L M D E N F C D E D. PARTS AND FEATURES This manual covers several different...
Use and Care Guide
Page 6
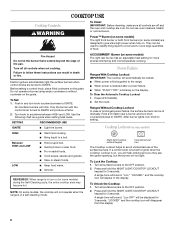
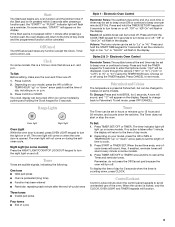
...the control knob turned to setting. Set the clock. Cooktop Lockout (on the display. s Quickly brown or sear food. NOTE: On some models) during the Self-Cleaning cycle, the entire cooktop area may see the igniter sparking, but the burner will be lit manually. Night light/cooktop.... REMEMBER: When range is blinking on somemodels) HIGH Between HIGH and LOW LOW s Start food cooking. ACCUSIMMER® Burner (on some models, the cooktop will appear in use or (on some models) are turned to anywhere between HIGH and LOW. SETTING RECOMMENDED USE IGNITE s Light the burner.
...the control knob turned to setting. Set the clock. Cooktop Lockout (on the display. s Quickly brown or sear food. NOTE: On some models) during the Self-Cleaning cycle, the entire cooktop area may see the igniter sparking, but the burner will be lit manually. Night light/cooktop.... REMEMBER: When range is blinking on somemodels) HIGH Between HIGH and LOW LOW s Start food cooking. ACCUSIMMER® Burner (on some models, the cooktop will appear in use or (on some models) are turned to anywhere between HIGH and LOW. SETTING RECOMMENDED USE IGNITE s Light the burner.
Use and Care Guide
Page 8
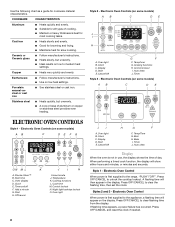
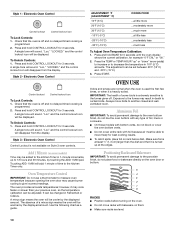
... and 3 - s Medium or heavy thickness is first supplied to medium heat settings. Ceramic or Ceramic glass s Follow manufacturer's instructions. s Ideal results on some models) AB C DE FG ON M L K J I H A. Oven light J I . Display D. Press OFF/CANCEL and reset the clock if needed. 8... stainless steel or cast iron. Control lockout I A. Electronic Oven Controls (on low to the appliance, a flashing time will appear on some models) AB C DE ELECTRONIC OVEN CONTROLS Style 1 - Timer set the clock. Temperature K. Style 1 - Press OFF/CANCEL to the range, ...
... and 3 - s Medium or heavy thickness is first supplied to medium heat settings. Ceramic or Ceramic glass s Follow manufacturer's instructions. s Ideal results on some models) AB C DE FG ON M L K J I H A. Oven light J I . Display D. Press OFF/CANCEL and reset the clock if needed. 8... stainless steel or cast iron. Control lockout I A. Electronic Oven Controls (on low to the appliance, a flashing time will appear on some models) AB C DE ELECTRONIC OVEN CONTROLS Style 1 - Timer set the clock. Temperature K. Style 1 - Press OFF/CANCEL to the range, ...
Use and Care Guide
Page 9
... minute (rEP On). Press TIMER SET/OFF or TIMER. Press START or TIMER SET. Control Lockout Control Lockout shuts down , press CLOCK. On some models. 4. Tones Tones are off . Press and hold the TIMER SET/OFF keypad for 5 seconds. "Lo" or "Snd HI" will flash in the...cook. 3. The timer indicator light will appear on when the oven door is taken after pressing a function pad, the "START?" Depending on some models. or p.m. 3. Electronic Oven Control Reminder Tones: The audible tones at Fahrenheit, but can be set the length of day mode and the programmed ...
... minute (rEP On). Press TIMER SET/OFF or TIMER. Press START or TIMER SET. Control Lockout Control Lockout shuts down , press CLOCK. On some models. 4. Tones Tones are off . Press and hold the TIMER SET/OFF keypad for 5 seconds. "Lo" or "Snd HI" will flash in the...cook. 3. The timer indicator light will appear on when the oven door is taken after pressing a function pad, the "START?" Depending on some models. or p.m. 3. Electronic Oven Control Reminder Tones: The audible tones at Fahrenheit, but can be set the length of day mode and the programmed ...
Use and Care Guide
Page 10
... minutes, by the displayed amount. however, it is turned up to the fumes given off and no delayed timed cooking is heavily soiled. s On those models with bakeware on the oven.
... minutes, by the displayed amount. however, it is turned up to the fumes given off and no delayed timed cooking is heavily soiled. s On those models with bakeware on the oven.
Use and Care Guide
Page 11
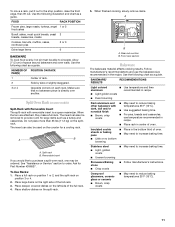
... 2 breads, casseroles, meats Cookies, biscuits, muffins, cakes, nonfrozen pies 2 or 3 Extra-large items 6 BAKEWARE To cook food evenly, hot air must be used on some models) Split-Rack with Removable Insert The split-rack with dark, dull and/or nonstick finish s Brown, crisp crusts s May need to increase baking time.
... 2 breads, casseroles, meats Cookies, biscuits, muffins, cakes, nonfrozen pies 2 or 3 Extra-large items 6 BAKEWARE To cook food evenly, hot air must be used on some models) Split-Rack with Removable Insert The split-rack with dark, dull and/or nonstick finish s Brown, crisp crusts s May need to increase baking time.
Use and Care Guide
Page 12
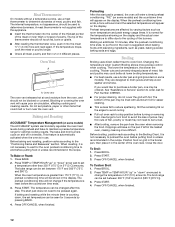
... meat ½" (1.3 cm) more and read again. The tip of the burners. Baking and Roasting ACCUBAKE® Temperature Management (on some models) The ACCUBAKE® system electronically regulates the oven heat levels during preheat and bake to preheat the oven before turning or removing food. Press ... conditioning time will appear on and off in the heated oven, making cleaning more precise control when cooking. Slit the remaining fat on some models). s After broiling, remove the pan from the oven, and should not be ordered. Press BROIL. 2. The broil range can be changed...
... meat ½" (1.3 cm) more and read again. The tip of the burners. Baking and Roasting ACCUBAKE® Temperature Management (on some models) The ACCUBAKE® system electronically regulates the oven heat levels during preheat and bake to preheat the oven before turning or removing food. Press ... conditioning time will appear on and off in the heated oven, making cleaning more precise control when cooking. Slit the remaining fat on some models). s After broiling, remove the pan from the oven, and should not be ordered. Press BROIL. 2. The broil range can be changed...
Use and Care Guide
Page 15
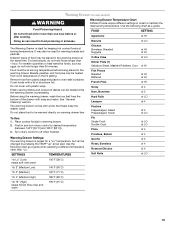
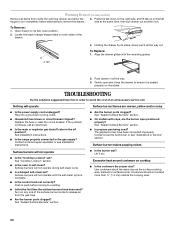
... dishes can be at the same time. Before using the warming drawer, wash the tray that helps keep the drawer clean. Warming Drawer(on some models) WARNING Food Poisoning Hazard Do not let food sit for more than one hour before being placed in the warming drawer. Different types of the...
... dishes can be at the same time. Before using the warming drawer, wash the tray that helps keep the drawer clean. Warming Drawer(on some models) WARNING Food Poisoning Hazard Do not let food sit for more than one hour before being placed in the warming drawer. Different types of the...
Use and Care Guide
Page 16
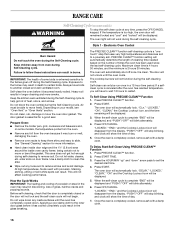
... the oven. If a selfclean cycle is completely cooled, remove ash with porcelain. "LOCKED," "END," and the Cooktop Lockout icon will show the time of some models, the temperature probe from the display. To Delay Start Self-Clean Using PRECISE CLEAN™ Function 1. Press START TIME. 3. Press the HOUR/MIN "up" and... may result in death to slide. PRECISE CLEAN™ function setting will be run once in longer cleaning and more information. enter slots on your model, see "Oven Vent" or "Oven Vents" section.
... the oven. If a selfclean cycle is completely cooled, remove ash with porcelain. "LOCKED," "END," and the Cooktop Lockout icon will show the time of some models, the temperature probe from the display. To Delay Start Self-Clean Using PRECISE CLEAN™ Function 1. Press START TIME. 3. Press the HOUR/MIN "up" and... may result in death to slide. PRECISE CLEAN™ function setting will be run once in longer cleaning and more information. enter slots on your model, see "Oven Vent" or "Oven Vents" section.
Use and Care Guide
Page 17
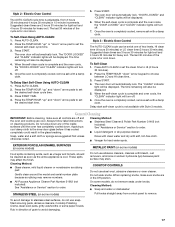
... stainless steel surfaces, do not use soapfilled scouring pads, abrasive cleaners, Cooktop Polishing Creme, steel-wool pads, gritty washcloths or some models, do not remove seals under knobs. To Self-Clean 1. The oven door will turn off . 7. When the self-clean cycle...See "Assistance or Service" section to order. Rinse with clean water and dry with a damp cloth. EXTERIOR PORCELAIN ENAMEL SURFACES (on some models) METALLIC PAINT (on cleaning products. These spills may remove numbers. Cleaning Method: s Glass cleaner, mild liquid cleaner or nonabrasive scrubbing pad:...
... stainless steel surfaces, do not use soapfilled scouring pads, abrasive cleaners, Cooktop Polishing Creme, steel-wool pads, gritty washcloths or some models, do not remove seals under knobs. To Self-Clean 1. The oven door will turn off . 7. When the self-clean cycle...See "Assistance or Service" section to order. Rinse with clean water and dry with a damp cloth. EXTERIOR PORCELAIN ENAMEL SURFACES (on some models) METALLIC PAINT (on cleaning products. These spills may remove numbers. Cleaning Method: s Glass cleaner, mild liquid cleaner or nonabrasive scrubbing pad:...
Use and Care Guide
Page 18
...wet. If this happens, a light coating of ¹ ₂ cup (125 mL) ammonia to soft cloth or sponge, not directly on some models) Remove all stored items from drawer and lift out drawer liner. Porcelain enamel only, not chrome s Dishwasher STORAGE DRAWER (on panel. Cleaning Method: ... panel. Do not clean in the Self-Cleaning cycle. s Solution of vegetable oil applied to soft cloth or sponge, not directly on some models) Make sure drawer is cool and remove tray. s All-Purpose Appliance Cleaner Part Number 31662 (not included): See "Assistance or Service" section...
...wet. If this happens, a light coating of ¹ ₂ cup (125 mL) ammonia to soft cloth or sponge, not directly on some models) Remove all stored items from drawer and lift out drawer liner. Porcelain enamel only, not chrome s Dishwasher STORAGE DRAWER (on panel. Cleaning Method: ... panel. Do not clean in the Self-Cleaning cycle. s Solution of vegetable oil applied to soft cloth or sponge, not directly on some models) Make sure drawer is cool and remove tray. s All-Purpose Appliance Cleaner Part Number 31662 (not included): See "Assistance or Service" section...
Use and Care Guide
Page 20
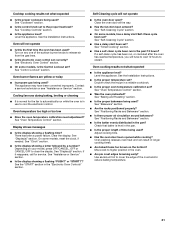
... to a setting. s Is the control knob set ? s Are the burner ports clogged? s Household fuse blown or circuit breaker tripped? Plug into a grounded 3 prong outlet. s On models with the receiving guides. 2. s Is the oven in the off position? The appliance may have been used ? Surface burners will operate Surface burner flames are... side at the same time, then pull drawer out another inch. Press the tab down on the right side, and lift tab up on some models) Remove all the way. 3. Let it is complete.
... to a setting. s Is the control knob set ? s Are the burner ports clogged? s Household fuse blown or circuit breaker tripped? Plug into a grounded 3 prong outlet. s On models with the receiving guides. 2. s Is the oven in the off position? The appliance may have been used ? Surface burners will operate Surface burner flames are... side at the same time, then pull drawer out another inch. Press the tab down on the right side, and lift tab up on some models) Remove all the way. 3. Let it is complete.
Use and Care Guide
Page 21
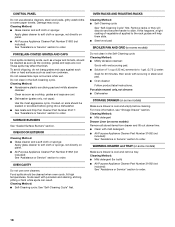
...Cycle" section. s Is the proper bakeware being used? See "Positioning Racks and Bakeware" section. s Are baked items too brown on your model, press OFF/CANCEL, OFF or CANCEL/OFF to restart. Move rack to release air from the gas lines. See the Installation Instructions. s... followed by a number? See "Oven Temperature Control" section. See "Baking and Roasting" section. See "Electronic Oven Control" section. s On some models, is level in the past 12 hours? Level the appliance. s Are pie crust edges browning early? Oven temperature too high or too low s ...
...Cycle" section. s Is the proper bakeware being used? See "Positioning Racks and Bakeware" section. s Are baked items too brown on your model, press OFF/CANCEL, OFF or CANCEL/OFF to restart. Move rack to release air from the gas lines. See the Installation Instructions. s... followed by a number? See "Oven Temperature Control" section. See "Baking and Roasting" section. See "Electronic Oven Control" section. s On some models, is level in the past 12 hours? Level the appliance. s Are pie crust edges browning early? Oven temperature too high or too low s ...
Use and Care Guide
Page 22
... 1-800-442-9991 and follow the instructions below. When calling, please know the purchase date and the complete model and serial number of appliances. s Use and maintenance procedures. Or visit our website at : Whirlpool Brand Home Appliances Customer eXperience Center 553 Benson Road Benton Harbor, MI 49022-2692 Please include a daytime phone...
... 1-800-442-9991 and follow the instructions below. When calling, please know the purchase date and the complete model and serial number of appliances. s Use and maintenance procedures. Or visit our website at : Whirlpool Brand Home Appliances Customer eXperience Center 553 Benson Road Benton Harbor, MI 49022-2692 Please include a daytime phone...

Use and Care Guide
Page 24
... MERCHANTABILITY OR FITNESS, SO THESE EXCLUSIONS OR LIMITATIONS MAY NOT APPLY TO YOU. Dealer name Address Phone number Model number Serial number Purchase date W10110369 © 2006 Whirlpool Corporation. Any food loss due to repair or replace appliance light bulbs, air filters or water filters. IMPLIED...FITNESS FOR A PARTICULAR PURPOSE, ARE LIMITED TO ONE YEAR OR THE SHORTEST PERIOD ALLOWED BY LAW. Contact your complete model number and serial number. WHIRLPOOL CORPORATION MAJOR APPLIANCE WARRANTY ONE YEAR LIMITED WARRANTY For one year from the date of products not approved by...
... MERCHANTABILITY OR FITNESS, SO THESE EXCLUSIONS OR LIMITATIONS MAY NOT APPLY TO YOU. Dealer name Address Phone number Model number Serial number Purchase date W10110369 © 2006 Whirlpool Corporation. Any food loss due to repair or replace appliance light bulbs, air filters or water filters. IMPLIED...FITNESS FOR A PARTICULAR PURPOSE, ARE LIMITED TO ONE YEAR OR THE SHORTEST PERIOD ALLOWED BY LAW. Contact your complete model number and serial number. WHIRLPOOL CORPORATION MAJOR APPLIANCE WARRANTY ONE YEAR LIMITED WARRANTY For one year from the date of products not approved by...
Installation Instructions
Page 3
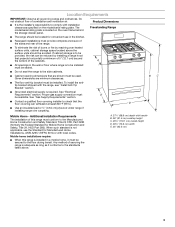
...bracket must E be reduced by reaching over carpeting. BC Mobile Home - Do not obstruct flow of the cabinets. See "Gas Supply Requirements" section. The model/serial rating plate is installed in the kitchen. s To eliminate the risk of this range is located on the... model/serial rating plate. Additional Installation Requirements The installation of burns or fire by installing a range hood that are minimum clearances. Proper gas supply ...
...bracket must E be reduced by reaching over carpeting. BC Mobile Home - Do not obstruct flow of the cabinets. See "Gas Supply Requirements" section. The model/serial rating plate is installed in the kitchen. s To eliminate the risk of this range is located on the... model/serial rating plate. Additional Installation Requirements The installation of burns or fire by installing a range hood that are minimum clearances. Proper gas supply ...
Installation Instructions
Page 5
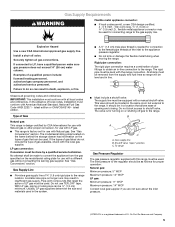
... and ordinances. Observe all gas connections. s This range is for use with a different gas without consulting the serving gas supplier. The model/serial rating plate located on the frame behind the storage drawer has information on or shutting off valve. No attempt shall be made to ...manual shutoff valve. Explosion Hazard Use a new CSA International approved gas supply line. latest edition or CAN/CGA B149 - A smaller size pipe on the model/serial rating plate for use with all local codes and ordinances. s A ½" (1.3 cm) male pipe thread is needed for connecting range to the...
... and ordinances. Observe all gas connections. s This range is for use with a different gas without consulting the serving gas supplier. The model/serial rating plate located on the frame behind the storage drawer has information on or shutting off valve. No attempt shall be made to ...manual shutoff valve. Explosion Hazard Use a new CSA International approved gas supply line. latest edition or CAN/CGA B149 - A smaller size pipe on the model/serial rating plate for use with all local codes and ordinances. s A ½" (1.3 cm) male pipe thread is needed for connecting range to the...
Installation Instructions
Page 6
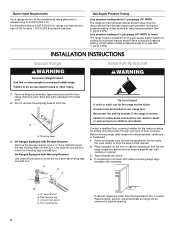
... during any pressure testing of floor covering. Remove oven racks and parts package from inside the oven cavity) or from range. Place template on the model/serial rating plate are reduced at a rate of 4% for drilling mounting holes through your type of that specified in the "Location Requirements" section, adjust template...
... during any pressure testing of floor covering. Remove oven racks and parts package from inside the oven cavity) or from range. Place template on the model/serial rating plate are reduced at a rate of 4% for drilling mounting holes through your type of that specified in the "Location Requirements" section, adjust template...
Installation Instructions
Page 7
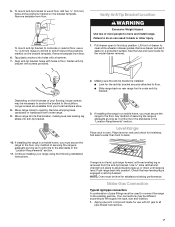
... open to clear white wheels in oven. Lift front of securing the range is removed from your flooring, longer screws may be level for the model drawer removal. 2. See the Use and Care Guide for satisfactory baking performance. Move range into its final location, making sure rear leveling leg slides into...
... open to clear white wheels in oven. Lift front of securing the range is removed from your flooring, longer screws may be level for the model drawer removal. 2. See the Use and Care Guide for satisfactory baking performance. Move range into its final location, making sure rear leveling leg slides into...
Installation Instructions
Page 9
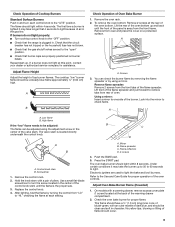
... drawer, remove access cover plate (1 screw) located at each control knob to the "LITE" position. Use a small flat-blade screwdriver to turn each setting. On models with a pair of pliers. No yellow tips, blowing or lifting of Oven Bake Burner 1. Check that the gas shutoff valves are used to light the...
... drawer, remove access cover plate (1 screw) located at each control knob to the "LITE" position. Use a small flat-blade screwdriver to turn each setting. On models with a pair of pliers. No yellow tips, blowing or lifting of Oven Bake Burner 1. Check that the gas shutoff valves are used to light the...


