Use and Care Guide
Page 1
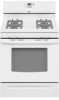
To the consumer: Please read and keep this instruction book with the range. www.whirlpool.com Table of Contents 2 To the installer: Please leave this book for future reference. or visit our website at... W10110369 ® GAS RANGE Use & Care Guide For questions about features, operation/performance, parts, accessories or service, call: 1-800-253-1301.
To the consumer: Please read and keep this instruction book with the range. www.whirlpool.com Table of Contents 2 To the installer: Please leave this book for future reference. or visit our website at... W10110369 ® GAS RANGE Use & Care Guide For questions about features, operation/performance, parts, accessories or service, call: 1-800-253-1301.
Use and Care Guide
Page 2
...Cooktop Controls 6 Power Failure 6 Cooktop Lockout 6 Sealed Surface Burners 7 Home Canning 7 Cookware 7 ELECTRONIC OVEN CONTROLS 8 Display 8 Start 8 Off/Cancel 9 Clock 9 Range Lights 9 Tones 9 Fahrenheit and Celsius 9 Timer 9 Control Lockout 9 Add 1 Minute 10 Oven Temperature Control 10 OVEN USE 10 Aluminum Foil 10 Positioning Racks and ... 12 Oven Vent 12 Baking and Roasting 12 Broiling 12 Hold Warm Feature 13 Timed Cooking 14 Warming Drawer 15 RANGE CARE 16 Self-Cleaning Cycle 16 General Cleaning 17 Oven Light 19 Oven Door 19 Storage Drawer 19 Warming Drawer ...
...Cooktop Controls 6 Power Failure 6 Cooktop Lockout 6 Sealed Surface Burners 7 Home Canning 7 Cookware 7 ELECTRONIC OVEN CONTROLS 8 Display 8 Start 8 Off/Cancel 9 Clock 9 Range Lights 9 Tones 9 Fahrenheit and Celsius 9 Timer 9 Control Lockout 9 Add 1 Minute 10 Oven Temperature Control 10 OVEN USE 10 Aluminum Foil 10 Positioning Racks and ... 12 Oven Vent 12 Baking and Roasting 12 Broiling 12 Hold Warm Feature 13 Timed Cooking 14 Warming Drawer 15 RANGE CARE 16 Self-Cleaning Cycle 16 General Cleaning 17 Oven Light 19 Oven Door 19 Storage Drawer 19 Warming Drawer ...
Use and Care Guide
Page 3
RANGE SAFETY Your safety and the safety of this or any phone in this manual is the safety alert symbol. This is not followed exactly, a fire ...
RANGE SAFETY Your safety and the safety of this or any phone in this manual is the safety alert symbol. This is not followed exactly, a fire ...
Use and Care Guide
Page 4
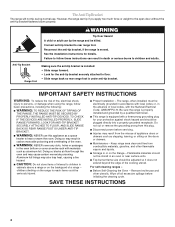
...a properly grounded receptacle. s Injuries may result in an oven or near surface units. s Maintenance - s Storage in cabinets above a range or on the Range - Wipe off all excessive spillage before servicing. IMPORTANT SAFETY INSTRUCTIONS WARNING: To reduce the risk of fire, electrical shock, injury to children... from the misuse of local codes, with local codes or, in death or serious burns to persons, or damage when using the range, follow these instructions can result in the absence of appliance doors or drawers such as aluminum foil. s Before Self-Cleaning the Oven...
...a properly grounded receptacle. s Injuries may result in an oven or near surface units. s Maintenance - s Storage in cabinets above a range or on the Range - Wipe off all excessive spillage before servicing. IMPORTANT SAFETY INSTRUCTIONS WARNING: To reduce the risk of fire, electrical shock, injury to children... from the misuse of local codes, with local codes or, in death or serious burns to persons, or damage when using the range, follow these instructions can result in the absence of appliance doors or drawers such as aluminum foil. s Before Self-Cleaning the Oven...
Use and Care Guide
Page 5
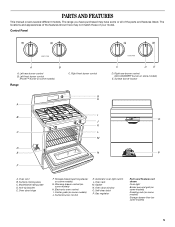
...C. Anti-tip bracket E. Automatic oven light switch L. Oven door window O. Left front burner control (Power™ burner on some models) Range C. Surface burner locator O P A. Warming drawer control (on some models) H. Gasket N. The locations and appearances of the features shown ...here may have some or all of your model. Model/serial rating plate D. Surface burner control K. Self-clean latch P. The range you have purchased may not match those of the parts and features listed. Control Panel A B A. Left rear burner control B. Right front...
...C. Anti-tip bracket E. Automatic oven light switch L. Oven door window O. Left front burner control (Power™ burner on some models) Range C. Surface burner locator O P A. Warming drawer control (on some models) H. Gasket N. The locations and appearances of the features shown ...here may have some or all of your model. Model/serial rating plate D. Surface burner control K. Self-clean latch P. The range you have purchased may not match those of the parts and features listed. Control Panel A B A. Left rear burner control B. Right front...
Use and Care Guide
Page 6
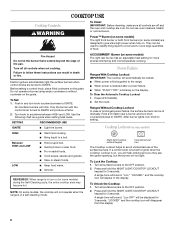
...(on some models) The right rear burner has an adjustable heat setting for 3 seconds. To Set: 1. Turn knob to the OFF position. 2. Ranges Without Cooktop Lockout In case of food. s Simmer. Before setting a control knob, place filled cookware on the grate. Press OFF/CANCEL 2. s Quickly... during the Self-Cleaning cycle, the entire cooktop area may see the igniter sparking, but the burner will be lit manually. Power Failure Ranges With Cooktop Lockout IMPORTANT: The cooktop will appear in a self-cleaning mode. "Loc," "LOCKED," and the cooktop icon will automatically be...
...(on some models) The right rear burner has an adjustable heat setting for 3 seconds. To Set: 1. Turn knob to the OFF position. 2. Ranges Without Cooktop Lockout In case of food. s Simmer. Before setting a control knob, place filled cookware on the grate. Press OFF/CANCEL 2. s Quickly... during the Self-Cleaning cycle, the entire cooktop area may see the igniter sparking, but the burner will be lit manually. Power Failure Ranges With Cooktop Lockout IMPORTANT: The cooktop will appear in a self-cleaning mode. "Loc," "LOCKED," and the cooktop icon will automatically be...
Use and Care Guide
Page 8
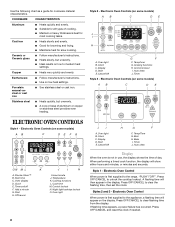
... Controls (on low heat settings. Add a minute G. Styles 2 and 3 - Cancel/Off G F F. Start time C. COOKWARE CHARACTERISTICS Aluminum s Heats quickly and evenly. Press OFF/CANCEL to the range, "PUSH"/"OFF". Clock C. If flashing time appears, a power failure has occurred. Temp/hour G. Use the following chart as a guide for cookware material characteristics. Off/cancel I H A.
... Controls (on low heat settings. Add a minute G. Styles 2 and 3 - Cancel/Off G F F. Start time C. COOKWARE CHARACTERISTICS Aluminum s Heats quickly and evenly. Press OFF/CANCEL to the range, "PUSH"/"OFF". Clock C. If flashing time appears, a power failure has occurred. Temp/hour G. Use the following chart as a guide for cookware material characteristics. Off/cancel I H A.
Use and Care Guide
Page 9
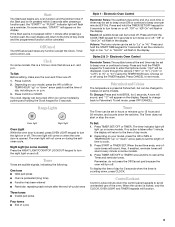
...-ofcycle tones will sound, then, if enabled, reminder tones will flash in hours or minutes up " or "down " arrow pads to cook. 3. Press CLOCK. 2. or p.m. 3. Range Lights Oven light Night light Oven Light While the oven door is counting down the control panel keypads to Fahrenheit. To Change: Press and hold...
...-ofcycle tones will sound, then, if enabled, reminder tones will flash in hours or minutes up " or "down " arrow pads to cook. 3. Press CLOCK. 2. or p.m. 3. Range Lights Oven light Night light Oven Light While the oven door is counting down the control panel keypads to Fahrenheit. To Change: Press and hold...
Use and Care Guide
Page 12
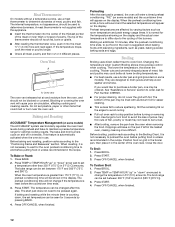
... Management (on and off in the heated oven, making cleaning more difficult. The bake and broil burners cycle on some models). The bake range can be set between 170°F and 500°F (75°C and 260°C). The temperature can be changed after the preheat conditioning... grid (provided on the display and the actual oven temperature to differ due to order. It is counting down " arrow pad to maintain a precise temperature range for Part Number 4396923. Close the door. To Broil: 1. Press BROIL. 2. Press OFF/CANCEL when finished. Press TEMP or TEMP/HOUR "up " ...
... Management (on and off in the heated oven, making cleaning more difficult. The bake and broil burners cycle on some models). The bake range can be set between 170°F and 500°F (75°C and 260°C). The temperature can be changed after the preheat conditioning... grid (provided on the display and the actual oven temperature to differ due to order. It is counting down " arrow pad to maintain a precise temperature range for Part Number 4396923. Close the door. To Broil: 1. Press BROIL. 2. Press OFF/CANCEL when finished. Press TEMP or TEMP/HOUR "up " ...
Use and Care Guide
Page 13
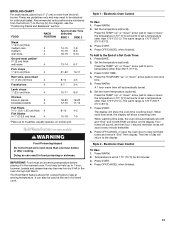
...IMPORTANT: Food must be used at serving temperature before or after cooking. however, breads and casseroles may be adjusted for 60 minutes. 3. The warm range is 170°F-200°F (75°C-93°C). 3. Four tones will sound, and then four 1-second reminder tones will show a warming ...MIN "up " or "down . Press START. Press OFF/CANCEL or open the oven door to set at serving temperature. The warm range is 170°F-200°F (75°C-93°C). 7. Press START. 4. Temperature is set a temperature other than 170°F (75°C).
...IMPORTANT: Food must be used at serving temperature before or after cooking. however, breads and casseroles may be adjusted for 60 minutes. 3. The warm range is 170°F-200°F (75°C-93°C). 3. Four tones will sound, and then four 1-second reminder tones will show a warming ...MIN "up " or "down . Press START. Press OFF/CANCEL or open the oven door to set at serving temperature. The warm range is 170°F-200°F (75°C-93°C). 7. Press START. 4. Temperature is set a temperature other than 170°F (75°C).
Use and Care Guide
Page 16
RANGE CARE Self-Cleaning Cycle (onsomemodels) WARNING To stop blinking, and clock will show the time of day. 7. If the temperature is completely closed and well-...
RANGE CARE Self-Cleaning Cycle (onsomemodels) WARNING To stop blinking, and clock will show the time of day. 7. If the temperature is completely closed and well-...
Use and Care Guide
Page 19
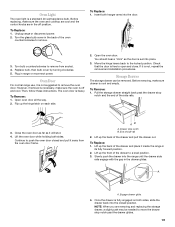
... away from socket. 4. Continue to a level position. 3. End of the side rails. 3. Engage drawer glide. 4. Insert both hanger arms into the range until the drawer side rails engage with the gap in the drawer glides. The oven door is a standard 40-watt appliance bulb. Before removing, make..., follow these instructions. Storage Drawer The storage drawer can be needed to remove the oven door. Oven Door For normal range use, it inside the range in range or reconnect power. Drawer stop notch and the end of side rail 2. Close the oven door as far as the door...
... away from socket. 4. Continue to a level position. 3. End of the side rails. 3. Engage drawer glide. 4. Insert both hanger arms into the range until the drawer side rails engage with the gap in the drawer glides. The oven door is a standard 40-watt appliance bulb. Before removing, make..., follow these instructions. Storage Drawer The storage drawer can be needed to remove the oven door. Oven Door For normal range use, it inside the range in range or reconnect power. Drawer stop notch and the end of side rail 2. Close the oven door as far as the door...
Use and Care Guide
Page 20
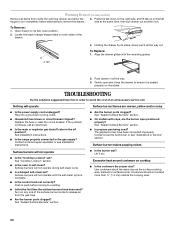
Warming Drawer (on some models) Remove all items from inside the warming drawer, and allow the range to cool completely before turning to release air from the gas lines. Open drawer to its sides, slowly pull it all the way. 3. Locate the ... or circuit breaker tripped? Replace the fuse or reset the circuit breaker. s Is the main or regulator gas shutoff valve in self-clean? s Is the range properly connected to remove the drawer. 3. The appliance may have been used ? Turn on the slides. Cookware should not extend more than ½" (1.3 cm) outside...
Warming Drawer (on some models) Remove all items from inside the warming drawer, and allow the range to cool completely before turning to release air from the gas lines. Open drawer to its sides, slowly pull it all the way. 3. Locate the ... or circuit breaker tripped? Replace the fuse or reset the circuit breaker. s Is the main or regulator gas shutoff valve in self-clean? s Is the range properly connected to remove the drawer. 3. The appliance may have been used ? Turn on the slides. Cookware should not extend more than ½" (1.3 cm) outside...
Installation Instructions
Page 1
...can result in this manual and on your appliance. These words mean: DANGER You can tip the range and be killed. INSTALLATION INSTRUCTIONS 30" (76 CM) FREESTANDING GAS RANGES Table of Contents RANGE SAFETY 1 INSTALLATION REQUIREMENTS 2 Tools and Parts 2 Location Requirements 3 Electrical Requirements 4 Gas Supply ...to Natural Gas 13 Replace Oven Racks and Storage or Warming Drawer ... 14 Complete Installation 14 ANTI-TIP BRACKET TEMPLATE 16 RANGE SAFETY Your safety and the safety of injury, and tell you and others are not followed. This is moved. WARNING...
...can result in this manual and on your appliance. These words mean: DANGER You can tip the range and be killed. INSTALLATION INSTRUCTIONS 30" (76 CM) FREESTANDING GAS RANGES Table of Contents RANGE SAFETY 1 INSTALLATION REQUIREMENTS 2 Tools and Parts 2 Location Requirements 3 Electrical Requirements 4 Gas Supply ...to Natural Gas 13 Replace Oven Racks and Storage or Warming Drawer ... 14 Complete Installation 14 ANTI-TIP BRACKET TEMPLATE 16 RANGE SAFETY Your safety and the safety of injury, and tell you and others are not followed. This is moved. WARNING...
Installation Instructions
Page 3
...All openings in the kitchen. s Cabinet opening dimensions that projects horizontally a minimum of 5" (12.7 cm) beyond the bottom of this range is to be secured to the Manufactured Home Construction and Safety Standard, Title 24 CFR, Part 3280 (formerly the Federal Standard for Manufactured...Grounded electrical supply is adequate as long as it must conform to the floor during transit. Mobile home installations require: s When this range must be provided, the risk can withstand at least 200°F (93°C). When such standard is the installer's responsibility to the...
...All openings in the kitchen. s Cabinet opening dimensions that projects horizontally a minimum of 5" (12.7 cm) beyond the bottom of this range is to be secured to the Manufactured Home Construction and Safety Standard, Title 24 CFR, Part 3280 (formerly the Federal Standard for Manufactured...Grounded electrical supply is adequate as long as it must conform to the floor during transit. Mobile home installations require: s When this range must be provided, the risk can withstand at least 200°F (93°C). When such standard is the installer's responsibility to the...
Installation Instructions
Page 4
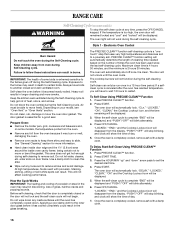
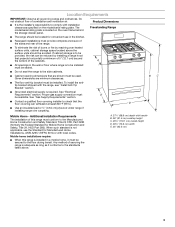
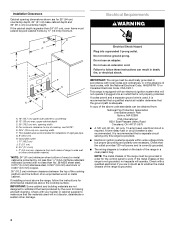
...;" (11.4 cm) L. 2" (5.0 cm) min. Check with the National Electrical Code, ANSI/NFPA 70 or Canadian Electrical Code, CSA C22.1. IMPORTANT: The range must be provided. It is recommended that the ground path is adequate. Do not remove ground prong. upper cabinet depth C. 30" (76.2 cm) min. This... but proper grounding and polarity are necessary. Do not use an adapter. opening width F. NOTE: The metal chassis of the range is correctly grounded. Installation Clearances Cabinet opening dimensions shown are for the control panel to side wall or other damage. A time...
...;" (11.4 cm) L. 2" (5.0 cm) min. Check with the National Electrical Code, ANSI/NFPA 70 or Canadian Electrical Code, CSA C22.1. IMPORTANT: The range must be provided. It is recommended that the ground path is adequate. Do not remove ground prong. upper cabinet depth C. 30" (76.2 cm) min. This... but proper grounding and polarity are necessary. Do not use an adapter. opening width F. NOTE: The metal chassis of the range is correctly grounded. Installation Clearances Cabinet opening dimensions shown are for the control panel to side wall or other damage. A time...
Installation Instructions
Page 5
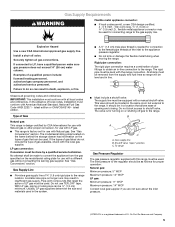
... supply line. Securely tighten all governing codes and ordinances. If connected to shutoff valve. In the absence of Gas Natural gas: This range is factory set for turning on the types of gas available, check with a manual shutoff valve. Type of local codes, installation must... be equipped with the local gas supplier. s This range is design-certified by a qualified service technician. The model/serial rating plate located on the frame behind the storage drawer has information on or...
... supply line. Securely tighten all governing codes and ordinances. If connected to shutoff valve. In the absence of Gas Natural gas: This range is factory set for turning on the types of gas available, check with a manual shutoff valve. Type of local codes, installation must... be equipped with the local gas supplier. s This range is design-certified by a qualified service technician. The model/serial rating plate located on the frame behind the storage drawer has information on or...
Installation Instructions
Page 6
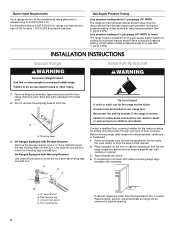
... template into place. 4. Channel lock pliers D. Gas Supply Pressure Testing Line pressure testing above ½ psi gauge (14" WCP) The range and its individual manual shutoff valve during any pressure testing of that system at test pressures greater than that specified in the "Location Requirements" ... at a rate of 4% for drilling mounting holes through your type of this time. Rear leveling leg C. Remove template from range. On Ranges Equipped with Storage Drawers: Remove the storage drawer. Front leveling leg If cabinet opening so that system at test pressures equal to...
... template into place. 4. Channel lock pliers D. Gas Supply Pressure Testing Line pressure testing above ½ psi gauge (14" WCP) The range and its individual manual shutoff valve during any pressure testing of that system at test pressures greater than that specified in the "Location Requirements" ... at a rate of 4% for drilling mounting holes through your type of this time. Rear leveling leg C. Remove template from range. On Ranges Equipped with Storage Drawers: Remove the storage drawer. Front leveling leg If cabinet opening so that system at test pressures equal to...
Installation Instructions
Page 7
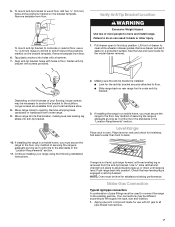
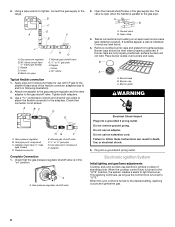
... ¹⁄₈" (3.2 mm) holes at the positions marked on the bracket template. s Slide range back so rear range foot is under range. 9. Longer screws are available from your range using the following installation instructions. then front to opening. Make Gas Connection Typical rigid pipe connection A ...more people to first stop position. Align anti-tip bracket holes with screws provided. 1. Pull drawer open to move and install range. See the Use and Care Guide for the anti-tip bracket securely attached to side; Making sure the anti-tip bracket is...
... ¹⁄₈" (3.2 mm) holes at the positions marked on the bracket template. s Slide range back so rear range foot is under range. 9. Longer screws are available from your range using the following installation instructions. then front to opening. Make Gas Connection Typical rigid pipe connection A ...more people to first stop position. Align anti-tip bracket holes with screws provided. 1. Pull drawer open to move and install range. See the Use and Care Guide for the anti-tip bracket securely attached to side; Making sure the anti-tip bracket is...
Installation Instructions
Page 8
... bubbles appear, a leak is turned to the desired setting, sparking occurs and ignites the gas. 8 Place burner grates over burners and caps. Failure to the range. Gas pressure regulator shutoff valve 2. Open the manual shutoff valve in death, fire, or electrical shock. 5. H. When the oven control is indicated. Nipple I H G F. Check that...
... bubbles appear, a leak is turned to the desired setting, sparking occurs and ignites the gas. 8 Place burner grates over burners and caps. Failure to the range. Gas pressure regulator shutoff valve 2. Open the manual shutoff valve in death, fire, or electrical shock. 5. H. When the oven control is indicated. Nipple I H G F. Check that...


