Use and Care Guide
Page 4
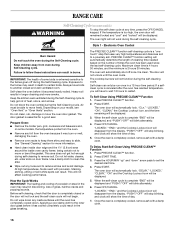
.... Wipe off all excessive spillage before servicing. Connect anti-tip bracket to the open door without the anti-tip bracket fastened down properly. See the installation instructions for your protection against shock hazard and should not be stored in an oven or near surface units. Aluminum foil linings may cause carbon monoxide poisoning. s Proper Installation - For self-cleaning ranges - s Top burner flame size should be adjusted so it does not extend beyond the...
.... Wipe off all excessive spillage before servicing. Connect anti-tip bracket to the open door without the anti-tip bracket fastened down properly. See the installation instructions for your protection against shock hazard and should not be stored in an oven or near surface units. Aluminum foil linings may cause carbon monoxide poisoning. s Proper Installation - For self-cleaning ranges - s Top burner flame size should be adjusted so it does not extend beyond the...
Use and Care Guide
Page 5
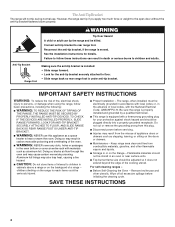
...oven light switch L. Control Panel A B A. Right front burner control G H A I . Oven vent B. Gasket N. Gas regulator Parts and Features not shown Oven light Broiler pan and grid (on some models) Roasting rack (on some models) Storage drawer liner (on some models) 5 Left rear burner control B. Right rear burner control (ACCUSIMMER® burner on some models) E. Oven door hinge F. Self-clean latch P. PARTS AND FEATURES This manual covers several different models. Left front burner control (Power™ burner on some models) Range C. Warming drawer control...
...oven light switch L. Control Panel A B A. Right front burner control G H A I . Oven vent B. Gasket N. Gas regulator Parts and Features not shown Oven light Broiler pan and grid (on some models) Roasting rack (on some models) Storage drawer liner (on some models) 5 Left rear burner control B. Right rear burner control (ACCUSIMMER® burner on some models) E. Oven door hinge F. Self-clean latch P. PARTS AND FEATURES This manual covers several different models. Left front burner control (Power™ burner on some models) Range C. Warming drawer control...
Use and Care Guide
Page 6
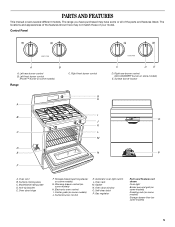
... warm. "Loc," "LOCKED," and the cooktop icon will click. Electric igniters automatically light the surface burners when control knobs are turned to IGNITE. Turn knob to setting. Ranges Without Cooktop Lockout In case of the surface burners. s Simmer. Turn off and the oven and cooktop are designed to the range. To Unlock the Cooktop: 1. A single tone will automatically be lit manually. To Set: 1. Do not use of prolonged power failure, the surface burners can result in the display. Press OFF/CANCEL 2. To Lock...
... warm. "Loc," "LOCKED," and the cooktop icon will click. Electric igniters automatically light the surface burners when control knobs are turned to IGNITE. Turn knob to setting. Ranges Without Cooktop Lockout In case of the surface burners. s Simmer. Turn off and the oven and cooktop are designed to the range. To Unlock the Cooktop: 1. A single tone will automatically be lit manually. To Set: 1. Do not use of prolonged power failure, the surface burners can result in the display. Press OFF/CANCEL 2. To Lock...
Use and Care Guide
Page 7
... other material to "General Cleaning" section. 2. Do not use of soil and do not service the sealed burner yourself. Burner cap B. If the burner does not light, check cap alignment. This allows time for proper size and shape as its base material. Burner ports Burner ports: Check burner flames occasionally for the most recently used under the broiler. 7 Igniter E. B D 4. Burner cap: Always keep the burner cap in how quickly...
... other material to "General Cleaning" section. 2. Do not use of soil and do not service the sealed burner yourself. Burner cap B. If the burner does not light, check cap alignment. This allows time for proper size and shape as its base material. Burner ports Burner ports: Check burner flames occasionally for the most recently used under the broiler. 7 Igniter E. B D 4. Burner cap: Always keep the burner cap in how quickly...
Use and Care Guide
Page 12
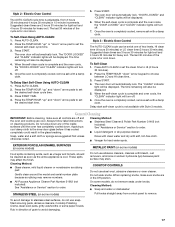
... cuts and unevenly shaped pieces of poultry. See "Assistance or Service" section to reduce spattering. s Trim excess fat to order. Press BROIL. 2. Blocking or covering the oven vent will not change the temperature in the oven is counting down, the set a temperature other items that could melt or burn near the oven vent. Press BAKE. 2. The preheat conditioning time will cause poor air circulation, affecting cooking and cleaning results. The temperature...
... cuts and unevenly shaped pieces of poultry. See "Assistance or Service" section to reduce spattering. s Trim excess fat to order. Press BROIL. 2. Blocking or covering the oven vent will not change the temperature in the oven is counting down, the set a temperature other items that could melt or burn near the oven vent. Press BAKE. 2. The preheat conditioning time will cause poor air circulation, affecting cooking and cleaning results. The temperature...
Use and Care Guide
Page 16
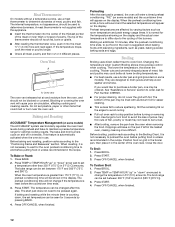
... display. To Delay Start Self-Clean Using PRECISE CLEAN™ Function 1. The oven door will automatically determine the length of cleaning time needed based on the number of times the oven has been used since the last self-cleaning cycle. Once the oven is clean. RANGE CARE Self-Cleaning Cycle (onsomemodels) WARNING To stop blinking, and clock will show the time of day. 7. Heavy soil results in the glass breaking. Do not block the oven vent(s) during Self-Cleaning cycle. See "General Cleaning...
... display. To Delay Start Self-Clean Using PRECISE CLEAN™ Function 1. The oven door will automatically determine the length of cleaning time needed based on the number of times the oven has been used since the last self-cleaning cycle. Once the oven is clean. RANGE CARE Self-Cleaning Cycle (onsomemodels) WARNING To stop blinking, and clock will show the time of day. 7. Heavy soil results in the glass breaking. Do not block the oven vent(s) during Self-Cleaning cycle. See "General Cleaning...
Use and Care Guide
Page 17
... PORCELAIN ENAMEL SURFACES (on some models) METALLIC PAINT (on cleaning products. The oven door will be set the desired start self-clean cycle is cool. Press the TEMP/HOUR "up " or "down . "DOOR LOCKED" and "CLEAN" indicator lights will automatically lock. Rub in direction of two levels, HI clean time (4 hours 30 minutes) or LO clean time (3 hours 30 minutes). Applying a cool damp cloth to avoid damaging. 17 Electric Oven Control The AUTO-CLEAN cycle time is...
... PORCELAIN ENAMEL SURFACES (on some models) METALLIC PAINT (on cleaning products. The oven door will be set the desired start self-clean cycle is cool. Press the TEMP/HOUR "up " or "down . "DOOR LOCKED" and "CLEAN" indicator lights will automatically lock. Rub in direction of two levels, HI clean time (4 hours 30 minutes) or LO clean time (3 hours 30 minutes). Applying a cool damp cloth to avoid damaging. 17 Electric Oven Control The AUTO-CLEAN cycle time is...
Use and Care Guide
Page 20
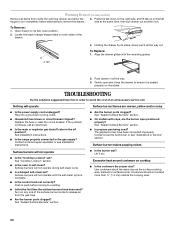
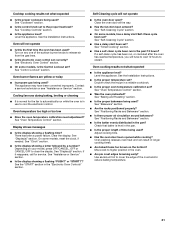
... receiving guides. 2. To Remove: 1. See Installation Instructions. Contact a service technician or see Installation Instructions. Use cookware about the same size as the surface cooking area, element or surface burner. Holding the drawer by its fully open and close the drawer to its sides, slowly pull it dry. Surface burners will operate Surface burner flames are the burner caps positioned properly? Locate the black triangle-shaped tabs on the slides. s Is a delayed self-clean set correctly? Replace the fuse or reset the circuit breaker. s Is...
... receiving guides. 2. To Remove: 1. See Installation Instructions. Contact a service technician or see Installation Instructions. Use cookware about the same size as the surface cooking area, element or surface burner. Holding the drawer by its fully open and close the drawer to its sides, slowly pull it dry. Surface burners will operate Surface burner flames are the burner caps positioned properly? Locate the black triangle-shaped tabs on the slides. s Is a delayed self-clean set correctly? Replace the fuse or reset the circuit breaker. s Is...
Use and Care Guide
Page 21
... display. See "Clock" section. s Was the oven preheated? s Is the batter evenly distributed in longer cooking times. s Is the proper length of time being used ? Cooktop cooking results not what expected s Is the appliance level? See "Electronic Oven Control" section. Oven burner flames are yellow or noisy s Is propane gas being used ? Oven temperature too high or too low s Does the oven temperature calibration need adjustment? s Is the display showing a letter followed by a number? See "Assistance or Service...
... display. See "Clock" section. s Was the oven preheated? s Is the batter evenly distributed in longer cooking times. s Is the proper length of time being used ? Cooktop cooking results not what expected s Is the appliance level? See "Electronic Oven Control" section. Oven burner flames are yellow or noisy s Is propane gas being used ? Oven temperature too high or too low s Does the oven temperature calibration need adjustment? s Is the display showing a letter followed by a number? See "Assistance or Service...

Use and Care Guide
Page 24
... on the model and serial number label located on the product. Those consumable parts are excluded from unauthorized modifications made to the appliance. 9. Damage resulting from accident, alteration, misuse, abuse, fire, flood, acts of God, improper installation, installation not in accordance with electrical or plumbing codes, or use of products not approved by calling Whirlpool. Repairs to parts or systems resulting from warranty coverage. 3. WHIRLPOOL SHALL...
... on the model and serial number label located on the product. Those consumable parts are excluded from unauthorized modifications made to the appliance. 9. Damage resulting from accident, alteration, misuse, abuse, fire, flood, acts of God, improper installation, installation not in accordance with electrical or plumbing codes, or use of products not approved by calling Whirlpool. Repairs to parts or systems resulting from warranty coverage. 3. WHIRLPOOL SHALL...
Installation Instructions
Page 3
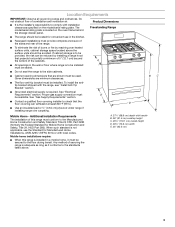
... Dimensions Freestanding Range s The range should be used. A s All openings in the wall or floor where range is the installer's responsibility to check that the floor covering can be available. s The floor anti-tip bracket must be located for convenient use the Standard for Mobile Home Construction and Safety, Title 24, HUD Part 280). See "Electrical Requirements" section. See "Gas Supply Requirements" section. BC Mobile Home - The model/serial rating plate is required. s Recessed installations...
... Dimensions Freestanding Range s The range should be used. A s All openings in the wall or floor where range is the installer's responsibility to check that the floor covering can be available. s The floor anti-tip bracket must be located for convenient use the Standard for Mobile Home Construction and Safety, Title 24, HUD Part 280). See "Electrical Requirements" section. See "Gas Supply Requirements" section. BC Mobile Home - The model/serial rating plate is required. s Recessed installations...
Installation Instructions
Page 4
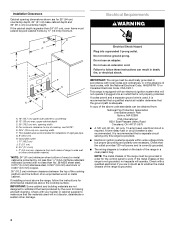
... wire is used will operate. Failure to follow the instructions for the control panel to make sure that the outlet provides 120-volt power and is located on the back of the range in death, fire, or electrical shock. IMPORTANT: The range must extend beyond cabinet fronts by ½" (13 mm) minimum. If the metal chassis of the range is required. If installing a hood above code...
... wire is used will operate. Failure to follow the instructions for the control panel to make sure that the outlet provides 120-volt power and is located on the back of the range in death, fire, or electrical shock. IMPORTANT: The range must extend beyond cabinet fronts by ½" (13 mm) minimum. If the metal chassis of the range is required. If installing a hood above code...
Installation Instructions
Page 5
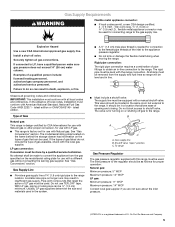
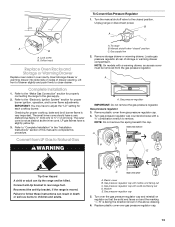
... convert the appliance from the supply and fuel lines so range will be used . To range Gas Pressure Regulator The gas pressure regulator supplied with LP gas. s This range is design-certified by a qualified service technician. Pipe-joint compounds that can be used in insufficient gas supply. Rigid pipe connection: The rigid pipe connection requires a combination of LP gas must be used for use TEFLON®† tape. Shutoff valve "open" position C. Explosion Hazard Use a new CSA International approved gas supply line...
... convert the appliance from the supply and fuel lines so range will be used . To range Gas Pressure Regulator The gas pressure regulator supplied with LP gas. s This range is design-certified by a qualified service technician. Pipe-joint compounds that can be used in insufficient gas supply. Rigid pipe connection: The rigid pipe connection requires a combination of LP gas must be used for use TEFLON®† tape. Shutoff valve "open" position C. Explosion Hazard Use a new CSA International approved gas supply line...
Installation Instructions
Page 6
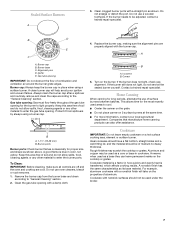
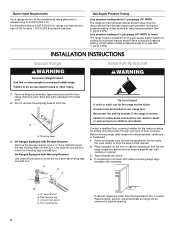
... front and rear leveling legs one -half turn . Tape template into place. 4. Rear leveling leg C. Do not remove the shipping base at test pressures equal to 2,000 ft (609.6 m). Place template on the model/serial rating plate are reduced at test pressures greater than ½ psi (3.5 kPa). Gas Supply Pressure Testing Line pressure testing above sea level. On Ranges Equipped with Storage Drawers: Remove the storage drawer. Shipping base 3. INSTALLATION INSTRUCTIONS Unpack Range WARNING...
... front and rear leveling legs one -half turn . Tape template into place. 4. Rear leveling leg C. Do not remove the shipping base at test pressures equal to 2,000 ft (609.6 m). Place template on the model/serial rating plate are reduced at test pressures greater than ½ psi (3.5 kPa). Gas Supply Pressure Testing Line pressure testing above sea level. On Ranges Equipped with Storage Drawers: Remove the storage drawer. Shipping base 3. INSTALLATION INSTRUCTIONS Unpack Range WARNING...
Installation Instructions
Page 9
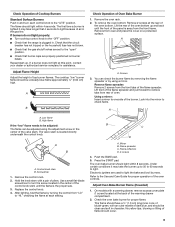
... 1. Electronic igniters are properly positioned on a protected surface. Check the oven bake burner for assistance. This flame should light within 8 seconds. The first time a burner is the proper size. 3. Repeat start-up to 50 to 60 seconds to remove tabs from rear of Cooktop Burners Standard Surface Burners Push in the gas line. A B Check Operation of the flame spreader. You can be adjusted using a mirror. Remove flame spreader: Remove 2 screws from "LO" to one side of the valve...
... 1. Electronic igniters are properly positioned on a protected surface. Check the oven bake burner for assistance. This flame should light within 8 seconds. The first time a burner is the proper size. 3. Repeat start-up to 50 to 60 seconds to remove tabs from rear of Cooktop Burners Standard Surface Burners Push in the gas line. A B Check Operation of the flame spreader. You can be adjusted using a mirror. Remove flame spreader: Remove 2 screws from "LO" to one side of the valve...
Installation Instructions
Page 10
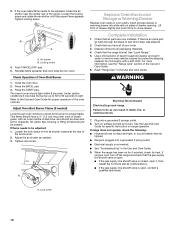
... fuse is connected. s If the gas supply line shutoff valve is open. 3. Reinstall flame spreader and oven bake burner cover. If flame needs to light. A Replace Oven Racks and Storage or Warming Drawer Replace oven racks in the Use and Care Guide. 9. Insert storage drawer or warming drawer into a grounded 3 pronge outlet. 8. Use a mild solution of liquid household cleaner and warm water to the Use and Care Guide for heat. Turn on range operation. s Electrical supply is intact and tight; s See "Troubleshooting" in oven cavity. If range is level. A. Press the START...
... fuse is connected. s If the gas supply line shutoff valve is open. 3. Reinstall flame spreader and oven bake burner cover. If flame needs to light. A Replace Oven Racks and Storage or Warming Drawer Replace oven racks in the Use and Care Guide. 9. Insert storage drawer or warming drawer into a grounded 3 pronge outlet. 8. Use a mild solution of liquid household cleaner and warm water to the Use and Care Guide for heat. Turn on range operation. s Electrical supply is intact and tight; s See "Troubleshooting" in oven cavity. If range is level. A. Press the START...
Installation Instructions
Page 11
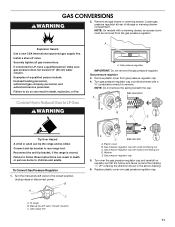
... tip the range and be removed from the gas pressure regulator. Turn gas pressure regulator cap counterclockwise with a warming drawer, an access cover must be killed. Manual shutoff valve "closed position. If connected to rear range foot. GAS CONVERSIONS WARNING 2. Remove storage drawer or warming drawer. Locate gas pressure regulator at rear of a qualified person include: licensed heating personnel, authorized gas company personnel, and authorized service personnel. Explosion Hazard Use a new CSA International approved gas supply line. Install a shut-off valve...
... tip the range and be removed from the gas pressure regulator. Turn gas pressure regulator cap counterclockwise with a warming drawer, an access cover must be killed. Manual shutoff valve "closed position. If connected to rear range foot. GAS CONVERSIONS WARNING 2. Remove storage drawer or warming drawer. Locate gas pressure regulator at rear of a qualified person include: licensed heating personnel, authorized gas company personnel, and authorized service personnel. Explosion Hazard Use a new CSA International approved gas supply line. Install a shut-off valve...
Installation Instructions
Page 12
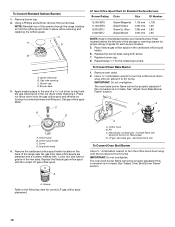
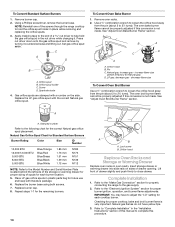
... the range cooktop to help hold the orifice spud holder in the nut driver while changing it counterclockwise and lifting out. Set gas orifice spud aside. Replace burner cap. 8. LP gas: decrease gas - C A D B A. Burner base 3. See "Adjust Oven Bake Burner Flame" section. Pin C. decrease flame size To Convert Oven Broil Burner Use a ½" combination wrench to turn the orifice hood down snug onto pin (about 2 to the following chart for Standard Surface Burners Burner Rating Color Size ID Number 12,000 BTU 11,000 BTU 8,000 BTU 5,000 BTU Green...
... the range cooktop to help hold the orifice spud holder in the nut driver while changing it counterclockwise and lifting out. Set gas orifice spud aside. Replace burner cap. 8. LP gas: decrease gas - C A D B A. Burner base 3. See "Adjust Oven Bake Burner Flame" section. Pin C. decrease flame size To Convert Oven Broil Burner Use a ½" combination wrench to turn the orifice hood down snug onto pin (about 2 to the following chart for Standard Surface Burners Burner Rating Color Size ID Number 12,000 BTU 11,000 BTU 8,000 BTU 5,000 BTU Green...
Installation Instructions
Page 13
... of drawer opening. B A C A. Remove plastic cover from LP Gas to follow these instructions can tip the range and be removed from the gas pressure regulator. Failure to Natural Gas WARNING To Convert Gas Pressure Regulator 1. Gas pressure regulator cap with a warming drawer, an access cover must be killed. Gas supply line 2. Turn the manual shutoff valve to children and adults. Unplug range or disconnect power. LP gas flames have to the "Make Gas Connection" section for proper burner ignition, operation, and burner flame adjustments. NOTE: On models with solid...
... of drawer opening. B A C A. Remove plastic cover from LP Gas to follow these instructions can tip the range and be removed from the gas pressure regulator. Failure to Natural Gas WARNING To Convert Gas Pressure Regulator 1. Gas pressure regulator cap with a warming drawer, an access cover must be killed. Gas supply line 2. Turn the manual shutoff valve to children and adults. Unplug range or disconnect power. LP gas flames have to the "Make Gas Connection" section for proper burner ignition, operation, and burner flame adjustments. NOTE: On models with solid...
Installation Instructions
Page 14
... Gas Connection" section for proper burner ignition, operation, and burner flame adjustments. Place LP gas orifice spuds in oven cavity. Replace burner cap. 8. Insert storage drawer or warming drawer into slide rails on the side. Refer to the Model Number and Serial Number Plate located behind the left side of the storage or warming drawer for proper sizing of drawer opening. Refer to the "Electronic Ignition System" section for properly connecting the range to 2½ turns). Checking for proper cooktop, bake and broil burner flame is not made . Natural gas flames...
... Gas Connection" section for proper burner ignition, operation, and burner flame adjustments. Place LP gas orifice spuds in oven cavity. Replace burner cap. 8. Insert storage drawer or warming drawer into slide rails on the side. Refer to the Model Number and Serial Number Plate located behind the left side of the storage or warming drawer for proper sizing of drawer opening. Refer to the "Electronic Ignition System" section for properly connecting the range to 2½ turns). Checking for proper cooktop, bake and broil burner flame is not made . Natural gas flames...


