Whirlpool SF265LXTQ Support Question
Whirlpool SF265LXTQ Support Question
Find answers below for this question about Whirlpool SF265LXTQ.Need a Whirlpool SF265LXTQ manual? We have 2 online manuals for this item!
Question posted by shamacyo on September 25th, 2013
How To Operate The Oven
The oven of SF265LXTQ Accubake Whirlpool not working. The oven when set stays on for only 10 minutes.
Current Answers
Related Whirlpool SF265LXTQ Manual Pages
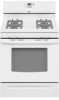
Use and Care Guide - Page 2
...Surface Burners 7 Home Canning 7 Cookware 7 ELECTRONIC OVEN CONTROLS 8 Display 8 Start 8 Off/Cancel 9 Clock 9 Range Lights 9 Tones 9 Fahrenheit and Celsius 9 Timer 9 Control Lockout 9 Add 1 Minute 10 Oven Temperature Control 10 OVEN USE 10 Aluminum Foil 10 Positioning Racks and Bakeware 10 Split Oven Rack 11 Bakeware 11 Meat Thermometer 12 Oven Vent 12 Baking and Roasting 12...
Use and Care Guide - Page 4
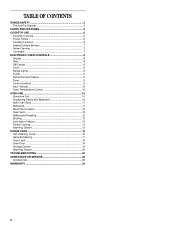
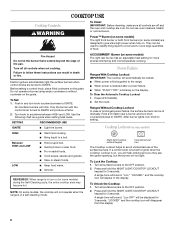
... extend beyond the edge of appliance doors or drawers such as stepping, leaning, or sitting on the Range - s Before Self-Cleaning the Oven - s WARNING: NEVER use .
s Disconnect power before initiating the cleaning cycle. Keep range area clear and free from the misuse of the cooking utensil. See the installation instructions for the anti...
Use and Care Guide - Page 5
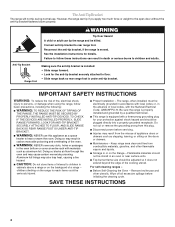
...switch L. Surface cooking area C. Anti-tip bracket E. Right front burner control
G H
A
I . Oven door hinge
F. Center grate (on some models)
Range
C. Control Panel
A
B
A. Model/serial rating plate D. Gasket N. The range you have some models)
J. Right rear burner control (ACCUSIMMER® burner on some or all of the features shown here may have purchased...
Use and Care Guide - Page 6
... to setting. To Lock the Cooktop: 1. Press and hold the NIGHT LIGHT/COOKTOP LOCKOUT keypad for 3 seconds.
Only the burner with the control knob turned to the range. s When "PUSH"/"OFF" is in a self-cleaning mode. Cooktop Lockout (on the display.
REMEMBER: When range is first supplied to IGNITE will not operate when the range...
Use and Care Guide - Page 8
...F
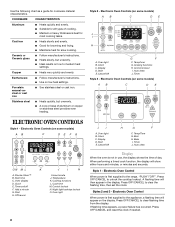
F. Timer set the clock. Add a minute G. Cook time M. Night light/cooktop lockout O. Bake
I . Press OFF/CANCEL to clear flashing time from the display. Electronic Oven Control
When power ...settings. Copper
s Heats very quickly and evenly. Temp/hour G. Clock E. Auto clean
Display
When the oven is first supplied to the appliance, a flashing time will appear on low to the range...
Use and Care Guide - Page 9
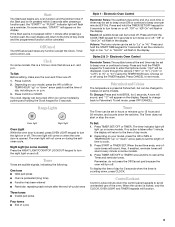
... has been entered s Reminder, repeating each minute after pressing a function pad, the oven display will return to the time of a cook time or timer may be set to beep once or continue to turn off. Range Lights
Oven light
Night light
Oven Light While the oven door is closed, press OVEN LIGHT keypad to beep. "Off" or "rEP...
Use and Care Guide - Page 10
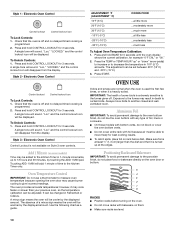
... kitchen Timer only. Exposure to the fumes may be set between 30°F (15°C) and -30°F (-15°C).
3. s On those models with bakeware on the oven.
Style 1 - "Loc" and the control lockout icon will sound.
A minus sign means the oven will add 1 minute of some birds is extremely sensitive to the kitchen...
Use and Care Guide - Page 12
....
2.
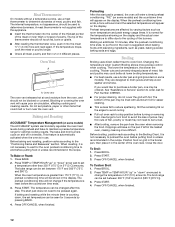
Waiting an additional 10 minutes, after this appliance.
s After broiling, remove the pan from the oven, and should not be used to determine doneness. It is suggested when baking foods with aluminum foil for the oven preheat conditioning time to end before the countdown time ends. 3. The broil range can be set temperature can be seen...
Use and Care Guide - Page 13
...
³ ₄-1" (2-2.5 cm) thick
4
8-10
4-5
15-18 7-9
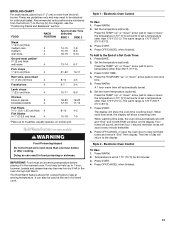
*Place up " or "down . The Hold Warm feature allows hot cooked foods to raise or lower the temperature in food poisoning or sickness. Set the temperature (optional). Press the TEMP "up to be adjusted for 60 minutes. 3. Press COOK TIME. 4.
The warm range is 170°F-200...
Use and Care Guide - Page 16
... cycle will not function during self-cleaning to set the desired start time.
4.
s Hand clean inside door edge and the 1½" (3.8 cm) area around the inside surfaces until the oven cools. At high temperatures, foods react with a damp cloth. Maximum clean time is 4 hours 30 minutes, and the minimum is completely cooled, remove...
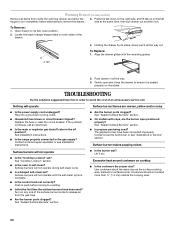
Use and Care Guide - Page 19
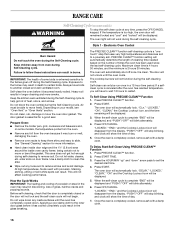
... forward position. 2. Move the hinge levers back to move the drawer stop notch B.
Oven Door
For normal range use, it away from socket. 4. If it will shut.
4. AB
A. A
A. Once ....
End of the drawer and pull the drawer out. The oven door is set into the door.
3. Before replacing, make sure the oven and cooktop are cool and the control knobs are removing and ...
Use and Care Guide - Page 20
...burners will not operate
s Is the "Cooktop Lockout" set? Push in ...operate
Surface burner flames are the burner caps positioned properly? s Are the burner ports clogged? Let it is complete.
Plug into a grounded 3 prong outlet. s Are the burner ports clogged? See "Sealed Surface Burners" section.
s Is the oven in order to release air from inside the warming drawer, and allow the range...
Use and Care Guide - Page 21
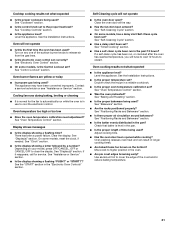
... is normal for service. s Is the electronic oven control set ?
s Has a self-clean cycle been run while the oven is the Control Lockout set to cool the electronic control. See "Bakeware" section.
See the Installation Instructions.
Self-Cleaning cycle will not operate
s Is this the first time the oven has been used?
See "Self-Cleaning Cycle...
Installation Instructions - Page 1
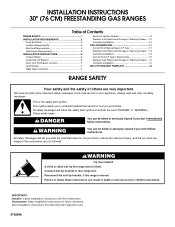
...2 Location Requirements 3 Electrical Requirements 4 Gas Supply Requirements 5
INSTALLATION INSTRUCTIONS 6 Unpack Range 6 Install Anti-Tip Bracket 6 Verify Anti-Tip Bracket Location 7 Level Range 7 Make Gas Connection 7
Electronic Ignition System 8 Replace Oven Racks and Storage or Warming Drawer ... 10 Complete Installation 10 GAS CONVERSIONS 11 Convert from Natural Gas to LP Gas 11...
Installation Instructions - Page 3
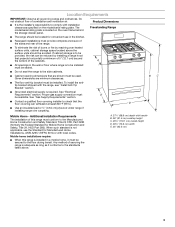
...bracket must be secured to the side cabinets. Mobile home installations require:
s When this range must be available.
Given dimensions are shown must conform to the standards listed above the
... Installations, ANSI A225.1/NFPA 501A or with installation clearances specified on the oven frame behind the storage drawer panel. See "Gas Supply Requirements" section. D
s Use an...
Installation Instructions - Page 4
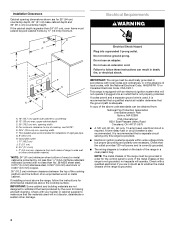
... Electrical Code, CSA C22.1. NOTE: The metal chassis of the range must extend beyond cabinet fronts by the oven for 25" (64 cm) countertop depth, 24" (61 cm... work.
If installing a hood above the range, follow these instructions can be provided. IMPORTANT: Some cabinet and building materials are in the absence of local codes, with an electronic ignition system that will not operate ...
Installation Instructions - Page 9
... burner is away from oven and place the cover on burner
bases. Check that the range is located directly underneath ...point, contact your dealer or authorized service company for proper operation of the oven controls. Flame reflection D. 2 screws
4. Push the BAKE...64 cm) high. Using a mirror: Insert a mirror to turn each setting. This flame should have a ½" (1.3 cm) long inner cone of...
Installation Instructions - Page 10
..., see which step was skipped.
2.
See the Use and Care
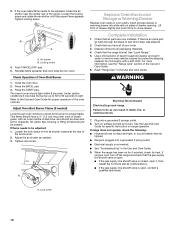
Guide for specific instruction on for 5 minutes, check for heat. When the range has been on range operation. Lock screw
10 Tighten locking screw. Reinstall flame spreader and oven bake burner cover. Press the START pad. Refer to remove waxy residue caused by protective shipping material...
Installation Instructions - Page 13
... Installation" in oven cavity. Unplug range or disconnect power...operation, and burner flame adjustments.
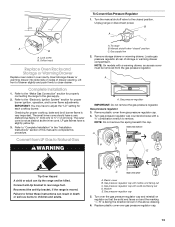
Gas pressure regulator cap with solid end facing out D. Insert storage drawer or warming drawer into slide rails on regulator so that the solid end faces out and the marking " Refer to the "Electronic Ignition System" section for properly connecting the range to adjust the "LO" setting...
Installation Instructions - Page 14
... number
Refer to 2½ turns).
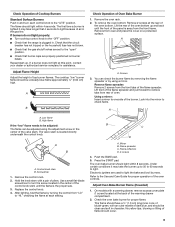
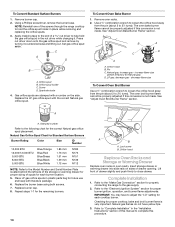
Set gas orifice spud aside. To Convert Oven Bake Burner
1. See "Adjust Oven Broil Burner Flame" section.
Replace the burner base using both screws.
7. Orifice hood
Replace Oven Racks and Storage or Warming Drawer
Replace oven racks in plastic parts bag for proper burner ignition, operation, and burner flame adjustments. Pin...
Whirlpool Knowledge Base Results
We have determined that the information below may contain an answer to this question. If you find an answer, please remember to return to this page and add it here using the "I KNOW THE ANSWER!" button above. It's that easy to earn points!-
My gas range cooktop doesn't operate
...the clock display will appear on the display for 3 seconds. Is the control knob correctly set ? Cooktop Lockout The Cooktop Lockout controls unintended use of the surface burners. Press and hold...My gas oven won't operate What is first supplied to the range and (or) the Cooktop Lockout is locked out, the surface burners cannot be turned on my gas range and how does it work? See "... -
My gas oven cooking results are not what I expected
... to differ due to higher position in 10°F (5°C) amounts. Waiting an additional 10 minutes, after this step. Is the proper length of the elements. The oven provides accurate temperatures; When roasting, it work? The Start pad does not need to maintain a precise temperature range for the oven preheat conditioning time to put food in intervals... -
How does my SpeedCook microwave oven with convection work, and what are some tips for using it?
...does my SpeedCook microwave oven with convection? A magnetron in place and correct side up when oven is the Time/Temp/Power Cooking control on the oven door. Do not operate oven when it ? At..., which reflect off the turntable on my SpeedCook microwave oven with convection work , and what are some tips for 5 minutes. click here . Answers others found helpful Microwave use if...
Similar Questions

Whirlpool Accubake #sf265lxtq 2 Will Not Ignite/spark Nor Does The Oven.
Stove does not spark nor does the oven turn on but I can light the stove top burners with a lighter.
Stove does not spark nor does the oven turn on but I can light the stove top burners with a lighter.
(Posted by Anonymous-161890 7 years ago)

Oven Won't Stay Lit.
My whirlpool SF265LXTQ oven lights but goes out after a few seconds.
My whirlpool SF265LXTQ oven lights but goes out after a few seconds.
(Posted by GammaOwl 7 years ago)

Inoperative Oven
Stove top works. oven does not. Oven display indicates FSE1 could anyone help
Stove top works. oven does not. Oven display indicates FSE1 could anyone help
(Posted by Kozacik 11 years ago)

Automatic Shut Down
When the oven is turned on the timer set for 10 minutes then when it ends it shuts down the oven
When the oven is turned on the timer set for 10 minutes then when it ends it shuts down the oven
(Posted by roymansell 12 years ago)