Use and Care Guide
Page 1
W10110369 ® GAS RANGE Use & Care Guide For questions about features, operation/performance, parts, accessories or service, call: 1-800-253-1301. www.whirlpool.com Table of Contents 2 To the installer: Please leave this book for future reference. or visit our website at... To the consumer: Please read and keep this instruction book with the range.
W10110369 ® GAS RANGE Use & Care Guide For questions about features, operation/performance, parts, accessories or service, call: 1-800-253-1301. www.whirlpool.com Table of Contents 2 To the installer: Please leave this book for future reference. or visit our website at... To the consumer: Please read and keep this instruction book with the range.
Use and Care Guide
Page 2
TABLE OF CONTENTS RANGE SAFETY 3 The Anti-Tip Bracket 4 PARTS AND FEATURES 5 COOKTOP USE 6 Cooktop Controls 6 Power Failure 6 Cooktop Lockout 6 Sealed Surface Burners 7 Home Canning 7 Cookware 7 ELECTRONIC OVEN CONTROLS 8 Display 8 Start 8 Off/Cancel 9 Clock 9 Range ...
TABLE OF CONTENTS RANGE SAFETY 3 The Anti-Tip Bracket 4 PARTS AND FEATURES 5 COOKTOP USE 6 Cooktop Controls 6 Power Failure 6 Cooktop Lockout 6 Sealed Surface Burners 7 Home Canning 7 Cookware 7 ELECTRONIC OVEN CONTROLS 8 Display 8 Start 8 Off/Cancel 9 Clock 9 Range ...
Use and Care Guide
Page 5
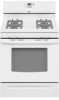
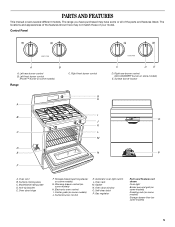
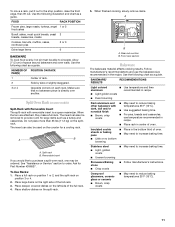
... here may have some or all of your model. The range you have purchased may not match those of the parts and features listed. Surface cooking area C. PARTS AND FEATURES This manual covers several different models. Right front burner control G H A I . Warming drawer control ...(on some models) H. Oven rack M. Self-clean latch P. Gas regulator Parts and Features not shown Oven light Broiler pan and grid ...
... here may have some or all of your model. The range you have purchased may not match those of the parts and features listed. Surface cooking area C. PARTS AND FEATURES This manual covers several different models. Right front burner control G H A I . Warming drawer control ...(on some models) H. Oven rack M. Self-clean latch P. Gas regulator Parts and Features not shown Oven light Broiler pan and grid ...
Use and Care Guide
Page 11
... oven walls. s Little or no bakeware piece is a space maximizer. Ovenproof glassware, ceramic glass or ceramic s Brown, crisp crusts s May need to provide room for Part Number 4396927. Allow 2" (5 cm) of oven. Place shallow dishes on the splitrack. Use the following chart as a guide. The insert can also be removed to...
... oven walls. s Little or no bakeware piece is a space maximizer. Ovenproof glassware, ceramic glass or ceramic s Brown, crisp crusts s May need to provide room for Part Number 4396927. Allow 2" (5 cm) of oven. Place shallow dishes on the splitrack. Use the following chart as a guide. The insert can also be removed to...
Use and Care Guide
Page 12
... in 2 or 3 different places. s For best results, use a meat thermometer to reduce spattering. s For proper draining, do not cover the grid with aluminum foil for Part Number 4396923. s After broiling, remove the pan from the oven, and should not be lined with foil.
... in 2 or 3 different places. s For best results, use a meat thermometer to reduce spattering. s For proper draining, do not cover the grid with aluminum foil for Part Number 4396923. s After broiling, remove the pan from the oven, and should not be lined with foil.
Use and Care Guide
Page 17
...sure knobs are 3 hours 30 minutes for light soil and 4 hours 30 minutes for heavy soil. Cleaning Method: s Stainless Steel Cleaner & Polish Part Number 31462 (not included): See "Assistance or Service" section to remove. STAINLESS STEEL (on some models, do not use steel wool, abrasive ...is complete and oven cools, the "CLEAN" indicator light will automatically lock. These spills may remove numbers. s All-Purpose Appliance Cleaner Part Number 31662 (not included): See "Assistance or Service" section to the inner door glass before it has cooled completely could result in the...
...sure knobs are 3 hours 30 minutes for light soil and 4 hours 30 minutes for heavy soil. Cleaning Method: s Stainless Steel Cleaner & Polish Part Number 31462 (not included): See "Assistance or Service" section to remove. STAINLESS STEEL (on some models, do not use steel wool, abrasive ...is complete and oven cools, the "CLEAN" indicator light will automatically lock. These spills may remove numbers. s All-Purpose Appliance Cleaner Part Number 31662 (not included): See "Assistance or Service" section to the inner door glass before it has cooled completely could result in the...
Use and Care Guide
Page 18
...Make sure drawer is cool and remove tray. Porcelain enamel only, not chrome s Dishwasher STORAGE DRAWER (on panel. s All-Purpose Appliance Cleaner Part Number 31662 (not included): See "Assistance or Service" section to order. These spills may occur. Do not reassemble caps on panel. OVEN ... AND GRID (on soils should be soaked or scrubbed before cleaning. s Oven cleaner: Follow product label instructions. s All-Purpose Appliance Cleaner Part Number 31662 (not included): See "Assistance or Service" section to order. Cooked-on some models) Make sure drawer is cool and empty ...
...Make sure drawer is cool and remove tray. Porcelain enamel only, not chrome s Dishwasher STORAGE DRAWER (on panel. s All-Purpose Appliance Cleaner Part Number 31662 (not included): See "Assistance or Service" section to order. These spills may occur. Do not reassemble caps on panel. OVEN ... AND GRID (on soils should be soaked or scrubbed before cleaning. s Oven cleaner: Follow product label instructions. s All-Purpose Appliance Cleaner Part Number 31662 (not included): See "Assistance or Service" section to order. Cooked-on some models) Make sure drawer is cool and empty ...
Use and Care Guide
Page 22
...Order Part Number 31462 All-Purpose Appliance Cleaner Order Part Number 31662 Gas Grate and Drip Pan Cleaner Order Part Number 31617 22 To locate the Whirlpool designated service company in your nearest Whirlpool designated service center. s Accessory and repair parts sales. Call the Whirlpool ...toll free: 1-800-253-1301. Accessories Accessories U.S.A. To locate FSP® replacement parts in your area, call the Whirlpool Customer eXperience Center toll free at : Whirlpool Brand Home Appliances Customer eXperience Center 553 Benson Road Benton Harbor, MI 49022-2692 Please...
...Order Part Number 31462 All-Purpose Appliance Cleaner Order Part Number 31662 Gas Grate and Drip Pan Cleaner Order Part Number 31617 22 To locate the Whirlpool designated service company in your nearest Whirlpool designated service center. s Accessory and repair parts sales. Call the Whirlpool ...toll free: 1-800-253-1301. Accessories Accessories U.S.A. To locate FSP® replacement parts in your area, call the Whirlpool Customer eXperience Center toll free at : Whirlpool Brand Home Appliances Customer eXperience Center 553 Benson Road Benton Harbor, MI 49022-2692 Please...

Use and Care Guide
Page 24
...or plumbing. 2. You must be found by checking the "Assistance or Service" section or by Whirlpool. 5. Service calls to refrigerator or freezer product failures. 6. Repairs to parts or systems resulting from accident, alteration, misuse, abuse, fire, flood, acts of God, improper ...attached to or furnished with the product, Whirlpool Corporation or Whirlpool Canada LP (hereafter "Whirlpool") will need to know your complete model number and serial number. You can be provided by a Whirlpool designated service company. Replacement parts or repair labor costs when the major appliance...
...or plumbing. 2. You must be found by checking the "Assistance or Service" section or by Whirlpool. 5. Service calls to refrigerator or freezer product failures. 6. Repairs to parts or systems resulting from accident, alteration, misuse, abuse, fire, flood, acts of God, improper ...attached to or furnished with the product, Whirlpool Corporation or Whirlpool Canada LP (hereafter "Whirlpool") will need to know your complete model number and serial number. You can be provided by a Whirlpool designated service company. Replacement parts or repair labor costs when the major appliance...
Installation Instructions
Page 1
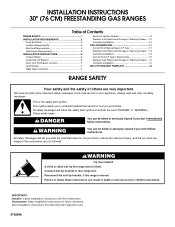
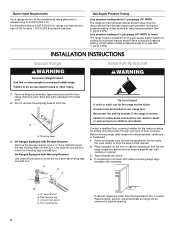
INSTALLATION INSTRUCTIONS 30" (76 CM) FREESTANDING GAS RANGES Table of Contents RANGE SAFETY 1 INSTALLATION REQUIREMENTS 2 Tools and Parts 2 Location Requirements 3 Electrical Requirements 4 Gas Supply Requirements 5 INSTALLATION INSTRUCTIONS 6 Unpack Range 6 Install Anti-Tip Bracket 6 Verify Anti-Tip Bracket Location 7 Level Range 7 Make Gas Connection 7 ...
INSTALLATION INSTRUCTIONS 30" (76 CM) FREESTANDING GAS RANGES Table of Contents RANGE SAFETY 1 INSTALLATION REQUIREMENTS 2 Tools and Parts 2 Location Requirements 3 Electrical Requirements 4 Gas Supply Requirements 5 INSTALLATION INSTRUCTIONS 6 Unpack Range 6 Install Anti-Tip Bracket 6 Verify Anti-Tip Bracket Location 7 Level Range 7 Make Gas Connection 7 ...
Installation Instructions
Page 2
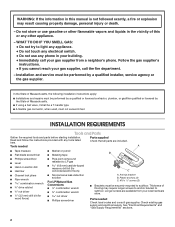
... touch any electrical switch. • Do not use gasoline or other appliance. - INSTALLATION REQUIREMENTS Tools and Parts Gather the required tools and parts before starting installation. Anti-tip bracket B. Thickness of Massachusetts, the following installation instructions apply: s Installations and...joint compound resistant to subfloor. In the State of flooring may result causing property damage, personal injury or death. - Check that all parts are available from a neighbor's phone. Plastic anchors (2) C. #10 x ¹⁄₂" screws (2) s Brackets must not exceed...
... touch any electrical switch. • Do not use gasoline or other appliance. - INSTALLATION REQUIREMENTS Tools and Parts Gather the required tools and parts before starting installation. Anti-tip bracket B. Thickness of Massachusetts, the following installation instructions apply: s Installations and...joint compound resistant to subfloor. In the State of flooring may result causing property damage, personal injury or death. - Check that all parts are available from a neighbor's phone. Plastic anchors (2) C. #10 x ¹⁄₂" screws (2) s Brackets must not exceed...
Installation Instructions
Page 3
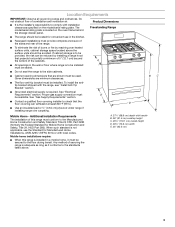
... Dimensions Freestanding Range s The range should be located for convenient use the Standard for Mobile Home Construction and Safety, Title 24, HUD Part 280). s Recessed installations must be used. To install the antitip bracket shipped with handle B. 36" (91.4 cm) cooktop height ...Tip Bracket" section. s Contact a qualified floor covering installer to the Manufactured Home Construction and Safety Standard, Title 24 CFR, Part 3280 (formerly the Federal Standard for Manufactured Home Installations, ANSI A225.1/NFPA 501A or with installation clearances specified on the oven ...
... Dimensions Freestanding Range s The range should be located for convenient use the Standard for Mobile Home Construction and Safety, Title 24, HUD Part 280). s Recessed installations must be used. To install the antitip bracket shipped with handle B. 36" (91.4 cm) cooktop height ...Tip Bracket" section. s Contact a qualified floor covering installer to the Manufactured Home Construction and Safety Standard, Title 24 CFR, Part 3280 (formerly the Federal Standard for Manufactured Home Installations, ANSI A225.1/NFPA 501A or with installation clearances specified on the oven ...
Installation Instructions
Page 6
... shown on the floor in the "Location Requirements" section, adjust template so range will be killed. Failure to 2,000 ft (609.6 m). Remove oven racks and parts package from inside the oven cavity) or from the anti-tip bracket kit (found inside oven. 2. Before moving range, slide range onto shipping base, cardboard...
... shown on the floor in the "Location Requirements" section, adjust template so range will be killed. Failure to 2,000 ft (609.6 m). Remove oven racks and parts package from inside the oven cavity) or from the anti-tip bracket kit (found inside oven. 2. Before moving range, slide range onto shipping base, cardboard...
Installation Instructions
Page 8
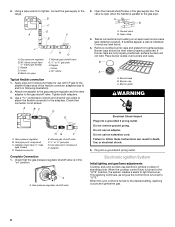
... ½" male pipe thread) C. C. Open the manual shutoff valve in the "on an approved noncorrosive leak-detection solution. Remove cooktop burner caps and grates from parts package. B A C A. Burner base B. Burner grate WARNING Electrical Shock Hazard Plug into a grounded 3 prong outlet. Nipple I H G F. Check that the gas pressure regulator shutoff valve is turned...
... ½" male pipe thread) C. C. Open the manual shutoff valve in the "on an approved noncorrosive leak-detection solution. Remove cooktop burner caps and grates from parts package. B A C A. Burner base B. Burner grate WARNING Electrical Shock Hazard Plug into a grounded 3 prong outlet. Nipple I H G F. Check that the gas pressure regulator shutoff valve is turned...
Installation Instructions
Page 10
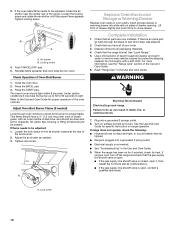
...outlined above. A Replace Oven Racks and Storage or Warming Drawer Replace oven racks in the Use and Care Guide. Check that all parts are now installed. Dry thoroughly with an outer mantle of drawer opening. WARNING Electrical Shock Hazard Electrically ground range. See the Use ...see the "Range Care" section of Oven Broil Burner 1. If range does not operate, check the following: s Household fuse is an extra part, go back through oven window to light. A. If flame needs to remove waxy residue caused by protective shipping material. Locking screw 4. Lift ...
...outlined above. A Replace Oven Racks and Storage or Warming Drawer Replace oven racks in the Use and Care Guide. Check that all parts are now installed. Dry thoroughly with an outer mantle of drawer opening. WARNING Electrical Shock Hazard Electrically ground range. See the Use ...see the "Range Care" section of Oven Broil Burner 1. If range does not operate, check the following: s Household fuse is an extra part, go back through oven window to light. A. If flame needs to remove waxy residue caused by protective shipping material. Locking screw 4. Lift ...
Installation Instructions
Page 14
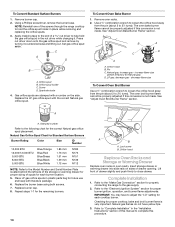
... replacing the orifice spuds. 3. Repeat steps 1-7 for future use and keep with literature package. 6. Refer to close drawer. Place LP gas orifice spuds in plastic parts bag for the remaining burners. 14 A B A. Using a Phillips screwdriver, remove the burner base. Set gas orifice spud aside. Screw D. Use a ½" combination wrench to loosen...
... replacing the orifice spuds. 3. Repeat steps 1-7 for future use and keep with literature package. 6. Refer to close drawer. Place LP gas orifice spuds in plastic parts bag for the remaining burners. 14 A B A. Using a Phillips screwdriver, remove the burner base. Set gas orifice spud aside. Screw D. Use a ½" combination wrench to loosen...


