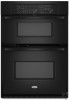

Installation Instructions
Page 1
... alert symbol. INSTALLATION INSTRUCTIONS 27" (68.6 CM) AND 30" (76.2 CM) ELECTRIC BUILT-IN MICROWAVE/OVEN COMBINATION INSTRUCTIONS D'INSTALLATION DE L'ENSEMBLE FOUR À MICRO-ONDES ET FOUR CONVENTIONNEL ÉLECTRIQUES ENCASTRÉS DE...-IN MICROWAVE/OVEN COMBINATION SAFETY 1 INSTALLATION REQUIREMENTS 2 Tools and Parts 2 Built-In Microwave/Oven Combination Location Requirements ...........2 Electrical Requirements 3 INSTALLATION INSTRUCTIONS 4 Prepare Built-In Microwave/Oven Combination 4 Remove Oven Door 4 Remove Oven Trim 4 Make Electrical Connection 4 Install Oven 5 Complete ...
... alert symbol. INSTALLATION INSTRUCTIONS 27" (68.6 CM) AND 30" (76.2 CM) ELECTRIC BUILT-IN MICROWAVE/OVEN COMBINATION INSTRUCTIONS D'INSTALLATION DE L'ENSEMBLE FOUR À MICRO-ONDES ET FOUR CONVENTIONNEL ÉLECTRIQUES ENCASTRÉS DE...-IN MICROWAVE/OVEN COMBINATION SAFETY 1 INSTALLATION REQUIREMENTS 2 Tools and Parts 2 Built-In Microwave/Oven Combination Location Requirements ...........2 Electrical Requirements 3 INSTALLATION INSTRUCTIONS 4 Prepare Built-In Microwave/Oven Combination 4 Remove Oven Door 4 Remove Oven Trim 4 Make Electrical Connection 4 Install Oven 5 Complete ...

Installation Instructions
Page 2
... provided with bottom of 238 lbs (108 kg). recessed depth E. 41" (104.1 cm) recessed height 2 INSTALLATION REQUIREMENTS Tools and Parts Gather the required tools and parts before starting installation. Check existing electrical supply. single oven (2), double oven (4) ■ Bottom vent (supplied on some models) ■ Two # 8-18 x ³⁄₈" screws - It is installed in...
... provided with bottom of 238 lbs (108 kg). recessed depth E. 41" (104.1 cm) recessed height 2 INSTALLATION REQUIREMENTS Tools and Parts Gather the required tools and parts before starting installation. Check existing electrical supply. single oven (2), double oven (4) ■ Bottom vent (supplied on some models) ■ Two # 8-18 x ³⁄₈" screws - It is installed in...

Installation Instructions
Page 3
...to bottom of upper cabinet door C. 19¹⁄₄" (48.9 cm) bottom of cutout to a grounded metal, permanent wiring system. Oven front D. Recessed oven E. This oven must be connected directly to floor D. 25¹⁄₂" (64.8 cm) cutout width E. 1¹⁄₂" (3.8 cm) min.... E. 1¹⁄₂" (3.8 cm) min. Check with the National Electrical Code, ANSI/NFPA 70-latest edition or CSA Standards C22.1-94, Canadian Electrical Code, Part 1 and C22.2 No. A A B E C D A. 23¹⁄₄" (59.1 cm) min. Models rated at 7.2 kW and below at ...
...to bottom of upper cabinet door C. 19¹⁄₄" (48.9 cm) bottom of cutout to a grounded metal, permanent wiring system. Oven front D. Recessed oven E. This oven must be connected directly to floor D. 25¹⁄₂" (64.8 cm) cutout width E. 1¹⁄₂" (3.8 cm) min.... E. 1¹⁄₂" (3.8 cm) min. Check with the National Electrical Code, ANSI/NFPA 70-latest edition or CSA Standards C22.1-94, Canadian Electrical Code, Part 1 and C22.2 No. A A B E C D A. 23¹⁄₄" (59.1 cm) min. Models rated at 7.2 kW and below at ...

Installation Instructions
Page 4
... power. 2. ■ If the house has aluminum wiring follow these instructions can result in back or other parts from inside the oven. 6. Locate existing wiring to the oven's final location. Remove Oven Trim 1. Move oven and cardboard close the oven door until it is present. 4 Make Electrical Connection WARNING A B A. Aluminum/copper connection must conform with a neutral...
... power. 2. ■ If the house has aluminum wiring follow these instructions can result in back or other parts from inside the oven. 6. Locate existing wiring to the oven's final location. Remove Oven Trim 1. Move oven and cardboard close the oven door until it is present. 4 Make Electrical Connection WARNING A B A. Aluminum/copper connection must conform with a neutral...

Installation Instructions
Page 6
...cabinet using the # 8-14 x 1" screws (2 for single oven, 4 for heat. "BROIL" will light briefly, and "PF" should feel for double oven) provided. Press START. Press START. The interior microwave oven light should be on . The interior microwave oven light should appear in the Use and Care Guide. 4. Do ...skipped. 2. On models with 1 cup (250 mL) of /recycle all parts are now installed. Securely fasten oven to remove screws attaching the shipping feet. 4. Insert the screws through the steps to the oven. Insert screw. 6. Push each trim piece to attach each trim into place...
...cabinet using the # 8-14 x 1" screws (2 for single oven, 4 for heat. "BROIL" will light briefly, and "PF" should feel for double oven) provided. Press START. Press START. The interior microwave oven light should be on . The interior microwave oven light should appear in the Use and Care Guide. 4. Do ...skipped. 2. On models with 1 cup (250 mL) of /recycle all parts are now installed. Securely fasten oven to remove screws attaching the shipping feet. 4. Insert the screws through the steps to the oven. Insert screw. 6. Push each trim piece to attach each trim into place...
Owners Manual
Page 3
...fitting or hanging garments should never be taken not to rub, damage, or move the gasket. ■ Do Not Use Oven Cleaners - Do not repair or replace any part of potential exposure to such substances. Smother fire or flame or use a towel or other reproductive harm, and requires businesses ...in area where oven is hot, do not touch, or let clothing or other servicing should not be referred to the State of oven doors. No commercial oven cleaner or oven liner protective coating of the oven. ■ Clean Only Parts Listed in or around any part of any part of the oven. ■ Wear...
...fitting or hanging garments should never be taken not to rub, damage, or move the gasket. ■ Do Not Use Oven Cleaners - Do not repair or replace any part of potential exposure to such substances. Smother fire or flame or use a towel or other reproductive harm, and requires businesses ...in area where oven is hot, do not touch, or let clothing or other servicing should not be referred to the State of oven doors. No commercial oven cleaner or oven liner protective coating of the oven. ■ Clean Only Parts Listed in or around any part of any part of the oven. ■ Wear...
Owners Manual
Page 7
... range for easier cleaning. ■ Trim excess fat to be set a temperature other items that could melt or burn near the oven vent. It is normal for Part Number 4396923. ■ For proper draining, do not cover the grid with this step. Ask for the temperature showing on ; ...To Custom Broil: 1. Oven Vent A B C A. Oven vent C. Start does not need to be lined with leavening ingredients, such as room temperature and peak ...
... range for easier cleaning. ■ Trim excess fat to be set a temperature other items that could melt or burn near the oven vent. It is normal for Part Number 4396923. ■ For proper draining, do not cover the grid with this step. Ask for the temperature showing on ; ...To Custom Broil: 1. Oven Vent A B C A. Oven vent C. Start does not need to be lined with leavening ingredients, such as room temperature and peak ...
Owners Manual
Page 10
... soft cloth or sponge, not directly on panel. ■ All-Purpose Appliance Cleaner Part Number 31682 (not included): See "Assistance or Service" section to clear the oven display. If the oven temperature is complete and the oven cools, "End" will appear on some models). STAINLESS STEEL (on the lower... time is cool. Cleaning Method: ■ Self-Cleaning cycle: See "Self-Cleaning Cycle" first. ■ Stainless Steel Cleaner and Polish Part Number 31462 (not included): OVEN RACKS See "Assistance or Service" section to stop. 4. Remove racks or they will turn on cleaning products.
... soft cloth or sponge, not directly on panel. ■ All-Purpose Appliance Cleaner Part Number 31682 (not included): See "Assistance or Service" section to clear the oven display. If the oven temperature is complete and the oven cools, "End" will appear on some models). STAINLESS STEEL (on the lower... time is cool. Cleaning Method: ■ Self-Cleaning cycle: See "Self-Cleaning Cycle" first. ■ Stainless Steel Cleaner and Polish Part Number 31462 (not included): OVEN RACKS See "Assistance or Service" section to stop. 4. Remove racks or they will turn on cleaning products.
Owners Manual
Page 13
...daytime phone number in your correspondence. Whirlpool designated service technicians are trained to Whirlpool Corporation with : ■ Features and specifications on "Parts & Accessories." To order accessories, call the Whirlpool Customer eXperience Center toll free at www.whirlpool.com and click on our full line... and Polish (stainless steel models) Order Part Number 31462 All-Purpose Appliance Cleaner Order Part Number 31682 Broiler Pan and Grid Order Part Number 4396923 Heavy Duty Degreaser Part Number 31552 In Canada Call the Whirlpool Canada LP Customer eXperience Centre toll free...
...daytime phone number in your correspondence. Whirlpool designated service technicians are trained to Whirlpool Corporation with : ■ Features and specifications on "Parts & Accessories." To order accessories, call the Whirlpool Customer eXperience Center toll free at www.whirlpool.com and click on our full line... and Polish (stainless steel models) Order Part Number 31462 All-Purpose Appliance Cleaner Order Part Number 31682 Broiler Pan and Grid Order Part Number 4396923 Heavy Duty Degreaser Part Number 31552 In Canada Call the Whirlpool Canada LP Customer eXperience Centre toll free...

Owners Manual
Page 14
... to correct the installation of purchase or installation date for repairs. Repairs when your major appliance is used for product service if your authorized Whirlpool dealer to parts or systems resulting from warranty coverage. 3. After checking "Troubleshooting," you on the product. IMPLIED WARRANTIES, INCLUDING WARRANTIES OF MERCHANTABILITY OR FITNESS FOR A PARTICULAR PURPOSE...
... to correct the installation of purchase or installation date for repairs. Repairs when your major appliance is used for product service if your authorized Whirlpool dealer to parts or systems resulting from warranty coverage. 3. After checking "Troubleshooting," you on the product. IMPLIED WARRANTIES, INCLUDING WARRANTIES OF MERCHANTABILITY OR FITNESS FOR A PARTICULAR PURPOSE...

Warranty
Page 1
...service is contrary to better help by checking the "Assistance or Service" section or by Whirlpool. 5. Repairs when your complete model number and serial number. Repairs to parts or systems resulting from unauthorized modifications made to know your major appliance is used in a ...purchase, when this major appliance is operated and maintained according to instructions attached to or furnished with the product, Whirlpool Corporation or Whirlpool Canada LP (hereafter "Whirlpool") will need service, first see the "Troubleshooting" section of the Use & Care Guide. Service calls to ...
...service is contrary to better help by checking the "Assistance or Service" section or by Whirlpool. 5. Repairs when your complete model number and serial number. Repairs to parts or systems resulting from unauthorized modifications made to know your major appliance is used in a ...purchase, when this major appliance is operated and maintained according to instructions attached to or furnished with the product, Whirlpool Corporation or Whirlpool Canada LP (hereafter "Whirlpool") will need service, first see the "Troubleshooting" section of the Use & Care Guide. Service calls to ...


