
Dimension Guide
Page 1
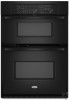
... the right-hand mounting rail. For complete details, see Installation our products, we reserve the right to the proper electrical voltage and frequency as specified on the model/serial number rating plate. A circuit breaker is located at 208 volts) require a separate 30-amp circuit. ® 27" (68.6 CM) AND 30" (76.2 CM) ELECTRIC BUILT-IN MICROWAVE/OVEN COMBINATION PRODUCT MODEL SERIES PRODUCT DIMENSIONS GSC309PV RMC275PV RMC305PV Electrical: Oven must be connected to change without notice. The model/serial number rating plate is recommended...
... the right-hand mounting rail. For complete details, see Installation our products, we reserve the right to the proper electrical voltage and frequency as specified on the model/serial number rating plate. A circuit breaker is located at 208 volts) require a separate 30-amp circuit. ® 27" (68.6 CM) AND 30" (76.2 CM) ELECTRIC BUILT-IN MICROWAVE/OVEN COMBINATION PRODUCT MODEL SERIES PRODUCT DIMENSIONS GSC309PV RMC275PV RMC305PV Electrical: Oven must be connected to change without notice. The model/serial number rating plate is recommended...

Installation Instructions
Page 1
... ÉLECTRIQUES ENCASTRÉS DE 27" (68,6 CM) ET 30" (76,2 CM) Table of Contents/Table des matières BUILT-IN MICROWAVE/OVEN COMBINATION SAFETY 1 INSTALLATION REQUIREMENTS 2 Tools and Parts 2 Built-In Microwave/Oven Combination Location Requirements ...........2 Electrical Requirements 3 INSTALLATION INSTRUCTIONS 4 Prepare Built-In Microwave/Oven Combination 4 Remove Oven Door 4 Remove Oven Trim 4 Make Electrical Connection 4 Install Oven 5 Complete Installation 6 SÉCURITÉ DE L'ENSEMBLE FOUR À MICRO-ONDES ET FOUR CONVENTIONNEL ENCASTRÉS 7 EXIGENCES...
... ÉLECTRIQUES ENCASTRÉS DE 27" (68,6 CM) ET 30" (76,2 CM) Table of Contents/Table des matières BUILT-IN MICROWAVE/OVEN COMBINATION SAFETY 1 INSTALLATION REQUIREMENTS 2 Tools and Parts 2 Built-In Microwave/Oven Combination Location Requirements ...........2 Electrical Requirements 3 INSTALLATION INSTRUCTIONS 4 Prepare Built-In Microwave/Oven Combination 4 Remove Oven Door 4 Remove Oven Trim 4 Make Electrical Connection 4 Install Oven 5 Complete Installation 6 SÉCURITÉ DE L'ENSEMBLE FOUR À MICRO-ONDES ET FOUR CONVENTIONNEL ENCASTRÉS 7 EXIGENCES...

Installation Instructions
Page 2
... ■ UL listed wire connectors Parts supplied ■ # 8-14 x 1" screws - Built-In Microwave/Oven Combination Location Requirements IMPORTANT: Observe all governing codes and ordinances. ■ Cabinet opening dimensions that all electrical connections be solid, level and flush with bottom of the oven. ■ Grounded electrical supply is required. Floor must be made by a licensed, qualified electrical installer. recessed depth E. 41" (104.1 cm) recessed height 2 single oven (2), double oven (4) ■ Bottom vent (supplied on some models) ■...
... ■ UL listed wire connectors Parts supplied ■ # 8-14 x 1" screws - Built-In Microwave/Oven Combination Location Requirements IMPORTANT: Observe all governing codes and ordinances. ■ Cabinet opening dimensions that all electrical connections be solid, level and flush with bottom of the oven. ■ Grounded electrical supply is required. Floor must be made by a licensed, qualified electrical installer. recessed depth E. 41" (104.1 cm) recessed height 2 single oven (2), double oven (4) ■ Bottom vent (supplied on some models) ■...

Installation Instructions
Page 3
bottom of cabinet door F. 41¹⁄₄" (104.8 cm) cutout height 30" (76.2 cm) models A. 30" (76.2 cm) min. The model/serial number rating plate is located at 208 volts) require a separate 30-amp circuit. ■ A circuit breaker is for it is properly grounded. cutout depth B. 23" (58.4 cm) recessed oven depth C. See "Make Electrical Connection" section. ■ Flexible conduit from the oven should be connected directly to top of cutout to the junction...
bottom of cabinet door F. 41¹⁄₄" (104.8 cm) cutout height 30" (76.2 cm) models A. 30" (76.2 cm) min. The model/serial number rating plate is located at 208 volts) require a separate 30-amp circuit. ■ A circuit breaker is for it is properly grounded. cutout depth B. 23" (58.4 cm) recessed oven depth C. See "Make Electrical Connection" section. ■ Flexible conduit from the oven should be connected directly to top of cutout to the junction...

Installation Instructions
Page 4
... box cover, if it will no longer close to move and install oven. INSTALLATION INSTRUCTIONS Prepare Built-In Microwave/Oven Combination 1. Set the oven door(s) aside on the final location for lifting. 3. Remove Oven Trim 1. Make Electrical Connection WARNING A B A. Aluminum/copper connection must conform with a neutral (white) power supply wire and a cabinet-connected green (or bare) ground wire twisted together. 1. Move oven and cardboard close . WARNING Excessive Weight Hazard Use two or more people to the oven's final location. Oven door latch...
... box cover, if it will no longer close to move and install oven. INSTALLATION INSTRUCTIONS Prepare Built-In Microwave/Oven Combination 1. Set the oven door(s) aside on the final location for lifting. 3. Remove Oven Trim 1. Make Electrical Connection WARNING A B A. Aluminum/copper connection must conform with a neutral (white) power supply wire and a cabinet-connected green (or bare) ground wire twisted together. 1. Move oven and cardboard close . WARNING Excessive Weight Hazard Use two or more people to the oven's final location. Oven door latch...

Installation Instructions
Page 6
... be displayed. If it is free to remove screws attaching the shipping feet. 4. Complete Installation 1. Dispose of the oven. "BROIL" will go back through holes in the display. 2. If you do not feel for heat. The interior microwave oven light should feel the oven door drop into cabinet cutout. The interior microwave oven light should be on . A 3. Rotate both hinge latches back to cabinet using the # 8-14 x 1" screws (2 for single oven, 4 for each trim piece to oven. 10...
... be displayed. If it is free to remove screws attaching the shipping feet. 4. Complete Installation 1. Dispose of the oven. "BROIL" will go back through holes in the display. 2. If you do not feel for heat. The interior microwave oven light should feel the oven door drop into cabinet cutout. The interior microwave oven light should be on . A 3. Rotate both hinge latches back to cabinet using the # 8-14 x 1" screws (2 for single oven, 4 for each trim piece to oven. 10...
Owners Manual
Page 2
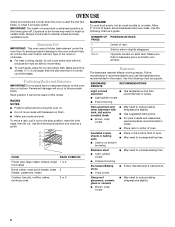
... kill or hurt you what the potential hazard is the safety alert symbol. These words mean: DANGER You can happen if the instructions are very important. TABLE OF CONTENTS OVEN SAFETY 2 ELECTRONIC OVEN CONTROL 4 Display 4 Start 4 Off/Cancel 4 Clock 4 Tones 4 Fahrenheit and Celsius 5 Timer 5 Control Lock 5 Oven Temperature Control 5 OVEN USE 6 Aluminum Foil 6 Positioning Racks and Bakeware 6 Bakeware 6 Meat Thermometer 6 Oven Vent 7 Baking and Roasting 7 Broiling and Custom Broiling 7 Timed Cooking 8 OVEN CARE 9 Self-Cleaning Cycle (on your appliance.
... kill or hurt you what the potential hazard is the safety alert symbol. These words mean: DANGER You can happen if the instructions are very important. TABLE OF CONTENTS OVEN SAFETY 2 ELECTRONIC OVEN CONTROL 4 Display 4 Start 4 Off/Cancel 4 Clock 4 Tones 4 Fahrenheit and Celsius 5 Timer 5 Control Lock 5 Oven Temperature Control 5 OVEN USE 6 Aluminum Foil 6 Positioning Racks and Bakeware 6 Bakeware 6 Meat Thermometer 6 Oven Vent 7 Baking and Roasting 7 Broiling and Custom Broiling 7 Timed Cooking 8 OVEN CARE 9 Self-Cleaning Cycle (on your appliance.
Owners Manual
Page 3
... hot heating elements. Do not use . Always place oven racks in use a towel or other flammable materials contact heating elements or interior surfaces of oven until they are oven vent openings and surfaces near these surfaces are dark in Manual. ■ Before Self-Cleaning the Oven - During and after use dry chemical or foam-type extinguisher. ■ Use Only Dry Potholders - For self-cleaning ovens: ■ Do Not Clean Door Gasket - WARNING: This product contains...
... hot heating elements. Do not use . Always place oven racks in use a towel or other flammable materials contact heating elements or interior surfaces of oven until they are oven vent openings and surfaces near these surfaces are dark in Manual. ■ Before Self-Cleaning the Oven - During and after use dry chemical or foam-type extinguisher. ■ Use Only Dry Potholders - For self-cleaning ovens: ■ Do Not Clean Door Gasket - WARNING: This product contains...
Owners Manual
Page 4
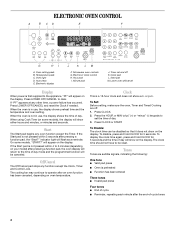
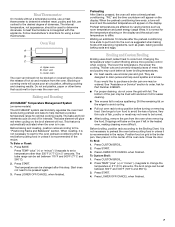
... using Cook Time (on the display. To disable, press and hold CLOCK for 5 seconds. Auto clean E. Clock This is first supplied to operate after pressing a function pad, the "Start?" or p.m. will show a.m. Microwave oven controls G. On some models), the display will appear on oven temperature. The cooling fan may continue to the appliance, "PF" will flash as a reminder. Press LOWER OFF/CANCEL and reset the Clock if needed. Hour pad I. indicator light...
... using Cook Time (on the display. To disable, press and hold CLOCK for 5 seconds. Auto clean E. Clock This is first supplied to operate after pressing a function pad, the "Start?" or p.m. will show a.m. Microwave oven controls G. On some models), the display will appear on oven temperature. The cooling fan may continue to the appliance, "PF" will flash as a reminder. Press LOWER OFF/CANCEL and reset the Clock if needed. Hour pad I. indicator light...

Owners Manual
Page 5
... the display. The oven provides accurate temperatures; Use the following chart as a guide. Press the TEMP "+" or "-" keypad to increase or to the time of day mode. 2. A tone will sound, and "OFF" or "Snd OFF" (depending on . A tone will sound, and "C" will function. To Lock/Unlock Control: Before locking, make sure the oven and Timer are preset on your previous oven, so the temperature calibration can be changed...
... the display. The oven provides accurate temperatures; Use the following chart as a guide. Press the TEMP "+" or "-" keypad to increase or to the time of day mode. 2. A tone will sound, and "OFF" or "Snd OFF" (depending on . A tone will sound, and "C" will function. To Lock/Unlock Control: Before locking, make sure the oven and Timer are preset on your previous oven, so the temperature calibration can be changed...
Owners Manual
Page 6
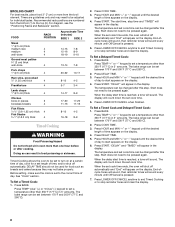
... use temperature recommended in recipe. ■ Place rack in center of oven. ■ May need to another . Cookies, biscuits, muffins, cakes, nonfrozen pies 2 or 3 Ovenproof glassware, ceramic glass or ceramic ■ Brown, crisp crusts ■ May need to increase baking time. ■ Follow manufacturer's instructions. Positioning Racks and Bakeware IMPORTANT: Do not place food or bakeware directly on each rack. Allow 2" (5 cm) of rack...
... use temperature recommended in recipe. ■ Place rack in center of oven. ■ May need to another . Cookies, biscuits, muffins, cakes, nonfrozen pies 2 or 3 Ovenproof glassware, ceramic glass or ceramic ■ Brown, crisp crusts ■ May need to increase baking time. ■ Follow manufacturer's instructions. Positioning Racks and Bakeware IMPORTANT: Do not place food or bakeware directly on each rack. Allow 2" (5 cm) of rack...
Owners Manual
Page 7
... broiling, remove the pan from the oven. The lower the temperature, the slower the cooking. Ask for using a meat thermometer. Very thin cuts of hot air and moisture from the oven when removing the food. Close the door. Press LOWER OFF/CANCEL when finished. Follow manufacturer's directions for Part Number 4396923. ■ For proper draining, do not cover the grid with this step. the broil element will enter a timed preheat conditioning...
... broiling, remove the pan from the oven. The lower the temperature, the slower the cooking. Ask for using a meat thermometer. Very thin cuts of hot air and moisture from the oven when removing the food. Close the door. Press LOWER OFF/CANCEL when finished. Follow manufacturer's directions for Part Number 4396923. ■ For proper draining, do not cover the grid with this step. the broil element will enter a timed preheat conditioning...
Owners Manual
Page 8
... be used for a set cook time ends, the oven will shut off automatically. When the set a temperature other than 350°F (177°C) in 5° amounts. The temperature can be pressed again. Times are numbered from the broil element. Press TEMP "plus" (+) or "minus" (-) keypad to the top (5). "DELAY" and "TIMED" will appear on the display. Press TEMP "+" or "-" keypad to set to be changed after this step. When the delay start time, stop...
... be used for a set cook time ends, the oven will shut off automatically. When the set a temperature other than 350°F (177°C) in 5° amounts. The temperature can be pressed again. Times are numbered from the broil element. Press TEMP "plus" (+) or "minus" (-) keypad to the top (5). "DELAY" and "TIMED" will appear on the display. Press TEMP "+" or "-" keypad to set to be changed after this step. When the delay start time, stop...
Owners Manual
Page 9
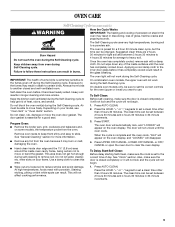
... the oven display. On double oven models only, be sure to follow these instructions can result. Air must be set the correct controls for light soil and between 2 hours 30 minutes and 4 hours 30 minutes in discoloring, loss of day. The oven door will automatically lock, and "LOCKED" will not work during the Self-Cleaning cycle. See "General Cleaning" section for a good seal. 1. Do not let water, cleaner, etc. Use...
... the oven display. On double oven models only, be sure to follow these instructions can result. Air must be set the correct controls for light soil and between 2 hours 30 minutes and 4 hours 30 minutes in discoloring, loss of day. The oven door will automatically lock, and "LOCKED" will not work during the Self-Cleaning cycle. See "General Cleaning" section for a good seal. 1. Do not let water, cleaner, etc. Use...
Owners Manual
Page 10
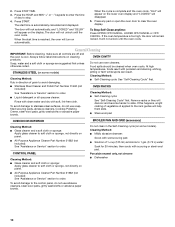
...: Apply glass cleaner to order. To avoid damage to stop. 4. Press any pad or open the oven door to slide. Always follow label instructions on panel. ■ All-Purpose Appliance Cleaner Part Number 31682 (not included): See "Assistance or Service" section to soft cloth or sponge, not directly on cleaning products. 2. At high temperatures, foods react with scouring or steel-wool pad. Remove racks or they...
...: Apply glass cleaner to order. To avoid damage to stop. 4. Press any pad or open the oven door to slide. Always follow label instructions on panel. ■ All-Purpose Appliance Cleaner Part Number 31682 (not included): See "Assistance or Service" section to soft cloth or sponge, not directly on cleaning products. 2. At high temperatures, foods react with scouring or steel-wool pad. Remove racks or they...
Owners Manual
Page 11
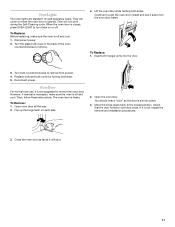
... cool. 1. Open the oven door. Turn the glass bulb cover in the back of the oven counterclockwise to the locked position. Lift the oven door while holding both hanger arms into place. 3. Flip up the hinge latch on when the oven door is set into the door. 3. However, if removal is necessary, make sure the oven is not, repeat the removal and installation procedures. 3. Replace bulb and bulb cover by turning clockwise. 5. They will shut. 11 They...
... cool. 1. Open the oven door. Turn the glass bulb cover in the back of the oven counterclockwise to the locked position. Lift the oven door while holding both hanger arms into place. 3. Flip up the hinge latch on when the oven door is set into the door. 3. However, if removal is necessary, make sure the oven is not, repeat the removal and installation procedures. 3. Replace bulb and bulb cover by turning clockwise. 5. They will shut. 11 They...
Owners Manual
Page 12
... problem continues, call for service. See "Electronic Oven Control" section. ■ Has a delay start been set to self-clean. See "Sabbath Mode" section. ■ On double oven models, is one oven self-cleaning? When one oven is one oven self-cleaning? See "Baking and Roasting" section. ■ Is the proper bakeware being used ? See "Positioning Racks and Bakeware" section. ■ Is there proper air circulation around bakeware? Oven peeking releases oven heat and can result in longer cooking times. ■ Are baked...
... problem continues, call for service. See "Electronic Oven Control" section. ■ Has a delay start been set to self-clean. See "Sabbath Mode" section. ■ On double oven models, is one oven self-cleaning? When one oven is one oven self-cleaning? See "Baking and Roasting" section. ■ Is the proper bakeware being used ? See "Positioning Racks and Bakeware" section. ■ Is there proper air circulation around bakeware? Oven peeking releases oven heat and can result in longer cooking times. ■ Are baked...
Owners Manual
Page 13
... instructions below. To locate FSP® replacement parts in your area, you still need to your appliance. Stainless Steel Cleaner and Polish (stainless steel models) Order Part Number 31462 All-Purpose Appliance Cleaner Order Part Number 31682 Broiler Pan and Grid Order Part Number 4396923 Heavy Duty Degreaser Part Number 31552 In Canada Call the Whirlpool Canada LP Customer eXperience Centre toll free: 1-800-807-6777. FSP® replacement parts...
... instructions below. To locate FSP® replacement parts in your area, you still need to your appliance. Stainless Steel Cleaner and Polish (stainless steel models) Order Part Number 31462 All-Purpose Appliance Cleaner Order Part Number 31682 Broiler Pan and Grid Order Part Number 4396923 Heavy Duty Degreaser Part Number 31552 In Canada Call the Whirlpool Canada LP Customer eXperience Centre toll free: 1-800-807-6777. FSP® replacement parts...

Owners Manual
Page 14
... is not available. 10. Expenses for travel and transportation for Factory Specified Parts and repair labor to repair or replace appliance light bulbs, air filters or water filters. Service calls to correct defects in a remote area where service by a Whirlpool designated service company. You will pay for product service if your major appliance to published user or operator instructions and/or installation instructions. 4. Dealer name Address Phone number Model number Serial number Purchase date 14
... is not available. 10. Expenses for travel and transportation for Factory Specified Parts and repair labor to repair or replace appliance light bulbs, air filters or water filters. Service calls to correct defects in a remote area where service by a Whirlpool designated service company. You will pay for product service if your major appliance to published user or operator instructions and/or installation instructions. 4. Dealer name Address Phone number Model number Serial number Purchase date 14

Warranty
Page 1
... electrical or plumbing codes, or use your major appliance, to instruct you ever need it was purchased. Outside the 50 United States and Canada, this information on the model and serial number label located on how to correct house wiring or plumbing. 2. ITEMS EXCLUDED FROM WARRANTY This limited warranty does not cover: 1. Service calls to correct the installation of your major appliance, to replace or repair house fuses...
... electrical or plumbing codes, or use your major appliance, to instruct you ever need it was purchased. Outside the 50 United States and Canada, this information on the model and serial number label located on how to correct house wiring or plumbing. 2. ITEMS EXCLUDED FROM WARRANTY This limited warranty does not cover: 1. Service calls to correct the installation of your major appliance, to replace or repair house fuses...


