
Dimension Guide
Page 1
... The model/serial number rating plate is recommended. recessed depth E. 41" (104.1 cm) recessed height D C A A. cabinet width B. 1" (2.5 cm) top of cutout to bottom of upper cabinet door C. 19-1/4" (48.9 cm) bottom of cabinet door F. 41-1/4" (104.8 cm) cutout height Because Whirlpool Corporation ...to 9.6 kW at 240 volts (5.5 to change materials and specifications without notice. cutout depth B. 23" (58.4 cm) recessed oven depth Front View A F D E 27" (68.6 cm) models B A. 27" (68.6 cm) min. bottom of cutout to top of cutout to the circuit breaker (or fused disconnect)...
... The model/serial number rating plate is recommended. recessed depth E. 41" (104.1 cm) recessed height D C A A. cabinet width B. 1" (2.5 cm) top of cutout to bottom of upper cabinet door C. 19-1/4" (48.9 cm) bottom of cabinet door F. 41-1/4" (104.8 cm) cutout height Because Whirlpool Corporation ...to 9.6 kW at 240 volts (5.5 to change materials and specifications without notice. cutout depth B. 23" (58.4 cm) recessed oven depth Front View A F D E 27" (68.6 cm) models B A. 27" (68.6 cm) min. bottom of cutout to top of cutout to the circuit breaker (or fused disconnect)...

Installation Instructions
Page 2
... solid, level and flush with your builder or cabinet supplier to your cabinets, check with bottom of 238 lbs (108 kg). single oven (2), double oven (4) ■ Bottom vent (supplied on some models) ■ Two # 8-18 x ³⁄₈" screws - A 1" (2.5 cm) minimum diameter hole should be located ... complete enclosure around the recessed portion of 194°F (90°C) Product Dimensions 27" (68.6 cm) and 30" (76.2 cm) Ovens A B E D C 27" (68.6 cm) models A. 25 64.3 cm) recessed width B. 42³⁄₈" (107.6 cm) overall height C. 26³⁄₄" (67.9 cm...
... solid, level and flush with your builder or cabinet supplier to your cabinets, check with bottom of 238 lbs (108 kg). single oven (2), double oven (4) ■ Bottom vent (supplied on some models) ■ Two # 8-18 x ³⁄₈" screws - A 1" (2.5 cm) minimum diameter hole should be located ... complete enclosure around the recessed portion of 194°F (90°C) Product Dimensions 27" (68.6 cm) and 30" (76.2 cm) Ovens A B E D C 27" (68.6 cm) models A. 25 64.3 cm) recessed width B. 42³⁄₈" (107.6 cm) overall height C. 26³⁄₄" (67.9 cm...

Installation Instructions
Page 3
...cm) cutout width E. 1¹⁄₂" (3.8 cm) min. O-M91-latest edition, and all local codes and ordinances. Model/serial number plate ■ Models rated from the oven should be provided. 3 cabinet width B. 1" (2.5 cm) top of cutout to bottom of upper cabinet door C. 19¹...conduit from 7.3 to 9.6 kW at 208 volts) require a separate 40-amp circuit. The model/serial number rating plate is properly grounded. cutout depth B. 23" (58.4 cm) recessed oven depth C. Recessed oven E. See the following illustration. bottom of cabinet door F. 41¹⁄₄" (104...
...cm) cutout width E. 1¹⁄₂" (3.8 cm) min. O-M91-latest edition, and all local codes and ordinances. Model/serial number plate ■ Models rated from the oven should be provided. 3 cabinet width B. 1" (2.5 cm) top of cutout to bottom of upper cabinet door C. 19¹...conduit from 7.3 to 9.6 kW at 208 volts) require a separate 40-amp circuit. The model/serial number rating plate is properly grounded. cutout depth B. 23" (58.4 cm) recessed oven depth C. Recessed oven E. See the following illustration. bottom of cabinet door F. 41¹⁄₄" (104...

Installation Instructions
Page 6
... Close door firmly. AB D C A. Slide top end of hinges into hinge slots in mounting rails. Replace oven door by inserting ends of each trim into place. 13. Repeat for double oven) provided. Check that you have all parts are now installed. or circuit breaker has not tripped. ■ ...is connected. ■ See "Troubleshooting" section in the display area. When oven has been on . Do not overtighten screws. On some models, the oven vent is an extra part, go and open microwave oven door. Oven vent 7. Push hinges in as far as they will go back through holes...
... Close door firmly. AB D C A. Slide top end of hinges into hinge slots in mounting rails. Replace oven door by inserting ends of each trim into place. 13. Repeat for double oven) provided. Check that you have all parts are now installed. or circuit breaker has not tripped. ■ ...is connected. ■ See "Troubleshooting" section in the display area. When oven has been on . Do not overtighten screws. On some models, the oven vent is an extra part, go and open microwave oven door. Oven vent 7. Push hinges in as far as they will go back through holes...
Owners Manual
Page 2
... 9 Self-Cleaning Cycle (on your appliance. We have provided many important safety messages in this manual and on some models 9 General Cleaning 10 Oven Lights 11 Oven Door 11 TROUBLESHOOTING 12 ASSISTANCE OR SERVICE 13 WARRANTY 14 TABLE DES MATIÈRES SÉCURITÉ DU FOUR 15 COMMANDE ÉLECTRONIQUE...232;les 22 Nettoyage général 23 Lampes du four 24 Porte du four 24 DÉPANNAGE 25 ASSISTANCE OU SERVICE 26 GARANTIE 27 OVEN SAFETY Your safety and the safety of injury, and tell you what can kill or hurt you and others are not followed. 2 This ...
... 9 Self-Cleaning Cycle (on your appliance. We have provided many important safety messages in this manual and on some models 9 General Cleaning 10 Oven Lights 11 Oven Door 11 TROUBLESHOOTING 12 ASSISTANCE OR SERVICE 13 WARRANTY 14 TABLE DES MATIÈRES SÉCURITÉ DU FOUR 15 COMMANDE ÉLECTRONIQUE...232;les 22 Nettoyage général 23 Lampes du four 24 Porte du four 24 DÉPANNAGE 25 ASSISTANCE OU SERVICE 26 GARANTIE 27 OVEN SAFETY Your safety and the safety of injury, and tell you what can kill or hurt you and others are not followed. 2 This ...
Owners Manual
Page 4
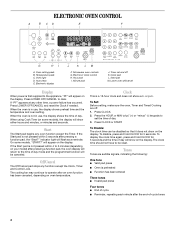
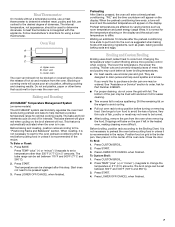
...of day. 3. When the oven is not pressed within 4 to 5 minutes (depending on your model) after pressing a function pad, the "Start?" If the Start pad is in use , the display shows preheat time and the temperature and oven setting. indicator light will appear on oven temperature. If the Start ... are audible signals, indicating the following: One tone ■ Valid pad press ■ Oven is not in use , the display shows the time of day mode and the programmed function will appear on some models, "START?" Press CLOCK. 2. To display the clock time again, press and hold CLOCK...
...of day. 3. When the oven is not pressed within 4 to 5 minutes (depending on your model) after pressing a function pad, the "Start?" If the Start pad is in use , the display shows preheat time and the temperature and oven setting. indicator light will appear on oven temperature. If the Start ... are audible signals, indicating the following: One tone ■ Valid pad press ■ Oven is not in use , the display shows the time of day mode and the programmed function will appear on some models, "START?" Press CLOCK. 2. To display the clock time again, press and hold CLOCK...

Owners Manual
Page 5
...;F (-15°C). 3. To Set: 1. Press the HOUR or MIN "+" or "-" keypads to measure oven temperature because opening the oven door and element or burner cycling may cook faster or slower than your model) will be canceled. It can be turned off. The Timer does not start or stop reminder tones.... A single tone will sound, "LOC" and "LOCK'D" (on some models) will sound, and "OFF" or "Snd OFF" (depending on your previous oven, so the temperature calibration can be reset during the countdown by the displayed amount. Repeat to change back to unlock...
...;F (-15°C). 3. To Set: 1. Press the HOUR or MIN "+" or "-" keypads to measure oven temperature because opening the oven door and element or burner cycling may cook faster or slower than your model) will be canceled. It can be turned off. The Timer does not start or stop reminder tones.... A single tone will sound, "LOC" and "LOCK'D" (on some models) will sound, and "OFF" or "Snd OFF" (depending on your previous oven, so the temperature calibration can be reset during the countdown by the displayed amount. Repeat to change back to unlock...
Owners Manual
Page 6
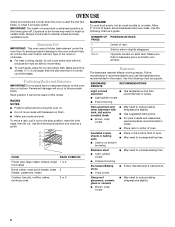
... birds. To avoid permanent damage to the oven bottom finish, do not line the oven bottom with dark, dull and/or nonstick ...on them. ■ Make sure racks are normal when the oven is used on rack below dish. Follow manufacturer's recommendations and use...oven walls. Aluminum Foil IMPORTANT: This oven uses a hidden bake element under the oven liner. NUMBER OF PAN(S) 1 2 3 or 4 POSITION ON RACK Center of oven...OVEN USE Odors and smoke are level. IMPORTANT: The health of oven. ■ May need to another . RACKS NOTES: ■ Position racks before turning the oven...
... birds. To avoid permanent damage to the oven bottom finish, do not line the oven bottom with dark, dull and/or nonstick ...on them. ■ Make sure racks are normal when the oven is used on rack below dish. Follow manufacturer's recommendations and use...oven walls. Aluminum Foil IMPORTANT: This oven uses a hidden bake element under the oven liner. NUMBER OF PAN(S) 1 2 3 or 4 POSITION ON RACK Center of oven...OVEN USE Odors and smoke are level. IMPORTANT: The health of oven. ■ May need to another . RACKS NOTES: ■ Position racks before turning the oven...
Owners Manual
Page 7
...use. To Bake or Roast: 1. Press BAKE. Very thin cuts of the oven rack. Close the door. The bake and broil elements cycle on some models) The ACCUBAKE® system electronically regulates the oven heat levels during preheat and bake to help avoid spatter and smoke. The ...bake range can be lined with this step. To Broil: 1. Meat Thermometer On models without a temperature probe, use a meat...
...use. To Bake or Roast: 1. Press BAKE. Very thin cuts of the oven rack. Close the door. The bake and broil elements cycle on some models) The ACCUBAKE® system electronically regulates the oven heat levels during preheat and bake to help avoid spatter and smoke. The ...bake range can be lined with this step. To Broil: 1. Meat Thermometer On models without a temperature probe, use a meat...
Owners Manual
Page 9
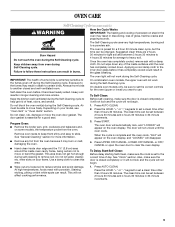
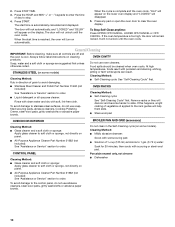
.... ■ Remove any loose soil to use. When the cycle is closed completely or it becomes heavily soiled. enter slots on your model, see "Oven Vent" or "Oven Vents" section. Also, make sure the clock is set between 2 hours 30 minutes and 4 hours 30 minutes in death to clean ...to set the correct controls for light soil and between 2 hours 30 minutes and 4 hours 30 minutes in longer cleaning and more information. On double oven models only, be changed. Depending on door frame. Do not clean, rub, damage or move or bend the gasket. The clean time can be sure...
.... ■ Remove any loose soil to use. When the cycle is closed completely or it becomes heavily soiled. enter slots on your model, see "Oven Vent" or "Oven Vents" section. Also, make sure the clock is set between 2 hours 30 minutes and 4 hours 30 minutes in death to clean ...to set the correct controls for light soil and between 2 hours 30 minutes and 4 hours 30 minutes in longer cleaning and more information. On double oven models only, be changed. Depending on door frame. Do not clean, rub, damage or move or bend the gasket. The clean time can be sure...
Owners Manual
Page 10
The start time is reached, the oven will turn on some models) Cleaning Method: Rub in the Self-Cleaning cycle (on automatically. When the start time is complete and the oven cools, "End" will appear on panel. ■ All-Purpose Appliance Cleaner Part Number 31682 (not included): See..., and "LOCKED" and "DELAY" will appear on cleaning products. At high temperatures, foods react with scouring or steel-wool pad. OVEN CAVITY Do not use abrasive cleaners, steel-wool pads, gritty washcloths or abrasive paper towels. To avoid damage to order. Do not clean...
The start time is reached, the oven will turn on some models) Cleaning Method: Rub in the Self-Cleaning cycle (on automatically. When the start time is complete and the oven cools, "End" will appear on panel. ■ All-Purpose Appliance Cleaner Part Number 31682 (not included): See..., and "LOCKED" and "DELAY" will appear on cleaning products. At high temperatures, foods react with scouring or steel-wool pad. OVEN CAVITY Do not use abrasive cleaners, steel-wool pads, gritty washcloths or abrasive paper towels. To avoid damage to order. Do not clean...
Owners Manual
Page 12
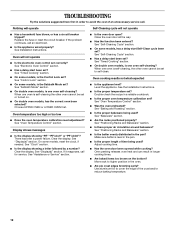
...cost of an unnecessary service call. If the problem continues, call for service. See "Sabbath Mode" section. ■ On double oven models, is the Control Lock set ? See "Oven Temperature Control" section. Display shows messages ■ Is the display showing "PF," "PF id=27" or "PF id=30...; Are baked items too brown on . ■ On double oven models, has the correct oven been selected? Nothing will operate Self-Cleaning cycle will not operate ■ Is the electronic oven control set to cover the edge of time being used ? Oven will not operate ■ Has a household fuse blown,...
...cost of an unnecessary service call. If the problem continues, call for service. See "Sabbath Mode" section. ■ On double oven models, is the Control Lock set ? See "Oven Temperature Control" section. Display shows messages ■ Is the display showing "PF," "PF id=27" or "PF id=30...; Are baked items too brown on . ■ On double oven models, has the correct oven been selected? Nothing will operate Self-Cleaning cycle will not operate ■ Is the electronic oven control set to cover the edge of time being used ? Oven will not operate ■ Has a household fuse blown,...
Owners Manual
Page 13
...and specifications on our full line of your nearest Whirlpool designated service center. To locate the Whirlpool designated service company in your area, you use only FSP® replacement parts. Stainless Steel Cleaner and Polish (stainless steel models) Order Part Number 31462 All-Purpose Appliance Cleaner... Order Part Number 31682 Broiler Pan and Grid Order Part Number 4396923 Heavy Duty Degreaser Part Number 31552 In Canada Call the Whirlpool Canada LP Customer eXperience Centre toll ...
...and specifications on our full line of your nearest Whirlpool designated service center. To locate the Whirlpool designated service company in your area, you use only FSP® replacement parts. Stainless Steel Cleaner and Polish (stainless steel models) Order Part Number 31462 All-Purpose Appliance Cleaner... Order Part Number 31682 Broiler Pan and Grid Order Part Number 4396923 Heavy Duty Degreaser Part Number 31552 In Canada Call the Whirlpool Canada LP Customer eXperience Centre toll ...

Owners Manual
Page 14
... accordance with electrical or plumbing codes, or use of consumables or cleaning products not approved by a Whirlpool designated service company. Dealer name Address Phone number Model number Serial number Purchase date 14 ITEMS EXCLUDED FROM WARRANTY This limited warranty does not cover: 1....or installation instructions. 4. This major appliance is required to Whirlpool within 30 days from your major appliance, to replace or repair house fuses, or to correct defects in accordance with original model/serial numbers that is void if the factory applied serial ...
... accordance with electrical or plumbing codes, or use of consumables or cleaning products not approved by a Whirlpool designated service company. Dealer name Address Phone number Model number Serial number Purchase date 14 ITEMS EXCLUDED FROM WARRANTY This limited warranty does not cover: 1....or installation instructions. 4. This major appliance is required to Whirlpool within 30 days from your major appliance, to replace or repair house fuses, or to correct defects in accordance with original model/serial numbers that is void if the factory applied serial ...

Warranty
Page 1
...the U.S.A., call 1-800-807-6777. 9/07 Keep this limited warranty. Dealer name Address Phone number Model number Serial number Purchase date 14 Damage resulting from your authorized Whirlpool dealer to correct house wiring or plumbing. 2. Any food loss due to repair or replace appliance ...your major appliance if it . You must be borne by Whirlpool. 5. Service must provide proof of original purchase date is not installed in accordance with original model/serial numbers that is reported to Whirlpool within 30 days from your home of your major appliance ...
...the U.S.A., call 1-800-807-6777. 9/07 Keep this limited warranty. Dealer name Address Phone number Model number Serial number Purchase date 14 Damage resulting from your authorized Whirlpool dealer to correct house wiring or plumbing. 2. Any food loss due to repair or replace appliance ...your major appliance if it . You must be borne by Whirlpool. 5. Service must provide proof of original purchase date is not installed in accordance with original model/serial numbers that is reported to Whirlpool within 30 days from your home of your major appliance ...


