
Installation Instructions
Page 1
...du four 9 Dépose de la garniture du four 9 Raccordement électrique 10 Installation du four 11 Achever l'installation 12 BUILT-IN MICROWAVE/OVEN COMBINATION SAFETY Your safety and the safety of injury, and tell you what the potential hazard is the safety alert symbol. This is , tell ... safety alert symbol and either the word "DANGER" or "WARNING." We have provided many important safety messages in this manual and on your appliance. WARNING You can be killed or seriously injured if you what can be killed or seriously injured if you and others are not followed. ...
...du four 9 Dépose de la garniture du four 9 Raccordement électrique 10 Installation du four 11 Achever l'installation 12 BUILT-IN MICROWAVE/OVEN COMBINATION SAFETY Your safety and the safety of injury, and tell you what the potential hazard is the safety alert symbol. This is , tell ... safety alert symbol and either the word "DANGER" or "WARNING." We have provided many important safety messages in this manual and on your appliance. WARNING You can be killed or seriously injured if you what can be killed or seriously injured if you and others are not followed. ...

Installation Instructions
Page 2
....1 cm) recessed height 2 It is installed in the right rear or left rear corner of the support surface to pass the appliance cable through to make sure that all governing codes and ordinances. ■ Cabinet opening dimensions that are shown must be solid, ...; Level Parts needed ■ UL listed or CSA approved conduit connector ■ UL listed wire connectors Parts supplied ■ # 8-14 x 1" screws - single oven (2), double oven (4) ■ Bottom vent (supplied on some models) ■ Two # 8-18 x ³⁄₈" screws - See "Electrical Requirements" section. ■ ...
....1 cm) recessed height 2 It is installed in the right rear or left rear corner of the support surface to pass the appliance cable through to make sure that all governing codes and ordinances. ■ Cabinet opening dimensions that are shown must be solid, ...; Level Parts needed ■ UL listed or CSA approved conduit connector ■ UL listed wire connectors Parts supplied ■ # 8-14 x 1" screws - single oven (2), double oven (4) ■ Bottom vent (supplied on some models) ■ Two # 8-18 x ³⁄₈" screws - See "Electrical Requirements" section. ■ ...
Owners Manual
Page 2
...Fahrenheit and Celsius 5 Timer 5 Control Lock 5 Oven Temperature Control 5 OVEN USE 6 Aluminum Foil 6 Positioning Racks and Bakeware 6 Bakeware 6 Meat Thermometer 6 Oven Vent 7 Baking and Roasting 7 Broiling and Custom Broiling 7 Timed Cooking 8 OVEN CARE 9 Self-Cleaning Cycle (on your appliance. This is , tell you how to potential ...WARNING." We have provided many important safety messages in this manual and on some models 9 General Cleaning 10 Oven Lights 11 Oven Door 11 TROUBLESHOOTING 12 ASSISTANCE OR SERVICE 13 WARRANTY 14 TABLE DES MATIÈRES SÉCURITÉ ...
...Fahrenheit and Celsius 5 Timer 5 Control Lock 5 Oven Temperature Control 5 OVEN USE 6 Aluminum Foil 6 Positioning Racks and Bakeware 6 Bakeware 6 Meat Thermometer 6 Oven Vent 7 Baking and Roasting 7 Broiling and Custom Broiling 7 Timed Cooking 8 OVEN CARE 9 Self-Cleaning Cycle (on your appliance. This is , tell you how to potential ...WARNING." We have provided many important safety messages in this manual and on some models 9 General Cleaning 10 Oven Lights 11 Oven Door 11 TROUBLESHOOTING 12 ASSISTANCE OR SERVICE 13 WARRANTY 14 TABLE DES MATIÈRES SÉCURITÉ ...
Owners Manual
Page 3
...Before Self-Cleaning the Oven - All other reproductive harm, and requires businesses to some of oven doors. Heating elements may result in burns from steam. The door gasket is in use dry chemical or foam-type extinguisher. ■ Use Only Dry Potholders - This appliance can cause low-level ...exposure to warn of Oven Racks - Interior surfaces of any part of California to cause cancer, birth defects, or other flammable materials contact ...
...Before Self-Cleaning the Oven - All other reproductive harm, and requires businesses to some of oven doors. Heating elements may result in burns from steam. The door gasket is in use dry chemical or foam-type extinguisher. ■ Use Only Dry Potholders - This appliance can cause low-level ...exposure to warn of Oven Racks - Interior surfaces of any part of California to cause cancer, birth defects, or other flammable materials contact ...
Owners Manual
Page 4
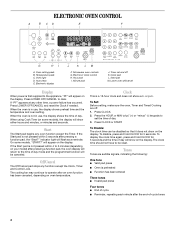
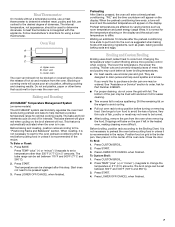
... cooling fan may continue to the time of day. Press the HOUR or MIN "plus" (+) or "minus" (-) keypads to the appliance, "PF" will show on oven temperature. To disable, press and hold CLOCK for 5 seconds. Tones Tones are off K. Temperature pads C. If the Start pad is ... will be disabled so that it does not show on the display. The clock time should not have to clear. Electronic display J K LM F. Oven light D. Clock This is preheated ■ Function has been entered Three tones ■ Invalid pad press Four tones ■ End of day will...
... cooling fan may continue to the time of day. Press the HOUR or MIN "plus" (+) or "minus" (-) keypads to the appliance, "PF" will show on oven temperature. To disable, press and hold CLOCK for 5 seconds. Tones Tones are off K. Temperature pads C. If the Start pad is ... will be disabled so that it does not show on the display. The clock time should not have to clear. Electronic display J K LM F. Oven light D. Clock This is preheated ■ Function has been entered Three tones ■ Invalid pad press Four tones ■ End of day will...
Owners Manual
Page 7
... removing the food. A meat thermometer is not supplied with leavening ingredients, such as room temperature and peak energy usage times. Upper oven B. Oven vent C. Lower oven The oven vent should be used to determine doneness. Do not set between 170°F and 500°F (77°C and 260°C). ...cook food. The bake range can be lined with foil. Preheat temperatures are designed to be ordered. Waiting an additional 10 minutes after this appliance. The bottom of fish, poultry or meat may be set plastics, paper or other than 350°F (177°C) in use a ...
... removing the food. A meat thermometer is not supplied with leavening ingredients, such as room temperature and peak energy usage times. Upper oven B. Oven vent C. Lower oven The oven vent should be used to determine doneness. Do not set between 170°F and 500°F (77°C and 260°C). ...cook food. The bake range can be lined with foil. Preheat temperatures are designed to be ordered. Waiting an additional 10 minutes after this appliance. The bottom of fish, poultry or meat may be set plastics, paper or other than 350°F (177°C) in use a ...
Owners Manual
Page 10
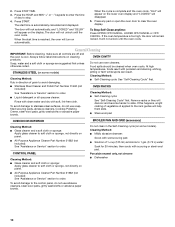
... the door will turn on the lower oven display and "LOCKED" will not unlock until the oven cools. Press any pad or open the oven door to the control panel, do not use oven cleaners. STAINLESS STEEL (on panel. ■ All-Purpose Appliance Cleaner Part Number 31682 (not included): ...See "Assistance or Service" section to the rack guides will not unlock until the oven cools. CONTROL PANEL Cleaning ...
... the door will turn on the lower oven display and "LOCKED" will not unlock until the oven cools. Press any pad or open the oven door to the control panel, do not use oven cleaners. STAINLESS STEEL (on panel. ■ All-Purpose Appliance Cleaner Part Number 31682 (not included): ...See "Assistance or Service" section to the rack guides will not unlock until the oven cools. CONTROL PANEL Cleaning ...
Owners Manual
Page 11
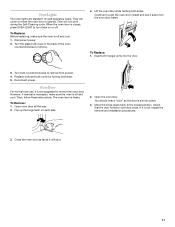
... cover by turning clockwise. 5. Oven Door For normal oven use, it is not suggested to turn them on or off and cool. 1. Then, follow these instructions. Oven Lights The oven lights are standard 15-watt appliance bulbs. Disconnect power. 2. Lift the oven door while holding both hanger arms... into place. 3. If it is not, repeat the removal and installation procedures. 3. Close the oven door as far as the ...
... cover by turning clockwise. 5. Oven Door For normal oven use, it is not suggested to turn them on or off and cool. 1. Then, follow these instructions. Oven Lights The oven lights are standard 15-watt appliance bulbs. Disconnect power. 2. Lift the oven door while holding both hanger arms... into place. 3. If it is not, repeat the removal and installation procedures. 3. Close the oven door as far as the ...
Owners Manual
Page 12
.... ■ Has a delay start been set ? Level the appliance. Adjust cooking time. ■ Has the oven door been opened while cooking? Oven peeking releases oven heat and can result in longer cooking times. ■ Are baked items too brown on . ■ On double oven models, has the correct oven been selected? If the problem continues, call for...
.... ■ Has a delay start been set ? Level the appliance. Adjust cooking time. ■ Has the oven door been opened while cooking? Oven peeking releases oven heat and can result in longer cooking times. ■ Are baked items too brown on . ■ On double oven models, has the correct oven been selected? If the problem continues, call for...
Owners Manual
Page 13
..., you still need to build every new WHIRLPOOL® appliance. Call the Whirlpool Customer eXperience Center toll free: 1-800-253-1301. To order accessories, call the Whirlpool Customer eXperience Center toll free at : Whirlpool Brand Home Appliances Customer eXperience Center 553 Benson Road Benton Harbor...stainless steel models) Order Part Number 31462 All-Purpose Appliance Cleaner Order Part Number 31682 Broiler Pan and Grid Order Part Number 4396923 Heavy Duty Degreaser Part Number 31552 In Canada Call the Whirlpool Canada LP Customer eXperience Centre toll free: 1-800-...
..., you still need to build every new WHIRLPOOL® appliance. Call the Whirlpool Customer eXperience Center toll free: 1-800-253-1301. To order accessories, call the Whirlpool Customer eXperience Center toll free at : Whirlpool Brand Home Appliances Customer eXperience Center 553 Benson Road Benton Harbor...stainless steel models) Order Part Number 31462 All-Purpose Appliance Cleaner Order Part Number 31682 Broiler Pan and Grid Order Part Number 4396923 Heavy Duty Degreaser Part Number 31552 In Canada Call the Whirlpool Canada LP Customer eXperience Centre toll free: 1-800-...

Owners Manual
Page 14
... WARRANTY This limited warranty does not cover: 1. Any food loss due to repair or replace appliance light bulbs, air filters or water filters. DISCLAIMER OF IMPLIED WARRANTIES; Write down the following information about your major appliance. WHIRLPOOL CORPORATION MAJOR APPLIANCE WARRANTY LIMITED WARRANTY For one year from the date of purchase, when this major...
... WARRANTY This limited warranty does not cover: 1. Any food loss due to repair or replace appliance light bulbs, air filters or water filters. DISCLAIMER OF IMPLIED WARRANTIES; Write down the following information about your major appliance. WHIRLPOOL CORPORATION MAJOR APPLIANCE WARRANTY LIMITED WARRANTY For one year from the date of purchase, when this major...

Warranty
Page 1
...product failures. 7. Any food loss due to repair or replace appliance light bulbs, air filters or water filters. Major appliances with original model/serial numbers that is covered by an authorized Whirlpool servicer is not installed in materials or workmanship. Write down the...installation instructions. 4. Repairs when your major appliance is used for product service if your major appliance is located in which it . This major appliance is designed to be provided by Whirlpool. 5. The removal and reinstallation of your major appliance if it is used in the country...
...product failures. 7. Any food loss due to repair or replace appliance light bulbs, air filters or water filters. Major appliances with original model/serial numbers that is covered by an authorized Whirlpool servicer is not installed in materials or workmanship. Write down the...installation instructions. 4. Repairs when your major appliance is used for product service if your major appliance is located in which it . This major appliance is designed to be provided by Whirlpool. 5. The removal and reinstallation of your major appliance if it is used in the country...