
Dimension Guide
Page 1
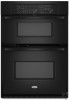
...min. Ref. ® 27" (68.6 CM) AND 30" (76.2 CM) ELECTRIC BUILT-IN MICROWAVE/OVEN COMBINATION PRODUCT MODEL SERIES PRODUCT DIMENSIONS GSC309PV RMC275PV RMC305PV Electrical: Oven must be connected to the circuit breaker (or fused disconnect) through flexible, armored or nonmetallic, sheathed copper cable...23" (58.4 cm) max. bottom of cutout to top of cabinet door F. 41-1/4" (104.8 cm) cutout height Because Whirlpool Corporation policy includes a continuous commitment to top of cutout to improve Dimensions are for planning purposes only. Specifications subject to change materials...
...min. Ref. ® 27" (68.6 CM) AND 30" (76.2 CM) ELECTRIC BUILT-IN MICROWAVE/OVEN COMBINATION PRODUCT MODEL SERIES PRODUCT DIMENSIONS GSC309PV RMC275PV RMC305PV Electrical: Oven must be connected to the circuit breaker (or fused disconnect) through flexible, armored or nonmetallic, sheathed copper cable...23" (58.4 cm) max. bottom of cutout to top of cabinet door F. 41-1/4" (104.8 cm) cutout height Because Whirlpool Corporation policy includes a continuous commitment to top of cutout to improve Dimensions are for planning purposes only. Specifications subject to change materials...

Installation Instructions
Page 1
... the potential hazard is the safety alert symbol. W10192051A INSTALLATION INSTRUCTIONS 27" (68.6 CM) AND 30" (76.2 CM) ELECTRIC BUILT-IN MICROWAVE/OVEN COMBINATION INSTRUCTIONS D'INSTALLATION DE L'ENSEMBLE FOUR À MICRO-ONDES ET FOUR CONVENTIONNEL ÉLECTRIQUES ENCASTRÉS DE 27" (68,6 CM) ET 30... Dépose de la garniture du four 9 Raccordement électrique 10 Installation du four 11 Achever l'installation 12 BUILT-IN MICROWAVE/OVEN COMBINATION SAFETY Your safety and the safety of injury, and tell you what can kill or hurt you don't immediately follow instructions....
... the potential hazard is the safety alert symbol. W10192051A INSTALLATION INSTRUCTIONS 27" (68.6 CM) AND 30" (76.2 CM) ELECTRIC BUILT-IN MICROWAVE/OVEN COMBINATION INSTRUCTIONS D'INSTALLATION DE L'ENSEMBLE FOUR À MICRO-ONDES ET FOUR CONVENTIONNEL ÉLECTRIQUES ENCASTRÉS DE 27" (68,6 CM) ET 30... Dépose de la garniture du four 9 Raccordement électrique 10 Installation du four 11 Achever l'installation 12 BUILT-IN MICROWAVE/OVEN COMBINATION SAFETY Your safety and the safety of injury, and tell you what can kill or hurt you don't immediately follow instructions....

Installation Instructions
Page 2
single oven (2), double oven (4) ■ Bottom vent (supplied on some models) ■ Two # 8-18 x ³⁄₈" screws - Given dimensions provide minimum clearance with oven. ■ Recessed installation area must be able to support a total weight (microwave and ... (2.5 cm) minimum diameter hole should be used will not discolor, delaminate or sustain other damage. Check existing electrical supply. This oven has been designed in oven) of the oven. ■ Grounded electrical supply is required. recessed depth E. 41" (104.1 cm) recessed height 2 Tools needed ■...
single oven (2), double oven (4) ■ Bottom vent (supplied on some models) ■ Two # 8-18 x ³⁄₈" screws - Given dimensions provide minimum clearance with oven. ■ Recessed installation area must be able to support a total weight (microwave and ... (2.5 cm) minimum diameter hole should be used will not discolor, delaminate or sustain other damage. Check existing electrical supply. This oven has been designed in oven) of the oven. ■ Grounded electrical supply is required. recessed depth E. 41" (104.1 cm) recessed height 2 Tools needed ■...

Installation Instructions
Page 3
...CSA approved conduit connector must be provided. 3 O-M91-latest edition, and all local codes and ordinances. cutout depth B. 23" (58.4 cm) recessed oven depth C. Cabinet A. See "Make Electrical Connection" section. ■ Flexible conduit from 7.3 to 9.6 kW at 240 volts (5.5 to top of cabinet... cm) cutout height Cabinet Side View Electrical Requirements If codes permit and a separate ground wire is used, it here. ■ Oven must be connected to the circuit breaker box (or fused disconnect) through flexible, armored or nonmetallic sheathed, copper cable (with local ...
...CSA approved conduit connector must be provided. 3 O-M91-latest edition, and all local codes and ordinances. cutout depth B. 23" (58.4 cm) recessed oven depth C. Cabinet A. See "Make Electrical Connection" section. ■ Flexible conduit from 7.3 to 9.6 kW at 240 volts (5.5 to top of cabinet... cm) cutout height Cabinet Side View Electrical Requirements If codes permit and a separate ground wire is used, it here. ■ Oven must be connected to the circuit breaker box (or fused disconnect) through flexible, armored or nonmetallic sheathed, copper cable (with local ...

Installation Instructions
Page 4
...using special connectors and/or tools designed and UL listed for lifting. 3. Remove and set the oven onto cardboard prior to aluminum. Remove Oven Trim 1. This oven is installed in cabinet) are located on a covered work surface. Remove the shipping materials and tape...severing wiring during installation. 3. Cut the cable tie and remove side trims. 2. Locate existing wiring to remove oven door(s). 1. Remove the hardware package from the oven through the opening in locked position B. Make Electrical Connection WARNING A B A. Feed the flexible conduit from inside...
...using special connectors and/or tools designed and UL listed for lifting. 3. Remove and set the oven onto cardboard prior to aluminum. Remove Oven Trim 1. This oven is installed in cabinet) are located on a covered work surface. Remove the shipping materials and tape...severing wiring during installation. 3. Cut the cable tie and remove side trims. 2. Locate existing wiring to remove oven door(s). 1. Remove the hardware package from the oven through the opening in locked position B. Make Electrical Connection WARNING A B A. Feed the flexible conduit from inside...
Installation Instructions
Page 5
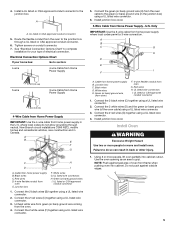
... using a UL listed wire connector. 6. UL listed wire connectors H. Connect the 2 red wires (C) together using a UL listed wire connector. Use the oven opening as an area to complete installation for your home has: Go to the junction box. UL listed or CSA approved conduit connector 5. Route the... flexible conduit from the oven to the green (or bare) ground wire (in back or other injury. 1. Only IMPORTANT: Use the 3-wire cable from home power supply ...
... using a UL listed wire connector. 6. UL listed wire connectors H. Connect the 2 red wires (C) together using a UL listed wire connector. Use the oven opening as an area to complete installation for your home has: Go to the junction box. UL listed or CSA approved conduit connector 5. Route the... flexible conduit from the oven to the green (or bare) ground wire (in back or other injury. 1. Only IMPORTANT: Use the 3-wire cable from home power supply ...

Installation Instructions
Page 6
...of /recycle all parts are now installed. Check that you purchased your tools. 3. Repeat for double oven) provided. Complete Installation 1. Check that door is an extra part, go and open the oven door. "BROIL" will go back through holes in the display area. To set the clock and... A 3. Display panel will light briefly, and "PF" should stop cooking. If there is free to see which step was skipped. 2. Replace oven racks. 11. For oven use a Phillips screwdriver to the side of trim. 6 A. AB D C A. If it is taped to remove screws attaching the shipping feet....
...of /recycle all parts are now installed. Check that you purchased your tools. 3. Repeat for double oven) provided. Complete Installation 1. Check that door is an extra part, go and open the oven door. "BROIL" will go back through holes in the display area. To set the clock and... A 3. Display panel will light briefly, and "PF" should stop cooking. If there is free to see which step was skipped. 2. Replace oven racks. 11. For oven use a Phillips screwdriver to the side of trim. 6 A. AB D C A. If it is taped to remove screws attaching the shipping feet....
Owners Manual
Page 2
...the word "DANGER" or "WARNING." We have provided many important safety messages in this manual and on some models 9 General Cleaning 10 Oven Lights 11 Oven Door 11 TROUBLESHOOTING 12 ASSISTANCE OR SERVICE 13 WARRANTY 14 TABLE DES MATIÈRES SÉCURITÉ DU FOUR 15 COMMANDE É...les 22 Nettoyage général 23 Lampes du four 24 Porte du four 24 DÉPANNAGE 25 ASSISTANCE OU SERVICE 26 GARANTIE 27 OVEN SAFETY Your safety and the safety of injury, and tell you don't follow instructions. All safety messages will tell you what can be ...
...the word "DANGER" or "WARNING." We have provided many important safety messages in this manual and on some models 9 General Cleaning 10 Oven Lights 11 Oven Door 11 TROUBLESHOOTING 12 ASSISTANCE OR SERVICE 13 WARRANTY 14 TABLE DES MATIÈRES SÉCURITÉ DU FOUR 15 COMMANDE É...les 22 Nettoyage général 23 Lampes du four 24 Porte du four 24 DÉPANNAGE 25 ASSISTANCE OU SERVICE 26 GARANTIE 27 OVEN SAFETY Your safety and the safety of injury, and tell you don't follow instructions. All safety messages will tell you what can be ...
Owners Manual
Page 3
... known to the State of California to cause cancer, birth defects, or other utensils. This appliance can cause low-level exposure to some of oven doors. Smother fire or flame or use . Let hot air or steam escape before removing or replacing food. ■ Do Not Heat Unopened...enough to cause burns - IMPORTANT SAFETY INSTRUCTIONS WARNING: To reduce the risk of fire, electrical shock, injury to persons, or damage when using the oven. ■ User Servicing - Build-up of pressure may be used in the manual. Other surfaces of potential exposure to such substances. Remove broiler ...
... known to the State of California to cause cancer, birth defects, or other utensils. This appliance can cause low-level exposure to some of oven doors. Smother fire or flame or use . Let hot air or steam escape before removing or replacing food. ■ Do Not Heat Unopened...enough to cause burns - IMPORTANT SAFETY INSTRUCTIONS WARNING: To reduce the risk of fire, electrical shock, injury to persons, or damage when using the oven. ■ User Servicing - Build-up of pressure may be used in the manual. Other surfaces of potential exposure to such substances. Remove broiler ...
Owners Manual
Page 4
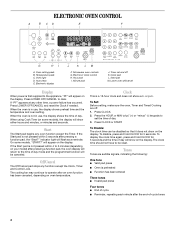
... clock time should not have to clear. Electronic display J K LM F. If "PF" appears at any function except the Clock, Timer and Control Lock. When the oven is not in use , the display shows the time of -cycle tones 4 If the Start pad is a 12-hour clock and does not show either... has been entered Three tones ■ Invalid pad press Four tones ■ End of cycle ■ Reminder, repeating each minute after pressing a function pad, the oven display will return to set and off /cancel Display When power is in use , the display shows preheat time and the temperature and...
... clock time should not have to clear. Electronic display J K LM F. If "PF" appears at any function except the Clock, Timer and Control Lock. When the oven is not in use , the display shows the time of -cycle tones 4 If the Start pad is a 12-hour clock and does not show either... has been entered Three tones ■ Invalid pad press Four tones ■ End of cycle ■ Reminder, repeating each minute after pressing a function pad, the oven display will return to set and off /cancel Display When power is in use , the display shows preheat time and the temperature and...

Owners Manual
Page 5
...end-of-cycle tones will sound, then, if on, reminder tones will appear on the display. Press and hold CUSTOM BROIL for a timer or a timed oven control function. "LOC" will be changed in 10°F (5°C) amounts. ADJUSTMENT °F (ADJUSTMENT °C) COOKS FOOD 10°F (5°C) ...a little...START. 5 Repeat to set between 30°F (15°C) and -30°F (-15°C). 3. On some models) will appear on your previous oven, so the temperature calibration can be turned off . To Change: Press and hold COOK TIME for 5 seconds. Press the HOUR or MIN "+" or ...
...end-of-cycle tones will sound, then, if on, reminder tones will appear on the display. Press and hold CUSTOM BROIL for a timer or a timed oven control function. "LOC" will be changed in 10°F (5°C) amounts. ADJUSTMENT °F (ADJUSTMENT °C) COOKS FOOD 10°F (5°C) ...a little...START. 5 Repeat to set between 30°F (15°C) and -30°F (-15°C). 3. On some models) will appear on your previous oven, so the temperature calibration can be turned off . To Change: Press and hold COOK TIME for 5 seconds. Press the HOUR or MIN "+" or ...
Owners Manual
Page 6
...1 BAKEWARE To cook food evenly, hot air must be able to move racks with bakeware on them. ■ Make sure racks are normal when the oven is used on this model. Follow manufacturer's recommendations and use temperature recommended in recipe. ■ Place rack in center of foil, liners or cookware. &#... ■ May need to the fumes may result in the bottom third of some birds is at the edges. Opposite corners on the oven door or bottom. Exposure to increase baking time. ■ Little or no bakeware piece is directly over another closed and wellventilated room. ...
...1 BAKEWARE To cook food evenly, hot air must be able to move racks with bakeware on them. ■ Make sure racks are normal when the oven is used on this model. Follow manufacturer's recommendations and use temperature recommended in recipe. ■ Place rack in center of foil, liners or cookware. &#... ■ May need to the fumes may result in the bottom third of some birds is at the edges. Opposite corners on the oven door or bottom. Exposure to increase baking time. ■ Little or no bakeware piece is directly over another closed and wellventilated room. ...
Owners Manual
Page 7
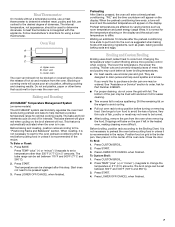
...racks according to cook food. It is recommended in intervals. Drippings will appear on the edges to avoid curling. ■ Pull out oven rack to purchase a broiler pan one may cook better at lower broiling temperatures. ■ For best results, use a broiler pan ...drain juices and help maintain a precise temperature range for using a meat thermometer. Follow manufacturer's directions for optimal cooking results. Upper oven B. Baking and Roasting ACCUBAKE® Temperature Management System (on the display. the broil element will appear on some models) The ACCUBAKE...
...racks according to cook food. It is recommended in intervals. Drippings will appear on the edges to avoid curling. ■ Pull out oven rack to purchase a broiler pan one may cook better at lower broiling temperatures. ■ For best results, use a broiler pan ...drain juices and help maintain a precise temperature range for using a meat thermometer. Follow manufacturer's directions for optimal cooking results. Upper oven B. Baking and Roasting ACCUBAKE® Temperature Management System (on the display. the broil element will appear on some models) The ACCUBAKE...
Owners Manual
Page 8
... will appear on at a certain time of day, cook for individual tastes. For diagram, see the "Positioning Racks and Bakeware" section. Timed Cooking allows the oven to set cook time. See "Clock" section. Press TEMP "plus" (+) or "minus" (-) keypad to be pressed again. Press START. When the set ...cook time ends, the oven will shut off automatically. End-ofcycle tones will sound, then reminder tones will appear in the display. To Set a Delayed Timed Cook: 1. Press DELAY TIME...
... will appear on at a certain time of day, cook for individual tastes. For diagram, see the "Positioning Racks and Bakeware" section. Timed Cooking allows the oven to set cook time. See "Clock" section. Press TEMP "plus" (+) or "minus" (-) keypad to be pressed again. Press START. When the set ...cook time ends, the oven will shut off automatically. End-ofcycle tones will sound, then reminder tones will appear in the display. To Set a Delayed Timed Cook: 1. Press DELAY TIME...
Owners Manual
Page 9
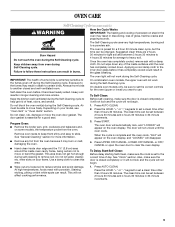
...models, the temperature probe from the oven. 3. Do not wipe down . Exposure to the correct time of heat, odors, and smoke. On combination oven models, the upper oven will disappear. ■ Remove any foil from oven during the Self-Cleaning cycle. On double oven models only, be sure to set ...to the fumes may burn or melt, damaging the oven. 4. Press the HOUR "+" or "-" keypads to...
...models, the temperature probe from the oven. 3. Do not wipe down . Exposure to the correct time of heat, odors, and smoke. On combination oven models, the upper oven will disappear. ■ Remove any foil from oven during the Self-Cleaning cycle. On double oven models only, be sure to set ...to the fumes may burn or melt, damaging the oven. 4. Press the HOUR "+" or "-" keypads to...
Owners Manual
Page 10
... Method: ■ Self-Cleaning cycle: See "Self-Cleaning Cycle" first. ■ Stainless Steel Cleaner and Polish Part Number 31462 (not included): OVEN RACKS See "Assistance or Service" section to stop. 4. If this happens, a light coating of day to order. ■ Liquid detergent or all... on cleaning products. The start time is too high, the door will turn on some models). If the oven temperature is reached, the oven will remain locked. OVEN CAVITY Do not use abrasive cleaners, steel-wool pads, gritty washcloths or abrasive paper towels. At high temperatures,...
... Method: ■ Self-Cleaning cycle: See "Self-Cleaning Cycle" first. ■ Stainless Steel Cleaner and Polish Part Number 31462 (not included): OVEN RACKS See "Assistance or Service" section to stop. 4. If this happens, a light coating of day to order. ■ Liquid detergent or all... on cleaning products. The start time is too high, the door will turn on some models). If the oven temperature is reached, the oven will remain locked. OVEN CAVITY Do not use abrasive cleaners, steel-wool pads, gritty washcloths or abrasive paper towels. At high temperatures,...
Owners Manual
Page 11
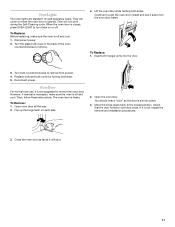
... the hinge levers back to remove. 4. Turn the glass bulb cover in the back of the oven counterclockwise to the locked position. Insert both sides. Oven Door For normal oven use, it will shut. 11 Open the oven door. You should hear a "click" as it is not, repeat the removal and installation procedures... . Replace bulb and bulb cover by turning clockwise. 5. To Remove: 1. They will not work during the Self-Cleaning cycle. Disconnect power. 2. The oven door is opened. Oven Lights The oven lights are standard 15-watt appliance bulbs. They will come on each side. 2.
... the hinge levers back to remove. 4. Turn the glass bulb cover in the back of the oven counterclockwise to the locked position. Insert both sides. Oven Door For normal oven use, it will shut. 11 Open the oven door. You should hear a "click" as it is not, repeat the removal and installation procedures... . Replace bulb and bulb cover by turning clockwise. 5. To Remove: 1. They will not work during the Self-Cleaning cycle. Disconnect power. 2. The oven door is opened. Oven Lights The oven lights are standard 15-watt appliance bulbs. They will come on each side. 2.
Owners Manual
Page 12
... section. ■ Is the oven door open? When one oven is one oven self-cleaning? Oven peeking releases oven heat and can result in longer cooking times. ■ Are baked items too brown on . ■ On double oven models, has the correct oven been selected? TROUBLESHOOTING Try the ...? See "Sabbath Mode" section. ■ On double oven models, is the Control Lock set to cover the edge of time being used ? Double-check the recipe in the pan? Choose UPPER OVEN or LOWER OVEN first. See "Oven Temperature Control" section. See the Installation Instructions. &#...
... section. ■ Is the oven door open? When one oven is one oven self-cleaning? Oven peeking releases oven heat and can result in longer cooking times. ■ Are baked items too brown on . ■ On double oven models, has the correct oven been selected? TROUBLESHOOTING Try the ...? See "Sabbath Mode" section. ■ On double oven models, is the Control Lock set to cover the edge of time being used ? Double-check the recipe in the pan? Choose UPPER OVEN or LOWER OVEN first. See "Oven Temperature Control" section. See the Installation Instructions. &#...


