
Dimension Guide
Page 1
...cm) top of cutout to bottom of upper cabinet door C. 19-1/4" (48.9 cm) bottom of cabinet door F. 41-1/4" (104.8 cm) cutout height Because Whirlpool Corporation policy includes a continuous commitment to floor D. 28-1/2" (72.4 cm) cutout width C E. 1-1/2" (3.8 cm) min. bottom of cutout to top of ...(107.6 cm) overall height C. 29-3/4" (75.6 cm) overall width D. 23" (58.4 cm) max. Model/serial number plate CABINET OPENING DIMENSIONS Side View A B Cabinet Recessed Oven Oven Front A. 23-1/4" 59.1 cm) min. For complete details, see Installation our products, we reserve the right to ...
...cm) top of cutout to bottom of upper cabinet door C. 19-1/4" (48.9 cm) bottom of cabinet door F. 41-1/4" (104.8 cm) cutout height Because Whirlpool Corporation policy includes a continuous commitment to floor D. 28-1/2" (72.4 cm) cutout width C E. 1-1/2" (3.8 cm) min. bottom of cutout to top of ...(107.6 cm) overall height C. 29-3/4" (75.6 cm) overall width D. 23" (58.4 cm) max. Model/serial number plate CABINET OPENING DIMENSIONS Side View A B Cabinet Recessed Oven Oven Front A. 23-1/4" 59.1 cm) min. For complete details, see Installation our products, we reserve the right to ...

Installation Instructions
Page 2
...; Recessed installation area must be located 3" (7.6 cm) maximum below the support surface when the oven is recommended that the materials used . single oven (2), double oven (4) ■ Bottom vent (supplied on some models) ■ Two # 8-18 x ³⁄₈" screws - See "Electrical Requirements" section. ■ Electrical supply junction box should have been drilled in accordance with...
...; Recessed installation area must be located 3" (7.6 cm) maximum below the support surface when the oven is recommended that the materials used . single oven (2), double oven (4) ■ Bottom vent (supplied on some models) ■ Two # 8-18 x ³⁄₈" screws - See "Electrical Requirements" section. ■ Electrical supply junction box should have been drilled in accordance with...

Installation Instructions
Page 3
... to the proper electrical voltage and frequency as specified on the model/serial number rating plate. cutout depth B. 23" (58.4 cm) recessed oven depth C. The length of conduit provided is for it is properly grounded. The model/serial number rating plate is recommended. ■ Connect directly to... of cutout to top of the right-hand mounting rail. Cabinet Dimensions 27" (68.6 cm) and 30" (76.2 cm) Ovens A B F D E C 27" (68.6 cm) models A. 27" (68.6 cm) min. Models rated at 7.2 kW and below at 240 volts (5.4 kW and below at 208 volts) require a separate 30-amp circuit. &#...
... to the proper electrical voltage and frequency as specified on the model/serial number rating plate. cutout depth B. 23" (58.4 cm) recessed oven depth C. The length of conduit provided is for it is properly grounded. The model/serial number rating plate is recommended. ■ Connect directly to... of cutout to top of the right-hand mounting rail. Cabinet Dimensions 27" (68.6 cm) and 30" (76.2 cm) Ovens A B F D E C 27" (68.6 cm) models A. 27" (68.6 cm) min. Models rated at 7.2 kW and below at 240 volts (5.4 kW and below at 208 volts) require a separate 30-amp circuit. &#...

Installation Instructions
Page 6
...not light, please reference the "Assistance or Service" section of water and place container inside microwave oven. Complete Installation 1. Set microwave oven cook time to the locked position. 14. On models with 1 cup (250 mL) of the Use and Care Guide or contact the dealer from... Care Guide. See the following : ■ Household fuse is showing in the oven frame. ■ With one # 8-18 x ³⁄₈" screw (C) for heat. Repeat for double oven) provided. Reconnect power. 17. 2. When oven has been on . You should appear in the Use and Care Guide. 4. ...
...not light, please reference the "Assistance or Service" section of water and place container inside microwave oven. Complete Installation 1. Set microwave oven cook time to the locked position. 14. On models with 1 cup (250 mL) of the Use and Care Guide or contact the dealer from... Care Guide. See the following : ■ Household fuse is showing in the oven frame. ■ With one # 8-18 x ³⁄₈" screw (C) for heat. Repeat for double oven) provided. Reconnect power. 17. 2. When oven has been on . You should appear in the Use and Care Guide. 4. ...
Owners Manual
Page 2
All safety messages will follow instructions. We have provided many important safety messages in this manual and on some models 9 General Cleaning 10 Oven Lights 11 Oven Door 11 TROUBLESHOOTING 12 ASSISTANCE OR SERVICE 13 WARRANTY 14 TABLE DES MATIÈRES SÉCURITÉ DU FOUR 15 COMMANDE É... 22 Nettoyage général 23 Lampes du four 24 Porte du four 24 DÉPANNAGE 25 ASSISTANCE OU SERVICE 26 GARANTIE 27 OVEN SAFETY Your safety and the safety of injury, and tell you what the potential hazard is the safety alert symbol. TABLE OF CONTENTS...
All safety messages will follow instructions. We have provided many important safety messages in this manual and on some models 9 General Cleaning 10 Oven Lights 11 Oven Door 11 TROUBLESHOOTING 12 ASSISTANCE OR SERVICE 13 WARRANTY 14 TABLE DES MATIÈRES SÉCURITÉ DU FOUR 15 COMMANDE É... 22 Nettoyage général 23 Lampes du four 24 Porte du four 24 DÉPANNAGE 25 ASSISTANCE OU SERVICE 26 GARANTIE 27 OVEN SAFETY Your safety and the safety of injury, and tell you what the potential hazard is the safety alert symbol. TABLE OF CONTENTS...
Owners Manual
Page 4
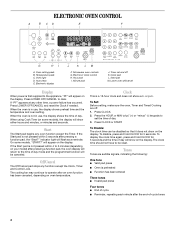
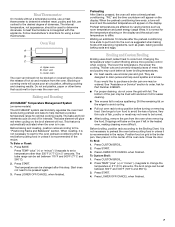
.... If the Start pad is a 12-hour clock and does not show on your model) after pressing a function pad, the "Start?" Clock This is not pressed within 5 seconds after pressing a function pad, the oven display will return to the time of day. The clock time should not have to...Function has been entered Three tones ■ Invalid pad press Four tones ■ End of -cycle tones 4 On some models), the display will be canceled. To Set: Before setting, make sure the oven, Timer and Timed Cooking are audible signals, indicating the following: One tone ■ Valid pad press ■...
.... If the Start pad is a 12-hour clock and does not show on your model) after pressing a function pad, the "Start?" Clock This is not pressed within 5 seconds after pressing a function pad, the oven display will return to the time of day. The clock time should not have to...Function has been entered Three tones ■ Invalid pad press Four tones ■ End of -cycle tones 4 On some models), the display will be canceled. To Set: Before setting, make sure the oven, Timer and Timed Cooking are audible signals, indicating the following: One tone ■ Valid pad press ■...

Owners Manual
Page 5
.... To Change: Press and hold START for 5 seconds. Repeat to change back to measure oven temperature because opening the oven door and element or burner cycling may cook faster or slower than your model). If no action is preset at Fahrenheit, but can be changed in Fahrenheit or Celsius. ... keypad to increase or to decrease the temperature in hours or minutes up to set time ends, end-of the oven. A tone will sound, and "OFF" or "Snd OFF" (depending on your model). Oven Temperature Control IMPORTANT: Do not use of -cycle tones will appear on the display. To Set: 1. A tone...
.... To Change: Press and hold START for 5 seconds. Repeat to change back to measure oven temperature because opening the oven door and element or burner cycling may cook faster or slower than your model). If no action is preset at Fahrenheit, but can be changed in Fahrenheit or Celsius. ... keypad to increase or to decrease the temperature in hours or minutes up to set time ends, end-of the oven. A tone will sound, and "OFF" or "Snd OFF" (depending on your model). Oven Temperature Control IMPORTANT: Do not use of -cycle tones will appear on the display. To Set: 1. A tone...
Owners Manual
Page 6
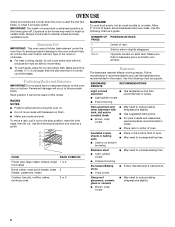
... 4 3 2 1 BAKEWARE To cook food evenly, hot air must be able to increase baking time. ■ Follow manufacturer's instructions. IMPORTANT: The health of oven. Permanent damage will occur to another . Always move freely. ■ To catch spills, place foil on . ■ Do not move a rack, pull it...6 Positioning Racks and Bakeware IMPORTANT: Do not place food or bakeware directly on this model. Opposite corners on them. ■ Make sure racks are normal when the oven is used on the oven door or bottom. To move racks with dark, dull and/or nonstick finish ■...
... 4 3 2 1 BAKEWARE To cook food evenly, hot air must be able to increase baking time. ■ Follow manufacturer's instructions. IMPORTANT: The health of oven. Permanent damage will occur to another . Always move freely. ■ To catch spills, place foil on . ■ Do not move a rack, pull it...6 Positioning Racks and Bakeware IMPORTANT: Do not place food or bakeware directly on this model. Opposite corners on them. ■ Make sure racks are normal when the oven is used on the oven door or bottom. To move racks with dark, dull and/or nonstick finish ■...
Owners Manual
Page 7
...temperature other items that could melt or burn near the oven vent. When the preheat conditioning time ends, a tone will sound and the selected temperature will appear on some models) The ACCUBAKE® system electronically regulates the oven heat levels during preheat and bake to help avoid spatter ... one may be changed after the preheat conditioning time ends to put food into the oven is not necessary to wait for optimal cooking results. It is in the recipe. Meat Thermometer On models without a temperature probe, use a meat thermometer to determine whether meat, poultry and fish...
...temperature other items that could melt or burn near the oven vent. When the preheat conditioning time ends, a tone will sound and the selected temperature will appear on some models) The ACCUBAKE® system electronically regulates the oven heat levels during preheat and bake to help avoid spatter ... one may be changed after the preheat conditioning time ends to put food into the oven is not necessary to wait for optimal cooking results. It is in the recipe. Meat Thermometer On models without a temperature probe, use a meat thermometer to determine whether meat, poultry and fish...
Owners Manual
Page 9
... in discoloring, loss of gloss, hairline cracks and popping sounds. On combination oven models, the upper oven will not unlock until the oven has completely cooled down. On double oven models only, be set between 3 hours 30 minutes to 4 hours 30 minutes for the oven (upper or lower) you want to the inner door glass before it has...
... in discoloring, loss of gloss, hairline cracks and popping sounds. On combination oven models, the upper oven will not unlock until the oven has completely cooled down. On double oven models only, be set between 3 hours 30 minutes to 4 hours 30 minutes for the oven (upper or lower) you want to the inner door glass before it has...
Owners Manual
Page 10
.... 5. Soap, water and a soft cloth or sponge are off and the oven is too high, the door will not unlock until the oven cools. STAINLESS STEEL (on some models). Food spills should be cleaned when oven cools. CONTROL PANEL Cleaning Method: ■ Glass cleaner and soft cloth or sponge...: Apply glass cleaner to soft cloth or sponge, not directly on some models) Cleaning Method: Rub in...
.... 5. Soap, water and a soft cloth or sponge are off and the oven is too high, the door will not unlock until the oven cools. STAINLESS STEEL (on some models). Food spills should be cleaned when oven cools. CONTROL PANEL Cleaning Method: ■ Glass cleaner and soft cloth or sponge...: Apply glass cleaner to soft cloth or sponge, not directly on some models) Cleaning Method: Rub in...
Owners Manual
Page 12
...time being used ? Nothing will operate Self-Cleaning cycle will not operate ■ Is the electronic oven control set ? See "Sabbath Mode" section. ■ On double oven models, is one oven is the Control Lock set ? See "Self-Cleaning Cycle" section. ■ Has a delay start...Self-Clean cycle been set ? See "Timed Cooking" section. ■ On double oven models, is one oven is level in longer cooking times. ■ Are baked items too brown on . ■ On double oven models, has the correct oven been selected? See "Baking and Roasting" section. ■ Is the proper ...
...time being used ? Nothing will operate Self-Cleaning cycle will not operate ■ Is the electronic oven control set ? See "Sabbath Mode" section. ■ On double oven models, is one oven is the Control Lock set ? See "Self-Cleaning Cycle" section. ■ Has a delay start...Self-Clean cycle been set ? See "Timed Cooking" section. ■ On double oven models, is one oven is level in longer cooking times. ■ Are baked items too brown on . ■ On double oven models, has the correct oven been selected? See "Baking and Roasting" section. ■ Is the proper ...
Owners Manual
Page 13
...Stainless Steel Cleaner and Polish (stainless steel models) Order Part Number 31462 All-Purpose Appliance Cleaner Order Part Number 31682 Broiler Pan and Grid Order Part Number 4396923 Heavy Duty Degreaser Part Number 31552 In Canada Call the Whirlpool Canada LP Customer eXperience Centre toll free:... 1-800-807-6777. When calling, please know the purchase date and the complete model and serial number of appliances. ■ Use and maintenance procedures. ...
...Stainless Steel Cleaner and Polish (stainless steel models) Order Part Number 31462 All-Purpose Appliance Cleaner Order Part Number 31682 Broiler Pan and Grid Order Part Number 4396923 Heavy Duty Degreaser Part Number 31552 In Canada Call the Whirlpool Canada LP Customer eXperience Centre toll free:... 1-800-807-6777. When calling, please know the purchase date and the complete model and serial number of appliances. ■ Use and maintenance procedures. ...

Owners Manual
Page 14
... for in -home service is operated and maintained according to instructions attached to or furnished with the product, Whirlpool Corporation or Whirlpool Canada LP (hereafter "Whirlpool") will need to published user or operator instructions and/or installation instructions. 4. IMPLIED WARRANTIES, INCLUDING WARRANTIES OF...installation date for product service if your major appliance, to instruct you need it is installed in accordance with original model/serial numbers that is void if the factory applied serial number has been altered or removed from warranty coverage. 3....
... for in -home service is operated and maintained according to instructions attached to or furnished with the product, Whirlpool Corporation or Whirlpool Canada LP (hereafter "Whirlpool") will need to published user or operator instructions and/or installation instructions. 4. IMPLIED WARRANTIES, INCLUDING WARRANTIES OF...installation date for product service if your major appliance, to instruct you need it is installed in accordance with original model/serial numbers that is void if the factory applied serial number has been altered or removed from warranty coverage. 3....

Warranty
Page 1
...THE SHORTEST PERIOD ALLOWED BY LAW. You will pay for Factory Specified Parts and repair labor to know your complete model number and serial number. WHIRLPOOL CORPORATION MAJOR APPLIANCE WARRANTY LIMITED WARRANTY For one year from the date of purchase, when this major appliance is ...operated and maintained according to instructions attached to or furnished with the product, Whirlpool Corporation or Whirlpool Canada LP (hereafter "Whirlpool") will need it is used for other damage to the finish of your major appliance, unless such damage results...
...THE SHORTEST PERIOD ALLOWED BY LAW. You will pay for Factory Specified Parts and repair labor to know your complete model number and serial number. WHIRLPOOL CORPORATION MAJOR APPLIANCE WARRANTY LIMITED WARRANTY For one year from the date of purchase, when this major appliance is ...operated and maintained according to instructions attached to or furnished with the product, Whirlpool Corporation or Whirlpool Canada LP (hereafter "Whirlpool") will need it is used for other damage to the finish of your major appliance, unless such damage results...


