
English Manual
Page 1
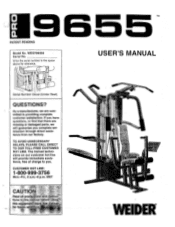
Write the serial number in the space above for future ref( rt WEIDER TO AVOID UNNECESSARY DELAYS, PLEASE CALL DIRECT TO OUR TOLL-FREE CUSTOMER HOT LINE. The trained technicians on our customer hot line will ...questions, or find that there are com- MST CAUTI ,Read all oreceutiOna and instruc Cons inthis manual before using tbls equipmentSave s Minim for reference. 0 0 0 • 0 Serial Number Decal (Under Seat) USER'S MANUAL QUESTIONS? CUSTOMER HOT LINE: 1-800-999-3756 Mon.-Fri., 6 a.m.-6 p.m. If you . 0 a 9655 PATENT PENDING Model No. tance from our factory.
Write the serial number in the space above for future ref( rt WEIDER TO AVOID UNNECESSARY DELAYS, PLEASE CALL DIRECT TO OUR TOLL-FREE CUSTOMER HOT LINE. The trained technicians on our customer hot line will ...questions, or find that there are com- MST CAUTI ,Read all oreceutiOna and instruc Cons inthis manual before using tbls equipmentSave s Minim for reference. 0 0 0 • 0 Serial Number Decal (Under Seat) USER'S MANUAL QUESTIONS? CUSTOMER HOT LINE: 1-800-999-3756 Mon.-Fri., 6 a.m.-6 p.m. If you . 0 a 9655 PATENT PENDING Model No. tance from our factory.

English Manual
Page 2
... any and all other warranties and any economic loss, loss of property, loss of revenues or profits, loss of enjoyment or use, costs of this manual. Some states do not allow limitations on how long an implied warranty lasts. ICON HEALTH & FITNESS, INC., 1500 S. 1000 W., LOGAN, UT 84321...whatsoever nature. This warranty gives you specific legal rights. Remove the PART IDENTIFICATION CHART and the PART LIST/EXPLODED DRAWING before beginning assembly. WEIDER is made must be received by ICON. All returns must be pre-authorized by ICON at one of its authorized service centers with ...
... any and all other warranties and any economic loss, loss of property, loss of revenues or profits, loss of enjoyment or use, costs of this manual. Some states do not allow limitations on how long an implied warranty lasts. ICON HEALTH & FITNESS, INC., 1500 S. 1000 W., LOGAN, UT 84321...whatsoever nature. This warranty gives you specific legal rights. Remove the PART IDENTIFICATION CHART and the PART LIST/EXPLODED DRAWING before beginning assembly. WEIDER is made must be received by ICON. All returns must be pre-authorized by ICON at one of its authorized service centers with ...
English Manual
Page 3
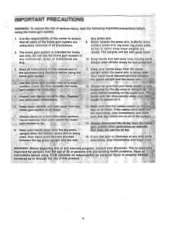
... the assist upright and the assist arm. 12. The assist arm can drop quickly when your body weight IS Placed on all instructions in this manual and in any time while exercising, stop immediately and make sure,that the cables are on it. 6 Keep small children and pets away from the...
... the assist upright and the assist arm. 12. The assist arm can drop quickly when your body weight IS Placed on all instructions in this manual and in any time while exercising, stop immediately and make sure,that the cables are on it. 6 Keep small children and pets away from the...
English Manual
Page 4
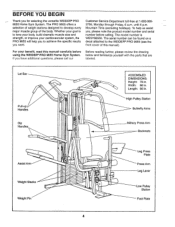
..., Monday through Friday, 6 a.m. The serial number can be found on a decal attached to the WEIDER® PRO 9655 (see the front cover of the body. Length: 66 in . To help you to develop every major muscle group of this manual carefully before calling. The model number is to tone your body, build dramatic muscle...
..., Monday through Friday, 6 a.m. The serial number can be found on a decal attached to the WEIDER® PRO 9655 (see the front cover of the body. Length: 66 in . To help you to develop every major muscle group of this manual carefully before calling. The model number is to tone your body, build dramatic muscle...
English Manual
Page 5
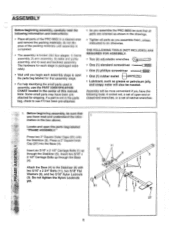
...screwdriver • One (1) phillips screwdriver • One (1) rubber mallet • Lubricant, such as you assemble them, unless instructed to do not dispose of this manual. Press two 2" Square Outer Caps (51) onto the Stabilizer (5). If a part is broken into the Base (4). 11 Insert six 5/16" x 2 1/2" Carriage... in the box above. LL1 Attach the Base (4) to see if it has been pre-attached. • As you assemble the PRO 9655 be sure that you have been preattached for that assembly stage. • For help identifying the small parts used in assembly, use the...
...screwdriver • One (1) phillips screwdriver • One (1) rubber mallet • Lubricant, such as you assemble them, unless instructed to do not dispose of this manual. Press two 2" Square Outer Caps (51) onto the Stabilizer (5). If a part is broken into the Base (4). 11 Insert six 5/16" x 2 1/2" Carriage... in the box above. LL1 Attach the Base (4) to see if it has been pre-attached. • As you assemble the PRO 9655 be sure that you have been preattached for that assembly stage. • For help identifying the small parts used in assembly, use the...
English Manual
Page 13
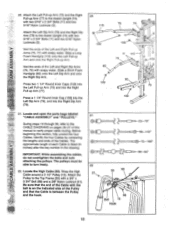
...-up LU Arm and onto the Right Pull-up Arms (75, 77) with two 5/16" x 2 3/4" Bolts (11) and two 5/16" Nylon Locknuts (3). Before beginning this manual to the Assist Upright (74) with soapy water. Wrap the High Cable around a 3 1/2" Pulley (15). Attach the Left Dip Arm (78) and the Right Dip...
...-up LU Arm and onto the Right Pull-up Arms (75, 77) with two 5/16" x 2 3/4" Bolts (11) and two 5/16" Nylon Locknuts (3). Before beginning this manual to the Assist Upright (74) with soapy water. Wrap the High Cable around a 3 1/2" Pulley (15). Attach the Left Dip Arm (78) and the Right Dip...
English Manual
Page 23
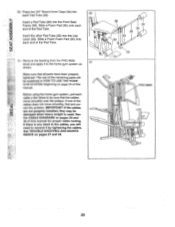
...28). Make sure that the cables move smoothly, find and cor- See the CABLE DIAGRAMS on pages 29 and 30 of this manual for proper cable routing. Press two 3/4" Round Inner Caps (34) into 50 each end of the Pad Tube. 51. See... system, pull each end of the Pad Tube. Remove the backing from the PRO 9655 decal and apply it by tightening the cables. NANCE on page 24 of this manual. If one of the remaining parts will need to remove it to be sure...HOME GYM SYSTEM, beginning on pages 27 and 28. 36 30 34 28 34 30 0 29 0 PRO 9655 0 0 23 Ca rect the problem.
...28). Make sure that the cables move smoothly, find and cor- See the CABLE DIAGRAMS on pages 29 and 30 of this manual for proper cable routing. Press two 3/4" Round Inner Caps (34) into 50 each end of the Pad Tube. 51. See... system, pull each end of the Pad Tube. Remove the backing from the PRO 9655 decal and apply it by tightening the cables. NANCE on page 24 of this manual. If one of the remaining parts will need to remove it to be sure...HOME GYM SYSTEM, beginning on pages 27 and 28. 36 30 34 28 34 30 0 29 0 PRO 9655 0 0 23 Ca rect the problem.
English Manual
Page 24
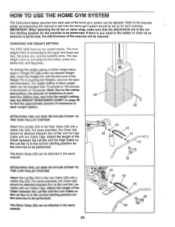
... Cable with two Cable Clips. Refer to the exercise poster accompanying this manual to the military press arm, assist arm, and leg press. If there is in increments of the exercise will be reduced. CHANGING THE WEIGHT SETTING The PRO 9655 features two weight stacks. The weight setting of either weight stack, insert...
... Cable with two Cable Clips. Refer to the exercise poster accompanying this manual to the military press arm, assist arm, and leg press. If there is in increments of the exercise will be reduced. CHANGING THE WEIGHT SETTING The PRO 9655 features two weight stacks. The weight setting of either weight stack, insert...
English Manual
Page 28
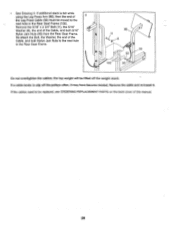
... cables; If the cables need to the next hole in the Rear Seat Frame (100). Re-attach the Bolt, the Washer, the end of this manual. 28 Remove the cable and re-install it may have become twisted. • See Drawing 3.
... cables; If the cables need to the next hole in the Rear Seat Frame (100). Re-attach the Bolt, the Washer, the end of this manual. 28 Remove the cable and re-install it may have become twisted. • See Drawing 3.

English Manual
Page 32
... to give the following information: 1. The NAME of the product (WESY96550). 2. The MODEL NUMBER of the product (WEIDER' PRO 9655 Home Gym System). 3. The KEY NUMBER and DESCRIPTION of the part(s) (see the front cover of this manual). 4. until 6 p.m. The SERIAL NUMBER of the product (see the PART LIST and EXPLODED DRAWING attached at...
... to give the following information: 1. The NAME of the product (WESY96550). 2. The MODEL NUMBER of the product (WEIDER' PRO 9655 Home Gym System). 3. The KEY NUMBER and DESCRIPTION of the part(s) (see the front cover of this manual). 4. until 6 p.m. The SERIAL NUMBER of the product (see the PART LIST and EXPLODED DRAWING attached at...
English Manual
Page 33
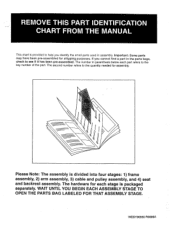
...: 1) frame assembly, 2) arm assembly, 3) cable and pulley assembly, and 4) seat and backrest assembly. The hardware for shipping purposes. REMOVE THIS PART IDENTIFICATION CHART FROM THE MANUAL This chart is provided to see if it has been pre-assembled. The second number refers to the key number of the part. WAIT UNTIL...
...: 1) frame assembly, 2) arm assembly, 3) cable and pulley assembly, and 4) seat and backrest assembly. The hardware for shipping purposes. REMOVE THIS PART IDENTIFICATION CHART FROM THE MANUAL This chart is provided to see if it has been pre-assembled. The second number refers to the key number of the part. WAIT UNTIL...
English Manual
Page 37
REMOVE THIS PART LIST/EXPLODED DRAWING CHART FROM THE MANUAL o
REMOVE THIS PART LIST/EXPLODED DRAWING CHART FROM THE MANUAL o
English Manual
Page 40
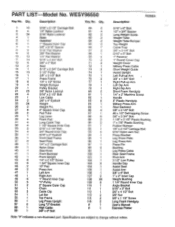
... Handle Cap Assist Seat Assist Arm 3/8" x 6" Bolt 1" x 2" Inner Cap Weight Bushing 1 1/4" Round Inner Cap Angle Bracket 5/16" x 3" Bolt 3/8" x 4 1/2" Bolt 3/8" Nut 3/8" x 1 1/2" Screw Long Foam Handgrip User's Manual Exercise Poster Note: "#" indicates a non-illustrated part. PART LIST Model No. Description Key No. Specifications are subject to change without notice. Qty. Qty.
... Handle Cap Assist Seat Assist Arm 3/8" x 6" Bolt 1" x 2" Inner Cap Weight Bushing 1 1/4" Round Inner Cap Angle Bracket 5/16" x 3" Bolt 3/8" x 4 1/2" Bolt 3/8" Nut 3/8" x 1 1/2" Screw Long Foam Handgrip User's Manual Exercise Poster Note: "#" indicates a non-illustrated part. PART LIST Model No. Description Key No. Specifications are subject to change without notice. Qty. Qty.


