
Uk Manual
Page 23
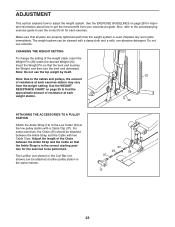
.... The weight system can be attached at either pulley station in the correct starting position for important information about how to be performed. For some exercises, the Chain (25) should be cleaned with a damp cloth and a mild, non-abrasive detergent. Make sure that all parts are properly tightened each ...Ankle Strap and the Cable so that the bent end touches the Weight, and then turn the bent end downward. Also, refer to the accompanying exercise guide to the Low Cable (53) at the low pulley station with two Cable Clips. Adjust the length of the Chain between the Ankle Strap ...
.... The weight system can be attached at either pulley station in the correct starting position for important information about how to be performed. For some exercises, the Chain (25) should be cleaned with a damp cloth and a mild, non-abrasive detergent. Make sure that all parts are properly tightened each ...Ankle Strap and the Cable so that the bent end touches the Weight, and then turn the bent end downward. Also, refer to the accompanying exercise guide to the Low Cable (53) at the low pulley station with two Cable Clips. Adjust the length of the Chain between the Ankle Strap ...
Uk Manual
Page 24
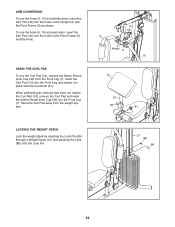
... Arm Pins (40) into the holes in place with the Curl Knob (61). Store the Curl Pad away from the Front Leg (7). When performing an exercise that does not require the Curl Pad (14), remove the Curl Pad and insert the 64mm Round Inner Cap (30) into the holes in the... CURL PAD To use the Arms (9, 10) as shown. LOCKING THE WEIGHT STACK Lock the weight stack by inserting the Lock Pin (89) through a Weight Guide (21) and securing the Lock (88) onto the Lock Pin. 3 40 9 Holes 5 10 14 13 30 61 7 21 88 89 24 To use the Arms...
... Arm Pins (40) into the holes in place with the Curl Knob (61). Store the Curl Pad away from the Front Leg (7). When performing an exercise that does not require the Curl Pad (14), remove the Curl Pad and insert the 64mm Round Inner Cap (30) into the holes in the... CURL PAD To use the Arms (9, 10) as shown. LOCKING THE WEIGHT STACK Lock the weight stack by inserting the Lock Pin (89) through a Weight Guide (21) and securing the Lock (88) onto the Lock Pin. 3 40 9 Holes 5 10 14 13 30 61 7 21 88 89 24 To use the Arms...
Uk Manual
Page 25
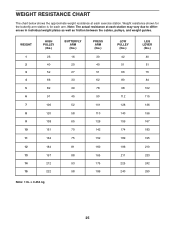
... for the butterfly arm station is for each exercise station. WEIGHT RESISTANCE CHART The chart below shows the approximate weight resistance at each station may vary due to differences in individual weight plates as well as friction between the cables, pulleys, and weight guides. Note: The actual resistance at each arm. WEIGHT...
... for the butterfly arm station is for each exercise station. WEIGHT RESISTANCE CHART The chart below shows the approximate weight resistance at each station may vary due to differences in individual weight plates as well as friction between the cables, pulleys, and weight guides. Note: The actual resistance at each arm. WEIGHT...
Uk Manual
Page 29
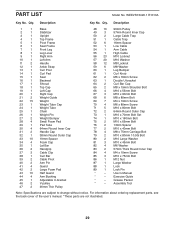
... 1 Ankle Strap 13 1 Curl Post 14 1 Curl Pad 15 1 Seat 16 1 Backrest 17 1 Shroud 18 1 Top Cap 19 1 Left Cap 20 1 Right Cap 21 2 Weight Guide 22 15 Weight 23 1 Weight Tube Cap 24 1 Weight Tube 25 1 Chain 26 1 Weight Pin 27 2 Weight Bumper 28 4 Small Foam Pad 29 1 Pad Tube... * - For information about ordering replacement parts, see the back cover of the userʼs manual. *These parts are subject to change without notice. Qty. Qty. Exercise Guide * - PART LIST Model No. Userʼs Manual * -
... 1 Ankle Strap 13 1 Curl Post 14 1 Curl Pad 15 1 Seat 16 1 Backrest 17 1 Shroud 18 1 Top Cap 19 1 Left Cap 20 1 Right Cap 21 2 Weight Guide 22 15 Weight 23 1 Weight Tube Cap 24 1 Weight Tube 25 1 Chain 26 1 Weight Pin 27 2 Weight Bumper 28 4 Small Foam Pad 29 1 Pad Tube... * - For information about ordering replacement parts, see the back cover of the userʼs manual. *These parts are subject to change without notice. Qty. Qty. Exercise Guide * - PART LIST Model No. Userʼs Manual * -


