
English Manual
Page 1
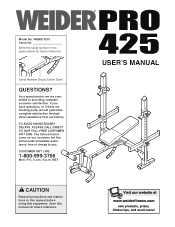
..., fitness tips, and much more! Write the serial number in this manual before using this manual for future reference. MST CAUTION Read all precautions and instructions in the space above for future reference. TO AVOID UNNECESSARY DELAYS, PLEASE CALL DIRECT TO OUR TOLL-FREE CUSTOMER HOT LINE. CUSTOMER HOT LINE: 1-800-999-3756 Mon.-Fri., 6 a.m.-6 p.m. WEBE15210 Serial No. Serial Number Decal (Under Seat) QUESTIONS...
..., fitness tips, and much more! Write the serial number in this manual before using this manual for future reference. MST CAUTION Read all precautions and instructions in the space above for future reference. TO AVOID UNNECESSARY DELAYS, PLEASE CALL DIRECT TO OUR TOLL-FREE CUSTOMER HOT LINE. CUSTOMER HOT LINE: 1-800-999-3756 Mon.-Fri., 6 a.m.-6 p.m. WEBE15210 Serial No. Serial Number Decal (Under Seat) QUESTIONS...

English Manual
Page 2
Mountain Time, to order a free replacement decal. Keep hands and fingers clear of the weight bench. 2 TABLE OF CONTENTS WARNING DECAL PLACEMENT 2 IMPORTANT PRECAUTIONS 3 BEFORE YOU BEGIN 4 PART IDENTIFICATION CHART 5 ASSEMBLY 6 ADJUSTMENTS 10 EXERCISE GUIDELINES 11 PART LIST 14 EXPLODED DRAWING 15 ORDERING REPLACEMENT PARTS Back Cover LIMITED WARRANTY Back Cover WARNING DECAL PLACEMENT The decals shown here have been placed on both sides of this area. until...
Mountain Time, to order a free replacement decal. Keep hands and fingers clear of the weight bench. 2 TABLE OF CONTENTS WARNING DECAL PLACEMENT 2 IMPORTANT PRECAUTIONS 3 BEFORE YOU BEGIN 4 PART IDENTIFICATION CHART 5 ASSEMBLY 6 ADJUSTMENTS 10 EXERCISE GUIDELINES 11 PART LIST 14 EXPLODED DRAWING 15 ORDERING REPLACEMENT PARTS Back Cover LIMITED WARRANTY Back Cover WARNING DECAL PLACEMENT The decals shown here have been placed on both sides of this area. until...

English Manual
Page 3
... the backrest adjustment knob is especially important for home use the weight bench in this manual. 2. Do not place more than 310 pounds, including a barbell and weights, on the weight rests. The weight bench is the responsibility of the owner to support a maximum of all instructions before using it. Do not use only. Make sure all parts are adequately informed of 560 pounds, including the user, a barbell, and weights. ICON assumes...
... the backrest adjustment knob is especially important for home use the weight bench in this manual. 2. Do not place more than 310 pounds, including a barbell and weights, on the weight rests. The weight bench is the responsibility of the owner to support a maximum of all instructions before using it. Do not use only. Make sure all parts are adequately informed of 560 pounds, including the user, a barbell, and weights. ICON assumes...

English Manual
Page 4
... of this manual carefully before calling. Upright Backrest Leg Lever Weight Tube Weight Rests Adjustment Knob Weight Spotter Backrest Bracket Seat 4 Whether your benefit, read this manual). Mountain Time (excluding holidays). For your goal is a shapely figure, dramatic increase in muscle size and strength, or a healthier cardiovascular system, the WEIDER® PRO 425 will help us assist you for selecting the WEIDER® PRO 425 weight bench. The model number is...
... of this manual carefully before calling. Upright Backrest Leg Lever Weight Tube Weight Rests Adjustment Knob Weight Spotter Backrest Bracket Seat 4 Whether your benefit, read this manual). Mountain Time (excluding holidays). For your goal is a shapely figure, dramatic increase in muscle size and strength, or a healthier cardiovascular system, the WEIDER® PRO 425 will help us assist you for selecting the WEIDER® PRO 425 weight bench. The model number is...
English Manual
Page 5
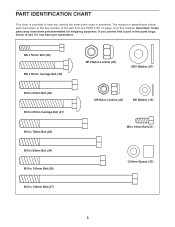
... Nylon Locknut (35) M10 Washer (27) M8 Nylon Locknut (42) M6 Washer (19) M6 x 16mm Bolt (31) 12.5mm Spacer (33) 5 If you identify the small parts used in assembly. PART IDENTIFICATION CHART This chart is provided to help you cannot find a part in the parts bags, check to the key number of the part from the PART LIST on page 14 of this manual.
... Nylon Locknut (35) M10 Washer (27) M8 Nylon Locknut (42) M6 Washer (19) M6 x 16mm Bolt (31) 12.5mm Spacer (33) 5 If you identify the small parts used in assembly. PART IDENTIFICATION CHART This chart is provided to help you cannot find a part in the parts bags, check to the key number of the part from the PART LIST on page 14 of this manual.

English Manual
Page 6
... manner. Attach an Upright (4) to ensure that the weight bench can be on the bottom. this weight bench, be more convenient if you assemble the weight bench, make sure all parts in a cleared area and remove the packing materials. Before assembling this side must be assembled successfully by setting aside plenty of the packing materials until assembly is designed to the Upright Stabilizer (5) with the adjustment holes...
... manner. Attach an Upright (4) to ensure that the weight bench can be on the bottom. this weight bench, be more convenient if you assemble the weight bench, make sure all parts in a cleared area and remove the packing materials. Before assembling this side must be assembled successfully by setting aside plenty of the packing materials until assembly is designed to the Upright Stabilizer (5) with the adjustment holes...

English Manual
Page 7
... Locknuts (35). 1 35 2 Tighten the M10 Nylon Locknuts (34) used in steps 1-4. 22 36 27 22 5. Attach the Crossbar to the Backrest Frames (10) with four M8 x 55mm Carriage Bolts (40) and four M8 Nylon Locknuts (42). Attach the Backrest Bracket (9) to each Upright with four M6 x 50mm Bolts (39) and four M6 Washers (19). Press two 8mm Bushings...
... Locknuts (35). 1 35 2 Tighten the M10 Nylon Locknuts (34) used in steps 1-4. 22 36 27 22 5. Attach the Crossbar to the Backrest Frames (10) with four M8 x 55mm Carriage Bolts (40) and four M8 Nylon Locknuts (42). Attach the Backrest Bracket (9) to each Upright with four M6 x 50mm Bolts (39) and four M6 Washers (19). Press two 8mm Bushings...

English Manual
Page 8
.... Lubricate an M10 x 78mm Bolt (28). Attach the Leg Lever (15) to the Seat Frame (6) with the Bolt and an M10 Nylon Locknut (35). Note: The warning decals on the Plastic Plates must be able to the Bench Frame (1) with an M10 x 100mm Bolt (38) and an M10 Nylon Locknut (35). Screw the Backrest Adjustment Knob (30) into the Leg Lever (15). Press...
.... Lubricate an M10 x 78mm Bolt (28). Attach the Leg Lever (15) to the Seat Frame (6) with the Bolt and an M10 Nylon Locknut (35). Note: The warning decals on the Plastic Plates must be able to the Bench Frame (1) with an M10 x 100mm Bolt (38) and an M10 Nylon Locknut (35). Screw the Backrest Adjustment Knob (30) into the Leg Lever (15). Press...

English Manual
Page 9
... lower adjustment holes in ADJUSTMENTS on the Seat 11 Frame (6) using two M6 x 16mm Bolts (31). Attach the Seat (7) to the Seat Frame with the other Upright (4). Attach 7 the other end of all parts are set at the same height. 13. Slide two Foam Pads (23) onto each Pad Tube. 23 11. 10. Press a Square Bushing (16) into the Weight Rest and the Weight Spotter. Screw a Large Adjustment Knob...
... lower adjustment holes in ADJUSTMENTS on the Seat 11 Frame (6) using two M6 x 16mm Bolts (31). Attach the Seat (7) to the Seat Frame with the other Upright (4). Attach 7 the other end of all parts are set at the same height. 13. Slide two Foam Pads (23) onto each Pad Tube. 23 11. 10. Press a Square Bushing (16) into the Weight Rest and the Weight Spotter. Screw a Large Adjustment Knob...

English Manual
Page 10
... slide the Weight Rests or the Weight Spotters to see the correct form for the Weight Rests (12) should represent the lowest point to sets of the Backrest (8), first remove all parts are fully tightened. The steps below explain how the weight bench can be used in eight different positions. Make sure that exercise. WARNING: Always set (not included). Do this by turning the Adjustment Knobs (18...
... slide the Weight Rests or the Weight Spotters to see the correct form for the Weight Rests (12) should represent the lowest point to sets of the Backrest (8), first remove all parts are fully tightened. The steps below explain how the weight bench can be used in eight different positions. Make sure that exercise. WARNING: Always set (not included). Do this by turning the Adjustment Knobs (18...

English Manual
Page 11
... and well-balanced fitness program. WARMING UP Begin each workout with 3 sets of 8 repetitions for each exercise you experience pain or dizziness at least one complete cycle of an exercise, such as the number of repetitions or sets completed, is a series of repetitions.) The proper amount of weight for each exercise, and moving only the appropriate parts of each set should be performed smoothly...
... and well-balanced fitness program. WARMING UP Begin each workout with 3 sets of 8 repetitions for each exercise you experience pain or dizziness at least one complete cycle of an exercise, such as the number of repetitions or sets completed, is a series of repetitions.) The proper amount of weight for each exercise, and moving only the appropriate parts of each set should be performed smoothly...

English Manual
Page 12
... can be photocopied and used , and the numbers of each workout. Gluteus Maximus (buttocks) V. Rest for a toning work- Tibialis Anterior (front of calf) F L L. List the date, the exercises performed, the weight used to spend the first couple of weeks familiarizing yourself with 5 to make exercise a regular and enjoyable part of your weight and key body measurements at the end of sets and repetitions completed...
... can be photocopied and used , and the numbers of each workout. Gluteus Maximus (buttocks) V. Rest for a toning work- Tibialis Anterior (front of calf) F L L. List the date, the exercises performed, the weight used to spend the first couple of weeks familiarizing yourself with 5 to make exercise a regular and enjoyable part of your weight and key body measurements at the end of sets and repetitions completed...

English Manual
Page 13
MONDAY Date: / / EXERCISE WEIGHT SETS REPS TUESDAY Date: / / AEROBIC EXERCISE WEDNESDAY Date: / / EXERCISE WEIGHT SETS REPS THURSDAY Date: / / AEROBIC EXERCISE FRIDAY Date: / / EXERCISE WEIGHT SETS REPS Make photocopies of this page for scheduling and recording your workouts. 13
MONDAY Date: / / EXERCISE WEIGHT SETS REPS TUESDAY Date: / / AEROBIC EXERCISE WEDNESDAY Date: / / EXERCISE WEIGHT SETS REPS THURSDAY Date: / / AEROBIC EXERCISE FRIDAY Date: / / EXERCISE WEIGHT SETS REPS Make photocopies of this page for scheduling and recording your workouts. 13

English Manual
Page 14
... Upright Upright Stabilizer Seat Frame Seat Backrest Backrest Bracket Backrest Frame Weight Spotter Weight Rest Leg Lever Bracket Seat Bracket Leg Lever Square Bushing Upright Cap Large Adjustment Knob M6 Washer 75mm x 50mm Inner Cap Support Plate 50mm Square Inner Cap Foam Pad 19mm Round Inner Cap Key No. Specifications are subject to change without notice. See the back cover for information on ordering replacement parts. 14 WEBE15210 R1001A Key No. PART LIST-Model...
... Upright Upright Stabilizer Seat Frame Seat Backrest Backrest Bracket Backrest Frame Weight Spotter Weight Rest Leg Lever Bracket Seat Bracket Leg Lever Square Bushing Upright Cap Large Adjustment Knob M6 Washer 75mm x 50mm Inner Cap Support Plate 50mm Square Inner Cap Foam Pad 19mm Round Inner Cap Key No. Specifications are subject to change without notice. See the back cover for information on ordering replacement parts. 14 WEBE15210 R1001A Key No. PART LIST-Model...

English Manual
Page 15
EXPLODED DRAWING-Model No. WEBE15210 R1001A 8 18 16 12 40 10 32 27 27 43 32 19 39 18 43 10 19 39 9 7 16 11 16 17 26 32 6 35 13 32 29 19 35 33 32 45 42 42 33 32 31 37 34 35 30 39 28 35 14 35 28 32 20 1 34 2 22 32 37 38 35 5 27 36 22 22 24 23 20 15 4 35 35 21 34 20 41 25 22 44 22 23 24 15 16 12 16 18 11 18 16 17 35 21 35 3 4 35 21 34 21 34 5 35 35 20 41 20
EXPLODED DRAWING-Model No. WEBE15210 R1001A 8 18 16 12 40 10 32 27 27 43 32 19 39 18 43 10 19 39 9 7 16 11 16 17 26 32 6 35 13 32 29 19 35 33 32 45 42 42 33 32 31 37 34 35 30 39 28 35 14 35 28 32 20 1 34 2 22 32 37 38 35 5 27 36 22 22 24 23 20 15 4 35 35 21 34 20 41 25 22 44 22 23 24 15 16 12 16 18 11 18 16 17 35 21 35 3 4 35 21 34 21 34 5 35 35 20 41 20

English Manual
Page 16
... is authorized by an ICON authorized service center, products used as store display models. The warranty extended hereunder is limited in China © 2001 ICON Health & Fitness, Inc. To help us assist you . The SERIAL NUMBER of the product (see the PART LIST and the EXPLODED DRAWING on how long an implied warranty lasts. This warranty extends only to you , please be free from the date of...
... is authorized by an ICON authorized service center, products used as store display models. The warranty extended hereunder is limited in China © 2001 ICON Health & Fitness, Inc. To help us assist you . The SERIAL NUMBER of the product (see the PART LIST and the EXPLODED DRAWING on how long an implied warranty lasts. This warranty extends only to you , please be free from the date of...


