
User Manual
Page 3
..., lat bar, or nylon strap while weights are on the pulleys at a time. 8. Always disconnect the lat bar from the home gym system when performing an exercise that could cause the home gym system to tip. 11. WARNING: Before beginning this product. 3 Keep small children and pets away from moving parts. 9. The... important precautions before using. It is the responsibility of the owner to be used by or through the use the lat bar. Use the home gym system only on a foot plate when performing an exercise that does not use of 35 or persons with great force. 12. Cover the ...
..., lat bar, or nylon strap while weights are on the pulleys at a time. 8. Always disconnect the lat bar from the home gym system when performing an exercise that could cause the home gym system to tip. 11. WARNING: Before beginning this product. 3 Keep small children and pets away from moving parts. 9. The... important precautions before using. It is the responsibility of the owner to be used by or through the use the lat bar. Use the home gym system only on a foot plate when performing an exercise that does not use of 35 or persons with great force. 12. Cover the ...
User Manual
Page 4
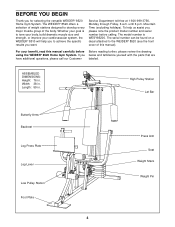
..., please note the product model number and serial number before Before reading further, please review the drawing using the WEIDER® 8520 Home Gym System. The model number is to tone your body, build dramatic muscle size and strength, or improve your cardiovascular system, the... Press Arm Seat Weight Stack Weight Pin until 6 p.m. Whether your benefit, read this manual). If you for selecting the versatile WEIDER® 8520 Home Gym System. BEFORE YOU BEGIN Thank you below and familiarize yourself with the parts that are have additional questions, please call our Customer labeled...
..., please note the product model number and serial number before Before reading further, please review the drawing using the WEIDER® 8520 Home Gym System. The model number is to tone your body, build dramatic muscle size and strength, or improve your cardiovascular system, the... Press Arm Seat Weight Stack Weight Pin until 6 p.m. Whether your benefit, read this manual). If you for selecting the versatile WEIDER® 8520 Home Gym System. BEFORE YOU BEGIN Thank you below and familiarize yourself with the parts that are have additional questions, please call our Customer labeled...
User Manual
Page 5
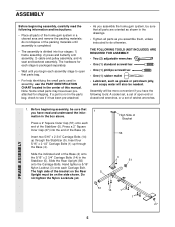
... until you begin each stage is not in the parts bag, check to see if it has been pre-attached. • As you assemble the home gym system, be on the Rear Upright must be sure that parts bag. • For help identifying the small parts used in assembly, use the PART... read the following tools: A socket set, a set of open that all parts are oriented as shown in the drawings. • Tighten all parts of the home gym system in the box above. If a part is packaged separately. • Wait until assembly is completed. • The assembly is divided into the end of...
... until you begin each stage is not in the parts bag, check to see if it has been pre-attached. • As you assemble the home gym system, be on the Rear Upright must be sure that parts bag. • For help identifying the small parts used in assembly, use the PART... read the following tools: A socket set, a set of open that all parts are oriented as shown in the drawings. • Tighten all parts of the home gym system in the box above. If a part is packaged separately. • Wait until assembly is completed. • The assembly is divided into the end of...

User Manual
Page 15
...into the Press Adjustment Tube (79). If one set of the Short Pad Tube. Before using the home gym system, pull each cable a few times to remove it to the Press Adjustment Tube (79) ...parts will need to be explained in the Rocker Arm (32). Remove the backing from the 8520 decal and apply it by tightening the cables. Align one of this way 33 34 30 28 ...8520 DECAL PLACEMENT 15 Press a 3/4" Round Inner Cap into the Seat Frame (36). If there is any slack in the cables, you will be sure that all parts have been properly tightened. Attach the Press Plate (78) to the home gym...
...into the Press Adjustment Tube (79). If one set of the Short Pad Tube. Before using the home gym system, pull each cable a few times to remove it to the Press Adjustment Tube (79) ...parts will need to be explained in the Rocker Arm (32). Remove the backing from the 8520 decal and apply it by tightening the cables. Align one of this way 33 34 30 28 ...8520 DECAL PLACEMENT 15 Press a 3/4" Round Inner Cap into the Seat Frame (36). If there is any slack in the cables, you will be sure that all parts have been properly tightened. Attach the Press Plate (78) to the home gym...
User Manual
Page 16
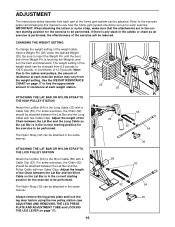
...of the weight stack can be reduced. The Nylon Strap (39) can be adjusted. ADJUSTMENT The instructions below describe how each part of the home gym system can be attached in the same manner. Always remove the leg press plate and lock the leg lever before using the low pulley station... (see how the home gym system should be attached in increments of the weight stack, insert a Weight Pin (26) under the desired Weight (25). Refer to the exercise ...
...of the weight stack can be reduced. The Nylon Strap (39) can be adjusted. ADJUSTMENT The instructions below describe how each part of the home gym system can be attached in the same manner. Always remove the leg press plate and lock the leg lever before using the low pulley station... (see how the home gym system should be attached in increments of the weight stack, insert a Weight Pin (26) under the desired Weight (25). Refer to the exercise ...
User Manual
Page 18
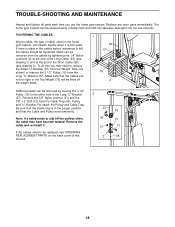
...Cable (23) (see drawing 2). Re-attach the Pulley and Cable Trap. If there is slack in the cables before resistance is first used on the home gym system, can be replaced, see ORDERING REPLACEMENT PARTS on the back cover of the Short Cable (58) (see drawing 1) and at the end of ... 12 If the cables need to the other hole in the proper position and that the Cable trap is in the Long "U"-Bracket 2 (57). The home gym system can be cleaned using a damp cloth and mild non-abrasive detergent. Replace any worn parts immediately. Remove the 3/8" Nylon Locknut (21) and the 3/8" x 2" ...
...Cable (23) (see drawing 2). Re-attach the Pulley and Cable Trap. If there is slack in the cables before resistance is first used on the home gym system, can be replaced, see ORDERING REPLACEMENT PARTS on the back cover of the Short Cable (58) (see drawing 1) and at the end of ... 12 If the cables need to the other hole in the proper position and that the Cable trap is in the Long "U"-Bracket 2 (57). The home gym system can be cleaned using a damp cloth and mild non-abrasive detergent. Replace any worn parts immediately. Remove the 3/8" Nylon Locknut (21) and the 3/8" x 2" ...
User Manual
Page 19
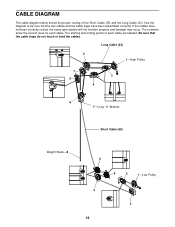
Be sure that the two cables and the cable traps have not been correctly routed, the home gym system will not function properly and damage may occur. The numbers show the correct route for each cable are labeled. Use the diagram to be ...
Be sure that the two cables and the cable traps have not been correctly routed, the home gym system will not function properly and damage may occur. The numbers show the correct route for each cable are labeled. Use the diagram to be ...
User Manual
Page 20
... © 1996 ICON Health & Fitness, Inc. To help us assist you, please be prepared to give the following information: 1. The MODEL NUMBER of the product (WEIDER® 8520 Home Gym System). 3. Mountain Time (excluding holidays).
... © 1996 ICON Health & Fitness, Inc. To help us assist you, please be prepared to give the following information: 1. The MODEL NUMBER of the product (WEIDER® 8520 Home Gym System). 3. Mountain Time (excluding holidays).


