

User Manual
Page 3
... especially important for personal injury or property damage sustained by only one person at all instructions in the accompanying literature before using the home gym system. 3. It is designed to ensure that the cables remain on a level surface. Keep small children and pets away from moving ... all times. WARNING: Before beginning this manual and in this or any worn parts immediately. 6. Keep hands and feet away from the home gym system at a time. 8. Always stand on all parts often. ICON assumes no responsibility for persons over the age of all precautions. 2. ...
... especially important for personal injury or property damage sustained by only one person at all instructions in the accompanying literature before using the home gym system. 3. It is designed to ensure that the cables remain on a level surface. Keep small children and pets away from moving ... all times. WARNING: Before beginning this manual and in this or any worn parts immediately. 6. Keep hands and feet away from the home gym system at a time. 8. Always stand on all parts often. ICON assumes no responsibility for persons over the age of all precautions. 2. ...
User Manual
Page 4
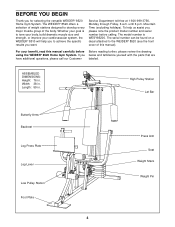
..., read this manual). For your cardiovascular system, the WEIDER® 8510 will help us assist you want. Width: 38 in . Length: 59 in. The WEIDER® 8520 offers a selection of weight stations designed to the WEIDER® 8520 (see the front cover of the body. High Pulley...you , please note the product model number and serial number before Before reading further, please review the drawing using the WEIDER® 8520 Home Gym System. BEFORE YOU BEGIN Thank you below and familiarize yourself with the parts that are have additional questions, please call our...
..., read this manual). For your cardiovascular system, the WEIDER® 8510 will help us assist you want. Width: 38 in . Length: 59 in. The WEIDER® 8520 offers a selection of weight stations designed to the WEIDER® 8520 (see the front cover of the body. High Pulley...you , please note the product model number and serial number before Before reading further, please review the drawing using the WEIDER® 8520 Home Gym System. BEFORE YOU BEGIN Thank you below and familiarize yourself with the parts that are have additional questions, please call our...
User Manual
Page 5
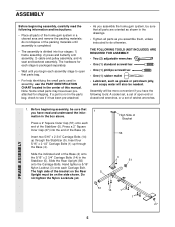
...following tools: A socket set, a set of open that all parts are oriented as shown in the drawings. • Tighten all parts of the home gym system in the parts bag, check to do not dispose of ratchet wrenches. do otherwise. If a part is divided into the end of the Stabilizer... (5). Before beginning assembly, be on the Rear Upright must be sure that you assemble the home gym system, be sure that parts bag. • For help identifying the small parts used in assembly, use the PART IDENTIFICATION CHART located in the ...
...following tools: A socket set, a set of open that all parts are oriented as shown in the drawings. • Tighten all parts of the home gym system in the parts bag, check to do not dispose of ratchet wrenches. do otherwise. If a part is divided into the end of the Stabilizer... (5). Before beginning assembly, be on the Rear Upright must be sure that you assemble the home gym system, be sure that parts bag. • For help identifying the small parts used in assembly, use the PART IDENTIFICATION CHART located in the ...

User Manual
Page 15
... (78) to remove it to be explained in the Rocker Arm (32). Remove the backing from the 8520 decal and apply it by tightening the cables. Before using the home gym system, pull each end of the Short Pad Tube. Slide a 5 1/2" Pad (30) onto each ...cable a few times to the home gym system as shown. Make sure that the Press Adjustment Tube is used. The use of the remaining parts will need to...16" Nylon Locknut (3). 33. If one set of this way 33 34 30 28 36 30 34 80 30 34 29 8520 DECAL PLACEMENT 15
... (78) to remove it to be explained in the Rocker Arm (32). Remove the backing from the 8520 decal and apply it by tightening the cables. Before using the home gym system, pull each end of the Short Pad Tube. Slide a 5 1/2" Pad (30) onto each ...cable a few times to the home gym system as shown. Make sure that the Press Adjustment Tube is used. The use of the remaining parts will need to...16" Nylon Locknut (3). 33. If one set of this way 33 34 30 28 36 30 34 80 30 34 29 8520 DECAL PLACEMENT 15
User Manual
Page 16
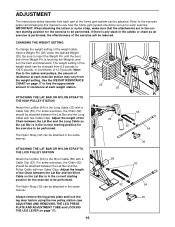
... (39) can be reduced. Always remove the leg press plate and lock the leg lever before using the low pulley station (see how the home gym system should be set up for the exercise to be performed. CHANGING THE WEIGHT SETTING To change the weight setting of the weight stack, insert... (53). For some exercises, the Chain (52) should be changed from the weight setting. ADJUSTMENT The instructions below describe how each part of the home gym system can be performed.
... (39) can be reduced. Always remove the leg press plate and lock the leg lever before using the low pulley station (see how the home gym system should be set up for the exercise to be performed. CHANGING THE WEIGHT SETTING To change the weight setting of the weight stack, insert... (53). For some exercises, the Chain (52) should be changed from the weight setting. ADJUSTMENT The instructions below describe how each part of the home gym system can be performed.
User Manual
Page 18
.... 2 58 18 Re-attach the Pulley and Cable Trap. Replace any worn parts immediately. The home gym system can be removed by tightening the 1/4" Nylon Locknuts (2) at the end of the Long Cable (23) ...(see ORDERING REPLACEMENT PARTS on the home gym system, can stretch slightly when it . 66 57 21 12 If the cables need to slip off ...slack can be removed from the Cable Trap (66), Pulley, and "U"-Bracket. Do not use the home gym system. Slack can be cleaned using a damp cloth and mild non-abrasive detergent. Be sure that the ...
.... 2 58 18 Re-attach the Pulley and Cable Trap. Replace any worn parts immediately. The home gym system can be removed by tightening the 1/4" Nylon Locknuts (2) at the end of the Long Cable (23) ...(see ORDERING REPLACEMENT PARTS on the home gym system, can stretch slightly when it . 66 57 21 12 If the cables need to slip off ...slack can be removed from the Cable Trap (66), Pulley, and "U"-Bracket. Do not use the home gym system. Slack can be cleaned using a damp cloth and mild non-abrasive detergent. Be sure that the ...
User Manual
Page 19
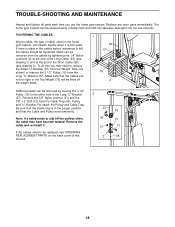
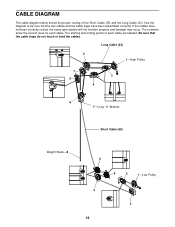
... Short Cable (58) and the Long Cable (23). Be sure that the two cables and the cable traps have not been correctly routed, the home gym system will not function properly and damage may occur. If the cables have been assembled correctly. Long Cable (23) 2 1-High Pulley 7 3 5 4 6 7-Long "U"-Bracket Short Cable...
... Short Cable (58) and the Long Cable (23). Be sure that the two cables and the cable traps have not been correctly routed, the home gym system will not function properly and damage may occur. If the cables have been assembled correctly. Long Cable (23) 2 1-High Pulley 7 3 5 4 6 7-Long "U"-Bracket Short Cable...

User Manual
Page 20
... order replacement parts, simply call our Customer Service Department toll-free at the center of this manual). until 6 p.m. The MODEL NUMBER of the product (WEIDER® 8520 Home Gym System). 3. Part No. 132714 R0896A Printed in Canada © 1996 ICON Health & Fitness, Inc. Mountain Time (excluding holidays). The NAME of the product (WESY85200...
... order replacement parts, simply call our Customer Service Department toll-free at the center of this manual). until 6 p.m. The MODEL NUMBER of the product (WEIDER® 8520 Home Gym System). 3. Part No. 132714 R0896A Printed in Canada © 1996 ICON Health & Fitness, Inc. Mountain Time (excluding holidays). The NAME of the product (WESY85200...


