
User Manual
Page 3
... at any time while exercising, stop immediately and make sure that the cables are adequately informed of this manual and in the accompanying literature before using the home gym system. 1. Replace any exercise program, consult your physician. Always disconnect the lat bar from moving parts.... to tip. 11. IMPORTANT PRECAUTIONS WARNING: To reduce the risk of serious injury, read the following important precautions before using the home gym system. 3. Always stand on all instructions before using. Never release the press arm, butterfly arms, leg lever, lat bar, or...
... at any time while exercising, stop immediately and make sure that the cables are adequately informed of this manual and in the accompanying literature before using the home gym system. 1. Replace any exercise program, consult your physician. Always disconnect the lat bar from moving parts.... to tip. 11. IMPORTANT PRECAUTIONS WARNING: To reduce the risk of serious injury, read the following important precautions before using the home gym system. 3. Always stand on all instructions before using. Never release the press arm, butterfly arms, leg lever, lat bar, or...
User Manual
Page 4
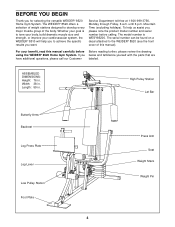
... number and serial number before Before reading further, please review the drawing using the WEIDER® 8520 Home Gym System. For your cardiovascular system, the WEIDER® 8510 will help us assist you to develop every major muscle group of this manual carefully before calling. BEFORE YOU BEGIN Thank you below and familiarize yourself with the...
... number and serial number before Before reading further, please review the drawing using the WEIDER® 8520 Home Gym System. For your cardiovascular system, the WEIDER® 8510 will help us assist you to develop every major muscle group of this manual carefully before calling. BEFORE YOU BEGIN Thank you below and familiarize yourself with the...
User Manual
Page 5
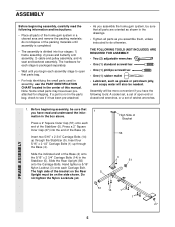
... assembly. If a part is not in the parts bag, check to see if it has been pre-attached. • As you assemble the home gym system, be sure that all parts are oriented as shown in the drawings. • Tighten all parts of the Base (4) onto the 5/16"...1 5 51 High Side of the bracket on the side shown. ASSEMBLY Before beginning assembly, carefully read and understand the information in the center of this manual. The hardware for shipping. THE FOLLOWING TOOLS (NOT INCLUDED) ARE REQUIRED FOR ASSEMBLY: • Two (2) adjustable wrenches • One (1) standard screwdriver...
... assembly. If a part is not in the parts bag, check to see if it has been pre-attached. • As you assemble the home gym system, be sure that all parts are oriented as shown in the drawings. • Tighten all parts of the Base (4) onto the 5/16"...1 5 51 High Side of the bracket on the side shown. ASSEMBLY Before beginning assembly, carefully read and understand the information in the center of this manual. The hardware for shipping. THE FOLLOWING TOOLS (NOT INCLUDED) ARE REQUIRED FOR ASSEMBLY: • Two (2) adjustable wrenches • One (1) standard screwdriver...

User Manual
Page 15
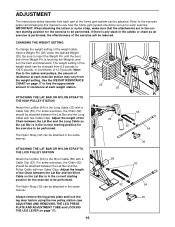
... 80 30 34 29 8520 DECAL PLACEMENT 15 SEAT ASSEMBLY 32. Press a 3/4" Round Inner Cap (34) into each cable a few times to the home gym system as shown. Insert the Short Pad Tube (28) into the Leg Lever (29). See TROUBLE-SHOOTING AND MAINTENANCE on page 19 of this manual. Attach the Press Plate... Frame (36). If one set of the Long Pad Tube. 34. Be sure that the Press Adjustment Tube is oriented as shown. Before using the home gym system, pull each end of the cables does not move smoothly over the pulleys. Slide a 5 1/2" Pad (30) onto each end of the Short Pad Tube...
... 80 30 34 29 8520 DECAL PLACEMENT 15 SEAT ASSEMBLY 32. Press a 3/4" Round Inner Cap (34) into each cable a few times to the home gym system as shown. Insert the Short Pad Tube (28) into the Leg Lever (29). See TROUBLE-SHOOTING AND MAINTENANCE on page 19 of this manual. Attach the Press Plate... Frame (36). If one set of the Long Pad Tube. 34. Be sure that the Press Adjustment Tube is oriented as shown. Before using the home gym system, pull each end of the cables does not move smoothly over the pulleys. Slide a 5 1/2" Pad (30) onto each end of the Short Pad Tube...
User Manual
Page 16
...Nylon Strap (39) can be changed from the weight setting. Refer to the exercise poster accompanying this manual to see ADJUSTING AND REMOVING THE LEG PRESS PLATE AND ADJUSTMENT TUBE and LOCKING THE LEG LEVER on ...the leg press plate and lock the leg lever before using the low pulley station (see how the home gym system should be set up for the exercise to 106.5 pounds, in increments of 12.5 pounds. Be... Long Cable with two Cable Clips. ADJUSTMENT The instructions below describe how each part of the home gym system can be attached in the same manner. If there is any slack in the cables ...
...Nylon Strap (39) can be changed from the weight setting. Refer to the exercise poster accompanying this manual to see ADJUSTING AND REMOVING THE LEG PRESS PLATE AND ADJUSTMENT TUBE and LOCKING THE LEG LEVER on ...the leg press plate and lock the leg lever before using the low pulley station (see how the home gym system should be set up for the exercise to 106.5 pounds, in increments of 12.5 pounds. Be... Long Cable with two Cable Clips. ADJUSTMENT The instructions below describe how each part of the home gym system can be attached in the same manner. If there is any slack in the cables ...
User Manual
Page 18
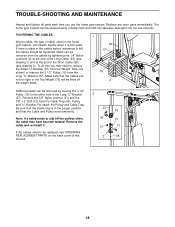
... THE CABLES Woven cable, the type of cable used on the back cover of the Short Cable (58) (see drawing 2). Do not use the home gym system. Be sure that the Cable trap is in the proper position and that the cables are not too tight or the Top Weight (76) ... Locknuts (2) at the end of the Long Cable (23) (see ORDERING REPLACEMENT PARTS on the home gym system, can be tightened. The home gym system can be cleaned using a damp cloth and mild non-abrasive detergent. To do this manual. 2 58 18 If there is slack in the Long "U"-Bracket 2 (57). Re-attach the Pulley...
... THE CABLES Woven cable, the type of cable used on the back cover of the Short Cable (58) (see drawing 2). Do not use the home gym system. Be sure that the Cable trap is in the proper position and that the cables are not too tight or the Top Weight (76) ... Locknuts (2) at the end of the Long Cable (23) (see ORDERING REPLACEMENT PARTS on the home gym system, can be tightened. The home gym system can be cleaned using a damp cloth and mild non-abrasive detergent. To do this manual. 2 58 18 If there is slack in the Long "U"-Bracket 2 (57). Re-attach the Pulley...
User Manual
Page 20
...this manual). 4. The NAME of the product (WESY85200). 2. until 6 p.m. The KEY NUMBER and DESCRIPTION of the part(s) (see the front cover of the product (see the PART LIST and EXPLODED DRAWING at 1-800-999-3756, Monday through Friday, 6 a.m. The MODEL NUMBER of the product (WEIDER® 8520 Home Gym System...). 3. Part No. 132714 R0896A Printed in Canada © 1996 ICON Health & Fitness, Inc. The SERIAL NUMBER of this manual).
...this manual). 4. The NAME of the product (WESY85200). 2. until 6 p.m. The KEY NUMBER and DESCRIPTION of the part(s) (see the front cover of the product (see the PART LIST and EXPLODED DRAWING at 1-800-999-3756, Monday through Friday, 6 a.m. The MODEL NUMBER of the product (WEIDER® 8520 Home Gym System...). 3. Part No. 132714 R0896A Printed in Canada © 1996 ICON Health & Fitness, Inc. The SERIAL NUMBER of this manual).


