

User Manual
Page 3
... To reduce the risk of serious injury, read the following important precautions before using the home gym system. 3. Read all instructions before using the home gym system. 1. Always disconnect the lat bar from the home gym system when performing an exercise that the cables remain on a level surface. Keep small ...children and pets away from moving parts. 9. Keep hands and feet away from the home gym system at all parts often. Never release the press arm, butterfly arms, leg lever, lat bar, or nylon strap while weights are ...
... To reduce the risk of serious injury, read the following important precautions before using the home gym system. 3. Read all instructions before using the home gym system. 1. Always disconnect the lat bar from the home gym system when performing an exercise that the cables remain on a level surface. Keep small ...children and pets away from moving parts. 9. Keep hands and feet away from the home gym system at all parts often. Never release the press arm, butterfly arms, leg lever, lat bar, or nylon strap while weights are ...
User Manual
Page 4
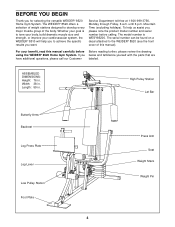
...a decal attached to develop every major muscle group of this manual carefully before calling. If you for selecting the versatile WEIDER® 8520 Home Gym System. To help you to achieve the specific results you , please note the product model number and serial number before ...Before reading further, please review the drawing using the WEIDER® 8520 Home Gym System. ASSEMBLED DIMENSIONS: Height: 76 in . Length: 59 in. The WEIDER® 8520 offers a selection of weight stations designed to the WEIDER® 8520 (see the front cover of the body.
...a decal attached to develop every major muscle group of this manual carefully before calling. If you for selecting the versatile WEIDER® 8520 Home Gym System. To help you to achieve the specific results you , please note the product model number and serial number before ...Before reading further, please review the drawing using the WEIDER® 8520 Home Gym System. ASSEMBLED DIMENSIONS: Height: 76 in . Length: 59 in. The WEIDER® 8520 offers a selection of weight stations designed to the WEIDER® 8520 (see the front cover of the body.
User Manual
Page 5
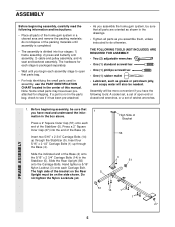
...the parts bag, check to see if it has been pre-attached. • As you begin each assembly stage to do not dispose of the home gym system in a cleared area and remove the packing materials; Before beginning assembly, be sure that parts bag. • For help identifying the small parts...• One (1) rubber mallet • Lubricant, such as shown in the drawings. • Tighten all parts of the packing materials until you assemble the home gym system, be on the Rear Upright must be sure that all parts are oriented as grease or petroleum jelly, and soapy water will be needed...
...the parts bag, check to see if it has been pre-attached. • As you begin each assembly stage to do not dispose of the home gym system in a cleared area and remove the packing materials; Before beginning assembly, be sure that parts bag. • For help identifying the small parts...• One (1) rubber mallet • Lubricant, such as shown in the drawings. • Tighten all parts of the packing materials until you assemble the home gym system, be on the Rear Upright must be sure that all parts are oriented as grease or petroleum jelly, and soapy water will be needed...

User Manual
Page 15
.... Be sure that the Press Adjustment Tube is oriented as shown. Remove the backing from the 8520 decal and apply it by tightening the cables. Before using the home gym system, pull each cable a few times to the home gym system as shown. If there is used. Make sure that the cables move smoothly, find... and correct the problem. See the CABLE DIAGRAM on page 18. 32 44 79 8 3 8 22 40 32 78 Slant must be turned this way 33 34 30 28 36 30 34 80 30 34 29 8520...
.... Be sure that the Press Adjustment Tube is oriented as shown. Remove the backing from the 8520 decal and apply it by tightening the cables. Before using the home gym system, pull each cable a few times to the home gym system as shown. If there is used. Make sure that the cables move smoothly, find... and correct the problem. See the CABLE DIAGRAM on page 18. 32 44 79 8 3 8 22 40 32 78 Slant must be turned this way 33 34 30 28 36 30 34 80 30 34 29 8520...
User Manual
Page 16
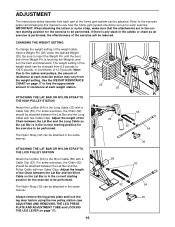
... the Weights, and turn the bent end downward. The Nylon Strap (39) can be adjusted. ADJUSTMENT The instructions below describe how each part of the home gym system can be attached in the same manner. Refer to the exercise poster accompanying this manual to the Long Cable (23) with a Cable Clip (53... weight station. 25 26 ATTACHING THE LAT BAR OR NYLON STRAP TO THE HIGH PULLEY STATION Attach the Lat Bar (54) to see how the home gym system should be set up for the exercise to the Short Cable (58) with a Cable Clip (53). Be sure to 106.5 pounds, in increments of...
... the Weights, and turn the bent end downward. The Nylon Strap (39) can be adjusted. ADJUSTMENT The instructions below describe how each part of the home gym system can be attached in the same manner. Refer to the exercise poster accompanying this manual to the Long Cable (23) with a Cable Clip (53... weight station. 25 26 ATTACHING THE LAT BAR OR NYLON STRAP TO THE HIGH PULLEY STATION Attach the Lat Bar (54) to see how the home gym system should be set up for the exercise to the Short Cable (58) with a Cable Clip (53). Be sure to 106.5 pounds, in increments of...
User Manual
Page 18
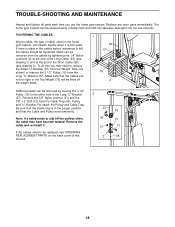
... 3/8" x 2" Bolt (12) from the cables by moving the 3 1/2" Pulley (15) to be removed from the Cable Trap (66), Pulley, and "U"-Bracket. The home gym system can be removed by tightening the 1/4" Nylon Locknuts (2) at the end of the Long Cable (23) (see drawing 2). TIGHTENING THE CABLES Woven cable, the... the Long "U"-Bracket (57). TROUBLE-SHOOTING AND MAINTENANCE Inspect and tighten all parts each time you may have become twisted. Do not use the home gym system. Slack can stretch slightly when it . 66 57 21 12 If the cables need to slip off the weight stack. 1 23 67 ...
... 3/8" x 2" Bolt (12) from the cables by moving the 3 1/2" Pulley (15) to be removed from the Cable Trap (66), Pulley, and "U"-Bracket. The home gym system can be removed by tightening the 1/4" Nylon Locknuts (2) at the end of the Long Cable (23) (see drawing 2). TIGHTENING THE CABLES Woven cable, the... the Long "U"-Bracket (57). TROUBLE-SHOOTING AND MAINTENANCE Inspect and tighten all parts each time you may have become twisted. Do not use the home gym system. Slack can stretch slightly when it . 66 57 21 12 If the cables need to slip off the weight stack. 1 23 67 ...
User Manual
Page 19
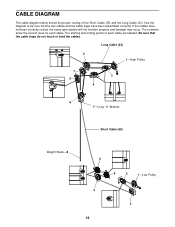
Be sure that the two cables and the cable traps have not been correctly routed, the home gym system will not function properly and damage may occur. The starting and ending points of the Short Cable (58) and the Long Cable (23). The ...
Be sure that the two cables and the cable traps have not been correctly routed, the home gym system will not function properly and damage may occur. The starting and ending points of the Short Cable (58) and the Long Cable (23). The ...
User Manual
Page 20
... SERIAL NUMBER of the product (see the PART LIST and EXPLODED DRAWING at 1-800-999-3756, Monday through Friday, 6 a.m. The MODEL NUMBER of the product (WEIDER® 8520 Home Gym System). 3. The KEY NUMBER and DESCRIPTION of the part(s) (see the front cover of this manual). The NAME of the product (WESY85200). 2. Part No...
... SERIAL NUMBER of the product (see the PART LIST and EXPLODED DRAWING at 1-800-999-3756, Monday through Friday, 6 a.m. The MODEL NUMBER of the product (WEIDER® 8520 Home Gym System). 3. The KEY NUMBER and DESCRIPTION of the part(s) (see the front cover of this manual). The NAME of the product (WESY85200). 2. Part No...


