
User Manual
Page 1
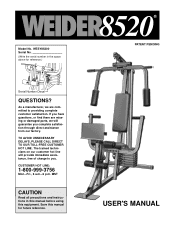
Model No. Save this equipment. WESY85200 Serial No. (Write the serial number in this manual before using this manual for reference.) Serial Number Decal QUESTIONS? As a manufacturer, we will provide immediate assistance, free of charge to providing complete customer satisfaction. The trained technicians on... through direct assistance from our factory. MST CAUTION Read all precautions and instructions in the space above for future reference. ® PATENT PENDING USER'S MANUAL TO AVOID UNNECESSARY DELAYS, PLEASE CALL DIRECT TO OUR TOLL-FREE CUSTOMER HOT LINE.
Model No. Save this equipment. WESY85200 Serial No. (Write the serial number in this manual before using this manual for reference.) Serial Number Decal QUESTIONS? As a manufacturer, we will provide immediate assistance, free of charge to providing complete customer satisfaction. The trained technicians on... through direct assistance from our factory. MST CAUTION Read all precautions and instructions in the space above for future reference. ® PATENT PENDING USER'S MANUAL TO AVOID UNNECESSARY DELAYS, PLEASE CALL DIRECT TO OUR TOLL-FREE CUSTOMER HOT LINE.
User Manual
Page 2
... damages with all other warranty beyond that specifically set forth herein. LIMITED WARRANTY ICON Health & Fitness, Inc. (ICON), warrants this manual. ICON HEALTH & FITNESS, INC., 1500 S. 1000 W., LOGAN, UT 84321-9813 2 WEIDER is not responsible or liable for a particular purpose is authorized by ICON. Some states do not allow limitations on how...
... damages with all other warranty beyond that specifically set forth herein. LIMITED WARRANTY ICON Health & Fitness, Inc. (ICON), warrants this manual. ICON HEALTH & FITNESS, INC., 1500 S. 1000 W., LOGAN, UT 84321-9813 2 WEIDER is not responsible or liable for a particular purpose is authorized by ICON. Some states do not allow limitations on how...

User Manual
Page 3
... shoes for protection. 5. Always disconnect the lat bar from the home gym system when performing an exercise that all parts often. WARNING: Before beginning this manual and in this or any worn parts immediately. 6. Cover the floor or carpet beneath the home gym system for foot protection. 10.
... shoes for protection. 5. Always disconnect the lat bar from the home gym system when performing an exercise that all parts often. WARNING: Before beginning this manual and in this or any worn parts immediately. 6. Cover the floor or carpet beneath the home gym system for foot protection. 10.
User Manual
Page 4
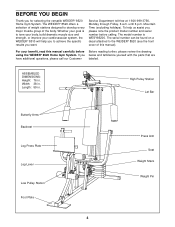
...Pin Mountain Time (excluding holidays). Length: 59 in . The WEIDER® 8520 offers a selection of weight stations designed to the WEIDER® 8520 (see the front cover of the body. For your cardiovascular system, the WEIDER® 8510 will help us assist you below and familiarize yourself...decal attached to develop every major muscle group of this manual carefully before calling. If you , please note the product model number and serial number before Before reading further, please review the drawing using the WEIDER® 8520 Home Gym System. Width: 38 in. Whether your ...
...Pin Mountain Time (excluding holidays). Length: 59 in . The WEIDER® 8520 offers a selection of weight stations designed to the WEIDER® 8520 (see the front cover of the body. For your cardiovascular system, the WEIDER® 8510 will help us assist you below and familiarize yourself...decal attached to develop every major muscle group of this manual carefully before calling. If you , please note the product model number and serial number before Before reading further, please review the drawing using the WEIDER® 8520 Home Gym System. Width: 38 in. Whether your ...
User Manual
Page 5
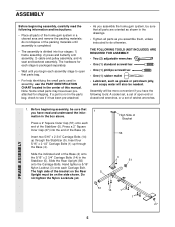
... in the drawings. • Tighten all parts of the home gym system in a cleared area and remove the packing materials; The high side of this manual. FRAME ASSEMBLY 1. Insert two 5/16" x 2 3/4" Carriage Bolts (14) up through the Stabilizer (5). Insert four 5/16" x 2 1/2" Carriage Bolts (1) up through the Base (4). ASSEMBLY Before beginning assembly...
... in the drawings. • Tighten all parts of the home gym system in a cleared area and remove the packing materials; The high side of this manual. FRAME ASSEMBLY 1. Insert two 5/16" x 2 3/4" Carriage Bolts (14) up through the Stabilizer (5). Insert four 5/16" x 2 1/2" Carriage Bolts (1) up through the Base (4). ASSEMBLY Before beginning assembly...
User Manual
Page 10
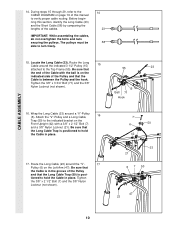
... the bolts and nuts securing the pulleys. Be sure that 55 23 the end of the cables. Locate the Long Cable (23). Before beginning this manual to hold the Cable in place. 17.
... the bolts and nuts securing the pulleys. Be sure that 55 23 the end of the cables. Locate the Long Cable (23). Before beginning this manual to hold the Cable in place. 17.

User Manual
Page 15
... each end of the Long Pad Tube (80). Insert the Short Pad Tube (28) into the Press Adjustment Tube (79). Remove the backing from the 8520 decal and apply it by tightening the cables. The use of holes in the Rocker Arm (32). If one set of the remaining parts will... tightened. Slide a 5 1/2" Pad (30) onto each cable a few times to the home gym system as shown. See the CABLE DIAGRAM on page 16 of this manual. Make sure that the cables move smoothly, find and correct the problem. See TROUBLE-SHOOTING AND MAINTENANCE on page 18. 32 44 79 8 3 8 22 40...
... each end of the Long Pad Tube (80). Insert the Short Pad Tube (28) into the Press Adjustment Tube (79). Remove the backing from the 8520 decal and apply it by tightening the cables. The use of holes in the Rocker Arm (32). If one set of the remaining parts will... tightened. Slide a 5 1/2" Pad (30) onto each cable a few times to the home gym system as shown. See the CABLE DIAGRAM on page 16 of this manual. Make sure that the cables move smoothly, find and correct the problem. See TROUBLE-SHOOTING AND MAINTENANCE on page 18. 32 44 79 8 3 8 22 40...
User Manual
Page 16
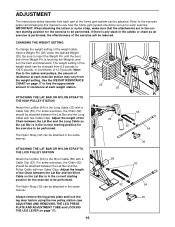
... the WEIGHT RESISTANCE CHART on page 17). 16 53 23 52 54 39 58 53 52 54 39 Refer to the exercise poster accompanying this manual to the Short Cable (58) with a Cable Clip (53).
... the WEIGHT RESISTANCE CHART on page 17). 16 53 23 52 54 39 58 53 52 54 39 Refer to the exercise poster accompanying this manual to the Short Cable (58) with a Cable Clip (53).
User Manual
Page 18
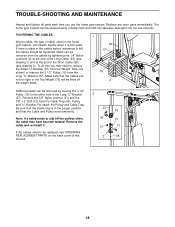
... used on the back cover of the Short Cable (58) (see ORDERING REPLACEMENT PARTS on the home gym system, can be tightened. To do this manual. 2 58 18 Be sure that the Cable trap is in the proper position and that the cables are not too tight or the Top Weight...
... used on the back cover of the Short Cable (58) (see ORDERING REPLACEMENT PARTS on the home gym system, can be tightened. To do this manual. 2 58 18 Be sure that the Cable trap is in the proper position and that the cables are not too tight or the Top Weight...
User Manual
Page 20
until 6 p.m. The MODEL NUMBER of the product (WEIDER® 8520 Home Gym System). 3. The NAME of the product (WESY85200). 2. To help us assist you, please be prepared to give the following information: 1. Part No. 132714 ... LIST and EXPLODED DRAWING at 1-800-999-3756, Monday through Friday, 6 a.m. The KEY NUMBER and DESCRIPTION of the part(s) (see the front cover of this manual). 4. ORDERING REPLACEMENT PARTS To order replacement parts, simply call our Customer Service Department toll-free at the center of this...
until 6 p.m. The MODEL NUMBER of the product (WEIDER® 8520 Home Gym System). 3. The NAME of the product (WESY85200). 2. To help us assist you, please be prepared to give the following information: 1. Part No. 132714 ... LIST and EXPLODED DRAWING at 1-800-999-3756, Monday through Friday, 6 a.m. The KEY NUMBER and DESCRIPTION of the part(s) (see the front cover of this manual). 4. ORDERING REPLACEMENT PARTS To order replacement parts, simply call our Customer Service Department toll-free at the center of this...
User Manual
Page 21
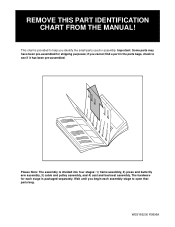
REMOVE THIS PART IDENTIFICATION CHART FROM THE MANUAL! Wait until you begin each stage is packaged separately. Important: Some parts may have been pre-assembled for each assembly stage to open that parts ...
REMOVE THIS PART IDENTIFICATION CHART FROM THE MANUAL! Wait until you begin each stage is packaged separately. Important: Some parts may have been pre-assembled for each assembly stage to open that parts ...
User Manual
Page 25
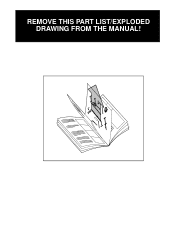
REMOVE THIS PART LIST/EXPLODED DRAWING FROM THE MANUAL! 81
REMOVE THIS PART LIST/EXPLODED DRAWING FROM THE MANUAL! 81
User Manual
Page 26
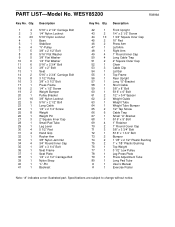
... 1" Round Cover Cap 3/8" x 3 3/4" Bolt 5/16" x 1 3/4" Bolt Bumper 1 1/8" x 2 1/2" Plastic Bushing 1" x 7/8" Plastic Bushing Top Weight 3 1/2" Low Pulley Leg Press Plate Press Adjustment Tube Long Pad Tube User's Manual Exercise Poster Note: "#" indicates a non-illustrated part. WESY85200 R0896A Key No.
... 1" Round Cover Cap 3/8" x 3 3/4" Bolt 5/16" x 1 3/4" Bolt Bumper 1 1/8" x 2 1/2" Plastic Bushing 1" x 7/8" Plastic Bushing Top Weight 3 1/2" Low Pulley Leg Press Plate Press Adjustment Tube Long Pad Tube User's Manual Exercise Poster Note: "#" indicates a non-illustrated part. WESY85200 R0896A Key No.


