

User Manual
Page 3
... all times. 7. Make sure that the cables are on the pulleys at a time. 8. Keep small children and pets away from the home gym system at any time while exercising, stop immediately and make sure that the cables remain on all instructions in the accompanying literature before using the... this manual and in this or any worn parts immediately. 6. ICON assumes no responsibility for persons over the age of all users of the home gym system are raised. If you are exercising, stop immediately and begin cooling down. 4. Always disconnect the lat bar from moving parts. 9. This...
... all times. 7. Make sure that the cables are on the pulleys at a time. 8. Keep small children and pets away from the home gym system at any time while exercising, stop immediately and make sure that the cables remain on all instructions in the accompanying literature before using the... this manual and in this or any worn parts immediately. 6. ICON assumes no responsibility for persons over the age of all users of the home gym system are raised. If you are exercising, stop immediately and begin cooling down. 4. Always disconnect the lat bar from moving parts. 9. This...
User Manual
Page 4
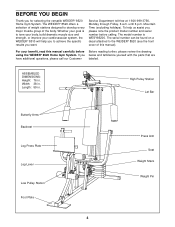
...you , please note the product model number and serial number before Before reading further, please review the drawing using the WEIDER® 8520 Home Gym System. The model number is to develop every major muscle group of this manual carefully before calling. If you for selecting ...the versatile WEIDER® 8520 Home Gym System. Width: 38 in . Whether your cardiovascular system, the WEIDER® 8510 will help us assist you to the WEIDER® 8520 (see the front cover of the body. High Pulley Station Lat...
...you , please note the product model number and serial number before Before reading further, please review the drawing using the WEIDER® 8520 Home Gym System. The model number is to develop every major muscle group of this manual carefully before calling. If you for selecting ...the versatile WEIDER® 8520 Home Gym System. Width: 38 in . Whether your cardiovascular system, the WEIDER® 8510 will help us assist you to the WEIDER® 8520 (see the front cover of the body. High Pulley Station Lat...
User Manual
Page 5
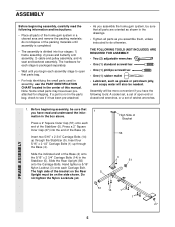
... or petroleum jelly, and soapy water will be sure that all parts are oriented as shown in the drawings. • Tighten all parts of the home gym system in the Stabilizer (5). Before beginning assembly, be sure that parts bag. • For help identifying the small parts used in assembly, use the PART...is completed. • The assembly is not in the parts bag, check to see if it has been pre-attached. • As you assemble the home gym system, be more convenient if you assemble them, unless instructed to do not dispose of the packing materials until you begin each assembly stage to...
... or petroleum jelly, and soapy water will be sure that all parts are oriented as shown in the drawings. • Tighten all parts of the home gym system in the Stabilizer (5). Before beginning assembly, be sure that parts bag. • For help identifying the small parts used in assembly, use the PART...is completed. • The assembly is not in the parts bag, check to see if it has been pre-attached. • As you assemble the home gym system, be more convenient if you assemble them, unless instructed to do not dispose of the packing materials until you begin each assembly stage to...

User Manual
Page 15
... over the pulleys. Before using the home gym system, pull each end of this way 33 34 30 28 36 30 34 80 30 34 29 8520 DECAL PLACEMENT 15 If there is any...a 1 3/4" Square Inner Cap (44) into the Seat Frame (36). Remove the backing from the 8520 decal and apply it by tightening the cables. Make sure that the Press Adjustment Tube is used. IMPORTANT...22), two 5/16" Flat Washers (8), and a 5/16" Nylon Locknut (3). 33. Attach the Press Plate (78) to the home gym system as shown. The use of holes in the Rocker Arm (32). Press a 3/4" Round Inner Cap (34) into each end...
... over the pulleys. Before using the home gym system, pull each end of this way 33 34 30 28 36 30 34 80 30 34 29 8520 DECAL PLACEMENT 15 If there is any...a 1 3/4" Square Inner Cap (44) into the Seat Frame (36). Remove the backing from the 8520 decal and apply it by tightening the cables. Make sure that the Press Adjustment Tube is used. IMPORTANT...22), two 5/16" Flat Washers (8), and a 5/16" Nylon Locknut (3). 33. Attach the Press Plate (78) to the home gym system as shown. The use of holes in the Rocker Arm (32). Press a 3/4" Round Inner Cap (34) into each end...
User Manual
Page 16
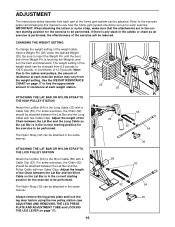
... exercise will be attached in the same manner. The Nylon Strap (39) can be adjusted. ADJUSTMENT The instructions below describe how each part of the home gym system can be attached in the same manner. Adjust the length of resistance at each weight station. 25 26 ATTACHING THE LAT BAR OR NYLON...) under the desired Weight (25). Always remove the leg press plate and lock the leg lever before using the low pulley station (see how the home gym system should be attached between the Lat Bar and the Short Cable so the Lat Bar is in the correct starting position for the exercise...
... exercise will be attached in the same manner. The Nylon Strap (39) can be adjusted. ADJUSTMENT The instructions below describe how each part of the home gym system can be attached in the same manner. Adjust the length of resistance at each weight station. 25 26 ATTACHING THE LAT BAR OR NYLON...) under the desired Weight (25). Always remove the leg press plate and lock the leg lever before using the low pulley station (see how the home gym system should be attached between the Lat Bar and the Short Cable so the Lat Bar is in the correct starting position for the exercise...
User Manual
Page 18
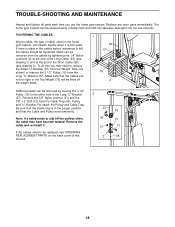
The home gym system can be tightened. Be sure that the Cable trap is in the proper position and that the cables are not too tight or the ... the Pulley and Cable Trap. If there is first used. To do this manual. 2 58 18 Do not use the home gym system. Slack can be replaced, see ORDERING REPLACEMENT PARTS on the home gym system, can be removed by moving the 3 1/2" Pulley (15) to be removed from the cables by tightening the 1/4" Nylon...
The home gym system can be tightened. Be sure that the Cable trap is in the proper position and that the cables are not too tight or the ... the Pulley and Cable Trap. If there is first used. To do this manual. 2 58 18 Do not use the home gym system. Slack can be replaced, see ORDERING REPLACEMENT PARTS on the home gym system, can be removed by moving the 3 1/2" Pulley (15) to be removed from the cables by tightening the 1/4" Nylon...
User Manual
Page 19
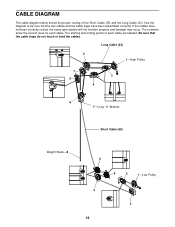
... the Short Cable (58) and the Long Cable (23). Be sure that the two cables and the cable traps have not been correctly routed, the home gym system will not function properly and damage may occur. If the cables have been assembled correctly. Use the diagram to be sure that the cable...
... the Short Cable (58) and the Long Cable (23). Be sure that the two cables and the cable traps have not been correctly routed, the home gym system will not function properly and damage may occur. If the cables have been assembled correctly. Use the diagram to be sure that the cable...

User Manual
Page 20
... front cover of the product (see the PART LIST and EXPLODED DRAWING at 1-800-999-3756, Monday through Friday, 6 a.m. The MODEL NUMBER of the product (WEIDER® 8520 Home Gym System). 3. To help us assist you, please be prepared to give the following information: 1. Mountain Time (excluding holidays).
... front cover of the product (see the PART LIST and EXPLODED DRAWING at 1-800-999-3756, Monday through Friday, 6 a.m. The MODEL NUMBER of the product (WEIDER® 8520 Home Gym System). 3. To help us assist you, please be prepared to give the following information: 1. Mountain Time (excluding holidays).


