

User Manual
Page 2
... Some states do not allow the exclusion or limitation of incidental or consequential damages. Remove the PART IDENTIFICATION CHART before beginning assembly. ICON is attached to state. This warranty extends only to any economic loss, loss of property, loss of revenues or...consequential damages of whatsoever nature. This warranty gives you specific legal rights. TABLE OF CONTENTS LIMITED WARRANTY IMPORTANT PRECAUTIONS BEFORE YOU BEGIN ASSEMBLY HOW TO USE THE HOME GYM SYSTEM TROUBLE-SHOOTING AND MAINTENANCE CABLE DIAGRAM PART LIST EXPLODED DRAWING ORDERING REPLACEMENT PARTS 2 3 4 ...
... Some states do not allow the exclusion or limitation of incidental or consequential damages. Remove the PART IDENTIFICATION CHART before beginning assembly. ICON is attached to state. This warranty extends only to any economic loss, loss of property, loss of revenues or...consequential damages of whatsoever nature. This warranty gives you specific legal rights. TABLE OF CONTENTS LIMITED WARRANTY IMPORTANT PRECAUTIONS BEFORE YOU BEGIN ASSEMBLY HOW TO USE THE HOME GYM SYSTEM TROUBLE-SHOOTING AND MAINTENANCE CABLE DIAGRAM PART LIST EXPLODED DRAWING ORDERING REPLACEMENT PARTS 2 3 4 ...

User Manual
Page 4
...in . The WEIDER® 8510 offers a selection of weight stations designed to the WEIDER® 8510 (see the front cover of the body. For your cardiovascular system, the WEIDER® 8510 will help ...specific results you , please note the product model number and serial number before using the WEIDER® 8510 Home Gym System. High Pulley Station Lat Bar Butterfly Arms Backrest Press Arm Seat Leg Lever...improve your benefit, read this owner's manual). If you for selecting the versatile WEIDER® 8510 Home Gym System. Whether your goal is WESY85100. BEFORE YOU BEGIN Thank you...
...in . The WEIDER® 8510 offers a selection of weight stations designed to the WEIDER® 8510 (see the front cover of the body. For your cardiovascular system, the WEIDER® 8510 will help ...specific results you , please note the product model number and serial number before using the WEIDER® 8510 Home Gym System. High Pulley Station Lat Bar Butterfly Arms Backrest Press Arm Seat Leg Lever...improve your benefit, read this owner's manual). If you for selecting the versatile WEIDER® 8510 Home Gym System. Whether your goal is WESY85100. BEFORE YOU BEGIN Thank you...

User Manual
Page 5
... water will also be sure that parts bag. • For help identifying the small parts used in assembly, use the PART IDENTIFICATION CHART located in the center of the WEIDER 8510 in a cleared area and remove the packing materials; The high side of the bracket on the side ... 3/4" Carriage Bolts (14) up through the Stabilizer (5). Do not tighten the Nylon Locknuts yet. 5 High Side of the packing materials until you assemble the WEIDER 8510, be on the Rear Upright should be sure that all parts are oriented as shown in the Stabilizer (5). If a part is divided into the ...
... water will also be sure that parts bag. • For help identifying the small parts used in assembly, use the PART IDENTIFICATION CHART located in the center of the WEIDER 8510 in a cleared area and remove the packing materials; The high side of the bracket on the side ... 3/4" Carriage Bolts (14) up through the Stabilizer (5). Do not tighten the Nylon Locknuts yet. 5 High Side of the packing materials until you assemble the WEIDER 8510, be on the Rear Upright should be sure that all parts are oriented as shown in the Stabilizer (5). If a part is divided into the ...

User Manual
Page 8
Assemble the other Press Arm (46) in the same manner. Tap two 1" Retainers (69) and a 1" Round Cover Cap (70) onto the axle. Press a 1 3/4" Square Inner Cap (...
Assemble the other Press Arm (46) in the same manner. Tap two 1" Retainers (69) and a 1" Round Cover Cap (70) onto the axle. Press a 1 3/4" Square Inner Cap (...
User Manual
Page 9
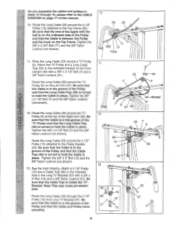
... 12 50 7 20 v 66 ° 0 . 12 48 15 23 • 13 rll 15 23 A.. 23 15 66 57 57 / 4- ' • 21 ,' ,\ 12 ii - As you assemble the cables and pulleys in steps 10 through the 3 1/2" Pulley (15) and Long "U"-Bracket (57). Tighten the 3/8" x 2 1/2" Bolt (7) and the 3/8" Nylon Locknut (not shown). See... the Right Arm (48). Attach a 3 1/2" Pulley (15) and a Cable Trap (66) to x 2 1/2" Bolt (7) and the 3/8" Nylon Locknut (not shown). < 12. Note: This may come pre-assembled.
... 12 50 7 20 v 66 ° 0 . 12 48 15 23 • 13 rll 15 23 A.. 23 15 66 57 57 / 4- ' • 21 ,' ,\ 12 ii - As you assemble the cables and pulleys in steps 10 through the 3 1/2" Pulley (15) and Long "U"-Bracket (57). Tighten the 3/8" x 2 1/2" Bolt (7) and the 3/8" Nylon Locknut (not shown). See... the Right Arm (48). Attach a 3 1/2" Pulley (15) and a Cable Trap (66) to x 2 1/2" Bolt (7) and the 3/8" Nylon Locknut (not shown). < 12. Note: This may come pre-assembled.

User Manual
Page 10
... Pulley and the crossbar on the indicated side of the Press Frame and that the Cable is in place and that the Cable is pre-assembled. A F If\-Mfc 58 21 15 Ball Crossbar Tighten the 3/8" Nylon Locknut (21) and 3/8" x 3 3/4" Bolt (not shown). Be sure that the Cable is routed around the...
... Pulley and the crossbar on the indicated side of the Press Frame and that the Cable is in place and that the Cable is pre-assembled. A F If\-Mfc 58 21 15 Ball Crossbar Tighten the 3/8" Nylon Locknut (21) and 3/8" x 3 3/4" Bolt (not shown). Be sure that the Cable is routed around the...

User Manual
Page 17
CABLE DIAGRAM The cable diagram below shows the proper routing of the Short Cable (58) and the Long Cable (23). The numbers show the correct route for each cable. 2 7 0 5 3 4 Long Cable (23) -High Pulley 6 5 -Long "U"-Bracket Weight Stack -8 Short Cable (58) 4 3 -Low Pulley 2 17 Use the diagram to be sure that the two cables have not been correctly routed, the home gym system will not function properly and damage may occur. If the cables have been assembled correctly. The starting and ending points for each cable are labeled.
CABLE DIAGRAM The cable diagram below shows the proper routing of the Short Cable (58) and the Long Cable (23). The numbers show the correct route for each cable. 2 7 0 5 3 4 Long Cable (23) -High Pulley 6 5 -Long "U"-Bracket Weight Stack -8 Short Cable (58) 4 3 -Low Pulley 2 17 Use the diagram to be sure that the two cables have not been correctly routed, the home gym system will not function properly and damage may occur. If the cables have been assembled correctly. The starting and ending points for each cable are labeled.


