
English Manual
Page 2
ICON HEALTH & FITNESS, INC., 1500 S. 1000 W., LOGAN, UT 84321-9813 WEIDER is a registered trademark of incidental or consequential damages. Table of Contents LIMITED WARRANTY 2 IMPORTANT PRECAUTIONS 3 BEFORE YOU BEGIN 4 PART IDENTIFICATION CHART 5 ASSEMBLY 6 USING THE WEIGHT BENCH 11 EXERCISE GUIDELINES 14 MUSCLE CHART 15 PART LIST 18 EXPLODED DRAWING 19 ORDERING REPLACEMENT PARTS...
ICON HEALTH & FITNESS, INC., 1500 S. 1000 W., LOGAN, UT 84321-9813 WEIDER is a registered trademark of incidental or consequential damages. Table of Contents LIMITED WARRANTY 2 IMPORTANT PRECAUTIONS 3 BEFORE YOU BEGIN 4 PART IDENTIFICATION CHART 5 ASSEMBLY 6 USING THE WEIGHT BENCH 11 EXERCISE GUIDELINES 14 MUSCLE CHART 15 PART LIST 18 EXPLODED DRAWING 19 ORDERING REPLACEMENT PARTS...
English Manual
Page 3
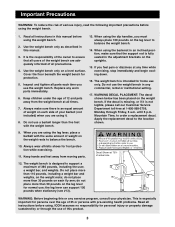
.... Apply the replacement decal to order a replacement decal. Inspect and tighten all precautions. 4. Always make sure that all users of the weight bench are adequately informed of all parts each time you feel pain or dizziness at 75% of actual size 12. Mountain Time, to ...the bench. 10. Important Precautions WARNING: To reduce the risk of serious injury, read the following important precautions before using the weight bench. 2. Use the weight bench only as described in any worn parts immediately. 6. It is designed to ensure that the support rod is not legible...
.... Apply the replacement decal to order a replacement decal. Inspect and tighten all precautions. 4. Always make sure that all users of the weight bench are adequately informed of all parts each time you feel pain or dizziness at 75% of actual size 12. Mountain Time, to ...the bench. 10. Important Precautions WARNING: To reduce the risk of serious injury, read the following important precautions before using the weight bench. 2. Use the weight bench only as described in any worn parts immediately. 6. It is designed to ensure that the support rod is not legible...
English Manual
Page 4
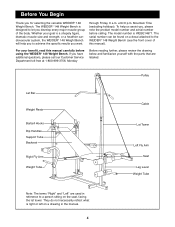
... results you for selecting the versatile WEIDER¨ 148 Weight Bench. They do not necessarily reflect what is WEBE14871. For your goal is designed to the WEIDER¨ 148 Weight Bench (see the front cover of the body. Pulley Lat Bar Weight Rests Barbell Hooks Dip Handles Support ... Mountain Time (excluding holidays). through Friday, 6 a.m. If you , please note the product model number and serial number before using the WEIDER¨ 148 Weight Bench. The model number is right or left on a drawing in reference to a person sitting on a decal attached to let you ...
... results you for selecting the versatile WEIDER¨ 148 Weight Bench. They do not necessarily reflect what is WEBE14871. For your goal is designed to the WEIDER¨ 148 Weight Bench (see the front cover of the body. Pulley Lat Bar Weight Rests Barbell Hooks Dip Handles Support ... Mountain Time (excluding holidays). through Friday, 6 a.m. If you , please note the product model number and serial number before using the WEIDER¨ 148 Weight Bench. The model number is right or left on a drawing in reference to a person sitting on a decal attached to let you ...
English Manual
Page 6
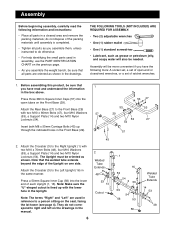
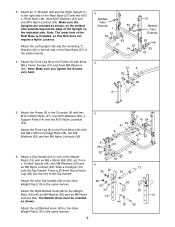
... Square Inner Caps (57) into the lower end of the Upright on the seat, facing the lat tower (see page 4). Note that 1 you assemble the weight bench, be needed. Note: The terms ÒRightÓ and ÒLeftÓ are oriented as shown. Insert both M8 x 50mm Carriage Bolts (45) up...
... Square Inner Caps (57) into the lower end of the Upright on the seat, facing the lat tower (see page 4). Note that 1 you assemble the weight bench, be needed. Note: The terms ÒRightÓ and ÒLeftÓ are oriented as shown. Insert both M8 x 50mm Carriage Bolts (45) up...
English Manual
Page 7
... Round Inner Cap (59) into the end of the Rear Base (27) in the same manner. Attach the other Dip Handle (24) to the other Weight Rest (19) in the Rear Base is threaded, so this Bolt does not require a Nylon Locknut. Attach the Right Barbell Hook (28) to the Crossbar...). Slide a Handgrip (12) onto the Dip Handle. The Barbell Hook must be oriented as shown, so the welded tube extends beyond the edge of the Weight Rests (19) with three M8 x 16mm Screws (51) and three M8 Washers (20). 3. Note: The lower hole in the same manner. 7 5 8 39 20 53 47...
... Round Inner Cap (59) into the end of the Rear Base (27) in the same manner. Attach the other Dip Handle (24) to the other Weight Rest (19) in the Rear Base is threaded, so this Bolt does not require a Nylon Locknut. Attach the Right Barbell Hook (28) to the Crossbar...). Slide a Handgrip (12) onto the Dip Handle. The Barbell Hook must be oriented as shown, so the welded tube extends beyond the edge of the Weight Rests (19) with three M8 x 16mm Screws (51) and three M8 Washers (20). 3. Note: The lower hole in the same manner. 7 5 8 39 20 53 47...
English Manual
Page 8
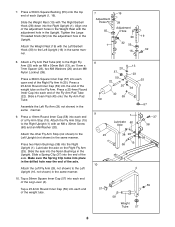
... the axle. Tap a 25.4mm Round Inner Cap (59) into each end of the adjustment holes in the Weight Rest with The Right Barbell Hook (28) down into the Right Upright (1). Attach the Fly Arm Stop (15)... to the Left Upright (not shown) in the same manner. 8. Align one of the weight tube. 7 Adjustment Holes 55 1 19 28 Adjustment Hole 30 32 55 16 19 32 8 59 20 57 59 ... a Fly Arm Stop (15). Tighten the Large Threaded Knob (32) into each end of the axle. Attach the Weight Rest (19) with the Left Barbell Hook (30) to the Right Fly Arm (25) with an M8 x 30mm...
... the axle. Tap a 25.4mm Round Inner Cap (59) into each end of the adjustment holes in the Weight Rest with The Right Barbell Hook (28) down into the Right Upright (1). Attach the Fly Arm Stop (15)... to the Left Upright (not shown) in the same manner. 8. Align one of the weight tube. 7 Adjustment Holes 55 1 19 28 Adjustment Hole 30 32 55 16 19 32 8 59 20 57 59 ... a Fly Arm Stop (15). Tighten the Large Threaded Knob (32) into each end of the axle. Attach the Weight Rest (19) with the Left Barbell Hook (30) to the Right Fly Arm (25) with an M8 x 30mm...
English Manual
Page 10
... the Pulley (33). Be sure that the Cable is in the Pulley Covers (34). Make sure all remaining parts will be explained in Using the Weight Bench starting on the Frame 15 (2) with soapy water. 15. Attach the Seat (11) to the Upper Lat Tower (17) with two M10 x 16 50mm...
... the Pulley (33). Be sure that the Cable is in the Pulley Covers (34). Make sure all remaining parts will be explained in Using the Weight Bench starting on the Frame 15 (2) with soapy water. 15. Attach the Seat (11) to the Upper Lat Tower (17) with two M10 x 16 50mm...
English Manual
Page 11
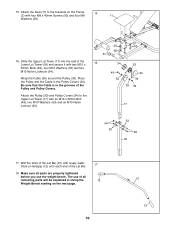
... Knobs. Note: When using the Dip Handles (24), you must be cleaned with a damp cloth and a mild, non-abrasive detergent. USING BARBELL HOOKS To change weights. 7 1 5 6 16 3 19 32 19 1 32 16 19 28 19 30 11 Insert the Support Tube (7) into one of the two upper sets of ... place 100 pounds on the leg lever to the desired height. See EXERCISE GUIDELINES on page 14 for additional exercises. The weight bench can be used with your own weight set (not included) for important exercise information and refer to the accompanying exercise poster to be used in a declined position,...
... Knobs. Note: When using the Dip Handles (24), you must be cleaned with a damp cloth and a mild, non-abrasive detergent. USING BARBELL HOOKS To change weights. 7 1 5 6 16 3 19 32 19 1 32 16 19 28 19 30 11 Insert the Support Tube (7) into one of the two upper sets of ... place 100 pounds on the leg lever to the desired height. See EXERCISE GUIDELINES on page 14 for additional exercises. The weight bench can be used with your own weight set (not included) for important exercise information and refer to the accompanying exercise poster to be used in a declined position,...
English Manual
Page 12
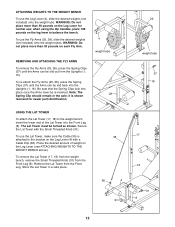
... into the Uprights (1, 16). WARNING: Do not place more than 30 pounds on the Leg Lever (see ATTACHING WEIGHTS TO THE WEIGHT BENCH above). To remove the Lat Tower (17, 18) from the weight bench, remove the Small Threaded Knob (31) from the Front Leg. Remove the Lat Tower from the Front Leg... for normal use the Lat Tower, make sure the Cable (35) is 35 attached to the bracket on the Leg Lever for easier part identification. 4 weight tube 26 USING THE LAT TOWER To attach the Lat Tower (17, 18) to balance the bench. To use ;
... into the Uprights (1, 16). WARNING: Do not place more than 30 pounds on the Leg Lever (see ATTACHING WEIGHTS TO THE WEIGHT BENCH above). To remove the Lat Tower (17, 18) from the weight bench, remove the Small Threaded Knob (31) from the Front Leg. Remove the Lat Tower from the Front Leg... for normal use the Lat Tower, make sure the Cable (35) is 35 attached to the bracket on the Leg Lever for easier part identification. 4 weight tube 26 USING THE LAT TOWER To attach the Lat Tower (17, 18) to balance the bench. To use ;

English Manual
Page 13
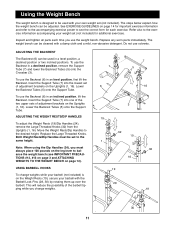
WARNING: Always remove the Lat Bar 36 from the weight bench when performing an exercise that does no use the lat bar. 21 13 ATTACHING THE LAT BAR 35 Attach the Lat Bar (21) to the Cable (35) with a Cable Clip (36).
WARNING: Always remove the Lat Bar 36 from the weight bench when performing an exercise that does no use the lat bar. 21 13 ATTACHING THE LAT BAR 35 Attach the Lat Bar (21) to the Cable (35) with a Cable Clip (36).
English Manual
Page 14
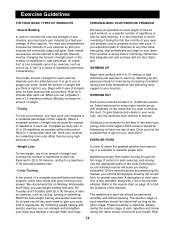
...Each workout should be tailored to warm up prepares your body for 1 minute after each exercise that is wrong before continuing. By combining weight training with 3 sets of 8 repetitions for you. On the exercise poster accompanying this manual, you can be performed smoothly and without...each set should be followed by increasing circulation, raising your body, plus develop a stronger heart and lungs. Select a moderate amount of weight and increase the number of repetitions in each set . Find out what is right for several exercises. Warming up . WORKING OUT ...
...Each workout should be tailored to warm up prepares your body for 1 minute after each exercise that is wrong before continuing. By combining weight training with 3 sets of 8 repetitions for you. On the exercise poster accompanying this manual, you can be performed smoothly and without...each set should be followed by increasing circulation, raising your body, plus develop a stronger heart and lungs. Select a moderate amount of weight and increase the number of repetitions in each set . Find out what is right for several exercises. Warming up . WORKING OUT ...

English Manual
Page 15
... equipment and learning the proper form for each set if you are doing a toning workout, and 30 seconds after each set if you are doing a weight loss workout. Include stretches for both your everyday life. COOLING DOWN End each workout with 5 to schedule and record your... weight and key body measurements at the end of each workout is to spend the first couple of this manual can without strain. Muscle Chart Trapezius ...
... equipment and learning the proper form for each set if you are doing a toning workout, and 30 seconds after each set if you are doing a weight loss workout. Include stretches for both your everyday life. COOLING DOWN End each workout with 5 to schedule and record your... weight and key body measurements at the end of each workout is to spend the first couple of this manual can without strain. Muscle Chart Trapezius ...
English Manual
Page 16
MONDAY Date: / / EXERCISE WEIGHT SETS REPS TUESDAY Date: / / AEROBIC EXERCISE WEDNESDAY Date: / / EXERCISE WEIGHT SETS REPS THURSDAY Date: / / AEROBIC EXERCISE FRIDAY Date: / / EXERCISE WEIGHT SETS REPS Make photocopies of this page for scheduling and recording your workouts. 16
MONDAY Date: / / EXERCISE WEIGHT SETS REPS TUESDAY Date: / / AEROBIC EXERCISE WEDNESDAY Date: / / EXERCISE WEIGHT SETS REPS THURSDAY Date: / / AEROBIC EXERCISE FRIDAY Date: / / EXERCISE WEIGHT SETS REPS Make photocopies of this page for scheduling and recording your workouts. 16

English Manual
Page 17
MONDAY Date: / / EXERCISE WEIGHT SETS REPS TUESDAY Date: / / AEROBIC EXERCISE WEDNESDAY Date: / / EXERCISE WEIGHT SETS REPS THURSDAY Date: / / AEROBIC EXERCISE FRIDAY Date: / / EXERCISE WEIGHT SETS REPS Make photocopies of this page for scheduling and recording your workouts. 17
MONDAY Date: / / EXERCISE WEIGHT SETS REPS TUESDAY Date: / / AEROBIC EXERCISE WEDNESDAY Date: / / EXERCISE WEIGHT SETS REPS THURSDAY Date: / / AEROBIC EXERCISE FRIDAY Date: / / EXERCISE WEIGHT SETS REPS Make photocopies of this page for scheduling and recording your workouts. 17
English Manual
Page 18
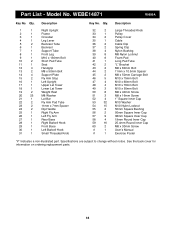
... Leg M10 x 130mm Bolt Short Pad Tube Seat Handgrip M8 x 50mm Bolt Support Plate Fly Arm Stop Left Upright Upper Lat Tower Lower Lat Tower Weight Rest M8 Washer Lat Bar Fly Arm Pad Tube 11mm x 7mm Spacer Dip Handle Right Fly Arm Left Fly Arm Rear Base Right Barbell Hook...
... Leg M10 x 130mm Bolt Short Pad Tube Seat Handgrip M8 x 50mm Bolt Support Plate Fly Arm Stop Left Upright Upper Lat Tower Lower Lat Tower Weight Rest M8 Washer Lat Bar Fly Arm Pad Tube 11mm x 7mm Spacer Dip Handle Right Fly Arm Left Fly Arm Rear Base Right Barbell Hook...
English Manual
Page 20
Mountain Time (excluding holidays). The MODEL NUMBER of the product (WEIDER¨ 148 Weight Bench). 3. until 6 p.m. The KEY NUMBER and DESCRIPTION of the desired part(s) (see the front cover of this manual). 4. The NAME of the product (WEBE14871). 2. The ...
Mountain Time (excluding holidays). The MODEL NUMBER of the product (WEIDER¨ 148 Weight Bench). 3. until 6 p.m. The KEY NUMBER and DESCRIPTION of the desired part(s) (see the front cover of this manual). 4. The NAME of the product (WEBE14871). 2. The ...


