
English Manual
Page 1
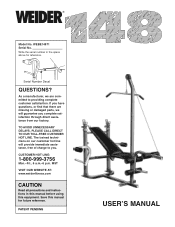
... Mon.ÐFri., 6 a.m.Ð6 p.m. PATENT PENDING USERÕS MANUAL Write the serial number in this manual before using this manual for reference. TO AVOID UNNECESSARY DELAYS, PLEASE CALL DIRECT TO OUR TOLL-FREE CUSTOMER HOT LINE. Serial Number Decal QUESTIONS? WEBE14871 Serial No. If you have questions, or find that there are missing or damaged parts, we are committed to you complete satisfaction...
... Mon.ÐFri., 6 a.m.Ð6 p.m. PATENT PENDING USERÕS MANUAL Write the serial number in this manual before using this manual for reference. TO AVOID UNNECESSARY DELAYS, PLEASE CALL DIRECT TO OUR TOLL-FREE CUSTOMER HOT LINE. Serial Number Decal QUESTIONS? WEBE14871 Serial No. If you have questions, or find that there are missing or damaged parts, we are committed to you complete satisfaction...
English Manual
Page 2
... not apply to you. This warranty gives you . Table of Contents LIMITED WARRANTY 2 IMPORTANT PRECAUTIONS 3 BEFORE YOU BEGIN 4 PART IDENTIFICATION CHART 5 ASSEMBLY 6 USING THE WEIGHT BENCH 11 EXERCISE GUIDELINES 14 MUSCLE CHART 15 PART LIST 18 EXPLODED DRAWING 19 ORDERING REPLACEMENT PARTS Back Cover Limited Warranty ICON Health & Fitness, Inc. (ICON), warrants this warranty is limited to replacing or repairing, at ICON's option, the product at one of its authorized service centers. This warranty extends only to freight damage...
... not apply to you. This warranty gives you . Table of Contents LIMITED WARRANTY 2 IMPORTANT PRECAUTIONS 3 BEFORE YOU BEGIN 4 PART IDENTIFICATION CHART 5 ASSEMBLY 6 USING THE WEIGHT BENCH 11 EXERCISE GUIDELINES 14 MUSCLE CHART 15 PART LIST 18 EXPLODED DRAWING 19 ORDERING REPLACEMENT PARTS Back Cover Limited Warranty ICON Health & Fitness, Inc. (ICON), warrants this warranty is limited to replacing or repairing, at ICON's option, the product at one of its authorized service centers. This warranty extends only to freight damage...
English Manual
Page 3
... the weight bench at any exercise program, consult your barbell (not included) when you use a barbell longer than 110 pounds, including a weight bar and weights, on the weight rests to balance the weight bench. 14. Use the weight bench only as described in this manual. 3. Replace any commercial, rental or institutional setting. 17. The weight bench is the responsibility of the owner to support a maximum of 360 pounds, including the user, a weight bar, and weights...
... the weight bench at any exercise program, consult your barbell (not included) when you use a barbell longer than 110 pounds, including a weight bar and weights, on the weight rests to balance the weight bench. 14. Use the weight bench only as described in this manual. 3. Replace any commercial, rental or institutional setting. 17. The weight bench is the responsibility of the owner to support a maximum of 360 pounds, including the user, a weight bar, and weights...
English Manual
Page 4
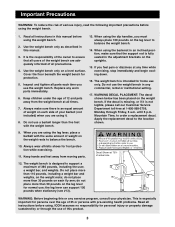
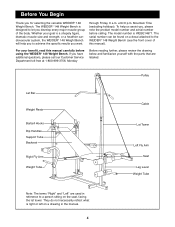
... Customer Service Department toll-free at 1-800-999-3756, Monday Before reading further, please review the drawing below and familiarize yourself with the parts that are used in the manual. 4 through Friday, 6 a.m. If you , please note the product model number and serial number before using the WEIDER¨ 148 Weight Bench. Pulley Lat Bar Weight Rests Barbell Hooks Dip Handles Support Tube Backrest Right Fly Arm Weight Tube Cable Lat Tower Left Fly Arm Seat Leg Lever Weight...
... Customer Service Department toll-free at 1-800-999-3756, Monday Before reading further, please review the drawing below and familiarize yourself with the parts that are used in the manual. 4 through Friday, 6 a.m. If you , please note the product model number and serial number before using the WEIDER¨ 148 Weight Bench. Pulley Lat Bar Weight Rests Barbell Hooks Dip Handles Support Tube Backrest Right Fly Arm Weight Tube Cable Lat Tower Left Fly Arm Seat Leg Lever Weight...
English Manual
Page 5
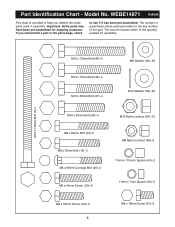
... M10 x 50mm Bolt (49)Ð3 M10 Nylon Locknut (54)Ð15 M8 x 60mm Bolt (43)Ð2 M8 x 50mm Bolt (13)Ð2 M8 x 50mm Carriage Bolt (45)Ð2 M8 x 40mm Screw (50)Ð8 M8...assembled for assembly. If you identify the small parts used in assembly. WEBE14871 R0699A This chart is provided to help you cannot find a part in parenthesis below each part refers to the key number of the part. The second number refers to see if it has been pre-assembled. The number in the parts bags, check to the quantity needed for shipping purposes. Model No. Part Identification Chart...
... M10 x 50mm Bolt (49)Ð3 M10 Nylon Locknut (54)Ð15 M8 x 60mm Bolt (43)Ð2 M8 x 50mm Bolt (13)Ð2 M8 x 50mm Carriage Bolt (45)Ð2 M8 x 40mm Screw (50)Ð8 M8...assembled for assembly. If you identify the small parts used in assembly. WEBE14871 R0699A This chart is provided to help you cannot find a part in parenthesis below each part refers to the key number of the part. The second number refers to see if it has been pre-assembled. The number in the parts bags, check to the quantity needed for shipping purposes. Model No. Part Identification Chart...
English Manual
Page 6
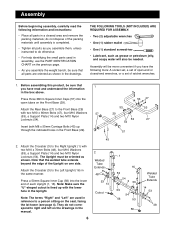
... information and instructions: ¥ Place all parts are used in assembly, use the PART IDENTIFICATION CHART on the Front Base (29). Before assembling this product, be oriented as grease or petroleum jelly, and soapy water will be needed. Press three 38mm Square Inner Caps (57) into the lower end of each Upright (1, 16). Attach the Crossbar (3) to the Front Base (29) with two M10 x 70mm Bolts...
... information and instructions: ¥ Place all parts are used in assembly, use the PART IDENTIFICATION CHART on the Front Base (29). Before assembling this product, be oriented as grease or petroleum jelly, and soapy water will be needed. Press three 38mm Square Inner Caps (57) into the lower end of each Upright (1, 16). Attach the Crossbar (3) to the Front Base (29) with two M10 x 70mm Bolts...
English Manual
Page 7
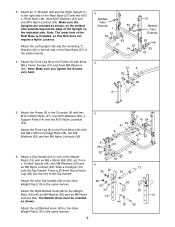
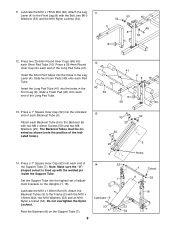
...lower hole in the same manner. 4. Press a 25.4mm Round Inner Cap (59) into the end of the Upright on the indicated side. Attach the Left Upright (16) and the remaining ÒLÓ Bracket (42) to the left side of the Rear Base (27) in the Rear Base is threaded, so this Bolt does not require a Nylon Locknut. Attach...and the Right Upright (1) to the other Weight Rest (19) in the same manner. Attach the other Dip Handle (24) to the right side of the Weight Rests (19) with three M8 x 16mm Screws (51) and three M8 Washers (20). Note: Make sure you tighten the Screws very hard....
...lower hole in the same manner. 4. Press a 25.4mm Round Inner Cap (59) into the end of the Upright on the indicated side. Attach the Left Upright (16) and the remaining ÒLÓ Bracket (42) to the left side of the Rear Base (27) in the Rear Base is threaded, so this Bolt does not require a Nylon Locknut. Attach...and the Right Upright (1) to the other Weight Rest (19) in the same manner. Attach the other Dip Handle (24) to the right side of the Weight Rests (19) with three M8 x 16mm Screws (51) and three M8 Washers (20). Note: Make sure you tighten the Screws very hard....
English Manual
Page 8
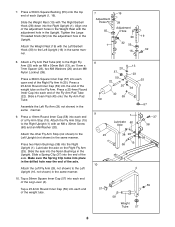
...10 4 59 57 59 Weight Tube 57 8 Press a 19mm Round Inner Cap (58) into each end of the Right Fly Arm A (25). Attach the Fly Arm Stop (15) to the Right Upright (1) with the adjustment hole in the same manner. 10. Slide a Spring Clip (37) into the end of the Leg Lever (4). Slide a ... Upright (1, 16). 7. Slide the Weight Rest (19) with an M8 x 50mm Bolt (13), an 11mm x 7mm Spacer (23), two M8 Washers (20) and an M8 Nylon Locknut (39). Tighten the Large Threaded Knob (32) into the Right Upright (1). Attach the Weight Rest (19) with the Left Barbell Hook (30) to the Right Fly Arm...
...10 4 59 57 59 Weight Tube 57 8 Press a 19mm Round Inner Cap (58) into each end of the Right Fly Arm A (25). Attach the Fly Arm Stop (15) to the Right Upright (1) with the adjustment hole in the same manner. 10. Slide a Spring Clip (37) into the end of the Leg Lever (4). Slide a ... Upright (1, 16). 7. Slide the Weight Rest (19) with an M8 x 50mm Bolt (13), an 11mm x 7mm Spacer (23), two M8 Washers (20) and an M8 Nylon Locknut (39). Tighten the Large Threaded Knob (32) into the Right Upright (1). Attach the Weight Rest (19) with the Left Barbell Hook (30) to the Right Fly Arm...
English Manual
Page 9
... up with the M10 x 130mm Bolt, two M10 Washers (53) and an M10 LubricateÑ9 Nylon Locknut (54). Set the Support Tube into the indicated end of 14 the Support Tube (7). Attach the 16 Backrest Tubes (5) to the Frame (2) with the welded pin inside the Support Tube. Press a 25.4mm Round Inner Cap ...59) into the holes in the Front Leg (8). Insert the Short Pad Tubes into each Backrest Tube (5) to the Front Leg (8) with two M8 x 40mm Screws (50) and two M8 Washers (20). 11. Press a 1Ó Square Inner Cap (52) into the highest set of the indicated holes). 50 52 20 ...
... up with the M10 x 130mm Bolt, two M10 Washers (53) and an M10 LubricateÑ9 Nylon Locknut (54). Set the Support Tube into the indicated end of 14 the Support Tube (7). Attach the 16 Backrest Tubes (5) to the Frame (2) with the welded pin inside the Support Tube. Press a 25.4mm Round Inner Cap ...59) into the holes in the Front Leg (8). Insert the Short Pad Tubes into each Backrest Tube (5) to the Front Leg (8) with two M8 x 40mm Screws (50) and two M8 Washers (20). 11. Press a 1Ó Square Inner Cap (52) into the highest set of the indicated holes). 50 52 20 ...
English Manual
Page 10
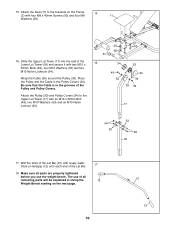
...Lat Bar. 18. The use the weight bench. Slide the Upper Lat Tower (17) into the end of all remaining parts will be explained in the Pulley Covers (34). Attach the Pulley (33) and Pulley Covers (34) to the brackets on the next page. 17 12 10 21 12 Place the Pulley and the Cable in Using the Weight Bench starting on the Frame 15 (2) with an M10 x 50mm Bolt...17. Make sure all parts are properly tightened before you use of the Lower Lat Tower (18) and secure it with soapy water. Attach the Seat (11) to the Upper Lat Tower (17) with four M8 x 40mm Screws (50) and four ...
...Lat Bar. 18. The use the weight bench. Slide the Upper Lat Tower (17) into the end of all remaining parts will be explained in the Pulley Covers (34). Attach the Pulley (33) and Pulley Covers (34) to the brackets on the next page. 17 12 10 21 12 Place the Pulley and the Cable in Using the Weight Bench starting on the Frame 15 (2) with an M10 x 50mm Bolt...17. Make sure all parts are properly tightened before you use of the Lower Lat Tower (18) and secure it with soapy water. Attach the Seat (11) to the Upper Lat Tower (17) with four M8 x 40mm Screws (50) and four ...
English Manual
Page 11
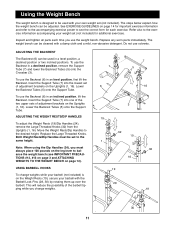
.... Replace any worn parts immediately. ADJUSTING THE BACKREST The Backrest (6) can be set (not included) for additional exercises. To use the Backrest (6) in a level position, a declined position or two inclined positions. Insert the Support Tube (7) into the lowest set (not included). Move the Weight Rests/Dip Handles to see IMPORTANT PRECAUTIONS #12, #13 on page 3 and ATTACHING WEIGHTS TO THE WEIGHT BENCH on the Uprights (1, 16). USING...
.... Replace any worn parts immediately. ADJUSTING THE BACKREST The Backrest (6) can be set (not included) for additional exercises. To use the Backrest (6) in a level position, a declined position or two inclined positions. Insert the Support Tube (7) into the lowest set (not included). Move the Weight Rests/Dip Handles to see IMPORTANT PRECAUTIONS #12, #13 on page 3 and ATTACHING WEIGHTS TO THE WEIGHT BENCH on the Uprights (1, 16). USING...
English Manual
Page 12
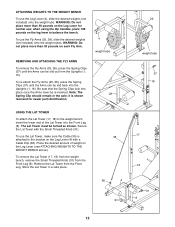
... Lat Tower, make sure the Cable (35) is shown removed for easier part identification. 4 weight tube 26 USING THE LAT TOWER To attach the Lat Tower (17, 18) to the weight bench, insert the lower end of weight on the leg lever to the bracket on each Fly Arm. REMOVING AND ATTACHING THE FLY ARMS To remove the Fly Arms (25, 26), press the Spring Clips (37) until the Arms can be turned...
... Lat Tower, make sure the Cable (35) is shown removed for easier part identification. 4 weight tube 26 USING THE LAT TOWER To attach the Lat Tower (17, 18) to the weight bench, insert the lower end of weight on the leg lever to the bracket on each Fly Arm. REMOVING AND ATTACHING THE FLY ARMS To remove the Fly Arms (25, 26), press the Spring Clips (37) until the Arms can be turned...

English Manual
Page 13
WARNING: Always remove the Lat Bar 36 from the weight bench when performing an exercise that does no use the lat bar. 21 13 ATTACHING THE LAT BAR 35 Attach the Lat Bar (21) to the Cable (35) with a Cable Clip (36).
WARNING: Always remove the Lat Bar 36 from the weight bench when performing an exercise that does no use the lat bar. 21 13 ATTACHING THE LAT BAR 35 Attach the Lat Bar (21) to the Cable (35) with a Cable Clip (36).
English Manual
Page 14
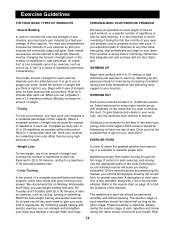
... you perform. Find out what is important. EXERCISE FORM ¥ Weight Loss To lose weight, use a low amount of weight and increase the number of repetitions in each exercise is up prepares your body for a maximum of 30 seconds between sets. ¥ Cross Training In the pursuit of a complete and well-balanced fitness program, many sets of 15 to the proper intensity level by at least...
... you perform. Find out what is important. EXERCISE FORM ¥ Weight Loss To lose weight, use a low amount of weight and increase the number of repetitions in each exercise is up prepares your body for a maximum of 30 seconds between sets. ¥ Cross Training In the pursuit of a complete and well-balanced fitness program, many sets of 15 to the proper intensity level by at least...

English Manual
Page 15
...only as far as you can be photocopied and used to make exercise a regular and enjoyable part of each workout. STAYING MOTIVATED For motivation, keep a record of each workout is to schedule and record your weight and key body measurements at the end of your arms and legs. The charts on pages 16 and 17 of stretching. Record... familiarizing yourself with 5 to achieving the greatest results is very effective for both your everyday life. Stretching at the end of sets and repetitions completed. List the date, exercises performed, weight, and numbers of every month.
...only as far as you can be photocopied and used to make exercise a regular and enjoyable part of each workout. STAYING MOTIVATED For motivation, keep a record of each workout is to schedule and record your weight and key body measurements at the end of your arms and legs. The charts on pages 16 and 17 of stretching. Record... familiarizing yourself with 5 to achieving the greatest results is very effective for both your everyday life. Stretching at the end of sets and repetitions completed. List the date, exercises performed, weight, and numbers of every month.
English Manual
Page 16
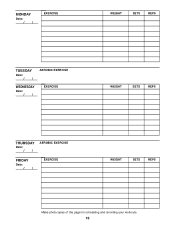
MONDAY Date: / / EXERCISE WEIGHT SETS REPS TUESDAY Date: / / AEROBIC EXERCISE WEDNESDAY Date: / / EXERCISE WEIGHT SETS REPS THURSDAY Date: / / AEROBIC EXERCISE FRIDAY Date: / / EXERCISE WEIGHT SETS REPS Make photocopies of this page for scheduling and recording your workouts. 16
MONDAY Date: / / EXERCISE WEIGHT SETS REPS TUESDAY Date: / / AEROBIC EXERCISE WEDNESDAY Date: / / EXERCISE WEIGHT SETS REPS THURSDAY Date: / / AEROBIC EXERCISE FRIDAY Date: / / EXERCISE WEIGHT SETS REPS Make photocopies of this page for scheduling and recording your workouts. 16

English Manual
Page 17
MONDAY Date: / / EXERCISE WEIGHT SETS REPS TUESDAY Date: / / AEROBIC EXERCISE WEDNESDAY Date: / / EXERCISE WEIGHT SETS REPS THURSDAY Date: / / AEROBIC EXERCISE FRIDAY Date: / / EXERCISE WEIGHT SETS REPS Make photocopies of this page for scheduling and recording your workouts. 17
MONDAY Date: / / EXERCISE WEIGHT SETS REPS TUESDAY Date: / / AEROBIC EXERCISE WEDNESDAY Date: / / EXERCISE WEIGHT SETS REPS THURSDAY Date: / / AEROBIC EXERCISE FRIDAY Date: / / EXERCISE WEIGHT SETS REPS Make photocopies of this page for scheduling and recording your workouts. 17
English Manual
Page 18
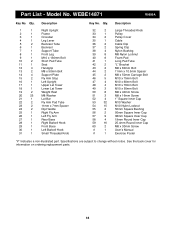
... 1 28 1 29 1 30 1 31 1 Description Right Upright Frame Crossbar Leg Lever Backrest Tube Backrest Support Tube Front Leg M10 x 130mm Bolt Short Pad Tube Seat Handgrip M8 x 50mm Bolt Support Plate Fly Arm Stop Left Upright Upper Lat Tower Lower Lat Tower Weight Rest M8 Washer Lat Bar Fly Arm Pad Tube 11mm x 7mm Spacer Dip Handle Right Fly Arm Left Fly Arm Rear Base Right Barbell Hook Front Base Left...
... 1 28 1 29 1 30 1 31 1 Description Right Upright Frame Crossbar Leg Lever Backrest Tube Backrest Support Tube Front Leg M10 x 130mm Bolt Short Pad Tube Seat Handgrip M8 x 50mm Bolt Support Plate Fly Arm Stop Left Upright Upper Lat Tower Lower Lat Tower Weight Rest M8 Washer Lat Bar Fly Arm Pad Tube 11mm x 7mm Spacer Dip Handle Right Fly Arm Left Fly Arm Rear Base Right Barbell Hook Front Base Left...
English Manual
Page 19
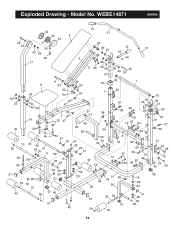
Exploded Drawing - Model No. WEBE14871 R0699A 34 33 6 34 12 21 49 53 35 53 54 36 17 52 39 20 12 24 12 20 5 44 39 5 50 ...
Exploded Drawing - Model No. WEBE14871 R0699A 34 33 6 34 12 21 49 53 35 53 54 36 17 52 39 20 12 24 12 20 5 44 39 5 50 ...
English Manual
Page 20
... J01168-C R0699A Printed in China © 1999 ICON Health & Fitness, Inc. The NAME of the product (WEBE14871). 2. The MODEL NUMBER of the product (WEIDER¨ 148 Weight Bench). 3. Mountain Time (excluding holidays). The KEY NUMBER and DESCRIPTION of the desired part(s) (see the front cover of this manual). 4. Ordering Replacement Parts To order replacement parts, simply call our Customer Service Department toll-free at 1-800-999-3756, Monday through Friday...
... J01168-C R0699A Printed in China © 1999 ICON Health & Fitness, Inc. The NAME of the product (WEBE14871). 2. The MODEL NUMBER of the product (WEIDER¨ 148 Weight Bench). 3. Mountain Time (excluding holidays). The KEY NUMBER and DESCRIPTION of the desired part(s) (see the front cover of this manual). 4. Ordering Replacement Parts To order replacement parts, simply call our Customer Service Department toll-free at 1-800-999-3756, Monday through Friday...


