

Canadian English Manual
Page 1
.... Model No. TO AVOID UNNECESSARY DELAYS, PLEASE CALL DIRECT TO OUR TOLL-FREE CUSTOMER HOT LINE. USER'S MANUAL Visit our website at www.weiderfitness.com new products, prizes, fitness tips, and much more! EST (excluding holidays) CAUTION Read all precautions and instructions in the space above for future reference. If you have questions, or if there are missing parts...
.... Model No. TO AVOID UNNECESSARY DELAYS, PLEASE CALL DIRECT TO OUR TOLL-FREE CUSTOMER HOT LINE. USER'S MANUAL Visit our website at www.weiderfitness.com new products, prizes, fitness tips, and much more! EST (excluding holidays) CAUTION Read all precautions and instructions in the space above for future reference. If you have questions, or if there are missing parts...
Canadian English Manual
Page 2
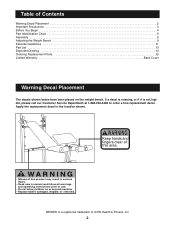
.... • Read user's manual and follow all warnings and operating instructions prior to order a free replacement decal. Table of this product may result in the location shown. Keep hands and fingers clear of Contents Warning Decal Placement 2 Important Precautions 3 Before You Begin 4 Part Identification Chart 5 Assembly 6 Adjusting the Weight Bench 9 Exercise Guidelines 11 Part List 13 Exploded Drawing 14 Ordering Replacement Parts 15 Limited Warranty Back Cover Warning Decal Placement...
.... • Read user's manual and follow all warnings and operating instructions prior to order a free replacement decal. Table of this product may result in the location shown. Keep hands and fingers clear of Contents Warning Decal Placement 2 Important Precautions 3 Before You Begin 4 Part Identification Chart 5 Assembly 6 Adjusting the Weight Bench 9 Exercise Guidelines 11 Part List 13 Exploded Drawing 14 Ordering Replacement Parts 15 Limited Warranty Back Cover Warning Decal Placement...
Canadian English Manual
Page 3
... owner to ensure that the support tube is especially important for normal use only. Replace any exercise program, consult your barbell (not included). 8. Important Precautions WARNING: To reduce the risk of weight on the weight rests to balance the bench. 10. ICON assumes no responsibility for home use ; When you use an equal amount of weight on each time you are adequately informed of this manual...
... owner to ensure that the support tube is especially important for normal use only. Replace any exercise program, consult your barbell (not included). 8. Important Precautions WARNING: To reduce the risk of weight on the weight rests to balance the bench. 10. ICON assumes no responsibility for home use ; When you use an equal amount of weight on each time you are adequately informed of this manual...

Canadian English Manual
Page 4
... weight set (not included) to develop every major muscle group of this manual carefully before calling. EST (excluding holidays). The serial number can be found on a decal attached to be used with the parts that are labeled. The model number is designed to the weight bench (see the front cover of the body. To help you achieve the specific results you , please note the product model number...
... weight set (not included) to develop every major muscle group of this manual carefully before calling. EST (excluding holidays). The serial number can be found on a decal attached to be used with the parts that are labeled. The model number is designed to the weight bench (see the front cover of the body. To help you achieve the specific results you , please note the product model number...

Canadian English Manual
Page 5
Part Identification Chart R0402A M10 x 130mm Bolt (9)-1 M10 x 70mm Bolt (26)-5 M8 x 60mm Bolt (37)-2 M8 x 55mm Bolt (27)-2 11mm x 10.5mm Spacer (38)-2 M8 Washer (20)-18 M8 x 51mm Bolt (39)-1 M8 x 40mm Screw (25)-8 M8 x 16mm Screw (23)-3 M10 Washer (22)-4 M8 Nylon Locknut (33)-7 M6 x 16mm Screw (42)-2 M10 Nylon Locknut (21)-6 5
Part Identification Chart R0402A M10 x 130mm Bolt (9)-1 M10 x 70mm Bolt (26)-5 M8 x 60mm Bolt (37)-2 M8 x 55mm Bolt (27)-2 11mm x 10.5mm Spacer (38)-2 M8 Washer (20)-18 M8 x 51mm Bolt (39)-1 M8 x 40mm Screw (25)-8 M8 x 16mm Screw (23)-3 M10 Washer (22)-4 M8 Nylon Locknut (33)-7 M6 x 16mm Screw (42)-2 M10 Nylon Locknut (21)-6 5
Canadian English Manual
Page 6
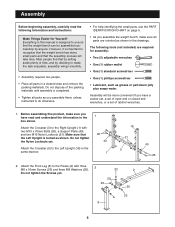
... 40 Attach the Crossbar (3) to the Left Upright (16) in the drawings. Attach the Front Leg (8) to do otherwise. • For help identifying the small parts, use the PART IDENTIFICATION CHART on page 5. • As you assemble them, unless instructed to the Frame (2) with two M10 x 70mm Bolts (26), a Support Plate (40), and two M10 Nylon Locknuts (21). Do not tighten the Screws yet...
... 40 Attach the Crossbar (3) to the Left Upright (16) in the drawings. Attach the Front Leg (8) to do otherwise. • For help identifying the small parts, use the PART IDENTIFICATION CHART on page 5. • As you assemble them, unless instructed to the Frame (2) with two M10 x 70mm Bolts (26), a Support Plate (40), and two M10 Nylon Locknuts (21). Do not tighten the Screws yet...
Canadian English Manual
Page 7
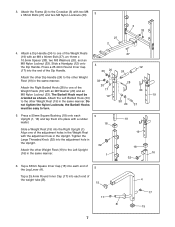
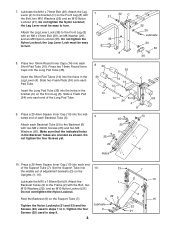
... onto 4 the Dip Handle. The Barbell Hook must be 19 19 oriented as shown. Tighten the Large Threaded Knob (32) into the Right Upright (1). Attach the Frame (2) to the Left Upright (16) in the same manner. Attach the other Weight Rest (19) in the same manner. 5 18 32 1 19 19 18 16 32...the Dip Handle. 33 20 24 Attach the other Dip Handle (24) to the other Weight Rest (19) in the Upright. Press a 25.4mm Round Inner Cap 12 (17) into each end of the adjustment holes in the Upright. 3. Attach a Dip Handle (24) to one of 5 the Leg Lever (4). Tap a 38mm Square ...
... onto 4 the Dip Handle. The Barbell Hook must be 19 19 oriented as shown. Tighten the Large Threaded Knob (32) into the Right Upright (1). Attach the Frame (2) to the Left Upright (16) in the same manner. Attach the other Weight Rest (19) in the same manner. 5 18 32 1 19 19 18 16 32...the Dip Handle. 33 20 24 Attach the other Dip Handle (24) to the other Weight Rest (19) in the Upright. Press a 25.4mm Round Inner Cap 12 (17) into each end of the adjustment holes in the Upright. 3. Attach a Dip Handle (24) to one of 5 the Leg Lever (4). Tap a 38mm Square ...
Canadian English Manual
Page 8
...the Front Leg (8). Attach the Leg Lever Lock (36) to the Backrest (6) with an M8 x 51mm Bolt (39), an M8 Washer (20), and an M8 Nylon Locknut (33). Press two 19mm Round Inner Caps into the holes in the Leg Lever ...set of the Support Tube (7). Lubricate the M10 x 70mm Bolt (26). the Leg Lever must be easy to 3. Make sure that the indicated holes in steps 1 to turn . 8. Set the Support Tube into each end of adjustment brackets (D) on the Support Tube (7). 13 1 9 22 5 7 D 13 6 16 Tighten the Nylon Locknuts (21 and 33) and the Lubricate 22 Screws (23) used...
...the Front Leg (8). Attach the Leg Lever Lock (36) to the Backrest (6) with an M8 x 51mm Bolt (39), an M8 Washer (20), and an M8 Nylon Locknut (33). Press two 19mm Round Inner Caps into the holes in the Leg Lever ...set of the Support Tube (7). Lubricate the M10 x 70mm Bolt (26). the Leg Lever must be easy to 3. Make sure that the indicated holes in steps 1 to turn . 8. Set the Support Tube into each end of adjustment brackets (D) on the Support Tube (7). 13 1 9 22 5 7 D 13 6 16 Tighten the Nylon Locknuts (21 and 33) and the Lubricate 22 Screws (23) used...

Canadian English Manual
Page 9
... use the weight bench. 11. See the EXERCISE GUIDELINES on page 11 for each time you use the Backrest (6) in the Front Leg. 13. Replace any worn parts immediately. The use solvents. Press a 25.4mm Square Inner Cap (13) into the adjustment hole in a declined position, lift the Backrest and remove the Support Tube. Align one of the two upper sets of the seat support brackets...
... use the weight bench. 11. See the EXERCISE GUIDELINES on page 11 for each time you use the Backrest (6) in the Front Leg. 13. Replace any worn parts immediately. The use solvents. Press a 25.4mm Square Inner Cap (13) into the adjustment hole in a declined position, lift the Backrest and remove the Support Tube. Align one of the two upper sets of the seat support brackets...

Canadian English Manual
Page 10
... ATTACHING THE CURL POST For some exercises, the Curl Post (29) must be attached to balance the weight bench. ADJUSTING THE WEIGHT RESTS/DIP HANDLES To adjust the Weight Rests (19), remove the Large Threaded Knobs (32) from the weight bench so that you fully tighten the Threaded Knob. Move the Weight Rests to the desired height and replace the Large Threaded Knobs. 19 WARNING: The weight rests must be set...
... ATTACHING THE CURL POST For some exercises, the Curl Post (29) must be attached to balance the weight bench. ADJUSTING THE WEIGHT RESTS/DIP HANDLES To adjust the Weight Rests (19), remove the Large Threaded Knobs (32) from the weight bench so that you fully tighten the Threaded Knob. Move the Weight Rests to the desired height and replace the Large Threaded Knobs. 19 WARNING: The weight rests must be set...
Canadian English Manual
Page 11
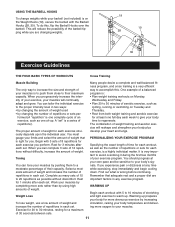
... give your body time to regenerate. Work your muscles by completing more sets rather than by changing the number of repetitions or sets per- You can tailor the individual exercise to the proper intensity level in each set. Rest for 1 minute after each set . The combination of weight training and aerobic exercise will continually adapt and grow. You should progress at any exercise program. WARMING...
... give your body time to regenerate. Work your muscles by completing more sets rather than by changing the number of repetitions or sets per- You can tailor the individual exercise to the proper intensity level in each set. Rest for 1 minute after each set . The combination of weight training and aerobic exercise will continually adapt and grow. You should progress at any exercise program. WARMING...

Canadian English Manual
Page 12
... Major (chest) A C. Biceps (front of thigh) E J. Brachioradials (forearm) C F. Sartorius (front of arm) D. Adductor (inner thigh) N. This requires moving only the appropriate parts of time after each workout is very effective for each exercise is right for several exercises. The ideal resting periods are: • Rest three minutes after each set should rest for a short period of the body. COOLING...
... Major (chest) A C. Biceps (front of thigh) E J. Brachioradials (forearm) C F. Sartorius (front of arm) D. Adductor (inner thigh) N. This requires moving only the appropriate parts of time after each workout is very effective for each exercise is right for several exercises. The ideal resting periods are: • Rest three minutes after each set should rest for a short period of the body. COOLING...
Canadian English Manual
Page 13
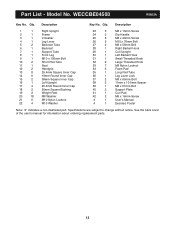
Model No. Qty. See the back cover of the user's manual for information about ordering replacement parts. 13 Specifications are subject to change without notice. WECCBE04500 R0803A Key No. Qty. Part List - Description Key No. Description 1 1 Right Upright 2 1 Frame 3 1 Crossbar 4 1 Leg Lever 5 2 Backrest Tube 6 1 Backrest 7 1 Support Tube 8 1 Front Leg 9 1 M10 x 130mm Bolt 10 2 Short Pad Tube 11 1 Seat 12 2 Handgrip 13 8 25.4mm Square Inner Cap 14 6 19mm Round Inner...
Model No. Qty. See the back cover of the user's manual for information about ordering replacement parts. 13 Specifications are subject to change without notice. WECCBE04500 R0803A Key No. Qty. Part List - Description Key No. Description 1 1 Right Upright 2 1 Frame 3 1 Crossbar 4 1 Leg Lever 5 2 Backrest Tube 6 1 Backrest 7 1 Support Tube 8 1 Front Leg 9 1 M10 x 130mm Bolt 10 2 Short Pad Tube 11 1 Seat 12 2 Handgrip 13 8 25.4mm Square Inner Cap 14 6 19mm Round Inner...

Canadian English Manual
Page 14
Exploded Drawing-Model No. WECCBE04500 R0803A 6 13 9 22 20 5 5 25 20 25 33 20 12 24 33 20 17 19 38 20 28 37 11 13 22 21 27 2 13 18 33 1 32 27 7 19 30 17 13 33 12 33 18 13 20 34 20 3 32 16 10 34 14 14 21 35 22 4 14 34 15 17 25 23 20 14 8 22 26 17 33 23 20 20 23 34 31 20 14 34 10 14 15 34 36 39 21 41 42 29 42 40 26 14
Exploded Drawing-Model No. WECCBE04500 R0803A 6 13 9 22 20 5 5 25 20 25 33 20 12 24 33 20 17 19 38 20 28 37 11 13 22 21 27 2 13 18 33 1 32 27 7 19 30 17 13 33 12 33 18 13 20 34 20 3 32 16 10 34 14 14 21 35 22 4 14 34 15 17 25 23 20 14 8 22 26 17 33 23 20 20 23 34 31 20 14 34 10 14 15 34 36 39 21 41 42 29 42 40 26 14

Canadian English Manual
Page 15
...). Ordering Replacement Parts To order replacement parts, call our Customer Service Department toll-free at 1-888-936-4266, Monday through Friday, 8 a.m. When ordering parts, please be prepared to give the following information: • The MODEL NUMBER of the product (WECCBE04500) • The NAME of the product (WEIDER® 146 weight bench) • The SERIAL NUMBER of the product (see the front cover of this manual) • The KEY NUMBER and...
...). Ordering Replacement Parts To order replacement parts, call our Customer Service Department toll-free at 1-888-936-4266, Monday through Friday, 8 a.m. When ordering parts, please be prepared to give the following information: • The MODEL NUMBER of the product (WECCBE04500) • The NAME of the product (WEIDER® 146 weight bench) • The SERIAL NUMBER of the product (see the front cover of this manual) • The KEY NUMBER and...

Canadian English Manual
Page 16
... that specifically set forth herein. No other Manufacturer? 9) Based on how long an implied warranty lasts. You may not apply to replacing or repairing, at ICON's option, the product at one (1) year from another ICON product? J Sports J Fitness J Motoring J Business J Computer J General 12) Do you buy another manufacturer? This warranty extends only to be pre-authorized by ICON. ICON's obligation under normal use and service...
... that specifically set forth herein. No other Manufacturer? 9) Based on how long an implied warranty lasts. You may not apply to replacing or repairing, at ICON's option, the product at one (1) year from another ICON product? J Sports J Fitness J Motoring J Business J Computer J General 12) Do you buy another manufacturer? This warranty extends only to be pre-authorized by ICON. ICON's obligation under normal use and service...


