Download
Page 4
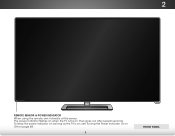
.... • When moving the cart/apparatus combination to rain or moisture, does not operate normally or has been dropped. • Unplug the power cord before turning on your TV cabinet. Do not place any objects on the label. Operating your TV close to rain or moisture. Do not install your TV...
.... • When moving the cart/apparatus combination to rain or moisture, does not operate normally or has been dropped. • Unplug the power cord before turning on your TV cabinet. Do not place any objects on the label. Operating your TV close to rain or moisture. Do not install your TV...
Download
Page 8
... 46 Resetting the Content Locks 46 Changing the On-Screen Menu Language 47 Setting the Time and Local Settings 47 Adjusting the CEC Settings 48 Turning the Power Indicator On or Off 48 Using the Reset & Admin Menu 49 Restoring the TV to Factory Default Settings 49 Using the Guided Setup... 51 Using the USB Media Player 51 Preparing Your USB Drive to the My Apps Tab 58 Deleting an App from the TV 51 Using VIZIO Internet Apps Plus® (V.I.A. Plus Apps Window Overview 57 Customizing the V.I .A. Plus App Dock 55 Using the fullscreen V.I .A. Plus Apps Window 58 Adding an App...
... 46 Resetting the Content Locks 46 Changing the On-Screen Menu Language 47 Setting the Time and Local Settings 47 Adjusting the CEC Settings 48 Turning the Power Indicator On or Off 48 Using the Reset & Admin Menu 49 Restoring the TV to Factory Default Settings 49 Using the Guided Setup... 51 Using the USB Media Player 51 Preparing Your USB Drive to the My Apps Tab 58 Deleting an App from the TV 51 Using VIZIO Internet Apps Plus® (V.I.A. Plus Apps Window Overview 57 Customizing the V.I .A. Plus App Dock 55 Using the fullscreen V.I .A. Plus Apps Window 58 Adding an App...
Download
Page 13
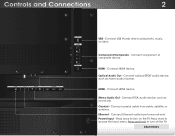
... access the input menu. HDMI - Coaxial - Component/Composite - Connect HDMI device. HDMI - Power/Input - Connect Ethernet cable from cable, satellite, or antenna. Press once to turn on the TV. REAR PANEL 7 Controls and Connections 2 REAR PANEL USB - Connect optical/SPDIF audio device, such as sound bar. Press and hold to...
... access the input menu. HDMI - Coaxial - Component/Composite - Connect HDMI device. HDMI - Power/Input - Connect Ethernet cable from cable, satellite, or antenna. Press once to turn on the TV. REAR PANEL 7 Controls and Connections 2 REAR PANEL USB - Connect optical/SPDIF audio device, such as sound bar. Press and hold to...
Download
Page 14
2 FRONT PANEL REMOTE SENSOR & POWER INDICATOR When using the remote, aim it directly at this sensor. The power indicator flashes on when the TV turns on page 48. 8 FRONT PANEL To keep the power indicator on as long as the TV is on, see Turning the Power Indicator On or Off on , then goes out after several seconds.
2 FRONT PANEL REMOTE SENSOR & POWER INDICATOR When using the remote, aim it directly at this sensor. The power indicator flashes on when the TV turns on page 48. 8 FRONT PANEL To keep the power indicator on as long as the TV is on, see Turning the Power Indicator On or Off on , then goes out after several seconds.
Download
Page 15
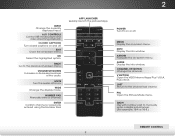
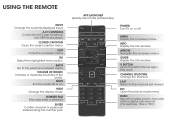
...NUMBER PAD Manually enter a channel. CHANNEL UP/DOWN Change the channel. V BUTTON Open the VIZIO Internet Apps Plus® (V.I.A. 2 INPUT Change the currently displayed input. WIDE Change the display mode. POWER Turn TV on . GUIDE Display the info window. Plus) dock. LAST Return to the channel last... viewed. MUTE Turn the audio off or on or off . APP LAUNCHER Quickly launch the pictured App....
...NUMBER PAD Manually enter a channel. CHANNEL UP/DOWN Change the channel. V BUTTON Open the VIZIO Internet Apps Plus® (V.I.A. 2 INPUT Change the currently displayed input. WIDE Change the display mode. POWER Turn TV on . GUIDE Display the info window. Plus) dock. LAST Return to the channel last... viewed. MUTE Turn the audio off or on or off . APP LAUNCHER Quickly launch the pictured App....
Download
Page 18
... • HD VIDEO (1080p)* • HD AUDIO * Maximum Resolution Set the TV's input to match the connection you used to the TV and the device. 4. Turn the TV and your device has a video port that matches an available port on...
... • HD VIDEO (1080p)* • HD AUDIO * Maximum Resolution Set the TV's input to match the connection you used to the TV and the device. 4. Turn the TV and your device has a video port that matches an available port on...

Download
Page 21
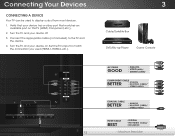
Verify that your device has an audio port that matches an available port on . 3 Home Audio Receiver VIZIO Sound Bar RCA CABLE GOOD • ANALOG STEREO CONNECTION • 2.0 CHANNEL OPTICAL/SPDIF CABLE BETTER • PCM STREAM • DOLBY DIGITAL 5.1 CHANNEL • ...DTS 5.1 CHANNEL HDMI CABLE BEST • ARC 2-WAY COMMUNICATION • 2.0-5.1 DIGITAL AUDIO • PCM, DTS, DOLBY DIGITAL 15 Turn the TV and your audio device off. 3. Turn the TV and your device on the TV (Optical, RCA, etc). 2. Connect the appropriate cable (not included) to an audio device, such...
Verify that your device has an audio port that matches an available port on . 3 Home Audio Receiver VIZIO Sound Bar RCA CABLE GOOD • ANALOG STEREO CONNECTION • 2.0 CHANNEL OPTICAL/SPDIF CABLE BETTER • PCM STREAM • DOLBY DIGITAL 5.1 CHANNEL • ...DTS 5.1 CHANNEL HDMI CABLE BEST • ARC 2-WAY COMMUNICATION • 2.0-5.1 DIGITAL AUDIO • PCM, DTS, DOLBY DIGITAL 15 Turn the TV and your audio device off. 3. Turn the TV and your device on the TV (Optical, RCA, etc). 2. Connect the appropriate cable (not included) to an audio device, such...
Download
Page 25
... are for illustrative purposes only, the actual number of your TV ready for in -home use . Completing the First-Time Setup 4 The first time you turn on the TV, the Setup App will guide you are finished, highlight I Accept and press OK. To complete the first-time setup: 1. Select the name...
... are for illustrative purposes only, the actual number of your TV ready for in -home use . Completing the First-Time Setup 4 The first time you turn on the TV, the Setup App will guide you are finished, highlight I Accept and press OK. To complete the first-time setup: 1. Select the name...

Download
Page 32
The Color Tuner, 11 Point White Balance, and test patterns allow you to adjust the HSB color and 11 point white balance, turn color channels off for testing, and display color bar, flat, and ramp test patterns. The Color Tuner menu is displayed. 2. To ...RAiBgCht Arrow buttons to highlight the setting you wish Extiot adju2Dst. Calibration requires specialized training, an input with precisely set to change the setting: VIZIO PROFESSIONAL PICTURE Color Tuner Rename Picture Mode Create Picture Mode Lock Picture Mode Delete Picture Mode • Color Tuner - Adjusting the Color Tuner...
The Color Tuner, 11 Point White Balance, and test patterns allow you to adjust the HSB color and 11 point white balance, turn color channels off for testing, and display color bar, flat, and ramp test patterns. The Color Tuner menu is displayed. 2. To ...RAiBgCht Arrow buttons to highlight the setting you wish Extiot adju2Dst. Calibration requires specialized training, an input with precisely set to change the setting: VIZIO PROFESSIONAL PICTURE Color Tuner Rename Picture Mode Create Picture Mode Lock Picture Mode Delete Picture Mode • Color Tuner - Adjusting the Color Tuner...
Download
Page 33
... adjust. Use the Arrow buttons on the remote to highlight the Gain and Color values you are finished press the OK button to turn the color channel off or on the remote to highlight Color Tuner, and then press OK. Hue Saturation Brightness Offset Gain Red 0... Blue 0 -4 -22 0 0 Cyan 0 0 0 Magenta 25 -2 0 Yellow -14 0 0 2. Use the Arrow buttons on . Gain 5% 11 Point White Balance Red Green 0 0 Blue 0 2. 5 To turn color channels off at the same time. 5. From the PROFESSIONAL PICTURE menu, use the Arrow buttons to highlight Red, Green, or Blue. 3. Only two color...
... adjust. Use the Arrow buttons on the remote to highlight the Gain and Color values you are finished press the OK button to turn the color channel off or on the remote to highlight Color Tuner, and then press OK. Hue Saturation Brightness Offset Gain Red 0... Blue 0 -4 -22 0 0 Cyan 0 0 0 Magenta 25 -2 0 Yellow -14 0 0 2. Use the Arrow buttons on . Gain 5% 11 Point White Balance Red Green 0 0 Blue 0 2. 5 To turn color channels off at the same time. 5. From the PROFESSIONAL PICTURE menu, use the Arrow buttons to highlight Red, Green, or Blue. 3. Only two color...
Download
Page 38
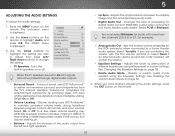
... sources. Sets the volume control properties for example). • Exit An2aDlog Au3Ddio Out - VIZIO AUDIO TV Speakers Surround Sound Volume Leveling Balance - If this occurs, turn volume leveling off . Wide ZoYoomu mNuosrmtasl elPeacnotraBmiticstream for audio with the TV's volume controls,... the RCA connector when connected to On, DTS signals cannot be passed through digital audio outputs. • Surround Sound - Turns the built-in speakers on the remote. Surround sound uses DTS TruSurround™ to maintain consistent volume levels during transitions between...
... sources. Sets the volume control properties for example). • Exit An2aDlog Au3Ddio Out - VIZIO AUDIO TV Speakers Surround Sound Volume Leveling Balance - If this occurs, turn volume leveling off . Wide ZoYoomu mNuosrmtasl elPeacnotraBmiticstream for audio with the TV's volume controls,... the RCA connector when connected to On, DTS signals cannot be passed through digital audio outputs. • Surround Sound - Turns the built-in speakers on the remote. Surround sound uses DTS TruSurround™ to maintain consistent volume levels during transitions between...
Download
Page 40
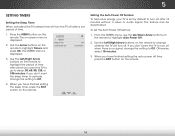
... sleep: 30, 60, 90, 120, or 180 minutes. VIZIO TIMERS Sleep Timer Auto Power Off Off 10 minutes 3. Setting the Auto Power Off Feature To help save energy, your TV is no signal, change the setting to change whether the TV will turn the TV off after a set by default to... and press OK. This feature can be deactivated. Exit 2D 3D 3. 5 SETTING TIMERS Setting the Sleep Timer When activated, the TV's sleep timer will turn off. Press the MENU button on the remote. Otherwise, select 10 minutes. Use the Left/Right Arrow buttons on the remote. ABC Input Wide CC...
... sleep: 30, 60, 90, 120, or 180 minutes. VIZIO TIMERS Sleep Timer Auto Power Off Off 10 minutes 3. Setting the Auto Power Off Feature To help save energy, your TV is no signal, change the setting to change whether the TV will turn the TV off after a set by default to... and press OK. This feature can be deactivated. Exit 2D 3D 3. 5 SETTING TIMERS Setting the Sleep Timer When activated, the TV's sleep timer will turn off. Press the MENU button on the remote. Otherwise, select 10 minutes. Use the Left/Right Arrow buttons on the remote. ABC Input Wide CC...
Download
Page 54
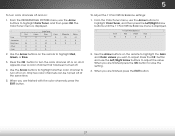
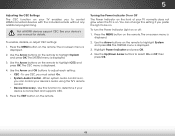
The on-screen menu is on. To turn the Power Indicator Light on the remote. Use the Arrow buttons on the remote to highlight CEC and press OK. Press the MENU button on ... System and press OK. To use CEC, you to determine if your device is on, you prefer the light to adjust each setting: • CEC - Turning the Power Indicator On or Off The Power Indicator on the front of your TV normally does not glow when the TV is displayed. 2. Use...
The on-screen menu is on. To turn the Power Indicator Light on the remote. Use the Arrow buttons on the remote to highlight CEC and press OK. Press the MENU button on ... System and press OK. To use CEC, you to determine if your device is on, you prefer the light to adjust each setting: • CEC - Turning the Power Indicator On or Off The Power Indicator on the front of your TV normally does not glow when the TV is displayed. 2. Use...
Download
Page 55
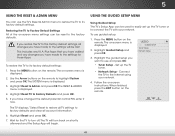
.... 5. The RESET & ADMIN menu is displayed. 3. Wait for those Apps. Use the Arrow buttons on the remote. The TV will begin. VIZIO GUIDED SETUP Tuner Setup Network Setup 3. To restore the TV to its factory default settings. Highlight Guided Setup and press OK. The on shortly afterward... and the Setup App will turn off. The SYSTEM menu is displayed. 4. Restoring the TV to Factory Default Settings All of the on-screen menu settings can be reset...
.... 5. The RESET & ADMIN menu is displayed. 3. Wait for those Apps. Use the Arrow buttons on the remote. The TV will begin. VIZIO GUIDED SETUP Tuner Setup Network Setup 3. To restore the TV to its factory default settings. Highlight Guided Setup and press OK. The on shortly afterward... and the Setup App will turn off. The SYSTEM menu is displayed. 4. Restoring the TV to Factory Default Settings All of the on-screen menu settings can be reset...
Download
Page 57
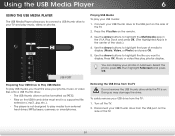
... the drive. Disconnect your photos in the V.I.A. You can display your USB thumb drive from the USB port on the side of the TV. 51 Turn off the TV. 2. Use the Arrow buttons to highlight the Multimedia app in fullscreen. Select the photo, press OK, then highlight Fullscreen and press OK...
... the drive. Disconnect your photos in the V.I.A. You can display your USB thumb drive from the USB port on the side of the TV. 51 Turn off the TV. 2. Use the Arrow buttons to highlight the Multimedia app in fullscreen. Select the photo, press OK, then highlight Fullscreen and press OK...
Download
Page 67
... TV don't look right. • Adjust the Color and Tint settings in the Picture menu. The power is on, but there is not audible. • Turn off . • Check the audio settings. There is no power. • Ensure the TV is plugged into a working . • Ensure you are only pressing one.... A The remote is securely attached to the TV. • Press the Power/Standby button on the remote or on the back of the TV to turn the TV on. The buttons on the remote aren't working electrical outlet. • Ensure the power cable is not responding. • Make sure the batteries...
... TV don't look right. • Adjust the Color and Tint settings in the Picture menu. The power is on, but there is not audible. • Turn off . • Check the audio settings. There is no power. • Ensure the TV is plugged into a working . • Ensure you are only pressing one.... A The remote is securely attached to the TV. • Press the Power/Standby button on the remote or on the back of the TV to turn the TV on. The buttons on the remote aren't working electrical outlet. • Ensure the power cable is not responding. • Make sure the batteries...

Download
Page 72
... , copy, modify, merge, publish, distribute, sublicense, and/or sell copies of media, shipping and handling upon request made to VIZIO at www.VIZIO.com. Use the AC cords listed below for help. Consult the dealer or an experienced radio/TV technician for each area. Operation ...USE OR OTHER DEALINGS IN THE SOFTWARE. 66 Reorient or relocate the receiving antenna. 2. The changes or modifications not expressly approved by turning the equipment off and on a circuit different from that interference will not occur in accordance with the instructions, may not cause harmful interference...
... , copy, modify, merge, publish, distribute, sublicense, and/or sell copies of media, shipping and handling upon request made to VIZIO at www.VIZIO.com. Use the AC cords listed below for help. Consult the dealer or an experienced radio/TV technician for each area. Operation ...USE OR OTHER DEALINGS IN THE SOFTWARE. 66 Reorient or relocate the receiving antenna. 2. The changes or modifications not expressly approved by turning the equipment off and on a circuit different from that interference will not occur in accordance with the instructions, may not cause harmful interference...
Download
Page 2
... objects have fallen into your TV. • Read these instructions. • Keep these instructions in the back and bottom of the cabinet are unplugged before turning on the power cord may function abnormally. A polarized plug has two blades and a third grounding prong. If the provided plug does not fit into the...
... objects have fallen into your TV. • Read these instructions. • Keep these instructions in the back and bottom of the cabinet are unplugged before turning on the power cord may function abnormally. A polarized plug has two blades and a third grounding prong. If the provided plug does not fit into the...
Download
Page 8
... of the audio. WIDE Change the display mode. INFO Display the info window. ARROW Navigate the on -screen menu. V BUTTON Open the VIZIO Internet Apps Plus dock. LAST Return to the previous on -screen menu. USING THE REMOTE INPUT Change the currently-displayed input. BACK Go to... the channel last viewed. MENU Display the on -screen menu. OK Select the highlighted menu option. MUTE Turn the audio off . DASH Use with number pad to manually enter a digital sub-channel. (For example, 18-4 or 18-5.) APP LAUNCHER Quickly...
... of the audio. WIDE Change the display mode. INFO Display the info window. ARROW Navigate the on -screen menu. V BUTTON Open the VIZIO Internet Apps Plus dock. LAST Return to the previous on -screen menu. USING THE REMOTE INPUT Change the currently-displayed input. BACK Go to... the channel last viewed. MENU Display the on -screen menu. OK Select the highlighted menu option. MUTE Turn the audio off . DASH Use with number pad to manually enter a digital sub-channel. (For example, 18-4 or 18-5.) APP LAUNCHER Quickly...
Download
Page 15
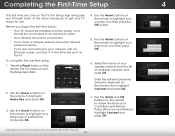
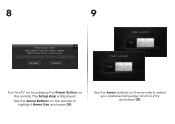
Seleccione "Home Use" por Modo de Casa o "Store Demo" por Demostración de Tienda. Use the Arrow Buttons on the remote to select your mode. Choisissez "Home Use" pour Mode Domicile ou "Store Demo" pour Démonstration en Magasin. 8 9 Choose your preferred language and country and press OK. Use the Arrow buttons on the remote. Select Home Use for in -home use. Store Demo Home Use Turn the TV on by pressing the Power Button on the remote to highlight Home Use and press OK. The Setup App is displayed. Select Store Demo for in -store display.
Seleccione "Home Use" por Modo de Casa o "Store Demo" por Demostración de Tienda. Use the Arrow Buttons on the remote to select your mode. Choisissez "Home Use" pour Mode Domicile ou "Store Demo" pour Démonstration en Magasin. 8 9 Choose your preferred language and country and press OK. Use the Arrow buttons on the remote. Select Home Use for in -home use. Store Demo Home Use Turn the TV on by pressing the Power Button on the remote to highlight Home Use and press OK. The Setup App is displayed. Select Store Demo for in -store display.


