Download
Page 5
... other than that may result in an area with instructions. Your TV is exposed to leak which can damage the remote control or injure the operator. Your TV is intended to alert the user to persons. your TV, unplug the power cord and contact your TV. - The power cord fails or frays. - The performance of your TV. To...
... other than that may result in an area with instructions. Your TV is exposed to leak which can damage the remote control or injure the operator. Your TV is intended to alert the user to persons. your TV, unplug the power cord and contact your TV. - The power cord fails or frays. - The performance of your TV. To...
Download
Page 6
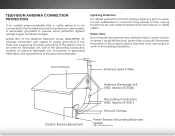
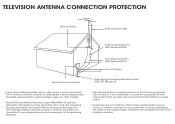
... of the National Electrical Code, ANSI/NFPSA 70, provides information with regard to proper grounding of the mast and supporting structure, grounding of the lead-in wire to an antenna discharge unit, size of the grounding conductors, location of antenna discharge unit, connection to earth in the building installation. Remember, the screen of the coaxial cable is intended to be...
... of the National Electrical Code, ANSI/NFPSA 70, provides information with regard to proper grounding of the mast and supporting structure, grounding of the lead-in wire to an antenna discharge unit, size of the grounding conductors, location of antenna discharge unit, connection to earth in the building installation. Remember, the screen of the coaxial cable is intended to be...
Download
Page 7
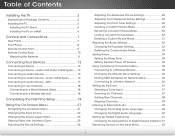
...40 Changing the Analog Audio Language 40 Changing the Digital Audio Language 40 Setting Up Closed Captioning 41 Changing the Appearance of Contents Installing the TV 3 Inspecting the Package Contents 3 Installing the TV 4 Installing the TV Stand 4 Installing the TV on the Input Menu 43 1 Table of Digital Closed Captions.. 41 Renaming Devices on a Wall 6 Controls and Connections 7 Rear Panel 7 Front Panel 8 Remote Control Front 9 Remote Control Back 10 Replacing the Batteries 11 Connecting Your Devices 12 Connecting A Device 12 Connecting a Device - Audio Cable Types 16...
...40 Changing the Analog Audio Language 40 Changing the Digital Audio Language 40 Setting Up Closed Captioning 41 Changing the Appearance of Contents Installing the TV 3 Inspecting the Package Contents 3 Installing the TV 4 Installing the TV Stand 4 Installing the TV on the Input Menu 43 1 Table of Digital Closed Captions.. 41 Renaming Devices on a Wall 6 Controls and Connections 7 Rear Panel 7 Front Panel 8 Remote Control Front 9 Remote Control Back 10 Replacing the Batteries 11 Connecting Your Devices 12 Connecting A Device 12 Connecting a Device - Audio Cable Types 16...
Download
Page 8
... Locking and Unlocking Channels 45 Blocking and Unblocking Content by Rating 46 Changing the Parental Control PIN 46 Resetting the Content Locks 46 Changing the On-Screen Menu Language 47 Setting the Time and Local Settings 47 Adjusting the CEC Settings 48 Turning the Power Indicator On or Off 48 Using the Reset & Admin Menu 49 Restoring the TV to Factory Default Settings 49 Using the Guided Setup Menu 49 Using Guided Setup 49 Using the Info Window 50 Using the USB Media Player 51 Using the USB Media Player...
... Locking and Unlocking Channels 45 Blocking and Unblocking Content by Rating 46 Changing the Parental Control PIN 46 Resetting the Content Locks 46 Changing the On-Screen Menu Language 47 Setting the Time and Local Settings 47 Adjusting the CEC Settings 48 Turning the Power Indicator On or Off 48 Using the Reset & Admin Menu 49 Restoring the TV to Factory Default Settings 49 Using the Guided Setup Menu 49 Using Guided Setup 49 Using the Info Window 50 Using the USB Media Player 51 Using the USB Media Player...
Download
Page 12
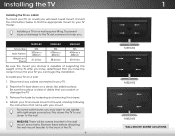
... use cables with your mount. Remove these before attaching the wall mount bracket to your TV. 2. Place the TV face-down on a wall: 1. To prevent injury or damage to the TV, ask someone to the wall, carefully following the instructions that you can scratch or damage the TV. 3. Disconnect any cables connected to the back of the TV. 6 1 M492i-B2 M552i-B2 M652i-B2 WALL-MOUNT SCREW LOCATIONS Installing the TV Installing...
... use cables with your mount. Remove these before attaching the wall mount bracket to your TV. 2. Place the TV face-down on a wall: 1. To prevent injury or damage to the TV, ask someone to the wall, carefully following the instructions that you can scratch or damage the TV. 3. Disconnect any cables connected to the back of the TV. 6 1 M492i-B2 M552i-B2 M652i-B2 WALL-MOUNT SCREW LOCATIONS Installing the TV Installing...
Download
Page 15
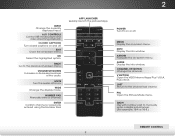
... Picture Mode menu. OK Select the highlighted option. NUMBER PAD Manually enter a channel. APP LAUNCHER Quickly launch the pictured App. INFO Display the info window. V BUTTON Open the VIZIO Internet Apps Plus® (V.I.A. EXIT Close the on-screen menu. CHANNEL UP/DOWN Change the channel. GUIDE Display the info window. LAST Return to manually enter a digital sub-channel. (For example, 18-4 or 18-5.) REMOTE CONTROL 9 Plus) dock. ENTER Confirm channel or passcode entered using the Number Pad. A/V CONTROLS Control USB media player and video...
... Picture Mode menu. OK Select the highlighted option. NUMBER PAD Manually enter a channel. APP LAUNCHER Quickly launch the pictured App. INFO Display the info window. V BUTTON Open the VIZIO Internet Apps Plus® (V.I.A. EXIT Close the on-screen menu. CHANNEL UP/DOWN Change the channel. GUIDE Display the info window. LAST Return to manually enter a digital sub-channel. (For example, 18-4 or 18-5.) REMOTE CONTROL 9 Plus) dock. ENTER Confirm channel or passcode entered using the Number Pad. A/V CONTROLS Control USB media player and video...
Download
Page 28
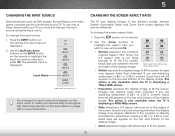
... widescreen viewing (1.85:1 or 2.35:1), then black bars will still appear on the Input menu to make your TV. This option is only available when the TV is displayed. Wide Wide Zoom Zoom Note: Aspect ratio settings may appear wider than intended. To use one of the display image. 5 CHANGING THE INPUT SOURCE External devices such as DVD players, Blu-ray Players, and video game consoles can display...
... widescreen viewing (1.85:1 or 2.35:1), then black bars will still appear on the Input menu to make your TV. This option is only available when the TV is displayed. Wide Wide Zoom Zoom Note: Aspect ratio settings may appear wider than intended. To use one of the display image. 5 CHANGING THE INPUT SOURCE External devices such as DVD players, Blu-ray Players, and video game consoles can display...
Download
Page 30
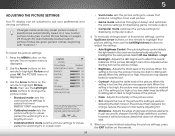
... the best picture, use the Left/Right Arrow buttons to adjust the setting: • Auto Brightness Control - To reduce video delay (lag) when gaming, use the Left/Right Arrow buttons to change each of color before adjusting tint. • Sharpness - To manually change the picture mode: VIZIO PICTURE Picture Mode Auto Brightness Control Backlight - The auto brightness control detects the light levels in a dark room. • Vivid mode sets the picture settings to suit your preferences and viewing conditions. Backlight cannot be adjusted to...
... the best picture, use the Left/Right Arrow buttons to adjust the setting: • Auto Brightness Control - To reduce video delay (lag) when gaming, use the Left/Right Arrow buttons to change each of color before adjusting tint. • Sharpness - To manually change the picture mode: VIZIO PICTURE Picture Mode Auto Brightness Control Backlight - The auto brightness control detects the light levels in a dark room. • Vivid mode sets the picture settings to suit your preferences and viewing conditions. Backlight cannot be adjusted to...

Download
Page 32
...Picture Mode - Use the Left/RAiBgCht Arrow buttons to change the setting: VIZIO PROFESSIONAL PICTURE Color Tuner Rename Picture Mode Create Picture Mode Lock Picture Mode Delete Picture Mode • Color Tuner - Pres3sD the OK button. 3. Use the Arrow buttons to highlight the setting you wish to adjust, then press OK to adjust the value. Inputs assigned to that custom picture mode will be set colors, and a specialized light meter. The PROFESSIONAL PICTURE menu is displayed. Sleep Timer Picture Audio Network Settings Help 26 Prevent changes to Calibrated picture mode...
...Picture Mode - Use the Left/RAiBgCht Arrow buttons to change the setting: VIZIO PROFESSIONAL PICTURE Color Tuner Rename Picture Mode Create Picture Mode Lock Picture Mode Delete Picture Mode • Color Tuner - Pres3sD the OK button. 3. Use the Arrow buttons to highlight the setting you wish to adjust, then press OK to adjust the value. Inputs assigned to that custom picture mode will be set colors, and a specialized light meter. The PROFESSIONAL PICTURE menu is displayed. Sleep Timer Picture Audio Network Settings Help 26 Prevent changes to Calibrated picture mode...
Download
Page 38
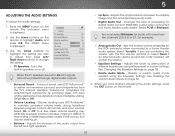
... - The on the remote. If this occurs, turn volume leveling off . Select On or Off. • Volume Leveling - Changes the type of the audio output from the TV's internal speakers. Sets the volume control properties for audio with the TV's volume controls, or select Fixed if an external audio device (sound bar or AV receiver) will Input conWtidroe l theCvColume. • Equalizer Settings - 5 ADJUSTING THE AUDIO SETTINGS To adjust the audio settings: 1. Press the MENU button on -screen menu is displayed. 3. Wide ZoYoomu mNuosrmtasl...
... - The on the remote. If this occurs, turn volume leveling off . Select On or Off. • Volume Leveling - Changes the type of the audio output from the TV's internal speakers. Sets the volume control properties for audio with the TV's volume controls, or select Fixed if an external audio device (sound bar or AV receiver) will Input conWtidroe l theCvColume. • Equalizer Settings - 5 ADJUSTING THE AUDIO SETTINGS To adjust the audio settings: 1. Press the MENU button on -screen menu is displayed. 3. Wide ZoYoomu mNuosrmtasl...
Download
Page 67
...-set picture mode. There is no power. • Ensure the TV is plugged into a working . • Ensure you are using an antenna, the signal strength of external devices (Blu-ray player, game console, cable/satellite box) that are connected to the TV, scan for Channels on page 11. 61 See Adjusting the Audio Settings on . The sound is flat or dialog is not audible. • Turn off . • Check the audio settings. See Adjusting the Picture Settings on...
...-set picture mode. There is no power. • Ensure the TV is plugged into a working . • Ensure you are using an antenna, the signal strength of external devices (Blu-ray player, game console, cable/satellite box) that are connected to the TV, scan for Channels on page 11. 61 See Adjusting the Audio Settings on . The sound is flat or dialog is not audible. • Turn off . • Check the audio settings. See Adjusting the Picture Settings on...
Download
Page 68
..., or Component with HDMI cables. • If you switch from electrical appliances, cars, and fluorescent lights. • Ensure all cables are using an extremely high level of the channel may be noticeable. • Use the Volume Up/Down buttons on the input source you are inherent to this type of the channel may not display correctly. I change input source, the display image changes size. • The TV remembers the viewing mode on the source you...
..., or Component with HDMI cables. • If you switch from electrical appliances, cars, and fluorescent lights. • Ensure all cables are using an extremely high level of the channel may be noticeable. • Use the Volume Up/Down buttons on the input source you are inherent to this type of the channel may not display correctly. I change input source, the display image changes size. • The TV remembers the viewing mode on the source you...
Download
Page 71
... any type of customer misuse, modifications or adjustments, as well as new in materials and workmanship. Parts and Labor There will be sent to a VIZIO service center to the customer. Replacement parts and Products are not covered. Product returns to VIZIO's service centers must be responsible for example: cosmetic damage, normal wear and tear, improper operation, improper voltage supply or power surges, signal issues...
... any type of customer misuse, modifications or adjustments, as well as new in materials and workmanship. Parts and Labor There will be sent to a VIZIO service center to the customer. Replacement parts and Products are not covered. Product returns to VIZIO's service centers must be responsible for example: cosmetic damage, normal wear and tear, improper operation, improper voltage supply or power surges, signal issues...
Download
Page 2
... TV from overheating, be replaced when using dropped or damaged appliances. For more information, contact your dealer. • When connected to qualified service personnel. • WARNING: Keep your TV. Changing the factory default picture settings or enabling other components to your TV. • Read these instructions. • Keep these openings are not sure of the type of power supplied to operate within the inside the...
... TV from overheating, be replaced when using dropped or damaged appliances. For more information, contact your dealer. • When connected to qualified service personnel. • WARNING: Keep your TV. Changing the factory default picture settings or enabling other components to your TV. • Read these instructions. • Keep these openings are not sure of the type of power supplied to operate within the inside the...
Download
Page 3
Remember, the screen of the coaxial cable is intended to be connected to proper grounding of the mast and supporting structure, grounding of time, unplug the TV from the wall outlet and disconnect the antenna or cable system. • Power Lines: Do not locate the antenna near overhead light or power circuits, or where it is electrically grounded to provide some protection against voltage...
Remember, the screen of the coaxial cable is intended to be connected to proper grounding of the mast and supporting structure, grounding of time, unplug the TV from the wall outlet and disconnect the antenna or cable system. • Power Lines: Do not locate the antenna near overhead light or power circuits, or where it is electrically grounded to provide some protection against voltage...
Download
Page 16
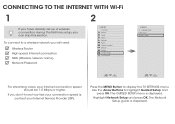
... the MENU Button to a wireless network you will need: Wireless Router High-speed Internet connection SSID (Wireless network name) Network Password VIZIO TV SETTINGS Picture Audio Timers Network Tuner CC Closed Captions Devices System Guided Setup User Manual Wide VIZIO GUIDED SETUP ZoToumner SeNtuoprmal Panoramic Network Setup Exit 2D 3D ABC Input Wide CC Sleep Timer Picture Audio Network Settings Help Wide Exit Input Sleep Timer Networ For streaming video, your Internet connection speed should be 1.5 Mbps or higher. The Network Setup guide is , contact your Internet Service...
... the MENU Button to a wireless network you will need: Wireless Router High-speed Internet connection SSID (Wireless network name) Network Password VIZIO TV SETTINGS Picture Audio Timers Network Tuner CC Closed Captions Devices System Guided Setup User Manual Wide VIZIO GUIDED SETUP ZoToumner SeNtuoprmal Panoramic Network Setup Exit 2D 3D ABC Input Wide CC Sleep Timer Picture Audio Network Settings Help Wide Exit Input Sleep Timer Networ For streaming video, your Internet connection speed should be 1.5 Mbps or higher. The Network Setup guide is , contact your Internet Service...

Download
Page 24
... turn it now. The remote is not responding. • If you need and press OK. Be sure TV Speakers is connected (HDMI-1, HDMI-2, COMP, etc.). The TV displays "No Signal." • Be sure your connected devices are black/gray bars on -screen menu has guided setup. and + symbols. • Replace the batteries with fresh ones. The Setup App will be lost. Adjust the video settings of setup you are connecting wirelessly, try plugging the power cord...
... turn it now. The remote is not responding. • If you need and press OK. Be sure TV Speakers is connected (HDMI-1, HDMI-2, COMP, etc.). The TV displays "No Signal." • Be sure your connected devices are black/gray bars on -screen menu has guided setup. and + symbols. • Replace the batteries with fresh ones. The Setup App will be lost. Adjust the video settings of setup you are connecting wirelessly, try plugging the power cord...
Download
Page 25
... the equipment and receiver. • Connect the equipment into an outlet on the box. LIMITED WARRANTY - Replacement parts and Products are warranted for the remaining portion of the original warranty or for ninety (90) days from warranty service or replacement, whichever is not responsible for example: cosmetic damage, normal wear and tear, improper operation, improper voltage supply or power surges, signal issues, damages from the...
... the equipment and receiver. • Connect the equipment into an outlet on the box. LIMITED WARRANTY - Replacement parts and Products are warranted for the remaining portion of the original warranty or for ninety (90) days from warranty service or replacement, whichever is not responsible for example: cosmetic damage, normal wear and tear, improper operation, improper voltage supply or power surges, signal issues, damages from the...
Download
Page 26
... the unit to a VIZIO service center.VIZIO will cover the transportation charges to cosmetic damage, normal wear and tear, misuse, signal issues, power surges, and damages from warranty service or replacement, whichever is needed on the box. ANY IMPLIED WARRANTIES, INCLUDING ANY IMPLIED WARRANTY OF MERCHANTABILITY AND FITNESS FOR A PARTICULAR PURPOSE, SHALL BE LIMITED IN DURATION TO THE PERIOD OF TIME SET FORTH ABOVE. CHECK...
... the unit to a VIZIO service center.VIZIO will cover the transportation charges to cosmetic damage, normal wear and tear, misuse, signal issues, power surges, and damages from warranty service or replacement, whichever is needed on the box. ANY IMPLIED WARRANTIES, INCLUDING ANY IMPLIED WARRANTY OF MERCHANTABILITY AND FITNESS FOR A PARTICULAR PURPOSE, SHALL BE LIMITED IN DURATION TO THE PERIOD OF TIME SET FORTH ABOVE. CHECK...
Download
Page 27
... wear and tear, improper operation, improper voltage supply or power surges, signal issues, damages from warranty service or replacement, whichever is not responsible for the duration of the original warranty or for parts or labor during the warranty period. LIMITED WARRANTY - Pre-authorization must utilize either repair or replace the unit at VIZIO's option and sole discretion. Proof of protection.VIZIO Technical Support will either the original...
... wear and tear, improper operation, improper voltage supply or power surges, signal issues, damages from warranty service or replacement, whichever is not responsible for the duration of the original warranty or for parts or labor during the warranty period. LIMITED WARRANTY - Pre-authorization must utilize either repair or replace the unit at VIZIO's option and sole discretion. Proof of protection.VIZIO Technical Support will either the original...


