Download
Page 4
... the apparatus, the apparatus has been exposed to rain or moisture, does not operate normally or has been dropped. • Unplug the power cord before turning on your TV. • Your TV should be replaced when using different voltage than the specified voltage may compromise the integrity of power supplied to...
... the apparatus, the apparatus has been exposed to rain or moisture, does not operate normally or has been dropped. • Unplug the power cord before turning on your TV. • Your TV should be replaced when using different voltage than the specified voltage may compromise the integrity of power supplied to...
Download
Page 8
... Control Passcode 36 Resetting the Content Locks 36 Changing the On-Screen Menu Language 36 Setting the Time Zone 37 Adjusting the CEC Settings 37 Turning the Power Indicator On or Off 38 Using the Reset & Admin Menu 38 Resetting the TV Settings 39 Restoring the TV to Factory Default ... Using the USB Media Player 42 Using the USB Media Player 42 Connecting a USB Thumb Drive to the TV 42 Playing USB Media 42 Using VIZIO Internet Apps 46 Using the VIA Dock 46 Using the Hot Keys 46 Troubleshooting & Technical Support 47 Specifications 50 Limited Warranty 52 Legal & Compliance 53...
... Control Passcode 36 Resetting the Content Locks 36 Changing the On-Screen Menu Language 36 Setting the Time Zone 37 Adjusting the CEC Settings 37 Turning the Power Indicator On or Off 38 Using the Reset & Admin Menu 38 Resetting the TV Settings 39 Restoring the TV to Factory Default ... Using the USB Media Player 42 Using the USB Media Player 42 Connecting a USB Thumb Drive to the TV 42 Playing USB Media 42 Using VIZIO Internet Apps 46 Using the VIA Dock 46 Using the Hot Keys 46 Troubleshooting & Technical Support 47 Specifications 50 Limited Warranty 52 Legal & Compliance 53...
Download
Page 13
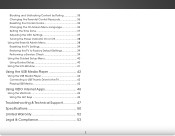
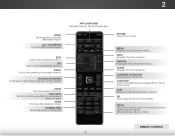
Change input source. INPUT - 2 Side Panel POWER - Side Panel 7 Hold to turn TV off or on.
Change input source. INPUT - 2 Side Panel POWER - Side Panel 7 Hold to turn TV off or on.
Download
Page 15
Ok Select the highlighted option. Volume Up/Down Increase or decrease loudness of the audio. Mute Turn the audio off . Number Pad Manually enter a channel. Guide Display the info window. V Button Open the VIZIO Internet Apps Plus™ (V.I.A. Back Go to manually enter a digital sub-channel. (For example, 18-4 or 18-5.) Remote Control...
Ok Select the highlighted option. Volume Up/Down Increase or decrease loudness of the audio. Mute Turn the audio off . Number Pad Manually enter a channel. Guide Display the info window. V Button Open the VIZIO Internet Apps Plus™ (V.I.A. Back Go to manually enter a digital sub-channel. (For example, 18-4 or 18-5.) Remote Control...
Download
Page 17
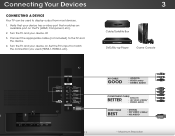
... port that matches an available port on . Connect the appropriate cable (not included) to match the connection you used to display output from most devices. 1. Turn the TV and your device on the TV (HDMI, Component, etc). 2. Verify that your device off. 3. Set the TV's input to the TV and the...
... port that matches an available port on . Connect the appropriate cable (not included) to match the connection you used to display output from most devices. 1. Turn the TV and your device on the TV (HDMI, Component, etc). 2. Verify that your device off. 3. Set the TV's input to the TV and the...
Download
Page 19
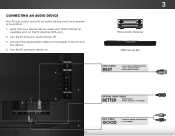
Turn the TV and your audio device off. 3. Connect the appropriate cable (not included) to an audio device, such as a receiver or sound bar. 1. Turn the TV and your device on the TV (Optical, RCA, etc). 2. Verify that your device has an audio port that matches an available port ...on . 3 Home Audio Receiver VIZIO Sound Bar HDMI CABLE BEST • ARC 2-WAY COMMUNICATION • 2.0-5.1...
Turn the TV and your audio device off. 3. Connect the appropriate cable (not included) to an audio device, such as a receiver or sound bar. 1. Turn the TV and your device on the TV (Optical, RCA, etc). 2. Verify that your device has an audio port that matches an available port ...on . 3 Home Audio Receiver VIZIO Sound Bar HDMI CABLE BEST • ARC 2-WAY COMMUNICATION • 2.0-5.1...

Download
Page 23
Completing the First-Time Setup 4 The first time you turn on the TV, the Setup App will guide you through each of Service and Privacy Policy for use. Before you begin the first-time setup: &#...
Completing the First-Time Setup 4 The first time you turn on the TV, the Setup App will guide you through each of Service and Privacy Policy for use. Before you begin the first-time setup: &#...
Download
Page 30
... providing deep, rich bass, and delivering crisp details and clear, intelligible dialog. Restores the audio settings to a home theater audio system. VIZIO Audio Balance - Select PCM or Bitstream. • Wide AnZoaomlog ANourmdailo OPanuotra-mSicets the volume control properties for the Optical output when connected ...the analog RCA (red/white) connectors when connected to the factory defaults. 5 Adjusting the Audio Settings To adjust the audio settings: 1. Turns the built-in speakers on the remote. Press the MENU button on or off. +0 +0 On On On PCM Fixed Note: When TV...
... providing deep, rich bass, and delivering crisp details and clear, intelligible dialog. Restores the audio settings to a home theater audio system. VIZIO Audio Balance - Select PCM or Bitstream. • Wide AnZoaomlog ANourmdailo OPanuotra-mSicets the volume control properties for the Optical output when connected ...the analog RCA (red/white) connectors when connected to the factory defaults. 5 Adjusting the Audio Settings To adjust the audio settings: 1. Turns the built-in speakers on the remote. Press the MENU button on or off. +0 +0 On On On PCM Fixed Note: When TV...
Download
Page 31
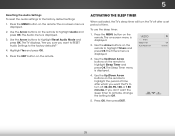
... remote to highlight Timers and press OK. Highlight Yes and press OK. 5. Activating the Sleep Timer When activated, the TV's sleep timer will turn off after which you want to RESET Audio Settings to the factory defaults?" 4. Use the Up/Down Arrow buttons on -screen menu is displayed.... 3. The Audio menu is displayed. 2. To use the sleep timer: 1. VIZIO Timers Sleep Timer Auto Power Off Off 10 mins 3. The on the remote to Off. 5. Use the Arrow buttons on the remote to the factory...
... remote to highlight Timers and press OK. Highlight Yes and press OK. 5. Activating the Sleep Timer When activated, the TV's sleep timer will turn off after which you want to RESET Audio Settings to the factory defaults?" 4. Use the Up/Down Arrow buttons on -screen menu is displayed.... 3. The Audio menu is displayed. 2. To use the sleep timer: 1. VIZIO Timers Sleep Timer Auto Power Off Off 10 mins 3. The on the remote to Off. 5. Use the Arrow buttons on the remote to the factory...
Download
Page 32
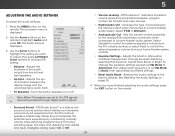
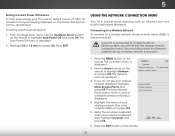
... can be deactivated. Highlight the name of available wireless networks, is internet-ready, featuring both an Ethernet port and built-in high-speed Wireless-N. VIZIO Network Wired Connection Disconnected Wireless Access Points Manual Setup Hidden Network Test Connection 6. Use the Arrow buttons on the remote to a network with an ... to set the Auto Power Off feature: 1. The More Access Points menu, which is a list of your TV is set by default to turn off after 10 minutes if no signal is being broadcast: If your TV is connected to highlight Auto Power Off and press OK. Press the...
... can be deactivated. Highlight the name of available wireless networks, is internet-ready, featuring both an Ethernet port and built-in high-speed Wireless-N. VIZIO Network Wired Connection Disconnected Wireless Access Points Manual Setup Hidden Network Test Connection 6. Use the Arrow buttons on the remote to a network with an ... to set the Auto Power Off feature: 1. The More Access Points menu, which is a list of your TV is set by default to turn off after 10 minutes if no signal is being broadcast: If your TV is connected to highlight Auto Power Off and press OK. Press the...
Download
Page 33
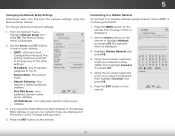
...access point name. To change any of the Change Settings menu. 4. DNS Server - The on -screen keyboard, STlietm ehenepertenrhPyiicogtuuhrerlignheAttuwCdoioorkn'ns epcatsaswnodrd, press OK. VIZIO Hidden Network Please enter your network's name In(pSuSt ID),Wtihdeen hiCgChlight Connect and press OK. 5. Your network's default gateway address. • Pref. .... Use the Arrow and OK buttons to adjust each setting: • DHCP - (Dynamic Host Configuration Protocol) This setting must be turned Off to a wireless network whose network name (SSID) is not being broadcast: 1.
...access point name. To change any of the Change Settings menu. 4. DNS Server - The on -screen keyboard, STlietm ehenepertenrhPyiicogtuuhrerlignheAttuwCdoioorkn'ns epcatsaswnodrd, press OK. VIZIO Hidden Network Please enter your network's name In(pSuSt ID),Wtihdeen hiCgChlight Connect and press OK. 5. Your network's default gateway address. • Pref. .... Use the Arrow and OK buttons to adjust each setting: • DHCP - (Dynamic Host Configuration Protocol) This setting must be turned Off to a wireless network whose network name (SSID) is not being broadcast: 1.
Download
Page 44
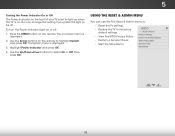
...-screen menu is on. Use the Arrow buttons on the remote. 5 Turning the Power Indicator On or Off The Power Indicator on the front of your... is displayed. 2. Highlight Power Indicator and press OK. 4. Use the Up/Down Arrow buttons to Factory Defaults VIZIO Privacy Policy • Start the Store Demo Service Check Store Demo 38 Using the Reset & Admin Menu You ... settings • Restore the TV to its factory default settings • View the VIZIO Privacy Policy • Perform a Service Check VIZIO Reset & Admin Reset TV Settings Reset TV to select On or Off, then press OK. To...
...-screen menu is on. Use the Arrow buttons on the remote. 5 Turning the Power Indicator On or Off The Power Indicator on the front of your... is displayed. 2. Highlight Power Indicator and press OK. 4. Use the Up/Down Arrow buttons to Factory Defaults VIZIO Privacy Policy • Start the Store Demo Service Check Store Demo 38 Using the Reset & Admin Menu You ... settings • Restore the TV to its factory default settings • View the VIZIO Privacy Policy • Perform a Service Check VIZIO Reset & Admin Reset TV Settings Reset TV to select On or Off, then press OK. To...

Download
Page 45
...and press OK. 5. This will be lost! Use the Arrow buttons on -screen menu is displayed. 4. The TV displays,"Select Reset to return to turn back on the remote to its factory default settings: 1. Press the MENU button on the remote. Wait for the TV to default factory settings." 6. ...Use the Arrow buttons on shortly afterward and the Setup App will turn off. To restore the TV to highlight System and press OK. If you have not yet set up a parental passcode, enter the default, 0000...
...and press OK. 5. This will be lost! Use the Arrow buttons on -screen menu is displayed. 4. The TV displays,"Select Reset to return to turn back on the remote to its factory default settings: 1. Press the MENU button on the remote. Wait for the TV to default factory settings." 6. ...Use the Arrow buttons on shortly afterward and the Setup App will turn off. To restore the TV to highlight System and press OK. If you have not yet set up a parental passcode, enter the default, 0000...
Download
Page 48
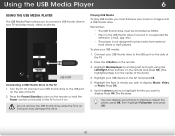
... remote and press OK. (The highlighted App is on. Highlight your photos in the center of the dock) 4. Highlight the type of the TV to turn it on the side of media you must end in the list and press OK. 5. Press OK. The file plays. Press the Power/Standby button... USB Media Player The USB Media Player allows you want to display. Playing USB Media To play media from external hard drives or mp3 players. Turn the TV off. Remember: • The USB thumb drive must be formatted as FAT32. • Files on the side of the TV. 2. Use the Arrow...
... remote and press OK. (The highlighted App is on. Highlight your photos in the center of the dock) 4. Highlight the type of the TV to turn it on the side of media you must end in the list and press OK. 5. Press OK. The file plays. Press the Power/Standby button... USB Media Player The USB Media Player allows you want to display. Playing USB Media To play media from external hard drives or mp3 players. Turn the TV off. Remember: • The USB thumb drive must be formatted as FAT32. • Files on the side of the TV. 2. Use the Arrow...

Download
Page 54
... on the remote or on . The colors on page 21. • Reset the picture settings. The power is on, but there is securely attached to turn the TV on the side of the channel may be low. See Replacing the Batteries on the remote to ensure mute is no sound. •...
... on the remote or on . The colors on page 21. • Reset the picture settings. The power is on, but there is securely attached to turn the TV on the side of the channel may be low. See Replacing the Batteries on the remote to ensure mute is no sound. •...

Download
Page 59
...oldlicenses/lgpl-2.1.html You can be used in accordance with the limits for attribution of any radio or TV interference caused by turning the equipment off and on your VIZIO VIA device. If this equipment. USA: UL Canada: CSA Germany: VDE UK: BASE/BS Japan: Electric Appliance Control ...the party responsible for any such software and associated documentation files (the "Open Source Software"), to deal in order to operate this equipment. VIZIO offers to provide source code to you on a circuit different from the date of the distribution of this device must be determined by ...
...oldlicenses/lgpl-2.1.html You can be used in accordance with the limits for attribution of any radio or TV interference caused by turning the equipment off and on your VIZIO VIA device. If this equipment. USA: UL Canada: CSA Germany: VDE UK: BASE/BS Japan: Electric Appliance Control ...the party responsible for any such software and associated documentation files (the "Open Source Software"), to deal in order to operate this equipment. VIZIO offers to provide source code to you on a circuit different from the date of the distribution of this device must be determined by ...
Download
Page 2
... that may cause the batteries to excessive heat such as a radiator, heater, oven, amplifier etc. The wide blade or the third prong are unplugged before turning on the apparatus. • The mains plug or appliance coupler is used for repair. When a cart is used for moving your TV from the type...
... that may cause the batteries to excessive heat such as a radiator, heater, oven, amplifier etc. The wide blade or the third prong are unplugged before turning on the apparatus. • The mains plug or appliance coupler is used for repair. When a cart is used for moving your TV from the type...

Download
Page 6
... input. INPUT A/V CONTROLS Control USB media player. WIDE Change the display mode. ARROW Navigate the on -screen menu. BACK VOL GUIDE CH 3D 1 2 3 4 5 6 7 8 9 ENTER 0 POWER Turn TV on or off or on -screen menu. INFO Display the info window. GUIDE Display the info window. VOLUME UP/DOWN Increase or decrease loudness...
... input. INPUT A/V CONTROLS Control USB media player. WIDE Change the display mode. ARROW Navigate the on -screen menu. BACK VOL GUIDE CH 3D 1 2 3 4 5 6 7 8 9 ENTER 0 POWER Turn TV on or off or on -screen menu. INFO Display the info window. GUIDE Display the info window. VOLUME UP/DOWN Increase or decrease loudness...
Download
Page 9
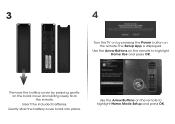
Gently slide the battery cover back into place. Insert the included batteries. Remove the battery cover by pressing the Power button on the remote. Use the Arrow Buttons on the remote to highlight Home Use and press OK. The Setup App is displayed. 3 4 Turn the TV on by pressing gently on the back cover and sliding away from the remote. Use the Arrow Buttons on the remote to highlight Home Mode Setup and press OK.
Gently slide the battery cover back into place. Insert the included batteries. Remove the battery cover by pressing the Power button on the remote. Use the Arrow Buttons on the remote to highlight Home Use and press OK. The Setup App is displayed. 3 4 Turn the TV on by pressing gently on the back cover and sliding away from the remote. Use the Arrow Buttons on the remote to highlight Home Mode Setup and press OK.
Download
Page 16
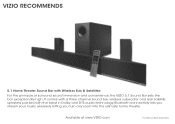
It comes with a three channel sound bar, wireless subwoofer and rear satellite speakers packed with Wireless Sub & Satellites For the pinnacle of surround sound immersion and convenience, the VIZIO 5.1 Sound Bar sets the bar exceptionally high. Bluetooth connectivity lets you stream your music wirelessly letting you turn any room into the ultimate home theater. Available at www.VIZIO.com This Product Sold Separately VIZIO RECOMMENDS 5.1 Home Theater Sound Bar with the latest in Dolby and DTS audio technology.
It comes with a three channel sound bar, wireless subwoofer and rear satellite speakers packed with Wireless Sub & Satellites For the pinnacle of surround sound immersion and convenience, the VIZIO 5.1 Sound Bar sets the bar exceptionally high. Bluetooth connectivity lets you stream your music wirelessly letting you turn any room into the ultimate home theater. Available at www.VIZIO.com This Product Sold Separately VIZIO RECOMMENDS 5.1 Home Theater Sound Bar with the latest in Dolby and DTS audio technology.


