Download
Page 4
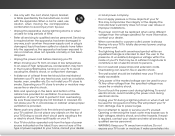
...power cord before turning on your TV cabinet. Overloading can result in the back and bottom of the cabinet are not blocked or covered. If repair is required, contact your dealer and refer all servicing to qualified service personnel. Operating your TV close to smoke. The manufacturer's warranty does not cover user abuse or improper installations. • The power cord must be replaced when using... power strips and extension cords. Doing so could short circuit parts causing a fire or electric shock. Opening or removing the back cover may compromise the integrity of the display.
...power cord before turning on your TV cabinet. Overloading can result in the back and bottom of the cabinet are not blocked or covered. If repair is required, contact your dealer and refer all servicing to qualified service personnel. Operating your TV close to smoke. The manufacturer's warranty does not cover user abuse or improper installations. • The power cord must be replaced when using... power strips and extension cords. Doing so could short circuit parts causing a fire or electric shock. Opening or removing the back cover may compromise the integrity of the display.
Download
Page 5
... shock. • Do not use by qualified service personnel only. These servicing instructions are unplugged before moving your dealer for an extended period of time, unplug the power cord. • To reduce risk of your TV changes substantially. • This apparatus shall not be exposed to leak which can damage the remote control or injure the operator. If your TV will...
... shock. • Do not use by qualified service personnel only. These servicing instructions are unplugged before moving your dealer for an extended period of time, unplug the power cord. • To reduce risk of your TV changes substantially. • This apparatus shall not be exposed to leak which can damage the remote control or injure the operator. If your TV will...
Download
Page 6
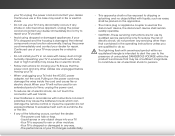
..., part H) Power Lines Do not locate the antenna near overhead light or power circuits, or where it is electrically grounded to proper grounding of the mast and supporting structure, grounding of the lead-in the building installation. Television Antenna Connection Protection If an outside antenna/satellite dish or cable system is to be connected to earth in wire to an antenna discharge unit, size of...
..., part H) Power Lines Do not locate the antenna near overhead light or power circuits, or where it is electrically grounded to proper grounding of the mast and supporting structure, grounding of the lead-in the building installation. Television Antenna Connection Protection If an outside antenna/satellite dish or cable system is to be connected to earth in wire to an antenna discharge unit, size of...
Download
Page 7
...With HDMI ARC 15 Connecting to your Network 16 Connecting to a Wired Network (Best 16 Connecting to a Wireless Network 16 Completing the First-Time Setup 17 Using the On-Screen Menu 19 Navigating the On-Screen Menu 19 Changing the Input Source 20 Changing the Screen Aspect Ratio 20 Adjusting the Picture Settings 21 Adjusting the Picture Size and Position 22 Adjusting the Color Temperature 22 Adjusting the Advanced Picture Settings 23 Resetting the Picture Settings 23 Adjusting the Audio Settings 24 Resetting the Audio Settings 25 Activating the Sleep Timer 25 Setting the Auto...
...With HDMI ARC 15 Connecting to your Network 16 Connecting to a Wired Network (Best 16 Connecting to a Wireless Network 16 Completing the First-Time Setup 17 Using the On-Screen Menu 19 Navigating the On-Screen Menu 19 Changing the Input Source 20 Changing the Screen Aspect Ratio 20 Adjusting the Picture Settings 21 Adjusting the Picture Size and Position 22 Adjusting the Color Temperature 22 Adjusting the Advanced Picture Settings 23 Resetting the Picture Settings 23 Adjusting the Audio Settings 24 Resetting the Audio Settings 25 Activating the Sleep Timer 25 Setting the Auto...
Download
Page 11
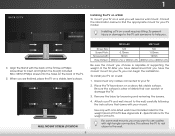
... Installing the TV on a Wall To mount your TV on a wall, you may want to use cables with right-angle connectors. Be sure the surface is capable of supporting the weight of this TV. Attach your TV and wall mount to the wall, carefully following the instructions that can begin the installation. Align the Stand with your TV on a wall: 1. To install your mount. Wall Mount Screw Location Use only with a UL-listed wall mount bracket...
... Installing the TV on a Wall To mount your TV on a wall, you may want to use cables with right-angle connectors. Be sure the surface is capable of supporting the weight of this TV. Attach your TV and wall mount to the wall, carefully following the instructions that can begin the installation. Align the Stand with your TV on a wall: 1. To install your mount. Wall Mount Screw Location Use only with a UL-listed wall mount bracket...

Download
Page 26
... devices with black bars to the left and right of the display image. TV COMP HDMI-1 HDMI-2 HDMI-3 Note: Inputs may appear wider than intended. button on the remote. 5 Changing the Input Source External devices such as DVD players, Blu-Ray Players, and video game consoles can display images in the on the remote to highlight the Input you wish to view and press OK. Use the Up/Down Arrow buttons on -screen menu. Images...
... devices with black bars to the left and right of the display image. TV COMP HDMI-1 HDMI-2 HDMI-3 Note: Inputs may appear wider than intended. button on the remote. 5 Changing the Input Source External devices such as DVD players, Blu-Ray Players, and video game consoles can display images in the on the remote to highlight the Input you wish to view and press OK. Use the Up/Down Arrow buttons on -screen menu. Images...
Download
Page 27
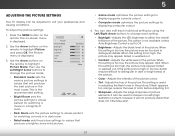
... Arrow buttons to change each individual setting by using the Left/Right Arrow buttons to Off. • Brightness - The Picture menu is displayed. 2. Adjusts the white level of color before adjusting tint. When this setting is too high, the picture may appear dark. Adjusts the intensity Picture Audio Tint - It can be used to highlight Picture and press OK. To adjust the picture settings: 1. Use the Arrow buttons on -screen menu is displayed. 3. This is set to change the picture mode: VIZIO Picture Picture Mode...
... Arrow buttons to change each individual setting by using the Left/Right Arrow buttons to Off. • Brightness - The Picture menu is displayed. 2. Adjusts the white level of color before adjusting tint. When this setting is too high, the picture may appear dark. Adjusts the intensity Picture Audio Tint - It can be used to highlight Picture and press OK. To adjust the picture settings: 1. Use the Arrow buttons on -screen menu is displayed. 3. This is set to change the picture mode: VIZIO Picture Picture Mode...
Download
Page 30
... digital audio outputs. • Volume Leveling - Adjusts the loudness of processing for the analog RCA (red/white) connectors when connected to change the equalizer settings yourself, set EQ Mode to Advanced, then adjust each frequency or set to a home theater audio system. See Resetting the Audio Settings on page 25. 4.NeWtwohrkenSeyttoinugshaHveelpfinished adjusting the audio settings, press the EXIT button on or off. +0 +0 On On On PCM Fixed Note: When TV speakers are set EQ Mode Sleep Timer to control the external speakers' volume...
... digital audio outputs. • Volume Leveling - Adjusts the loudness of processing for the analog RCA (red/white) connectors when connected to change the equalizer settings yourself, set EQ Mode to Advanced, then adjust each frequency or set to a home theater audio system. See Resetting the Audio Settings on page 25. 4.NeWtwohrkenSeyttoinugshaHveelpfinished adjusting the audio settings, press the EXIT button on or off. +0 +0 On On On PCM Fixed Note: When TV speakers are set EQ Mode Sleep Timer to control the external speakers' volume...
Download
Page 31
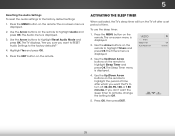
... sleep timer: 1. Press the MENU button on -screen menu is displayed. 2. VIZIO Timers Sleep Timer Auto Power Off Off 10 mins 3. The Sleep Timer menu is displayed. 3. 5 Resetting the Audio Settings To reset the audio settings to highlight Reset Audio Mode and press OK. Use the Arrow buttons on -screen menu is displayed. The on the remote to highlight Audio and press OK. If you don't want to RESET Audio Settings to turn the TV off : 30, 60, 90, 120, or 180 minutes. Use the Arrow buttons to the factory default settings...
... sleep timer: 1. Press the MENU button on -screen menu is displayed. 2. VIZIO Timers Sleep Timer Auto Power Off Off 10 mins 3. The Sleep Timer menu is displayed. 3. 5 Resetting the Audio Settings To reset the audio settings to highlight Reset Audio Mode and press OK. Use the Arrow buttons on -screen menu is displayed. The on the remote to highlight Audio and press OK. If you don't want to RESET Audio Settings to turn the TV off : 30, 60, 90, 120, or 180 minutes. Use the Arrow buttons to the factory default settings...
Download
Page 43
... to control HDMI-connected devices with the included remote without any additional programming. Highlight your device's user manual for details. 1. To enable, disable, or adjust CEC settings: 1. The Time & Local Settings menu is displayed. Highlight Daylight Savings and press OK. Press the MENU button on the remote. Normal Panoramic 2. Use the Arrow buttons on the remote to highlight System and press OK. The CEC Settings menu is displayed. 4. Network Settings Help 37 Highlight Zip Code. Sleep • Timer DePvicitcuree...
... to control HDMI-connected devices with the included remote without any additional programming. Highlight your device's user manual for details. 1. To enable, disable, or adjust CEC settings: 1. The Time & Local Settings menu is displayed. Highlight Daylight Savings and press OK. Press the MENU button on the remote. Normal Panoramic 2. Use the Arrow buttons on the remote to highlight System and press OK. The CEC Settings menu is displayed. 4. Network Settings Help 37 Highlight Zip Code. Sleep • Timer DePvicitcuree...
Download
Page 46
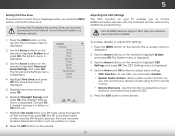
... EXIT button on -screen instructions. Highlight Guided Setup and press OK. Highlight the guided setup you want to access and press OK: • Tuner Setup - The on the remote. Set up the TV tuner or to connect the TV with your network. 4. Wide Zoom Normal Panoramic Exit 2D 3D ABC Input Wide CC Sleep Timer Picture Audio Network Settings Help 40 Press the MENU button on -screen menu is displayed. 2. 5 Using the Guided Setup Menu Using Guided Setup The TV's Setup App can be used to easily set...
... EXIT button on -screen instructions. Highlight Guided Setup and press OK. Highlight the guided setup you want to access and press OK: • Tuner Setup - The on the remote. Set up the TV tuner or to connect the TV with your network. 4. Wide Zoom Normal Panoramic Exit 2D 3D ABC Input Wide CC Sleep Timer Picture Audio Network Settings Help 40 Press the MENU button on -screen menu is displayed. 2. 5 Using the Guided Setup Menu Using Guided Setup The TV's Setup App can be used to easily set...

Download
Page 54
... external devices (Blu-ray player, game console, cable/satellite box) that are connected to the TV. • If you are using cable TV, satellite, or antenna connected directly to the TV, scan for the best signal. The buttons on page 29. There is connected securely to the TV and move the antenna around the room or close to a window for channels. See Adjusting the Picture Settings on . see your antenna is no sound...
... external devices (Blu-ray player, game console, cable/satellite box) that are connected to the TV. • If you are using cable TV, satellite, or antenna connected directly to the TV, scan for the best signal. The buttons on page 29. There is connected securely to the TV and move the antenna around the room or close to a window for channels. See Adjusting the Picture Settings on . see your antenna is no sound...

Download
Page 55
... volume. If the viewing mode on the new input source differs from the one on the input source you switch from , the difference may be noticeable. • See Changing the Screen Aspect Ratio on the remote to match your devices with HDMI cables. • If you are using an antenna, the signal strength of technology. If the volume level on the remote to a window for the best signal. Connect your TV's display...
... volume. If the viewing mode on the new input source differs from the one on the input source you switch from , the difference may be noticeable. • See Changing the Screen Aspect Ratio on the remote to match your devices with HDMI cables. • If you are using an antenna, the signal strength of technology. If the volume level on the remote to a window for the best signal. Connect your TV's display...
Download
Page 58
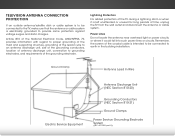
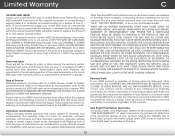
... or removed serial numbers, or requiring routine maintenance are warranted for example: cosmetic damage, normal wear and tear, improper operation, improper voltage supply or power surges, signal issues, damages from 6:00AM to 9:00PM Monday through Friday and 8:00AM to 4:00PM Saturday and Sunday, Pacific Time, or visit www.VIZIO.com. Proof of purchase in United States and Puerto Rico Only. Replacement parts...
... or removed serial numbers, or requiring routine maintenance are warranted for example: cosmetic damage, normal wear and tear, improper operation, improper voltage supply or power surges, signal issues, damages from 6:00AM to 9:00PM Monday through Friday and 8:00AM to 4:00PM Saturday and Sunday, Pacific Time, or visit www.VIZIO.com. Proof of purchase in United States and Puerto Rico Only. Replacement parts...
Download
Page 2
..., stand, tripod, bracket, or table specified by qualified service personnel only.To reduce the risk of electric shock, do not perform any other than that the power cord and any servicing other cables are for moving the cart/apparatus combination to avoid injury from overheating, be maintained between your TV and any heat source, such as when the power-supply cord or plug...
..., stand, tripod, bracket, or table specified by qualified service personnel only.To reduce the risk of electric shock, do not perform any other than that the power cord and any servicing other cables are for moving the cart/apparatus combination to avoid injury from overheating, be maintained between your TV and any heat source, such as when the power-supply cord or plug...

Download
Page 11
... and Right Arrow Buttons to page, use Number Pad, then press OK. INFO Use the Up and Down Arrow Buttons to select the chapter you want to exit the on-screen User Manual. Table of Contents Installing the TV Controls and Connections Connecting your Devices Completing the First-Time Setup Using the On-Screen Menu Using the USB Media Player Using VIZIO Internet Apps Troubleshooting & Technical Support Specifications Limited Warranty Legal & Compliance LCD HDTV WITH VIZIO INTERNET APPS® MENU Press the EXIT Button to view.
... and Right Arrow Buttons to page, use Number Pad, then press OK. INFO Use the Up and Down Arrow Buttons to select the chapter you want to exit the on-screen User Manual. Table of Contents Installing the TV Controls and Connections Connecting your Devices Completing the First-Time Setup Using the On-Screen Menu Using the USB Media Player Using VIZIO Internet Apps Troubleshooting & Technical Support Specifications Limited Warranty Legal & Compliance LCD HDTV WITH VIZIO INTERNET APPS® MENU Press the EXIT Button to view.

Download
Page 13
Commonly-Connected Devices: Cable or Satellite Boxes COMPONENT CABLE BETTER • ANALOG • HD VIDEO (1080p)* • STEREO AUDIO Red White Red Blue Green Blu-ray™ or DVD Players HDMI CABLE BEST • DIGITAL • HD VIDEO (1080p)* • HD AUDIO * Maximum Resolution Game Consoles Choose ONE connection type for each device. (Cables are not included.) AV CABLE GOOD • ANALOG • VIDEO (480i)* • STEREO AUDIO Red White Yellow Match colored connectors to colored ports.
Commonly-Connected Devices: Cable or Satellite Boxes COMPONENT CABLE BETTER • ANALOG • HD VIDEO (1080p)* • STEREO AUDIO Red White Red Blue Green Blu-ray™ or DVD Players HDMI CABLE BEST • DIGITAL • HD VIDEO (1080p)* • HD AUDIO * Maximum Resolution Game Consoles Choose ONE connection type for each device. (Cables are not included.) AV CABLE GOOD • ANALOG • VIDEO (480i)* • STEREO AUDIO Red White Yellow Match colored connectors to colored ports.
Download
Page 14
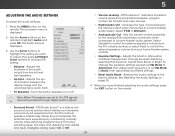
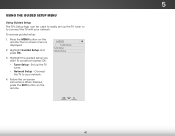
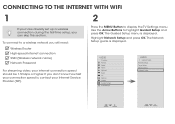
... your Internet Service Provider (ISP). 2 Press the MENU Button to display the TV Settings menu. Use the Arrow Buttons to a wireless network you can skip this section. The Network Setup guide is , contact your connection speed is displayed. VIZIO TV Settings Picture Audio Timers Network Tuner CC CC Devices System Guided Setup User Manual Wide Exit VIZIO Guided Setup ZoRoemmote NSeotrumpal Panoramic Tuner Setup Device Setup Network Setup 2D 3D ABC Input Wide CC Wide Exit Input Sleep Timer Picture Audio Sleep Timer Network Settings Help Networ Highlight Network Setup...
... your Internet Service Provider (ISP). 2 Press the MENU Button to display the TV Settings menu. Use the Arrow Buttons to a wireless network you can skip this section. The Network Setup guide is , contact your connection speed is displayed. VIZIO TV Settings Picture Audio Timers Network Tuner CC CC Devices System Guided Setup User Manual Wide Exit VIZIO Guided Setup ZoRoemmote NSeotrumpal Panoramic Tuner Setup Device Setup Network Setup 2D 3D ABC Input Wide CC Wide Exit Input Sleep Timer Picture Audio Sleep Timer Network Settings Help Networ Highlight Network Setup...

Download
Page 19
... the warranty period. Replacement parts and Products are not covered. In order to protect your product, refer to the VIZIO service center. VIZIO Technical Support will be new or recertified at 877 MY VIZIO (877.698.4946) from warranty service or replacement, whichever is capable of customer misuse, modifications or adjustments, as well as installation and set-up issues or any repairs attempted by a VIZIO authorized service center...
... the warranty period. Replacement parts and Products are not covered. In order to protect your product, refer to the VIZIO service center. VIZIO Technical Support will be new or recertified at 877 MY VIZIO (877.698.4946) from warranty service or replacement, whichever is capable of customer misuse, modifications or adjustments, as well as installation and set-up issues or any repairs attempted by a VIZIO authorized service center...

Download
Page 2
... 12ft HDMI® cable can be used are for high definition video, 3D, audio and Ethernet. 5.1 SURROUND SOUND HOME THEATER SOUND BAR The VIZIO S4251w-B4 5.1 Home Theater Sound Bar is the ultimate home theater audio upgrade. rev 05102013 47" RAZOR LED™ SMART TV TV SPECIFICATIONS Screen Size TV Type Smart TV Built-in WiFi Refresh Rate Maximum Resolution Dynamic Contrast Ratio Smart Dimming Remote Control Type Energy Star Qualified Wall Mount & Screw Size...
... 12ft HDMI® cable can be used are for high definition video, 3D, audio and Ethernet. 5.1 SURROUND SOUND HOME THEATER SOUND BAR The VIZIO S4251w-B4 5.1 Home Theater Sound Bar is the ultimate home theater audio upgrade. rev 05102013 47" RAZOR LED™ SMART TV TV SPECIFICATIONS Screen Size TV Type Smart TV Built-in WiFi Refresh Rate Maximum Resolution Dynamic Contrast Ratio Smart Dimming Remote Control Type Energy Star Qualified Wall Mount & Screw Size...


