User Guide
Page 26
... the computer 66 Adjusting the quality of the external display.........67 Video limitations 67 Using an external keyboard 68 Making your external keyboard emulate the Fn key 69 Using a mouse 69 Setting up a PS/2 mouse with the AccuPoint II....69 Connecting a local printer 70 Connecting an external diskette drive 71 Connecting external speakers or headphones .........72 Connecting an external microphone 72 Using an expansion device 73 Adding memory 73 Installing a memory module 74 Removing a memory module 76 Using Slim SelectBay® modules 77 Removing a module from the...
... the computer 66 Adjusting the quality of the external display.........67 Video limitations 67 Using an external keyboard 68 Making your external keyboard emulate the Fn key 69 Using a mouse 69 Setting up a PS/2 mouse with the AccuPoint II....69 Connecting a local printer 70 Connecting an external diskette drive 71 Connecting external speakers or headphones .........72 Connecting an external microphone 72 Using an expansion device 73 Adding memory 73 Installing a memory module 74 Removing a memory module 76 Using Slim SelectBay® modules 77 Removing a module from the...
User Guide
Page 32
... Hibernation mode more quickly........233 Starting again from Hibernation 234 Using Standby 234 Going into Standby mode more quickly 235 Starting again from Standby 236 Quickly changing your Shut down mode ...........236 Toshiba Utilities 237 Toshiba Hardware Setup 237 Appendix B: Hot Keys 240 Volume Mute 240 Instant password security 240 Without a password 241 With a password 241 Power usage mode 242 Standby mode 243 Hibernation mode 243 Display modes 244 Display brightness 244 Wireless device enable 245 Disabling or enabling the Touchpad/AccuPoint II 245 Keyboard hot keys...
... Hibernation mode more quickly........233 Starting again from Hibernation 234 Using Standby 234 Going into Standby mode more quickly 235 Starting again from Standby 236 Quickly changing your Shut down mode ...........236 Toshiba Utilities 237 Toshiba Hardware Setup 237 Appendix B: Hot Keys 240 Volume Mute 240 Instant password security 240 Without a password 241 With a password 241 Power usage mode 242 Standby mode 243 Hibernation mode 243 Display modes 244 Display brightness 244 Wireless device enable 245 Disabling or enabling the Touchpad/AccuPoint II 245 Keyboard hot keys...
User Guide
Page 34
...; Windows® XP, already installed on your computer, or to perform the most demanding computing tasks from any location. With your Toshiba notebook computer, your work can accompany you wherever you to stay current with the various computer software or hardware options, visit Toshiba's Web site at the time of publication to ensure the accuracy of powerful, portable multimedia computing. Tecra S1 Series notebook computers...
...; Windows® XP, already installed on your computer, or to perform the most demanding computing tasks from any location. With your Toshiba notebook computer, your work can accompany you wherever you to stay current with the various computer software or hardware options, visit Toshiba's Web site at the time of publication to ensure the accuracy of powerful, portable multimedia computing. Tecra S1 Series notebook computers...
User Guide
Page 40
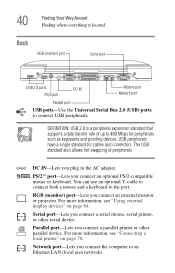
... you plug in the AC adapter. RGB (monitor) port-Lets you connect the computer to the port. You can use an optional Y-cable to connect both a mouse and a keyboard to an Ethernet LAN (local area network). For more information, see "Using external display devices" on page 70. DEFINITION: USB 2.0 is located Back RGB (monitor) port Serial port USB 2.0 ports PS/2 port DC IN Modem port Network port Parallel port USB ports-Use the Universal Serial Bus 2.0 (USB) ports to 480 Mbps for cables and connectors. 40 Finding...
... you plug in the AC adapter. RGB (monitor) port-Lets you connect the computer to the port. You can use an optional Y-cable to connect both a mouse and a keyboard to an Ethernet LAN (local area network). For more information, see "Using external display devices" on page 70. DEFINITION: USB 2.0 is located Back RGB (monitor) port Serial port USB 2.0 ports PS/2 port DC IN Modem port Network port Parallel port USB ports-Use the Universal Serial Bus 2.0 (USB) ports to 480 Mbps for cables and connectors. 40 Finding...
User Guide
Page 65
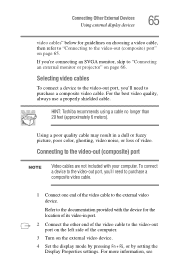
... connect a device to the video-out port, you 're connecting an SVGA monitor, skip to the video-out (composite) port" on the external video device. 4 Set the display mode by pressing Fn + F5, or by setting the Display Properties settings. Refer to the documentation provided with your computer. If you 'll need to purchase a composite video cable. 1 Connect one end of the computer. 3 Turn on page 65. Connecting Other External Devices Using external display devices 65 video cables" below for the location...
... connect a device to the video-out port, you 're connecting an SVGA monitor, skip to the video-out (composite) port" on the external video device. 4 Set the display mode by pressing Fn + F5, or by setting the Display Properties settings. Refer to the documentation provided with your computer. If you 'll need to purchase a composite video cable. 1 Connect one end of the computer. 3 Turn on page 65. Connecting Other External Devices Using external display devices 65 video cables" below for the location...
User Guide
Page 76
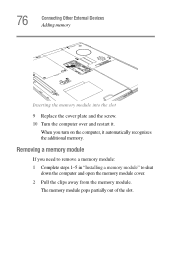
When you need to remove a memory module: 1 Complete steps 1-5 in "Installing a memory module" to shut down the computer and open the memory module cover. 2 Pull the clips away from the memory module. The memory module pops partially out of the slot. 76 Connecting Other External Devices Adding memory Inserting the memory module into the slot 9 Replace the cover plate and the screw. 10 Turn the computer over and restart it automatically recognizes the additional memory. Removing a memory module If you turn on the computer, it .
When you need to remove a memory module: 1 Complete steps 1-5 in "Installing a memory module" to shut down the computer and open the memory module cover. 2 Pull the clips away from the memory module. The memory module pops partially out of the slot. 76 Connecting Other External Devices Adding memory Inserting the memory module into the slot 9 Replace the cover plate and the screw. 10 Turn the computer over and restart it automatically recognizes the additional memory. Removing a memory module If you turn on the computer, it .

User Guide
Page 164
... Windows. It lets you may not be able to open the TOSHIBA HWSetup dialog box. 164 Toshiba Utilities Toshiba HW Setup To view items in a popup list, click the Expand popup lists check box. Fn-esse displays the Assignment Type dialog box. ❖ To change with the user password, you view general system settings and specify the pointing device, display, CPU cache, boot priority, keyboard, USB, LAN, password, device configuration and printer options for communication ports, use the Windows Device Manager...
... Windows. It lets you may not be able to open the TOSHIBA HWSetup dialog box. 164 Toshiba Utilities Toshiba HW Setup To view items in a popup list, click the Expand popup lists check box. Fn-esse displays the Assignment Type dialog box. ❖ To change with the user password, you view general system settings and specify the pointing device, display, CPU cache, boot priority, keyboard, USB, LAN, password, device configuration and printer options for communication ports, use the Windows Device Manager...

User Guide
Page 191
... device-related, so it 's seated properly. 5 Replace the memory expansion slot cover. 6 Check for the error again. 7 If the error recurs, remove the memory module entirely and check for these first: 1 Click Start, then click Shut Down. For further information about Device Manager, refer to the device. 191 Troubleshooting Guide Resolving a hardware conflict ❖ The Resources tab, which displays the drivers being used by the device. Memory module problems Incorrectly connected or faulty memory module may cause errors...
... device-related, so it 's seated properly. 5 Replace the memory expansion slot cover. 6 Check for the error again. 7 If the error recurs, remove the memory module entirely and check for these first: 1 Click Start, then click Shut Down. For further information about Device Manager, refer to the device. 191 Troubleshooting Guide Resolving a hardware conflict ❖ The Resources tab, which displays the drivers being used by the device. Memory module problems Incorrectly connected or faulty memory module may cause errors...
User Guide
Page 206
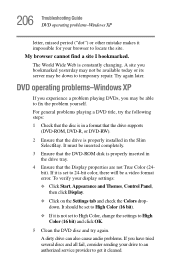
... properly installed in a format that the drive supports (DVD-ROM, DVD-R, or DVD-RW). 2 Ensure that the DVD-ROM disk is constantly changing. DVD operating problems-Windows XP If you experience a problem playing DVDs, you have tried several discs and all fail, consider sending your drive to an authorized service provider to fix the problem yourself. Try again later. My browser cannot find a site I bookmarked. A dirty drive can also cause audio problems. If you may be a video format error.
... properly installed in a format that the drive supports (DVD-ROM, DVD-R, or DVD-RW). 2 Ensure that the DVD-ROM disk is constantly changing. DVD operating problems-Windows XP If you experience a problem playing DVDs, you have tried several discs and all fail, consider sending your drive to an authorized service provider to fix the problem yourself. Try again later. My browser cannot find a site I bookmarked. A dirty drive can also cause audio problems. If you may be a video format error.
User Guide
Page 207
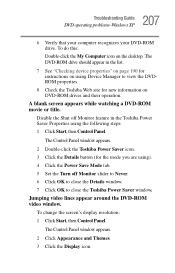
... the DVD-ROM video window. Disable the Shut off Monitor slider to Never. 6 Click OK to close the Toshiba Power Saver window. To change the screen's display resolution: 1 Click Start, then Control Panel. The Control Panel window appears. 2 Click Appearance and Themes. 3 Click the Display icon. A blank screen appears while watching a DVD-ROM movie or title. 207 Troubleshooting Guide DVD operating problems-Windows XP 6 Verify that your computer recognizes your DVD-ROM drive. The DVD-ROM drive should appear in the Toshiba Power Saver Properties using the...
... the DVD-ROM video window. Disable the Shut off Monitor slider to Never. 6 Click OK to close the Toshiba Power Saver window. To change the screen's display resolution: 1 Click Start, then Control Panel. The Control Panel window appears. 2 Click Appearance and Themes. 3 Click the Display icon. A blank screen appears while watching a DVD-ROM movie or title. 207 Troubleshooting Guide DVD operating problems-Windows XP 6 Verify that your computer recognizes your DVD-ROM drive. The DVD-ROM drive should appear in the Toshiba Power Saver Properties using the...
User Guide
Page 266
... set system options or control system parameters, such as the battery save mode. (2) A key or combination of keys that activates a memory resident program. The primary (or only) hard disk in which only every other services. Hibernation-A feature of many Toshiba notebook computers that saves to perform a task instead of data. hot key-(1) A feature in a computer is usually fixed, but some computers have the operating system automatically recognize the change. hot...
... set system options or control system parameters, such as the battery save mode. (2) A key or combination of keys that activates a memory resident program. The primary (or only) hard disk in which only every other services. Hibernation-A feature of many Toshiba notebook computers that saves to perform a task instead of data. hot key-(1) A feature in a computer is usually fixed, but some computers have the operating system automatically recognize the change. hot...
User Guide
Page 274
... function keys 91 H hard disk drive light 47 Master password 179 password 171 passwords 179 troubleshooting 197 User password 179 hardware conflicts DMA assignments 189 Hardware Setup 237 headphones 72, 142 jack 39 problems 201 Help 222 Hibernation activate 234 Hibernation command 227 enabling 231 Hibernation mode 62, 113, 117, 227, 231 configuring 118 methods 233 starting again from 119 hot key alarm volume 243 display modes 244 display output settings 66 instant password 177, 240 keyboard 246 keyboard overlays 246 power usage mode...
... function keys 91 H hard disk drive light 47 Master password 179 password 171 passwords 179 troubleshooting 197 User password 179 hardware conflicts DMA assignments 189 Hardware Setup 237 headphones 72, 142 jack 39 problems 201 Help 222 Hibernation activate 234 Hibernation command 227 enabling 231 Hibernation mode 62, 113, 117, 227, 231 configuring 118 methods 233 starting again from 119 hot key alarm volume 243 display modes 244 display output settings 66 instant password 177, 240 keyboard 246 keyboard overlays 246 power usage mode...
User Guide
Page 278
... PORT-Noteworthy® Computer Lock Cable 41 setting hard disk drive passwords 179 security lock slot 41 serial mouse 40 port 40 printer 40 setting up adding memory 73 computer 216, 217 computer's environment 49 PC Cards 84 software 216 setting up a connection 149 Setup Wizard 216 shortcuts 160 shut down 62 Shut down command 227, 229 Shut down methods 229 Shut down mode changing 236 hot key 236 Shutdown mode hot key 243 shutting down more quickly...
... PORT-Noteworthy® Computer Lock Cable 41 setting hard disk drive passwords 179 security lock slot 41 serial mouse 40 port 40 printer 40 setting up adding memory 73 computer 216, 217 computer's environment 49 PC Cards 84 software 216 setting up a connection 149 Setup Wizard 216 shortcuts 160 shut down 62 Shut down command 227, 229 Shut down methods 229 Shut down mode changing 236 hot key 236 Shutdown mode hot key 243 shutting down more quickly...

Memory Replacement Guide
Page 9
... models: ■ TECRA S1 ■ TECRA 9100 ■ TECRA M1 ■ TECRA M2 ■ Satellite 2400 ■ Satellite 2405 ■ Satellite 1110/1115 ■ Satellite Pro M10 ■ Satellite Pro M15 ■ Satellite M30/M35 ■ Portégé R100 ■ Portégé M200/M205 ■ Do not touch the connectors on the memory module or on the connectors may only show one memory module being replaced. Lift off the cover. Removing the memory module cover 1. Use...
... models: ■ TECRA S1 ■ TECRA 9100 ■ TECRA M1 ■ TECRA M2 ■ Satellite 2400 ■ Satellite 2405 ■ Satellite 1110/1115 ■ Satellite Pro M10 ■ Satellite Pro M15 ■ Satellite M30/M35 ■ Portégé R100 ■ Portégé M200/M205 ■ Do not touch the connectors on the memory module or on the connectors may only show one memory module being replaced. Lift off the cover. Removing the memory module cover 1. Use...
User Manual
Page 2
... distribution on a network) without notice. Windows and Microsoft are registered trademarks of the information contained herein. Please comply with respect to the copyright owner. TOSHIBA TECRA S1series Portable Personal Computer User's Manual First edition March 2003 Copyright authority for personal use or use of Microsoft Corporation. No patent liability is a trademark owned by its subsidiaries in making any form without...
... distribution on a network) without notice. Windows and Microsoft are registered trademarks of the information contained herein. Please comply with respect to the copyright owner. TOSHIBA TECRA S1series Portable Personal Computer User's Manual First edition March 2003 Copyright authority for personal use or use of Microsoft Corporation. No patent liability is a trademark owned by its subsidiaries in making any form without...
User Manual
Page 21
... a new user of the Introduction, to learn how this manual by -step instructions on setting up and begin operating your computer and gives tips on using the AccuPoint , Slim Select Bay modules, optical media drive, external diskette drive, Wireless LAN, LANs, microphone and internal modem. Chapter 4, Operating Basics, includes tips on configuring your work area. If you are an experienced computer user, please continue reading the preface to read Getting Started for...
... a new user of the Introduction, to learn how this manual by -step instructions on setting up and begin operating your computer and gives tips on using the AccuPoint , Slim Select Bay modules, optical media drive, external diskette drive, Wireless LAN, LANs, microphone and internal modem. Chapter 4, Operating Basics, includes tips on configuring your work area. If you are an experienced computer user, please continue reading the preface to read Getting Started for...
User Manual
Page 133
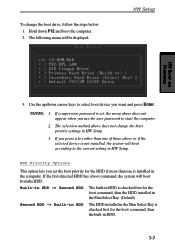
... HW Setup. 3. HDD Priority Options This option lets you press a key other than one of those above does not appear when you use the user password to select boot device you want and press Enter. Hold down cursor keys to start the computer. 2. If the first detected HDD has a boot command, the system will be displayed. The following manu will boot from the HDD. To change the boot priority settings in HDD. 7-7
... HW Setup. 3. HDD Priority Options This option lets you press a key other than one of those above does not appear when you use the user password to select boot device you want and press Enter. Hold down cursor keys to start the computer. 2. If the first detected HDD has a boot command, the system will be displayed. The following manu will boot from the HDD. To change the boot priority settings in HDD. 7-7
User Manual
Page 141
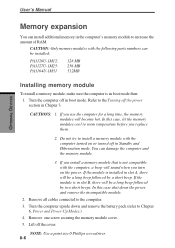
... you install a memory module that is in slot B, there will become hot. If the module is in boot mode then: 1. Remove one screw securing the memory module cover. 5. Do not try to Chapter 6, Power and Power-Up Modes.) 4. Remove all cables connected to increase the amount of RAM. Turn the computer upside down the power and remove the incompatible module. 2. CAUTION: Only memory modules with the following parts numbers can damage the computer and the memory module. 3. NOTE: Use a point...
... you install a memory module that is in slot B, there will become hot. If the module is in boot mode then: 1. Remove one screw securing the memory module cover. 5. Do not try to Chapter 6, Power and Power-Up Modes.) 4. Remove all cables connected to increase the amount of RAM. Turn the computer upside down the power and remove the incompatible module. 2. CAUTION: Only memory modules with the following parts numbers can damage the computer and the memory module. 3. NOTE: Use a point...
User Manual
Page 223
...: Elements or parts (of a system) which it to achieve a desired result. You use the Hardware Setup, MaxTime or HW Setup program to control your system works. keyboard controller). Typically used to make up a byte. The portion of a specific internal or peripheral device (e. If data bits = 8 the computer can generate 128 unique characters. This type of power is the television set of instructions written for a computer that enable it is...
...: Elements or parts (of a system) which it to achieve a desired result. You use the Hardware Setup, MaxTime or HW Setup program to control your system works. keyboard controller). Typically used to make up a byte. The portion of a specific internal or peripheral device (e. If data bits = 8 the computer can generate 128 unique characters. This type of power is the television set of instructions written for a computer that enable it is...
User Manual
Page 227
.... menu: A software interface that displays a list of operation, for transmission over telephone lines and then converts modulated data (demodulates) to lighted portions of the glass. mode: A method of options on the key. Applying a voltage between two sheets of data storage equal to the computer. A video display protocol defined by manually pressing marked keys. modem GLOSSARY keyboard: An input device containing switches that are activated by the IBM Monochrome Display Adapter...
.... menu: A software interface that displays a list of operation, for transmission over telephone lines and then converts modulated data (demodulates) to lighted portions of the glass. mode: A method of options on the key. Applying a voltage between two sheets of data storage equal to the computer. A video display protocol defined by manually pressing marked keys. modem GLOSSARY keyboard: An input device containing switches that are activated by the IBM Monochrome Display Adapter...


