
Maintenance Manual
Page 3
... hazards. Improper repair of a hazard that relates to strictly. If you replace the battery pack or RTC battery, be sure to fasten screws securely with the right screwdriver. Tecra A3/S2 Maintenance Manual iii "Caution" indicates the existence of the computer may result in bodily injury if the safety instruction is not observed. If a screw is not observed. Installation of a short...
... hazards. Improper repair of a hazard that relates to strictly. If you replace the battery pack or RTC battery, be sure to fasten screws securely with the right screwdriver. Tecra A3/S2 Maintenance Manual iii "Caution" indicates the existence of the computer may result in bodily injury if the safety instruction is not observed. If a screw is not observed. Installation of a short...
Maintenance Manual
Page 15
1 Hardware Overview 1.2 System Unit ‰ BIOS • 1MB Flash ROM for Wireless LAN Communication. 1-6 Tecra A3/S2 Series Maintenance Manual b) Password protection (System). d) Refreshable e) ACPI compliant BIOS ‰ Power • 12-cell Li-Ion smart battery pack with 10.8V*8600mAh capacity or 6-cell Li-Ion smart battery pack with 10.8V*4300mAh capacity (depending on the models). • Approximately 12 hours or longer charge time to 100% battery capacity...
1 Hardware Overview 1.2 System Unit ‰ BIOS • 1MB Flash ROM for Wireless LAN Communication. 1-6 Tecra A3/S2 Series Maintenance Manual b) Password protection (System). d) Refreshable e) ACPI compliant BIOS ‰ Power • 12-cell Li-Ion smart battery pack with 10.8V*8600mAh capacity or 6-cell Li-Ion smart battery pack with 10.8V*4300mAh capacity (depending on the models). • Approximately 12 hours or longer charge time to 100% battery capacity...
Maintenance Manual
Page 22
..., 44, 66, 100, 133 and 150MB/s • Serial ATA power save modes • Serial ATA hot-plug • Enhanced receiving FIFO flow control for Serial ATA link • DMA Command Queuing(maximum 32 entries • Supports 20, 25, 30, or 40MHz reference clock. • Serial ATA Interface of 1.5Gbps • Full scan for high production test coverage Tecra A3/S2 Series Maintenance Manual 1-13
..., 44, 66, 100, 133 and 150MB/s • Serial ATA power save modes • Serial ATA hot-plug • Enhanced receiving FIFO flow control for Serial ATA link • DMA Command Queuing(maximum 32 entries • Supports 20, 25, 30, or 40MHz reference clock. • Serial ATA Interface of 1.5Gbps • Full scan for high production test coverage Tecra A3/S2 Series Maintenance Manual 1-13
Maintenance Manual
Page 48
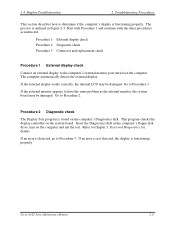
... an error is functioning properly. Start with Procedure 1 and continue with the other procedures as the internal monitor, the system board may be damaged. If an error is not detected, the display is stored on the computer's Diagnostics disk. Refer to Procedure 2. Tecra A3/S2 Series Maintenance Manual 2-13 The computer automatically detects the external display. Insert the Diagnostics disk in Figure 2-3. If the external display works correctly, the internal LCD may...
... an error is functioning properly. Start with Procedure 1 and continue with the other procedures as the internal monitor, the system board may be damaged. If an error is not detected, the display is stored on the computer's Diagnostics disk. Refer to Procedure 2. Tecra A3/S2 Series Maintenance Manual 2-13 The computer automatically detects the external display. Insert the Diagnostics disk in Figure 2-3. If the external display works correctly, the internal LCD may...

Maintenance Manual
Page 53
... the USB device still does not work, go to have the same problem as instructed. If the alternative USB device appears to Check 2. The computer automatically detects the external device. Perform Check 1. If the alternative USB device works correctly, the original device may be damaged and should be faulty. 2 Troubleshooting Procedures 2.6 External USB Devices Troubleshooting To determine if the computer's external USB devices are three in Chapter 4. 2-18 Tecra A3/S2 Series Maintenance Manual Start with a new one...
... the USB device still does not work, go to have the same problem as instructed. If the alternative USB device appears to Check 2. The computer automatically detects the external device. Perform Check 1. If the alternative USB device works correctly, the original device may be damaged and should be faulty. 2 Troubleshooting Procedures 2.6 External USB Devices Troubleshooting To determine if the computer's external USB devices are three in Chapter 4. 2-18 Tecra A3/S2 Series Maintenance Manual Start with a new one...
Maintenance Manual
Page 66
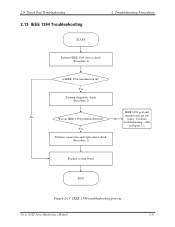
Yes Perform diagnostic check (Procedure 2) IEEE 1394 port and No Was an IEEE 1394 problem detected? refer to Figure 2.1 Yes Perform connection and replacement check (Procedure 3) Replace system board END Figure 2-13 IEEE 1394 troubleshooting process Tecra A3/S2 Series Maintenance Manual 2-31 transmission are not No faulty. Continue troubleshooting - 2.9 Touch Pad Troubleshooting 2.13 IEEE 1394 Troubleshooting START 2 Troubleshooting Procedures Perform IEEE 1394 device check (Procedure 1) Is IEEE 1394 transmission ok?
Yes Perform diagnostic check (Procedure 2) IEEE 1394 port and No Was an IEEE 1394 problem detected? refer to Figure 2.1 Yes Perform connection and replacement check (Procedure 3) Replace system board END Figure 2-13 IEEE 1394 troubleshooting process Tecra A3/S2 Series Maintenance Manual 2-31 transmission are not No faulty. Continue troubleshooting - 2.9 Touch Pad Troubleshooting 2.13 IEEE 1394 Troubleshooting START 2 Troubleshooting Procedures Perform IEEE 1394 device check (Procedure 1) Is IEEE 1394 transmission ok?

Maintenance Manual
Page 77
... T&D program installed in the CD/DVD-ROM drive. CONFIG CHECK TEST B. PIO LOOPBACK TEST D. LAN TEST F. KEYBOARD TEST L. MOUSE (PAD) TEST M. 3. NOTE: To execute the CD test, make sure the CD is as reference at the end of test item, or run the DIAGNOSTICS PROGRAM. DMI CHECK TEST C. SPEAKER AUDIO TEST G. FDD TEST J. HDD R/W TEST P. D1 STEPPING TEST 3-2 Tecra A3/S2 Series Maintenance Manual Tests and...
... T&D program installed in the CD/DVD-ROM drive. CONFIG CHECK TEST B. PIO LOOPBACK TEST D. LAN TEST F. KEYBOARD TEST L. MOUSE (PAD) TEST M. 3. NOTE: To execute the CD test, make sure the CD is as reference at the end of test item, or run the DIAGNOSTICS PROGRAM. DMI CHECK TEST C. SPEAKER AUDIO TEST G. FDD TEST J. HDD R/W TEST P. D1 STEPPING TEST 3-2 Tecra A3/S2 Series Maintenance Manual Tests and...
User Manual
Page 2
... validated and reviewed for damages incurred directly or indirectly from errors, omissions or discrepancies between the computer and the manual. TOSHIBA assumes no liability for accuracy. TOSHIBA TECRA A3/S2 Series Portable Personal Computer User's Manual First edition Jan. 2005 Ownership and copyright of Eastman Kodak. Please remember to observe the copyright laws when you use the screen mode switching functions (e.g.Wide mode, Wide Zoom mode, etc...
... validated and reviewed for damages incurred directly or indirectly from errors, omissions or discrepancies between the computer and the manual. TOSHIBA assumes no liability for accuracy. TOSHIBA TECRA A3/S2 Series Portable Personal Computer User's Manual First edition Jan. 2005 Ownership and copyright of Eastman Kodak. Please remember to observe the copyright laws when you use the screen mode switching functions (e.g.Wide mode, Wide Zoom mode, etc...

User Manual
Page 45
... Password Two levels of password security are available: supervisor and user. Panel Power Off/On In AC mode, this feature turns power to the computer off power to your computer. TECRA A3/S2 1-10 Power-on when the panel is not accessed for a time specified. Battery Save Mode This feature lets you quickly modify the system configuration directly from a pointing device. You can specify the setting in the TOSHIBA Power Saver utility. Hard Disk Drive Automatic Power...
... Password Two levels of password security are available: supervisor and user. Panel Power Off/On In AC mode, this feature turns power to the computer off power to your computer. TECRA A3/S2 1-10 Power-on when the panel is not accessed for a time specified. Battery Save Mode This feature lets you quickly modify the system configuration directly from a pointing device. You can specify the setting in the TOSHIBA Power Saver utility. Hard Disk Drive Automatic Power...
User Manual
Page 47
... changed and be displayed as an icon. ConfigFree ConfigFree is Category View. TECRA A3/S2 Features Utilities This section describes preinstalled utilities and tells how to find communication problems and create profiles for TOSHIBA You can create CD/DVDs in the pull down menu list. DVD Player The DVD Video Player is TOSHIBA Assist. ■ TOSHIBA Presentation button There are some items in the Windows environment enables or disables the TouchPad function. TECRA A3/S2 1-12 TOSHIBA Power...
... changed and be displayed as an icon. ConfigFree ConfigFree is Category View. TECRA A3/S2 Features Utilities This section describes preinstalled utilities and tells how to find communication problems and create profiles for TOSHIBA You can create CD/DVDs in the pull down menu list. DVD Player The DVD Video Player is TOSHIBA Assist. ■ TOSHIBA Presentation button There are some items in the Windows environment enables or disables the TouchPad function. TECRA A3/S2 1-12 TOSHIBA Power...
User Manual
Page 51
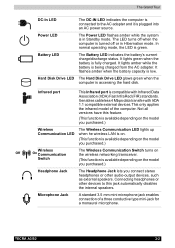
... conductive type mini-jack for a monaural microphone. It lights amber while the battery is low. It flashes amber when the battery capacity is being charged from the AC adapter. Hard Disk Drive LED The Hard Disk Drive LED glows green when the computer is turned off when the computer is accessing the hard disk. Connecting headphones or other audio-output devices, such as external speakers. The LED turns off or in Standby mode. Switch (This function is fully charged. It lights green...
... conductive type mini-jack for a monaural microphone. It lights amber while the battery is low. It flashes amber when the battery capacity is being charged from the AC adapter. Hard Disk Drive LED The Hard Disk Drive LED glows green when the computer is turned off when the computer is accessing the hard disk. Connecting headphones or other audio-output devices, such as external speakers. The LED turns off or in Standby mode. Switch (This function is fully charged. It lights green...

User Manual
Page 73
... to your previous working environment immediately when you can use the panel power off . Hibernation mode The hibernation feature saves the contents of memory to the hard disk drive. Benefits of peripheral devices. 1. Turn off . Click start and click Turn Off Computer. Wait a moment to go out. 2. While entering Hibernation mode, the computer saves the contents of memory to the hard disk when the computer is restored. TECRA A3/S2 3-8 The...
... to your previous working environment immediately when you can use the panel power off . Hibernation mode The hibernation feature saves the contents of memory to the hard disk drive. Benefits of peripheral devices. 1. Turn off . Click start and click Turn Off Computer. Wait a moment to go out. 2. While entering Hibernation mode, the computer saves the contents of memory to the hard disk when the computer is restored. TECRA A3/S2 3-8 The...

User Manual
Page 79
... reinstall the Windows operating system, the hard disk will be reformatted and all preinstalled software, follow the steps below. When In Touch with Tomorrow TOSHIBA appears, release the F12 key. 3. For details, refer to restore them. A menu appears. Press the "1" key on -screen instructions. TECRA A3/S2 3-14 Press the "3" key to restore drive C:. Press the "2" key to keep your created Recovery Media to the Boot Priority section in the display menu. To restore the operating system...
... reinstall the Windows operating system, the hard disk will be reformatted and all preinstalled software, follow the steps below. When In Touch with Tomorrow TOSHIBA appears, release the F12 key. 3. For details, refer to restore them. A menu appears. Press the "1" key on -screen instructions. TECRA A3/S2 3-14 Press the "3" key to restore drive C:. Press the "2" key to keep your created Recovery Media to the Boot Priority section in the display menu. To restore the operating system...

User Manual
Page 87
...-T). TECRA A3/S2 4-8 Connecting LAN cable The computer must be sure to a LAN. Turn off the power to the computer and to all external devices connected to a LAN. Plug the other end of the cable into a LAN hub connector. Operating Basics LAN The computer is equipped with your LAN administrator regarding set-up on LAN is enabled. Wake-up procedures. Do not install or remove an optional memory module while Wake-up on LAN does not work...
...-T). TECRA A3/S2 4-8 Connecting LAN cable The computer must be sure to a LAN. Turn off the power to the computer and to all external devices connected to a LAN. Plug the other end of the cable into a LAN hub connector. Operating Basics LAN The computer is equipped with your LAN administrator regarding set-up on LAN is enabled. Wake-up procedures. Do not install or remove an optional memory module while Wake-up on LAN does not work...

User Manual
Page 96
... PC. ■ Install, remove or connect external drives, including the following: PC card, USB devices, external display, i.LINK devices, optical digital devices. ■ Open the optical media drive. ■ Remove the optical media drive from the Slim Select Bay (TECRA S2 series only). ■ If the media is a write error. ■ Do not perform any of the media and the way it to finish, then disable virus detection programs including any software that checks files...
... PC. ■ Install, remove or connect external drives, including the following: PC card, USB devices, external display, i.LINK devices, optical digital devices. ■ Open the optical media drive. ■ Remove the optical media drive from the Slim Select Bay (TECRA S2 series only). ■ If the media is a write error. ■ Do not perform any of the media and the way it to finish, then disable virus detection programs including any software that checks files...
User Manual
Page 104
... Data Options. 4. TECRA A3/S2 4-25 If DLA Format menu may occur. Video You can run Setup. Click the Options button ( ) on the RecordNow! In this case, plase copy them to format this disc, an error may appear when inserting a DVD-RAM disc into a disc formatted by clicking the Start button on the taskbar to display the Start menu and then selecting "All Programs", "DVD-RAM", "DVD-RAM Driver" and "DVDForm" sequentially. ■ Do not use any discs that...
... Data Options. 4. TECRA A3/S2 4-25 If DLA Format menu may occur. Video You can run Setup. Click the Options button ( ) on the RecordNow! In this case, plase copy them to format this disc, an error may appear when inserting a DVD-RAM disc into a disc formatted by clicking the Start button on the taskbar to display the Start menu and then selecting "All Programs", "DVD-RAM", "DVD-RAM Driver" and "DVDForm" sequentially. ■ Do not use any discs that...

User Manual
Page 113
... white numbers become numeric keypad keys (Fn + F11) or cursor control keys (Fn + F10). Some software may require you are key combinations that the keyboard does not have special computer functions. Soft-key settings are called function keys because they execute programmed functions when pressed. The power on the computer. F1 through F12 are not restored by individual keys depends on the software you to use keys that enable, disable or configure specific...
... white numbers become numeric keypad keys (Fn + F11) or cursor control keys (Fn + F10). Some software may require you are key combinations that the keyboard does not have special computer functions. Soft-key settings are called function keys because they execute programmed functions when pressed. The power on the computer. F1 through F12 are not restored by individual keys depends on the software you to use keys that enable, disable or configure specific...

User Manual
Page 132
... port type to make settings for simultaneous display. Power On Display Lets you use , CPU operation is displayed in use the display to be used when the computer is booted (This setting is enabled. LCD + Analog RGB Selects both the internal LCD and external monitor for the Parallel port. Use the Windows Device Manager to Extended Capabilities Port (ECP). CPU This function lets you customize your computer's display settings for either the internal LCD screen or for power on Windows Desktop). Display This tab lets you set or reset the user password...
... port type to make settings for simultaneous display. Power On Display Lets you use , CPU operation is displayed in use the display to be used when the computer is booted (This setting is enabled. LCD + Analog RGB Selects both the internal LCD and external monitor for the Parallel port. Use the Windows Device Manager to Extended Capabilities Port (ECP). CPU This function lets you customize your computer's display settings for either the internal LCD screen or for power on Windows Desktop). Display This tab lets you set or reset the user password...

User Manual
Page 140
... lay media close to boot mode and turn off the power. In this case, shut down using a memory card, return it get dirty. Set the computer to containers of liquid. 7. b. TECRA A3/S2 8-6 Do not try to upgrade system memory, you should only use the computer for a list of RAM. Do not twist or bend memory cards. 6. TECRA A3/S2 series: There will issue a warning. CAUTION: If you want to install a memory module under...
... lay media close to boot mode and turn off the power. In this case, shut down using a memory card, return it get dirty. Set the computer to containers of liquid. 7. b. TECRA A3/S2 8-6 Do not try to upgrade system memory, you should only use the computer for a list of RAM. Do not twist or bend memory cards. 6. TECRA A3/S2 series: There will issue a warning. CAUTION: If you want to install a memory module under...

User Manual
Page 142
... turned on . Seat the cover and secure it off and all cables are disconnected from the computer. Replace the battery pack as described in boot mode then: 1. Removing memory module If you replace them. Turn the computer upside down using the Stand by the CD Power switch. 2. Be sure the power is recognized. The computer is in Chapter 6, Power System. 10. c. 12 Optional Devices 2 1 Installing a module 8. To remove the memory module, make sure the added memory...
... turned on . Seat the cover and secure it off and all cables are disconnected from the computer. Replace the battery pack as described in boot mode then: 1. Removing memory module If you replace them. Turn the computer upside down using the Stand by the CD Power switch. 2. Be sure the power is recognized. The computer is in Chapter 6, Power System. 10. c. 12 Optional Devices 2 1 Installing a module 8. To remove the memory module, make sure the added memory...


