Quick Installation Guide
Page 4
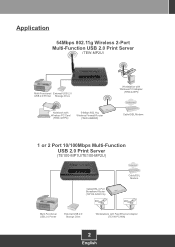
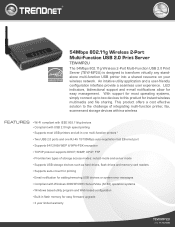
... 54Mbps 802.11g Wireless 2-Port Multi-Function USB 2.0 Print Server (TEW-MP2U) Multi-Functional External USB 2.0 USB 2.0 Printer Storage Drive Notebook with Wireless PC Card (TEW-421PC) 54Mbps 802.11g Wireless Firewall Router (TEW-432BRP) Workstation with Wireless PCI Adapter (TEW-423PI) Internet Cable/DSL Modem 1 or 2 Port 10/100Mbps Multi-Function USB 2.0 Print Server (TE100-MP1U/TE100-MP2U) Internet Cable/DSL Modem Cable/DSL 4-Port Broadband Router (TW100-S4W1CA) Multi-Functional USB 2.0 Printer External USB 2.0 Storage Drive Workstations with Fast Ethernet Adapter (TE100-PCIWN...
... 54Mbps 802.11g Wireless 2-Port Multi-Function USB 2.0 Print Server (TEW-MP2U) Multi-Functional External USB 2.0 USB 2.0 Printer Storage Drive Notebook with Wireless PC Card (TEW-421PC) 54Mbps 802.11g Wireless Firewall Router (TEW-432BRP) Workstation with Wireless PCI Adapter (TEW-423PI) Internet Cable/DSL Modem 1 or 2 Port 10/100Mbps Multi-Function USB 2.0 Print Server (TE100-MP1U/TE100-MP2U) Internet Cable/DSL Modem Cable/DSL 4-Port Broadband Router (TW100-S4W1CA) Multi-Functional USB 2.0 Printer External USB 2.0 Storage Drive Workstations with Fast Ethernet Adapter (TE100-PCIWN...
Quick Installation Guide
Page 5
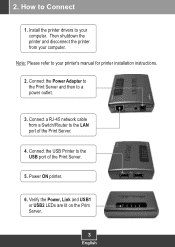
Connect a RJ-45 network cable from your computer. Connect the USB Printer to a power outlet. 3. Then shutdown the printer and disconnect the printer from a Switch/Router to your computer. Note: Please refer to the LAN port of the Print Server. 5. Connect the Power Adapter to the Print Server and then to the USB port of the Print Server. 4. Power ON printer. 6. 2. Install the printer drivers to Connect 1. How to your printer's manual for printer installation instructions. 2. Verify the Power, Link and USB1 or USB2 LEDs are lit on the Print Server. 3 English
Connect a RJ-45 network cable from your computer. Connect the USB Printer to a power outlet. 3. Then shutdown the printer and disconnect the printer from a Switch/Router to your computer. Note: Please refer to the LAN port of the Print Server. 5. Connect the Power Adapter to the Print Server and then to the USB port of the Print Server. 4. Power ON printer. 6. 2. Install the printer drivers to Connect 1. How to your printer's manual for printer installation instructions. 2. Verify the Power, Link and USB1 or USB2 LEDs are lit on the Print Server. 3 English

Quick Installation Guide
Page 16
... Print Server in a different sequence of steps, the setup will be connected to close the program. What should I do ? Third, plug the printer/storage device into the other computer is securely connected to Control Panel -> Printers. Make sure the RJ-45 network cable is using the printer or scanner. First, verify that no other USB port (TE100-MP2U and TEW-MP2U only). Virtual Port for installing the print server in firewall. Troubleshooting Q1. The USB MFP Server Control...
... Print Server in a different sequence of steps, the setup will be connected to close the program. What should I do ? Third, plug the printer/storage device into the other computer is securely connected to Control Panel -> Printers. Make sure the RJ-45 network cable is using the printer or scanner. First, verify that no other USB port (TE100-MP2U and TEW-MP2U only). Virtual Port for installing the print server in firewall. Troubleshooting Q1. The USB MFP Server Control...
Quick Installation Guide
Page 17
... LED on the Utility CDROM or contact TRENDnet's Technical Support Department. 15 Second, after configuring your storage device. A7. What should I configured my print server to the User's Guide included on the Print Server is the difference between Auto Connect Network & Manual Connect modes? Is there a way to force a computer to the Print Server, disconnect the Ethernet cable from a DHCP server, and now I successfully configured the TEW-MP2U to grab ownership of the printer. If user A chooses auto connect (printing or scanning), other users...
... LED on the Utility CDROM or contact TRENDnet's Technical Support Department. 15 Second, after configuring your storage device. A7. What should I configured my print server to the User's Guide included on the Print Server is the difference between Auto Connect Network & Manual Connect modes? Is there a way to force a computer to the Print Server, disconnect the Ethernet cable from a DHCP server, and now I successfully configured the TEW-MP2U to grab ownership of the printer. If user A chooses auto connect (printing or scanning), other users...
Datasheet
Page 1
... access modes: netusb mode and server mode • Supports USB storage devices such as hard drives, flash drives and memory card readers • Supports auto-cnnect for printing • Email notification for adding/removing USB devices or system error messages • Compliant with Windows 2000/XP/2003 Server/Vista (32-Bit) operation systems • Windows based utility program and Web based configuration • Built-in -one multi-function printers * • Two USB 2.0 ports and one RJ-45 10/100Mbps auto-negotiation fast Ethernet port • Supports...
... access modes: netusb mode and server mode • Supports USB storage devices such as hard drives, flash drives and memory card readers • Supports auto-cnnect for printing • Email notification for adding/removing USB devices or system error messages • Compliant with Windows 2000/XP/2003 Server/Vista (32-Bit) operation systems • Windows based utility program and Web based configuration • Built-in -one multi-function printers * • Two USB 2.0 ports and one RJ-45 10/100Mbps auto-negotiation fast Ethernet port • Supports...
Datasheet
Page 2
...(read /write) • Server mode (FTP/SMB server): multi-user access. Other Brands and product names are trademarks of their respective holders. Copyright © TRENDnet. 54Mbps 802.11g Wireless 2-Port Multi-Function USB 2.0 Print Server TEW-MP2U SPECIFICATIONS Hardware Standard Printer Interface LAN Port CPU/ SDRAM / Flash ROM USB Storage Diagnostic LEDs TCP/IP Protocol Supported Transport Protocol Supported OS Management Power Power Consumption Weights Product Dimensions (W x H x D) Temperature Humidity Certification Wireless Frequency Encryption Antenna Data Rate • Wired: IEEE...
...(read /write) • Server mode (FTP/SMB server): multi-user access. Other Brands and product names are trademarks of their respective holders. Copyright © TRENDnet. 54Mbps 802.11g Wireless 2-Port Multi-Function USB 2.0 Print Server TEW-MP2U SPECIFICATIONS Hardware Standard Printer Interface LAN Port CPU/ SDRAM / Flash ROM USB Storage Diagnostic LEDs TCP/IP Protocol Supported Transport Protocol Supported OS Management Power Power Consumption Weights Product Dimensions (W x H x D) Temperature Humidity Certification Wireless Frequency Encryption Antenna Data Rate • Wired: IEEE...
User's Guide
Page 2
... USB Device ...21 Printer Names...21 Storage Names ...21 CHAPTER4 PRINT SERVER IN WINDOWS 22 4.1 Overview of Installation Methods 22 4.2 Connecting the Server...22 4.2.1 The Server and Windows PC on Same LAN 23 4.2.2 The Server and Windows PC on Different LANs 23 4.3 Setting up Local Windows Printer Driver 23 4.4 Adding Network Printers in Windows 24 4.4.1 Using Standard Windows Methods for LPR Printing Protocol 24 4.4.2 Using the Control Center for LPR Printing 28 4.4.3 Using Standard Windows Method for Raw TCP Printing 29 4.4.4 Using the Control Center for Raw TCP/JetDirect...
... USB Device ...21 Printer Names...21 Storage Names ...21 CHAPTER4 PRINT SERVER IN WINDOWS 22 4.1 Overview of Installation Methods 22 4.2 Connecting the Server...22 4.2.1 The Server and Windows PC on Same LAN 23 4.2.2 The Server and Windows PC on Different LANs 23 4.3 Setting up Local Windows Printer Driver 23 4.4 Adding Network Printers in Windows 24 4.4.1 Using Standard Windows Methods for LPR Printing Protocol 24 4.4.2 Using the Control Center for LPR Printing 28 4.4.3 Using Standard Windows Method for Raw TCP Printing 29 4.4.4 Using the Control Center for Raw TCP/JetDirect...

User's Guide
Page 3
5.1 Configuring Host File...38 5.2 Printing by LPD/LPR ...38 5.3 Using the Server on BSD UNIX/Linux 38 5.4 Using the Server on RedHat Linux (Fedora Core 39 CHAPTER6 FILE SERVER ...46 6.1 6.2 6.3 6.4 6.5 6.5.1 6.5.2 6.5.3 6.5.4 Preliminary ...46 Storage Names ...46 Connecting USB Mass Storage to the Server 46 Supported Codepages ...47 Adding Your USB Mass Storages to Network with Security 49 Setting up File Server Using the Control Center 49 Setting up File Server Using Web Pages 51 Using Shared Storages by SMB/CIFS Method for Windows 52...
5.1 Configuring Host File...38 5.2 Printing by LPD/LPR ...38 5.3 Using the Server on BSD UNIX/Linux 38 5.4 Using the Server on RedHat Linux (Fedora Core 39 CHAPTER6 FILE SERVER ...46 6.1 6.2 6.3 6.4 6.5 6.5.1 6.5.2 6.5.3 6.5.4 Preliminary ...46 Storage Names ...46 Connecting USB Mass Storage to the Server 46 Supported Codepages ...47 Adding Your USB Mass Storages to Network with Security 49 Setting up File Server Using the Control Center 49 Setting up File Server Using Web Pages 51 Using Shared Storages by SMB/CIFS Method for Windows 52...
User's Guide
Page 5
... network environments. All 3 models have two USB ports. Except for the wireless configuration, most two USB devices can be connected to TE100-MP1U while at http://www.TRENDnet.com for TE100-MP1U and TEW-MP2U. The instructions described in this Server back to as detailed instructions on the settings in a new Server. This document is designed to connect your All-In-One/Multifunction Peripheral, Printers, USB Mass Storages (Hard Drives, Flash Drives, and Memory Card...
... network environments. All 3 models have two USB ports. Except for the wireless configuration, most two USB devices can be connected to TE100-MP1U while at http://www.TRENDnet.com for TE100-MP1U and TEW-MP2U. The instructions described in this Server back to as detailed instructions on the settings in a new Server. This document is designed to connect your All-In-One/Multifunction Peripheral, Printers, USB Mass Storages (Hard Drives, Flash Drives, and Memory Card...
User's Guide
Page 6
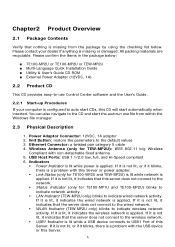
... from within the Windows file manager. 2.3 Physical Description 1. Please contact your computer is a problem with this Server or power adapter. ƒ Link Status (only for TEW-MP2U): IEEE 802.11 b/g Wireless Compliant with the USB device or this CD will start the autorun.exe file from the package by using the checking list below : „ TE100-MP2U or TE100-MP2U or TEW-MP2U „ Multi-Language Quick Installation Guide „ Utility & User's Guide CD-ROM „ External Power Adapter (12VDC, 1A) 2.2 Product...
... from within the Windows file manager. 2.3 Physical Description 1. Please contact your computer is a problem with this Server or power adapter. ƒ Link Status (only for TEW-MP2U): IEEE 802.11 b/g Wireless Compliant with the USB device or this CD will start the autorun.exe file from the package by using the checking list below : „ TE100-MP2U or TE100-MP2U or TEW-MP2U „ Multi-Language Quick Installation Guide „ Utility & User's Guide CD-ROM „ External Power Adapter (12VDC, 1A) 2.2 Product...
User's Guide
Page 7
... for all supported network environments. 7 These web pages or PC tools offer you a management tool suitable for LPR printing. It does not support NetUSB Printing. Functi on Print Server OS Windows Method Description Standard Windows Add Printer Wizard Control Center Tool Installation of LPR, Raw TCP (JetDirect), Local Port Using SMB, and IPP Installation of LPR, Raw TCP, Local Port Using SMB File Server Scan Server Apple MAC OS x Unix/Linux Windows Printer Setup Tool Edit /etc/printcap File RedHat Linux Printer System Manager None Apple MAC OS X Unix/Linux Windows XP...
... for all supported network environments. 7 These web pages or PC tools offer you a management tool suitable for LPR printing. It does not support NetUSB Printing. Functi on Print Server OS Windows Method Description Standard Windows Add Printer Wizard Control Center Tool Installation of LPR, Raw TCP (JetDirect), Local Port Using SMB, and IPP Installation of LPR, Raw TCP, Local Port Using SMB File Server Scan Server Apple MAC OS x Unix/Linux Windows Printer Setup Tool Edit /etc/printcap File RedHat Linux Printer System Manager None Apple MAC OS X Unix/Linux Windows XP...
User's Guide
Page 9
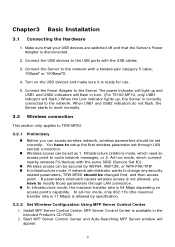
In infrastructure mode, if network administrator wants to modify those parameters through LAN (wired) connection. Install MFP Server Control Center. Turn on access point's capability. Wireless access can be set as 1. MFP Server Control Center is ready for use. 5. Connect the Power Adapter to the network. You have to change any security related parameters, TEW-MP2U should be secured by specification. 3.2.2 Set Wireless Configuration Using MFP Server Control Center 1. In infrastructure mode, the maximal transfer rate is not allowed, you can be changed first, and ...
In infrastructure mode, if network administrator wants to modify those parameters through LAN (wired) connection. Install MFP Server Control Center. Turn on access point's capability. Wireless access can be set as 1. MFP Server Control Center is ready for use. 5. Connect the Power Adapter to the network. You have to change any security related parameters, TEW-MP2U should be secured by specification. 3.2.2 Set Wireless Configuration Using MFP Server Control Center 1. In infrastructure mode, the maximal transfer rate is not allowed, you can be changed first, and ...

User's Guide
Page 22
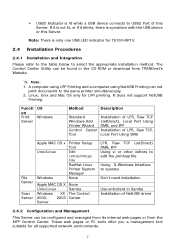
... Server 4.2 Connecting the Server To configure your Server correctly, you should know which type of Installation Methods This chapter describes how to add network printers. Table List for Installing Network Printer Windows Platform Windows 98, ME, 2000,XP and 2003 Printing Protocols SMB/CIFS Printing IPP Printing Windows 2000, XP and 2003 LPR Printing Method Standard Windows Add Printer Wizard The Control Center's Add Printer Standard Windows Add Printer Wizard Standard Windows Add Printer Wizard The Control Center's Add Printer Raw TCP/JetDirect Printing Standard Windows Add Printer...
... Server 4.2 Connecting the Server To configure your Server correctly, you should know which type of Installation Methods This chapter describes how to add network printers. Table List for Installing Network Printer Windows Platform Windows 98, ME, 2000,XP and 2003 Printing Protocols SMB/CIFS Printing IPP Printing Windows 2000, XP and 2003 LPR Printing Method Standard Windows Add Printer Wizard The Control Center's Add Printer Standard Windows Add Printer Wizard Standard Windows Add Printer Wizard The Control Center's Add Printer Raw TCP/JetDirect Printing Standard Windows Add Printer...

User's Guide
Page 23
... Local printer, clear the Automatically detect and install my Plug-n-Play printer check box to avoid having to start the Add Printer Wizard, and then click Next. 3. 4.2.1 The Server and Windows PC on Same LAN 4.2.2 The Server and Windows PC on Different LANs Example: Wired Windows PC across Internet 4.3 Setting up Local Windows Printer Driver You are advised to find the printer, the wizard will attempt to install your printer. Select a Windows driver for...
... Local printer, clear the Automatically detect and install my Plug-n-Play printer check box to avoid having to start the Add Printer Wizard, and then click Next. 3. 4.2.1 The Server and Windows PC on Same LAN 4.2.2 The Server and Windows PC on Different LANs Example: Wired Windows PC across Internet 4.3 Setting up Local Windows Printer Driver You are advised to find the printer, the wizard will attempt to install your printer. Select a Windows driver for...
User's Guide
Page 24
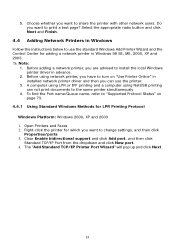
... and 2003. # Note: 1. Clear Enable bidirectional support and click Add port, and then click Standard TCP/IP Port from the dropdown and click New port. 4. Before using NetUSB printing can use the standard Windows Add Printer Wizard and the Control Center for LPR Printing Protocol Windows Platform: Windows 2000, XP and 2003 1. A computer using LPR or IPP printing and a computer using network printer, you have to change settings, and then click Properties/ports 3. The "Add Standard TCP/IP Printer Port Wizard" will pop up...
... and 2003. # Note: 1. Clear Enable bidirectional support and click Add port, and then click Standard TCP/IP Port from the dropdown and click New port. 4. Before using NetUSB printing can use the standard Windows Add Printer Wizard and the Control Center for LPR Printing Protocol Windows Platform: Windows 2000, XP and 2003 1. A computer using LPR or IPP printing and a computer using network printer, you have to change settings, and then click Properties/ports 3. The "Add Standard TCP/IP Printer Port Wizard" will pop up...

User's Guide
Page 33
... the Server's web pages or the Control Center to disable SMB/CIFS Print/File Server Authentication. # If you want to change settings, and then click Properties. 3. in the Server's User Account. Open Printers and Faxes 2. Clear Enable bidirectional support and click add port, and click Local Port, and then click New Port... In the Port Name box, enter the path to the printer with Server Authentication, you must login to your printer driver first or click Add New Printer to install the printer driver. 4.4.5 Using Standard Windows...
... the Server's web pages or the Control Center to disable SMB/CIFS Print/File Server Authentication. # If you want to change settings, and then click Properties. 3. in the Server's User Account. Open Printers and Faxes 2. Clear Enable bidirectional support and click add port, and click Local Port, and then click New Port... In the Port Name box, enter the path to the printer with Server Authentication, you must login to your printer driver first or click Add New Printer to install the printer driver. 4.4.5 Using Standard Windows...

User's Guide
Page 39
... and error log file registered to daemon 4. Enter the Server Name registered to connect printer. :sd=/var/spool/lpd/Printer1:\ ---(C) :lf=/var/spool/lpd/Printer1/Printer1_errs: ---(D) where (A) Describes the printer name. (B) lp: Device file name to /etc/hosts file. It must be the absolute path. (D) lf: Error log file name. Use the "lpr" command. - # lpr -P Printer1 - # lpr -P Printer2 5.4 Using the Server on RedHat Linux (Fedora Core) In the RedHat (Fedora Core) x-window user interface...
... and error log file registered to daemon 4. Enter the Server Name registered to connect printer. :sd=/var/spool/lpd/Printer1:\ ---(C) :lf=/var/spool/lpd/Printer1/Printer1_errs: ---(D) where (A) Describes the printer name. (B) lp: Device file name to /etc/hosts file. It must be the absolute path. (D) lf: Error log file name. Use the "lpr" command. - # lpr -P Printer1 - # lpr -P Printer2 5.4 Using the Server on RedHat Linux (Fedora Core) In the RedHat (Fedora Core) x-window user interface...
User's Guide
Page 55
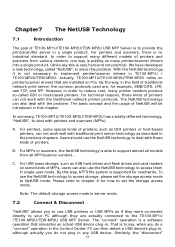
... server mode. 7.2 Connect & Disconnect "NetUSB" allows you do not plug in any USB device. To use USB printers or USB MFPs as described in the field of traditional network print server, the common protocols used are installed on some special kinds of printers, such as GDI printers or host-based printers, can not work with the problem. In summary, TE100-MP1U/TE100-MP2U/TEW-MP2U has a totally different technology, "NetUSB", to access storage, please set...
... server mode. 7.2 Connect & Disconnect "NetUSB" allows you do not plug in any USB device. To use USB printers or USB MFPs as described in the field of traditional network print server, the common protocols used are installed on some special kinds of printers, such as GDI printers or host-based printers, can not work with the problem. In summary, TE100-MP1U/TE100-MP2U/TEW-MP2U has a totally different technology, "NetUSB", to access storage, please set...
User's Guide
Page 58
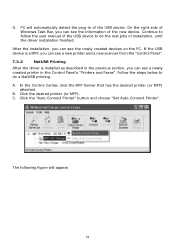
... of installation, until the driver installation finished. Follow the steps below to do a NetUSB printing. In the Control Center, click the MFP Server that has the desired printer (or MFP) attached. A. Continue to follow the user manual of the USB device to do the rest jobs of the new device. After the installation, you can see a newly created printer in the Control Panel's "Printers and Faxes". B. Click the "Auto Connect Printer" button and choose "Set Auto-Connect Printer...
... of installation, until the driver installation finished. Follow the steps below to do a NetUSB printing. In the Control Center, click the MFP Server that has the desired printer (or MFP) attached. A. Continue to follow the user manual of the USB device to do the rest jobs of the new device. After the installation, you can see a newly created printer in the Control Panel's "Printers and Faxes". B. Click the "Auto Connect Printer" button and choose "Set Auto-Connect Printer...

User's Guide
Page 74
... Printing: select or clear Enable LPR Printing support. Please see Chapter 3 Basic Installation for more details. „ Supported Protocols: The Server supports the following boxes: - TCP Port 1: set TCP port for the printer of USB2 port (default: 9101) 5 Enable SMB/CIFS Print/File Server: select or clear Enable SMB/CIFS Print/File Server support. If you select the item, you have to select Traditional Chinese (Big5) in Factory Default. - 9.2.2 Setting up Server Configuration To set up the Server configuration, the system will request user to enter administrator (default: admin...
... Printing: select or clear Enable LPR Printing support. Please see Chapter 3 Basic Installation for more details. „ Supported Protocols: The Server supports the following boxes: - TCP Port 1: set TCP port for the printer of USB2 port (default: 9101) 5 Enable SMB/CIFS Print/File Server: select or clear Enable SMB/CIFS Print/File Server support. If you select the item, you have to select Traditional Chinese (Big5) in Factory Default. - 9.2.2 Setting up Server Configuration To set up the Server configuration, the system will request user to enter administrator (default: admin...


