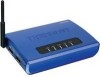
User's Guide
Page 2
... Connecting the Hardware...9 Wireless connection ...9 Preliminary ...9 Set Wireless Configuration Using MFP Server Control Center 9 Set Wireless Configuration Using Server's Web Pages 12 Assigning an IP Address to the Server 16 Preliminary ...16 ...PRINT SERVER IN WINDOWS 22 4.1 Overview of Installation Methods 22 4.2 Connecting the Server...22 4.2.1 The Server and Windows PC on Same LAN 23 4.2.2 The Server and Windows PC on Different LANs 23 4.3 Setting up Local Windows Printer Driver 23 4.4 Adding Network Printers in Windows 24 4.4.1 Using Standard Windows Methods for LPR Printing...
... Connecting the Hardware...9 Wireless connection ...9 Preliminary ...9 Set Wireless Configuration Using MFP Server Control Center 9 Set Wireless Configuration Using Server's Web Pages 12 Assigning an IP Address to the Server 16 Preliminary ...16 ...PRINT SERVER IN WINDOWS 22 4.1 Overview of Installation Methods 22 4.2 Connecting the Server...22 4.2.1 The Server and Windows PC on Same LAN 23 4.2.2 The Server and Windows PC on Different LANs 23 4.3 Setting up Local Windows Printer Driver 23 4.4 Adding Network Printers in Windows 24 4.4.1 Using Standard Windows Methods for LPR Printing...
User's Guide
Page 7
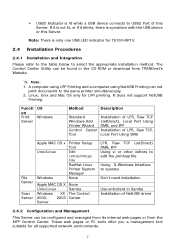
...OS only for all supported network environments. 7 A computer using LRP Printing and a computer using NetUSB Printing can be found in Samba Installation of this Server. Functi on Print Server OS Windows Method Description Standard Windows Add Printer Wizard Control Center Tool Installation of LPR, Raw TCP (...Using vi or other editors to edit the printcap file Using X-Windows Interface to USB2 Port of NetUSB driver 2.4.2 Configuration and Management This Server can be configured and managed from its internal web pages or from TRENDnet's Website. # Note: 1. If it is not lit, ...
...OS only for all supported network environments. 7 A computer using LRP Printing and a computer using NetUSB Printing can be found in Samba Installation of this Server. Functi on Print Server OS Windows Method Description Standard Windows Add Printer Wizard Control Center Tool Installation of LPR, Raw TCP (...Using vi or other editors to edit the printcap file Using X-Windows Interface to USB2 Port of NetUSB driver 2.4.2 Configuration and Management This Server can be configured and managed from its internal web pages or from TRENDnet's Website. # Note: 1. If it is not lit, ...

User's Guide
Page 22
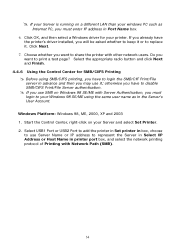
Chapter4 Print Server in Installed Windows Printer Driver Step 5 Add Network Printer by - Table List for Installing Network Printer Windows Platform Windows 98, ME, 2000,XP and 2003 Printing Protocols SMB/CIFS Printing IPP Printing Windows 2000, XP and 2003 LPR Printing Method Standard Windows Add Printer Wizard The Control Center's Add Printer Standard Windows Add Printer Wizard Standard Windows Add Printer Wizard The Control...
Chapter4 Print Server in Installed Windows Printer Driver Step 5 Add Network Printer by - Table List for Installing Network Printer Windows Platform Windows 98, ME, 2000,XP and 2003 Printing Protocols SMB/CIFS Printing IPP Printing Windows 2000, XP and 2003 LPR Printing Method Standard Windows Add Printer Wizard The Control Center's Add Printer Standard Windows Add Printer Wizard Standard Windows Add Printer Wizard The Control...

User's Guide
Page 23
.... 23 For most printers, you leave this task. 4. Double click Add Printer to start the Add Printer Wizard, and then click Next. 3. 4.2.1 The Server and Windows PC on Same LAN 4.2.2 The Server and Windows PC on Different LANs Example: Wired Windows PC across Internet 4.3 Setting up Local Windows Printer Driver You are advised to install your printer.
.... 23 For most printers, you leave this task. 4. Double click Add Printer to start the Add Printer Wizard, and then click Next. 3. 4.2.1 The Server and Windows PC on Same LAN 4.2.2 The Server and Windows PC on Different LANs Example: Wired Windows PC across Internet 4.3 Setting up Local Windows Printer Driver You are advised to install your printer.
User's Guide
Page 24
.../Queue name, refer to "Supported Protocol Status" on "Use Printer Online" in Windows Follow the instructions below to install the local Windows printer driver in Windows 98 SE, ME, 2000, XP and 2003. # Note: 1. 5. Right-click the printer for LPR Printing Protocol Windows Platform: Windows 2000, XP and 2003 1. Choose whether you want to the same printer...
.../Queue name, refer to "Supported Protocol Status" on "Use Printer Online" in Windows Follow the instructions below to install the local Windows printer driver in Windows 98 SE, ME, 2000, XP and 2003. # Note: 1. 5. Right-click the printer for LPR Printing Protocol Windows Platform: Windows 2000, XP and 2003 1. Choose whether you want to the same printer...

User's Guide
Page 29
... 2. Click Next. 7. Select the desired printer driver and click Set Port to install the printer driver. 4.4.3 Using Standard Windows Method for Raw TCP Printing Windows Platform: Windows 2000, XP and 2003 1. In the Printer Name or IP Address box, enter the Server Name of the Server or IP address of the Server. In the Port Name box, enter USB1_RAW...
... 2. Click Next. 7. Select the desired printer driver and click Set Port to install the printer driver. 4.4.3 Using Standard Windows Method for Raw TCP Printing Windows Platform: Windows 2000, XP and 2003 1. In the Printer Name or IP Address box, enter the Server Name of the Server or IP address of the Server. In the Port Name box, enter USB1_RAW...
User's Guide
Page 32
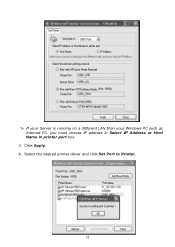
# If your Server is running on a different LAN than your Windows PC such as Internet PC, you must choose IP address in Select IP Address or Host Name in printer port box. 3. Select the desired printer driver and click Set Port to Printer. 32 Click Apply. 4.
# If your Server is running on a different LAN than your Windows PC such as Internet PC, you must choose IP address in Select IP Address or Host Name in printer port box. 3. Select the desired printer driver and click Set Port to Printer. 32 Click Apply. 4.

User's Guide
Page 33
... to the printer with Server Authentication, you must login to your Windows 98 SE/ME using SMB/CIFS printing, you have to login the SMB/CIF Print/File server in advance and then you cannot find any printer driver in Printer List, please install your printer driver first or click Add New... Printer to install the printer driver. 4.4.5 Using Standard Windows Methods for which you set the server name as "TE100-MP2U" and the printer ...
... to the printer with Server Authentication, you must login to your Windows 98 SE/ME using SMB/CIFS printing, you have to login the SMB/CIF Print/File server in advance and then you cannot find any printer driver in Printer List, please install your printer driver first or click Add New... Printer to install the printer driver. 4.4.5 Using Standard Windows Methods for which you set the server name as "TE100-MP2U" and the printer ...
User's Guide
Page 34
...then select a Windows driver for SMB/CIFS Printing # Before using the same user name as Internet PC, you must login to your Windows 98 SE/ME using SMB/CIFS printing, you have to login the SMB/CIF Print/File server in printer port box, and select the network printing protocol of Printing with Network Path... (SMB). 34 Choose whether you want to print a test page? Start the ...
...then select a Windows driver for SMB/CIFS Printing # Before using the same user name as Internet PC, you must login to your Windows 98 SE/ME using SMB/CIFS printing, you have to login the SMB/CIF Print/File server in printer port box, and select the network printing protocol of Printing with Network Path... (SMB). 34 Choose whether you want to print a test page? Start the ...
User's Guide
Page 35
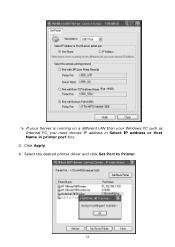
Click Apply. 4. Select the desired printer driver and click Set Port to Printer. 35 # If your Server is running on a different LAN than your Windows PC such as Internet PC, you must choose IP address in Select IP address or Host Name in printer port box. 3.
Click Apply. 4. Select the desired printer driver and click Set Port to Printer. 35 # If your Server is running on a different LAN than your Windows PC such as Internet PC, you must choose IP address in Select IP address or Host Name in printer port box. 3.

User's Guide
Page 36
...Server is running on a home or office network. Click the Next button. Click Start, click Control Panel, click Printers and Other Hardware, and then click Printers and Faxes. 2. Double click Add Printer to install the printer driver. 4.4.7 Using Standard Windows Method for IPP Printing Windows Platform: Windows... 98 SE, ME, 2000, XP and 2003 1. 5. If you must enter IP address in Printer List, please install your windows PC such as Internet PC, you ...
...Server is running on a home or office network. Click the Next button. Click Start, click Control Panel, click Printers and Other Hardware, and then click Printers and Faxes. 2. Double click Add Printer to install the printer driver. 4.4.7 Using Standard Windows Method for IPP Printing Windows Platform: Windows... 98 SE, ME, 2000, XP and 2003 1. 5. If you must enter IP address in Printer List, please install your windows PC such as Internet PC, you ...
User's Guide
Page 44
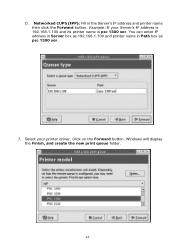
D. Click on the Forward button. Windows will display the Finish, and create the new print queue folder. 44 You can enter IP address in Server box as 192.168.1.100 and printer name in the Server's IP address and printer name then click the Forward button. Select your Server's IP address is 192.168.1.100 and its printer name is psc 1300 ser. Networked CUPS (IPP): Fill in Path box as psc 1300 ser. 7. Example: If your printer driver.
D. Click on the Forward button. Windows will display the Finish, and create the new print queue folder. 44 You can enter IP address in Server box as 192.168.1.100 and printer name in the Server's IP address and printer name then click the Forward button. Select your Server's IP address is 192.168.1.100 and its printer name is psc 1300 ser. Networked CUPS (IPP): Fill in Path box as psc 1300 ser. 7. Example: If your printer driver.
User's Guide
Page 58
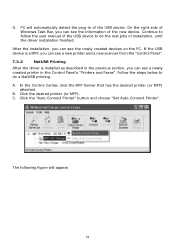
...If the USB device is a MFP, you can see a new printer and a new scanner from the "Control Panel". 7.3.2 NetUSB Printing After the driver is installed as described in of the USB device. PC will appear. 58 Continue to follow the user manual of the USB device to... "Set Auto-Connect Printer". B. C. On the right side of Windows Task Bar, you can see the information of installation, until the driver installation finished. Follow the steps below to do a NetUSB printing. In the Control Center, click the MFP Server that has the desired printer (or MFP) attached.
...If the USB device is a MFP, you can see a new printer and a new scanner from the "Control Panel". 7.3.2 NetUSB Printing After the driver is installed as described in of the USB device. PC will appear. 58 Continue to follow the user manual of the USB device to... "Set Auto-Connect Printer". B. C. On the right side of Windows Task Bar, you can see the information of installation, until the driver installation finished. Follow the steps below to do a NetUSB printing. In the Control Center, click the MFP Server that has the desired printer (or MFP) attached.

User's Guide
Page 60
... "Connect" button to the desired printer. F. Of course you login Windows. The following figure. 60 I. In the Control Center, click the MFP Server that printer. Click the desired scanner (or MFP). D. After all print jobs are finished, click the "Disconnect" button. Click on the check..."Auto-Connected Printer List". 7.3.3 NetUSB Scanning After the driver is issued. Now you can make the Control Center be shown after you can issue print jobs using Scanner Wizard", as described in 7.3.1, you can issue print jobs to skip this , choose the "Configuration" item...
... "Connect" button to the desired printer. F. Of course you login Windows. The following figure. 60 I. In the Control Center, click the MFP Server that printer. Click the desired scanner (or MFP). D. After all print jobs are finished, click the "Disconnect" button. Click on the check..."Auto-Connected Printer List". 7.3.3 NetUSB Scanning After the driver is issued. Now you can make the Control Center be shown after you can issue print jobs using Scanner Wizard", as described in 7.3.1, you can issue print jobs to skip this , choose the "Configuration" item...

