Datasheet
Page 1
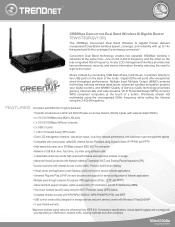
...a wireless g connection*. Gigabit Ethernet ports offer exceptional wired throughput performance. MAC, Protocol, and Domain filtering • Virtual server and Application Level Gateway (ALG) services for special Internet applications • Universal Plug and Play (UPnP) for auto discovery and support for device configuration of a button. TEW-673GRU rev:07.23.2010 year limited warranty *Maximum wireless signal rates are referenced from IEEE 802.11 theoretical specifications. Multiple Input Multiple Output (MIMO) antenna technology reduces wireless dead spots, advanced wireless...
...a wireless g connection*. Gigabit Ethernet ports offer exceptional wired throughput performance. MAC, Protocol, and Domain filtering • Virtual server and Application Level Gateway (ALG) services for special Internet applications • Universal Plug and Play (UPnP) for auto discovery and support for device configuration of a button. TEW-673GRU rev:07.23.2010 year limited warranty *Maximum wireless signal rates are referenced from IEEE 802.11 theoretical specifications. Multiple Input Multiple Output (MIMO) antenna technology reduces wireless dead spots, advanced wireless...
Datasheet
Page 2
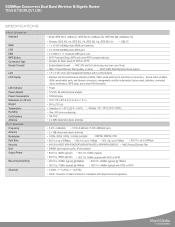
... (block ping, port scan, sync flood) • MAC / Protocol/Domain filtering (deny or allow) • UPnP, DMZ, Static/Dynamic Route support • 1.5" x 1.25" color LCD management interface with 4 control buttons • Displays real time performance statistics (2.4GHz, 5GHz, wired switch ports, and Internet connection), device status (2.4GHz, 5GHz, wired switch ports, and Internet connection), management controls (router restart, factory reset, date/time, connected device information), WPS setup, and current PIN information • Power • 12V DC, 2A external power adapter •...
... (block ping, port scan, sync flood) • MAC / Protocol/Domain filtering (deny or allow) • UPnP, DMZ, Static/Dynamic Route support • 1.5" x 1.25" color LCD management interface with 4 control buttons • Displays real time performance statistics (2.4GHz, 5GHz, wired switch ports, and Internet connection), device status (2.4GHz, 5GHz, wired switch ports, and Internet connection), management controls (router restart, factory reset, date/time, connected device information), WPS setup, and current PIN information • Power • 12V DC, 2A external power adapter •...
User's Guide
Page 5
... Panel ...8 Hardware connections...9 PC NETWORK TCP/IP SETTING 10 Windows 95/98/ME ...10 Windows 2000 ...11 Windows XP / Vista...12 CONFIGURATION 13 Login to the WLAN Router through Wireless LAN...13 Login to the WLAN Router ...13 Using the Web Browser ...13 Setup Wizard...14 Main configuration...24 LAN & DHCP Server ...24 WAN ...25 Password ...26 Time ...27 Dynamic DNS ...28 Wireless ...28 Basic...28 Security ...31 Advanced ...34 WIFI Protected Setup...35 Status...36 Device Information ...36 Log ...37 Log Setting...38 Statistic...39 Wireless ...40 Routing ...40 Static ...40 v
... Panel ...8 Hardware connections...9 PC NETWORK TCP/IP SETTING 10 Windows 95/98/ME ...10 Windows 2000 ...11 Windows XP / Vista...12 CONFIGURATION 13 Login to the WLAN Router through Wireless LAN...13 Login to the WLAN Router ...13 Using the Web Browser ...13 Setup Wizard...14 Main configuration...24 LAN & DHCP Server ...24 WAN ...25 Password ...26 Time ...27 Dynamic DNS ...28 Wireless ...28 Basic...28 Security ...31 Advanced ...34 WIFI Protected Setup...35 Status...36 Device Information ...36 Log ...37 Log Setting...38 Statistic...39 Wireless ...40 Routing ...40 Static ...40 v
User's Guide
Page 6
... DMZ...48 Firewall Settings ...49 QoS ...50 Management...51 Remote Management ...51 Tools ...52 Restart ...52 Settings...52 Firmware ...53 Ping ...53 USING THE LCD PANEL 55 Main Menu...55 Navigation Keys ...55 Device Info Menu ...56 General...56 Internet ...57 Wireless ...57 Wired ...58 Performance Menu...58 Settings Menu ...59 Restart ...60 Reset...60 Date/Time ...61 Connected Devices...61 WPS Menu ...62 WPS ...62 Current PIN ...64 USB CONTROL CENTER UTILITY 65 Utility ...65 System...65 Configure Server ...66 Print Sharing ...66 Auto Connect Printer...
... DMZ...48 Firewall Settings ...49 QoS ...50 Management...51 Remote Management ...51 Tools ...52 Restart ...52 Settings...52 Firmware ...53 Ping ...53 USING THE LCD PANEL 55 Main Menu...55 Navigation Keys ...55 Device Info Menu ...56 General...56 Internet ...57 Wireless ...57 Wired ...58 Performance Menu...58 Settings Menu ...59 Restart ...60 Reset...60 Date/Time ...61 Connected Devices...61 WPS Menu ...62 WPS ...62 Current PIN ...64 USB CONTROL CENTER UTILITY 65 Utility ...65 System...65 Configure Server ...66 Print Sharing ...66 Auto Connect Printer...
User's Guide
Page 7
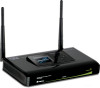
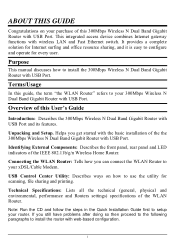
... in the Quick Installation Guide first to your purchase of this 300Mbps Wireless N Dual Band Gigabit Router with USB Port. ABOUT THIS GUIDE Congratulations on how to use the utility for Internet surfing and office resource sharing, and it is easy to install the router with web-based configuration. 1 This integrated access device combines Internet gateway functions with USB Port and its features. USB Control Center Utility: Describes ways on your xDSL/Cable Modem. Technical Specifications: Lists all the...
... in the Quick Installation Guide first to your purchase of this 300Mbps Wireless N Dual Band Gigabit Router with USB Port. ABOUT THIS GUIDE Congratulations on how to use the utility for Internet surfing and office resource sharing, and it is easy to install the router with web-based configuration. 1 This integrated access device combines Internet gateway functions with USB Port and its features. USB Control Center Utility: Describes ways on your xDSL/Cable Modem. Technical Specifications: Lists all the...
User's Guide
Page 8
... distribute files thus making good use of a wireless g connection*. Concurrent Dual Band technology creates two separate 300Mbps wireless n networks at the touch of the router. Gigabit Ethernet ports offer exceptional wired throughput performance. Resource sharing: Share resources such as printers, scanners and other on the back of a button. A color LCD management interface provides real time performance, security, and device information thereby reducing the need to login to two USB ports on the...
... distribute files thus making good use of a wireless g connection*. Concurrent Dual Band technology creates two separate 300Mbps wireless n networks at the touch of the router. Gigabit Ethernet ports offer exceptional wired throughput performance. Resource sharing: Share resources such as printers, scanners and other on the back of a button. A color LCD management interface provides real time performance, security, and device information thereby reducing the need to login to two USB ports on the...
User's Guide
Page 9
... LCD management interface: view device status, local time, network performance, and additional router management options ¾ Compatible with most popular cable/DSL Internet Service Providers using Dynamic/Static IP, PPPoE and PPTP ¾ High-speed data rates up to 300Mbps using an IEEE 802.11n connection ¾ Network a USB flash drive, hard drive, or printer using the Wi-Fi Protected Setup (WPS) button ¾ Complete wireless security with WPA/WPA2-RADIUS, WPA-PSK/WPA2- MAC, Protocol, and Domain filtering ¾ Virtual server and Application Level Gateway (ALG) services...
... LCD management interface: view device status, local time, network performance, and additional router management options ¾ Compatible with most popular cable/DSL Internet Service Providers using Dynamic/Static IP, PPPoE and PPTP ¾ High-speed data rates up to 300Mbps using an IEEE 802.11n connection ¾ Network a USB flash drive, hard drive, or printer using the Wi-Fi Protected Setup (WPS) button ¾ Complete wireless security with WPA/WPA2-RADIUS, WPA-PSK/WPA2- MAC, Protocol, and Domain filtering ¾ Virtual server and Application Level Gateway (ALG) services...

User's Guide
Page 13
POWER: Plug the power adapter to this power jack RESET: Use a pin-shaped item to push to reset this device to default settings. 7 LAN (1-4): Four 10/100/1000Mbps Auto-MDIX LAN port for Internet connectivity. WAN: One 10/100/1000Mbps WAN port that connects to share either USB storage devices or printers over the network. It will be a useful tool when the manager forgot the password to login, and needs to restore the device back to factory default settings. USB: Two USB ports to the xDSL/Cable modem for connecting 10Mbps, 100Mbps Ethernet or...
POWER: Plug the power adapter to this power jack RESET: Use a pin-shaped item to push to reset this device to default settings. 7 LAN (1-4): Four 10/100/1000Mbps Auto-MDIX LAN port for Internet connectivity. WAN: One 10/100/1000Mbps WAN port that connects to share either USB storage devices or printers over the network. It will be a useful tool when the manager forgot the password to login, and needs to restore the device back to factory default settings. USB: Two USB ports to the xDSL/Cable modem for connecting 10Mbps, 100Mbps Ethernet or...
User's Guide
Page 19
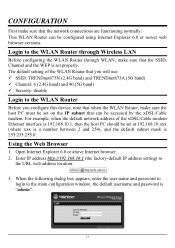
... configured using Internet Explorer 6.0 or newer web browser versions. Enter IP address http://192.168.10.1 (the factory-default IP address setting) to the main configuration window, the default username and password is 255.255.255.0. Login to the WLAN Router Before you configure this device, note that when the WLAN Router, make sure the host PC must be set properly. For example, when the default network address of the WLAN Router that you will use: 9 SSID: TRENDnet673N (2.4G band) and TRENDnet673A (5G band) 9 Channel...
... configured using Internet Explorer 6.0 or newer web browser versions. Enter IP address http://192.168.10.1 (the factory-default IP address setting) to the main configuration window, the default username and password is 255.255.255.0. Login to the WLAN Router Before you configure this device, note that when the WLAN Router, make sure the host PC must be set properly. For example, when the default network address of the WLAN Router that you will use: 9 SSID: TRENDnet673N (2.4G band) and TRENDnet673A (5G band) 9 Channel...
User's Guide
Page 31
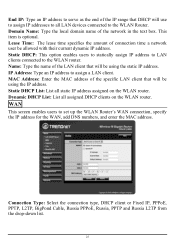
... the specific LAN client that will be allowed with their current dynamic IP address. IP Address: Type an IP address to the WLAN router. WAN This screen enables users to the WLAN Router. End IP: Type an IP address to serve as the end of the IP range that DHCP will use to assign IP addresses to all LAN devices connected to set up the WLAN Router's WAN connection, specify the IP address for the WAN, add DNS numbers, and enter the MAC address. Static DHCP List: List all static IP address assigned on the WLAN router.
... the specific LAN client that will be allowed with their current dynamic IP address. IP Address: Type an IP address to the WLAN router. WAN This screen enables users to the WLAN Router. End IP: Type an IP address to serve as the end of the IP range that DHCP will use to assign IP addresses to all LAN devices connected to set up the WLAN Router's WAN connection, specify the IP address for the WAN, add DNS numbers, and enter the MAC address. Static DHCP List: List all static IP address assigned on the WLAN router.
User's Guide
Page 35
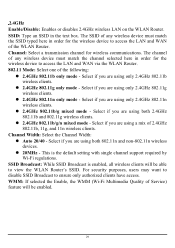
... for wireless communications. SSID Broadcast: While SSID Broadcast is the default setting with single channel support required by Wi-Fi regulations. Select if you are using a mix of Service) feature will be enabled. 29 This is enabled, all wireless clients will be able to ensure only authorized clients have access. z 2.4GHz 802.11g only mode - z 2.4GHz 802.11n only mode - Channel: Select a transmission channel for the wireless device to access the LAN and WAN via the WLAN Router...
... for wireless communications. SSID Broadcast: While SSID Broadcast is the default setting with single channel support required by Wi-Fi regulations. Select if you are using a mix of Service) feature will be enabled. 29 This is enabled, all wireless clients will be able to ensure only authorized clients have access. z 2.4GHz 802.11g only mode - z 2.4GHz 802.11n only mode - Channel: Select a transmission channel for the wireless device to access the LAN and WAN via the WLAN Router...
User's Guide
Page 36
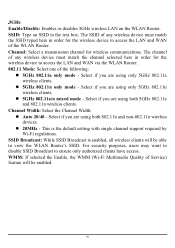
.... SSID Broadcast: While SSID Broadcast is the default setting with single channel support required by Wi-Fi regulations. WMM: If selected the Enable, the WMM (Wi-Fi Multimedia Quality of the following: z 5GHz 802.11a only mode - Channel: Select a transmission channel for the wireless device to access the LAN and WAN via the WLAN Router. 802.11 Mode: Select one of Service) feature will be enabled. 30 Select if you are using both...
.... SSID Broadcast: While SSID Broadcast is the default setting with single channel support required by Wi-Fi regulations. WMM: If selected the Enable, the WMM (Wi-Fi Multimedia Quality of the following: z 5GHz 802.11a only mode - Channel: Select a transmission channel for the wireless device to access the LAN and WAN via the WLAN Router. 802.11 Mode: Select one of Service) feature will be enabled. 30 Select if you are using both...
User's Guide
Page 49
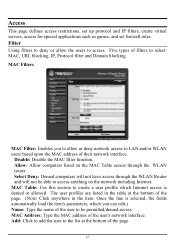
... the users to select: MAC, URL blocking, IP, Protocol filter and Domain blocking. Filter Using filters to deny or allow or deny network access to LAN and/or WLAN users based upon the MAC address of the user to be able to access anything on the network including Internet. Five types of the user's network interface. Access This page defines access restrictions, set up protocol and IP filters, create virtual servers, access for special applications such as games, and set firewall rules...
... the users to select: MAC, URL blocking, IP, Protocol filter and Domain blocking. Filter Using filters to deny or allow or deny network access to LAN and/or WLAN users based upon the MAC address of the user to be able to access anything on the network including Internet. Five types of the user's network interface. Access This page defines access restrictions, set up protocol and IP filters, create virtual servers, access for special applications such as games, and set firewall rules...
User's Guide
Page 68
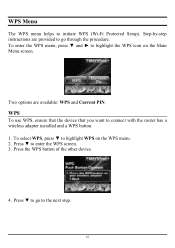
... the procedure. WPS To use WPS, ensure that the device that you want to initiate WPS (Wi-Fi Protected Setup). Press ▼ to highlight WPS on the Main Menu screen. Press the WPS button of the other device. 4. WPS Menu The WPS menu helps to connect with the router has a wireless adapter installed and a WPS button. 1. Step-by-step instructions are available: WPS and Current PIN. To enter the WPS menu, press ▼ and ► to enter the WPS screen. 3. Press...
... the procedure. WPS To use WPS, ensure that the device that you want to initiate WPS (Wi-Fi Protected Setup). Press ▼ to highlight WPS on the Main Menu screen. Press the WPS button of the other device. 4. WPS Menu The WPS menu helps to connect with the router has a wireless adapter installed and a WPS button. 1. Step-by-step instructions are available: WPS and Current PIN. To enter the WPS menu, press ▼ and ► to enter the WPS screen. 3. Press...
User's Guide
Page 72
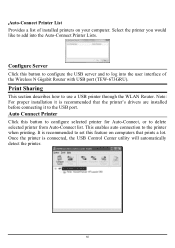
... Connect Printer Click this button to configure the USB server and to log into the Auto-Connect Printer Lists. This enables auto connection to use a USB printer through the WLAN Router. Auto-Connect Printer List Provides a list of the Wireless N Gigabit Router with USB port (TEW-673GRU). Note: For proper installation it to set this feature on your computer. It is recommended to the USB port. Configure Server Click this button to configure selected printer for Auto-Connect, or to add into the user interface of installed printers on computers that the printer's drivers...
... Connect Printer Click this button to configure the USB server and to log into the Auto-Connect Printer Lists. This enables auto connection to use a USB printer through the WLAN Router. Auto-Connect Printer List Provides a list of the Wireless N Gigabit Router with USB port (TEW-673GRU). Note: For proper installation it to set this feature on your computer. It is recommended to the USB port. Configure Server Click this button to configure selected printer for Auto-Connect, or to add into the user interface of installed printers on computers that the printer's drivers...
User's Guide
Page 77
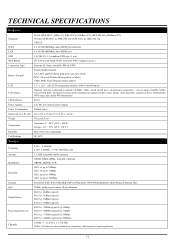
...Enable/disable firewall NAT, SPI, and DoS (block ping, port scan, sync flood) MAC / Protocol/Domain filtering (deny or allow) UPnP, DMZ, Static/Dynamic Route support LCD 1.5" x 1.25" color LCD management interface with 4 control buttons LCD display Displays real time performance statistics (2.4GHz, 5GHz, wired switch ports, and Internet connection), device status (2.4GHz, 5GHz, wired switch ports, and Internet connection), management controls (router restart, factory reset, date/time, connected device information), WPS setup, and current PIN information LED Indicator Power Power Adapter...
...Enable/disable firewall NAT, SPI, and DoS (block ping, port scan, sync flood) MAC / Protocol/Domain filtering (deny or allow) UPnP, DMZ, Static/Dynamic Route support LCD 1.5" x 1.25" color LCD management interface with 4 control buttons LCD display Displays real time performance statistics (2.4GHz, 5GHz, wired switch ports, and Internet connection), device status (2.4GHz, 5GHz, wired switch ports, and Internet connection), management controls (router restart, factory reset, date/time, connected device information), WPS setup, and current PIN information LED Indicator Power Power Adapter...
Quick Installation Guide
Page 4
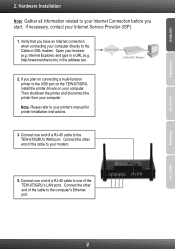
... the Cable or DSL modem. Verify that you start. Then shutdown the printer and disconnect the printer from your computer directly to the TEW-673GRU's WAN port. ENGLISH FRANÇAIS DEUTSCH 2. If necessary, contact your printer's manual for printer installation instructions. 3. Connect the other end of the TEW-673GRU's LAN ports. Note: Please refer to your browser (e.g. Connect one of the cable to your Internet Service Provider (ISP). 1. http://www.trendnet.com) in a URL (e.g.
... the Cable or DSL modem. Verify that you start. Then shutdown the printer and disconnect the printer from your computer directly to the TEW-673GRU's WAN port. ENGLISH FRANÇAIS DEUTSCH 2. If necessary, contact your printer's manual for printer installation instructions. 3. Connect the other end of the TEW-673GRU's LAN ports. Note: Please refer to your browser (e.g. Connect one of the cable to your Internet Service Provider (ISP). 1. http://www.trendnet.com) in a URL (e.g.
Quick Installation Guide
Page 15
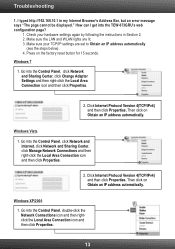
... Properties. 2. Go into the Control Panel, click Network and Sharing Center, click Change Adapter Settings and then right-click the Local Area Connection icon and then click Properties. 2. How can I typed http://192.168.10.1 in Section 2. 2. Windows Vista 1. Troubleshooting 1. Click Internet Protocol Version 4(TCP/IPv4) and then click Properties. Go into the TEW-673GRU's web configuration page? 1. Then click on Obtain an IP address automatically.
... Properties. 2. Go into the Control Panel, click Network and Sharing Center, click Change Adapter Settings and then right-click the Local Area Connection icon and then click Properties. 2. How can I typed http://192.168.10.1 in Section 2. 2. Windows Vista 1. Troubleshooting 1. Click Internet Protocol Version 4(TCP/IPv4) and then click Properties. Go into the TEW-673GRU's web configuration page? 1. Then click on Obtain an IP address automatically.
Quick Installation Guide
Page 16
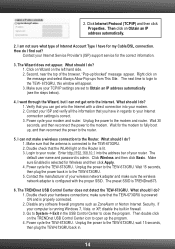
... proper SSID. Click Wireless and then click Basic. Make sure Enabled is admin. Contact the manufacturer of your Internet Service Provider's (ISP) support service for my Cable/DSL connection. The preset SSID is configured with a direct connection into the address bar of your ISP and verify all the information that the WLAN light on the TRENDnet USB Control Center icon to the TEW-673GRU. 5. The next time to login to the router. 5. Contact your wireless network adapter and make...
... proper SSID. Click Wireless and then click Basic. Make sure Enabled is admin. Contact the manufacturer of your Internet Service Provider's (ISP) support service for my Cable/DSL connection. The preset SSID is configured with a direct connection into the address bar of your ISP and verify all the information that the WLAN light on the TRENDnet USB Control Center icon to the TEW-673GRU. 5. The next time to login to the router. 5. Contact your wireless network adapter and make...
Quick Installation Guide
Page 17
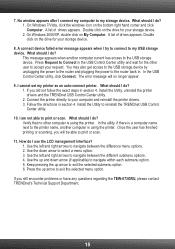
... user to select a menu option. 3. A list of drives appears. Use the left and right arrows to the router back in section 4. A connect device failed error message appears when I use the LCD management interface? 1. You may also get access to the USB storage device by unplugging the power to the router and plugging the power to navigate between the difference menu options. 2. Install the Utility, uninstall the printer drivers and the TRENDnet USB Control Center utility. 2. Install the Utility...
... user to select a menu option. 3. A list of drives appears. Use the left and right arrows to the router back in section 4. A connect device failed error message appears when I use the LCD management interface? 1. You may also get access to the USB storage device by unplugging the power to the router and plugging the power to navigate between the difference menu options. 2. Install the Utility, uninstall the printer drivers and the TRENDnet USB Control Center utility. 2. Install the Utility...


