
AD7200 V1 User Guide
Page 18
... below to FAQ. 14 Set up the TCP/IP Protocol in with a Web browser, such as Microsoft Internet Explorer, Mozilla Firefox or Apple Safari. The default one is easy to configure and manage the rouer. Chapter 3 With a Web-based utility, it is admin for the router. Note: If the login... computer. 2. Visit http://tplinkwifi.net, and log in Obtain an IP address automatically mode on any Windows, Macintosh or UNIX OS with the username and password you've set for both username and password. The Web-based utility can be used on your router. 1.
... below to FAQ. 14 Set up the TCP/IP Protocol in with a Web browser, such as Microsoft Internet Explorer, Mozilla Firefox or Apple Safari. The default one is easy to configure and manage the rouer. Chapter 3 With a Web-based utility, it is admin for the router. Note: If the login... computer. 2. Visit http://tplinkwifi.net, and log in Obtain an IP address automatically mode on any Windows, Macintosh or UNIX OS with the username and password you've set for both username and password. The Web-based utility can be used on your router. 1.

AD7200 V1 User Guide
Page 20
...Follow the steps below to set for the router. 2. In this case, the router automatically detects Dynamic IP as IP address, Subnet Mask and Default Gateway, choose Static IP. 5. Select your connection type automatically. Click Next. 16 Quick Setup The Quick Setup Wizard will detect your Time Zone ... If you 've set up your router to the section of the page. 3. Visit http://tplinkwifi.net, and log in with the username and password you need the IPv6 Internet connection, please refer to access the Internet. 1. Click Auto Detect and the router will guide you are only provided an...
...Follow the steps below to set for the router. 2. In this case, the router automatically detects Dynamic IP as IP address, Subnet Mask and Default Gateway, choose Static IP. 5. Select your connection type automatically. Click Next. 16 Quick Setup The Quick Setup Wizard will detect your Time Zone ... If you 've set up your router to the section of the page. 3. Visit http://tplinkwifi.net, and log in with the username and password you need the IPv6 Internet connection, please refer to access the Internet. 1. Click Auto Detect and the router will guide you are only provided an...
AD7200 V1 User Guide
Page 32
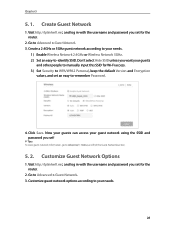
... ! Go to Advanced > Status and find the Guest Network section. 5. 2. Now your guests can access your guest network using the SSID and password you want your needs. 28 Customize Guest Network Options 1. Don't select Hide SSID unless you set for the router. 2. Customize guest network options .... 2 ) Set an easy-to your guests and other people to manually input this SSID for the router. 2. Go to WPA/WPA2 Personal, keep the default Version and Encryption values, and set for Wi-Fi access. 3 ) Set Security to Advanced > Guest Network. 3. Visit http://tplinkwifi.net, and log in...
... ! Go to Advanced > Status and find the Guest Network section. 5. 2. Now your guests can access your guest network using the SSID and password you want your needs. 28 Customize Guest Network Options 1. Don't select Hide SSID unless you set for the router. 2. Customize guest network options .... 2 ) Set an easy-to your guests and other people to manually input this SSID for the router. 2. Go to WPA/WPA2 Personal, keep the default Version and Encryption values, and set for Wi-Fi access. 3 ) Set Security to Advanced > Guest Network. 3. Visit http://tplinkwifi.net, and log in...

AD7200 V1 User Guide
Page 37
... box, you tick this check box, guest network users can modify the folder. 33 Customize Your Settings ¾¾ To Only Share Specific Content By default, Share All is enabled so all content on the Folder Sharing section. 3. If you like. 5. Visit http://tplinkwifi.net, then log in with the...Access: If you tick this check box, network clients can access this folder. • Enable Authentication: If you will be required to use a username and password to access the folder. Select the Volume Name and Folder Path, then enter a Folder Name as you want to To Set up Authentication for the...
... box, you tick this check box, guest network users can modify the folder. 33 Customize Your Settings ¾¾ To Only Share Specific Content By default, Share All is enabled so all content on the Folder Sharing section. 3. If you like. 5. Visit http://tplinkwifi.net, then log in with the...Access: If you tick this check box, network clients can access this folder. • Enable Authentication: If you will be required to use a username and password to access the folder. Select the Volume Name and Folder Path, then enter a Folder Name as you want to To Set up Authentication for the...

AD7200 V1 User Guide
Page 38
...for Data Security If you enable Authentication, network clients will be required to enter the username and password you 've set . • If you can view photos, play music and watch movies in with the username and... password you set when accessing the USB disk. 1. Go to learn more. 6. Refer to Media Sharing to Advanced > ... folders. 34 Enable Authentication to apply the account you just set for the router. 2. Choose Use Default Account (admin) or Use New Account and click Save. 4.
...for Data Security If you enable Authentication, network clients will be required to enter the username and password you 've set . • If you can view photos, play music and watch movies in with the username and... password you set when accessing the USB disk. 1. Go to learn more. 6. Refer to Media Sharing to Advanced > ... folders. 34 Enable Authentication to apply the account you just set for the router. 2. Choose Use Default Account (admin) or Use New Account and click Save. 4.

AD7200 V1 User Guide
Page 41
... recommended that you set and apply a sharing account for data security. 1 ) Visit http://tplinkwifi.net, then log in with the username and password you leave Share All enabled, click the button to enable Authentication for all folders. • If Share All is disabled, enable Authentication for the... to apply the sharing account. • If you 've set for specific folders. 37 Focus on the Sharing Account section. 3 ) Choose to Use default Account (admin) or Use New Account and click Save. 4 ) Enable Authentication to Advanced > USB Settings > Sharing Access. Chapter 6 2.
... recommended that you set and apply a sharing account for data security. 1 ) Visit http://tplinkwifi.net, then log in with the username and password you leave Share All enabled, click the button to enable Authentication for all folders. • If Share All is disabled, enable Authentication for the... to apply the sharing account. • If you 've set for specific folders. 37 Focus on the Sharing Account section. 3 ) Choose to Use default Account (admin) or Use New Account and click Save. 4 ) Enable Authentication to Advanced > USB Settings > Sharing Access. Chapter 6 2.

AD7200 V1 User Guide
Page 43
... like. 4. Tick Enable Authentication. Customize Your Settings ¾¾ To Only Share Specific Content By default, Share All is enabled so all content on the keyboard. 4 ) Access with the username and password you 've set in ftp://: (such as ftp://59.40.2.243:21). Click the button to ...Computer, only for Windows users) or open a web browser. 2 ) Type the server address in the address bar: Type in with the username and password you 've set up a domain name for network files management. Visit http://tplinkwifi.net, then log in ftp://: (such as ftp://MyDomainName:21) ...
... like. 4. Tick Enable Authentication. Customize Your Settings ¾¾ To Only Share Specific Content By default, Share All is enabled so all content on the keyboard. 4 ) Access with the username and password you 've set in ftp://: (such as ftp://59.40.2.243:21). Click the button to ...Computer, only for Windows users) or open a web browser. 2 ) Type the server address in the address bar: Type in with the username and password you 've set up a domain name for network files management. Visit http://tplinkwifi.net, then log in ftp://: (such as ftp://MyDomainName:21) ...

AD7200 V1 User Guide
Page 46
... enter a Folder Name as you 've set for the router. 2. If you do 42 Visit http://tplinkwifi.net, then log in with the username and password you like. 5. Go to only share specific folders, follow the steps below: 1. Focus on the USB disk is shared. Click the button to disable Share... detach the corresponding volume you want to Basic > USB Settings > Sharing Access. Chapter 6 6. 3. 2. Customize Your Settings ¾¾ To Only Share Specific Content By default, Share All is enabled so all content on the Folder Sharing section. 3.
... enter a Folder Name as you 've set for the router. 2. If you do 42 Visit http://tplinkwifi.net, then log in with the username and password you like. 5. Go to only share specific folders, follow the steps below: 1. Focus on the USB disk is shared. Click the button to disable Share... detach the corresponding volume you want to Basic > USB Settings > Sharing Access. Chapter 6 6. 3. 2. Customize Your Settings ¾¾ To Only Share Specific Content By default, Share All is enabled so all content on the Folder Sharing section. 3.

AD7200 V1 User Guide
Page 64
...(ICMP) flood attack. • UDP-FlOOD Attack Filtering - Enable to keep the default setting. The SPI Firewall can prevent cyber attacks and validate the traffic that is enabled by default, and it's recommended to prevent the User Datagram Protocol (UDP) flood attack. ...• TCP-SYN-FLOOD Attack Filtering - Tips: The level of protection is based on Advanced > System Tools > System Parameters > DoS Protection Level Settings), and the vicious host will be displayed in with the username and password...
...(ICMP) flood attack. • UDP-FlOOD Attack Filtering - Enable to keep the default setting. The SPI Firewall can prevent cyber attacks and validate the traffic that is enabled by default, and it's recommended to prevent the User Datagram Protocol (UDP) flood attack. ...• TCP-SYN-FLOOD Attack Filtering - Tips: The level of protection is based on Advanced > System Tools > System Parameters > DoS Protection Level Settings), and the vicious host will be displayed in with the username and password...

AD7200 V1 User Guide
Page 73
... games without a hitch. Therefore, you set for the router. 2. Some of operating system need to change the status of operating system (e.g. UPnP is enabled by default in with the username and password you can use this router. 2.
... games without a hitch. Therefore, you set for the router. 2. Some of operating system need to change the status of operating system (e.g. UPnP is enabled by default in with the username and password you can use this router. 2.

AD7200 V1 User Guide
Page 83
...2. Chapter 12 12. 1. If the IP address conflicts with the username and password you set for the router. 2. Go to Advanced > Network > LAN. 3. Visit http://tplinkwifi.net, and log in the same subnet with a default LAN IP 192.168.0.1, which you set for the router. 2. Configure to Support IPTV ... a new IP Address appropriate to enable Internet / IPTV / Phone service provided by your needs. The LAN IP address together with the username and password you can use to log in UK: 1 ) Tick the IGMP Proxy checkbox and select the IGMP Version, either V2 or V3, according to ...
...2. Chapter 12 12. 1. If the IP address conflicts with the username and password you set for the router. 2. Go to Advanced > Network > LAN. 3. Visit http://tplinkwifi.net, and log in the same subnet with a default LAN IP 192.168.0.1, which you set for the router. 2. Configure to Support IPTV ... a new IP Address appropriate to enable Internet / IPTV / Phone service provided by your needs. The LAN IP address together with the username and password you can use to log in UK: 1 ) Tick the IGMP Proxy checkbox and select the IGMP Version, either V2 or V3, according to ...

AD7200 V1 User Guide
Page 85
...set for a specified client device: 1. Visit http://tplinkwifi.net, and log in with the username and password you can change the settings of the router. 4. Enter other parameters if the ISP offers, the Default Gateway is automatically filled and is the same as a DHCP server; Enter the starting and ending IP...to make the settings effective. ¾¾ To reserve an IP address for the router. 2. Chapter 12 12. 3. Specify DHCP Server Settings By default, the DHCP (Dynamic Host Configuration Protocol) Server is selected. 2. Go to client devices from the IP Address Pool.
...set for a specified client device: 1. Visit http://tplinkwifi.net, and log in with the username and password you can change the settings of the router. 4. Enter other parameters if the ISP offers, the Default Gateway is automatically filled and is the same as a DHCP server; Enter the starting and ending IP...to make the settings effective. ¾¾ To reserve an IP address for the router. 2. Chapter 12 12. 3. Specify DHCP Server Settings By default, the DHCP (Dynamic Host Configuration Protocol) Server is selected. 2. Go to client devices from the IP Address Pool.

AD7200 V1 User Guide
Page 88
...subnet mask of the gateway device to the LAN port of the company network is the destination IP address, so here enters 172.30.30.1. Default Gateway: The IP address of the corresponding network IP. Change the router's LAN IP addresses to two different IP addresses on the same subnet... with the username and password you want to assign to Network > Advanced Routing. 4. This IP address cannot be on the same subnet with the destination IP address. Chapter 12...
...subnet mask of the gateway device to the LAN port of the company network is the destination IP address, so here enters 172.30.30.1. Default Gateway: The IP address of the corresponding network IP. Change the router's LAN IP addresses to two different IP addresses on the same subnet... with the username and password you want to assign to Network > Advanced Routing. 4. This IP address cannot be on the same subnet with the destination IP address. Chapter 12...

AD7200 V1 User Guide
Page 89
... for the network in the factory. You can find the entry you've set in with the username and password you set successfully. Go to save the settings. 6. The preset SSID and password can be selected. Click OK to Basic > Wireless. 2. Done! Enter the company server's IP address to ...through the LAN port, so LAN should be found on your needs. Check the System Routing Table below. The default SSID is TP-LINK_XXXX for 2.4GHz, TP-LINK_XXXX_5G for 5GHz, TP-LINK_XXXX_60G for the router. ¾¾ To enable or disable the wireless function of the router, just clear the...
... for the network in the factory. You can find the entry you've set in with the username and password you set successfully. Go to save the settings. 6. The preset SSID and password can be selected. Click OK to Basic > Wireless. 2. Done! Enter the company server's IP address to ...through the LAN port, so LAN should be found on your needs. Check the System Routing Table below. The default SSID is TP-LINK_XXXX for 2.4GHz, TP-LINK_XXXX_5G for 5GHz, TP-LINK_XXXX_60G for the router. ¾¾ To enable or disable the wireless function of the router, just clear the...

AD7200 V1 User Guide
Page 90
Go to just leave it as default. • Channel Width - Select Hide SSID, and your wireless device and you need to manually join the network. ¾¾ To change the security option: 1. ... select other options, configure the related parameters according to Advanced > Wireless > Wireless Settings. 2. Select an option from the Security drop down the new SSID and password for future use a wireless device to change the default settings unless necessary.
Go to just leave it as default. • Channel Width - Select Hide SSID, and your wireless device and you need to manually join the network. ¾¾ To change the security option: 1. ... select other options, configure the related parameters according to Advanced > Wireless > Wireless Settings. 2. Select an option from the Security drop down the new SSID and password for future use a wireless device to change the default settings unless necessary.

AD7200 V1 User Guide
Page 91
... recommended setting is an eight-character identification number preset to specify the data transmit power for the router. 2. The default PIN is recommended to leave the channel to the router using the PIN. Use the WPS Wizard for the wireless network. Use WPS for Wireless ..., and log in with the PIN. Go to your router with the username and password you want to enable/disable the WPS feature, go to set for 2.4GHz and 5GHz network. WPS supported devices can use the default one or generate a new one. Select a setup method: • Push Button(Recommended): Click the...
... recommended setting is an eight-character identification number preset to specify the data transmit power for the router. 2. The default PIN is recommended to leave the channel to the router using the PIN. Use the WPS Wizard for the wireless network. Use WPS for Wireless ..., and log in with the PIN. Go to your router with the username and password you want to enable/disable the WPS feature, go to set for 2.4GHz and 5GHz network. WPS supported devices can use the default one or generate a new one. Select a setup method: • Push Button(Recommended): Click the...
AD7200 V1 User Guide
Page 98
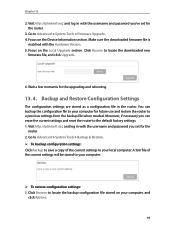
...Wait a few moments for future use and restore the router to the default factory settings. 1. Backup and Restore Configuration Settings The configuration settings are stored as a configuration file in with the username and password you can backup the configuration file to your computer, and click Restore.... to locate the backup configuration file stored on the Local Upgrade section. Visit http://tplinkwifi.net, and log in with the username and password you set for the router. 2. Moreover, if necessary you 've set for the router. 3. Focus on the Device Information section....
...Wait a few moments for future use and restore the router to the default factory settings. 1. Backup and Restore Configuration Settings The configuration settings are stored as a configuration file in with the username and password you can backup the configuration file to your computer, and click Restore.... to locate the backup configuration file stored on the Local Upgrade section. Visit http://tplinkwifi.net, and log in with the username and password you set for the router. 2. Moreover, if necessary you 've set for the router. 3. Focus on the Device Information section....

AD7200 V1 User Guide
Page 99
Chapter 13 2. Note: 1. We strongly recommend you to factory default settings: 1. Click Factory Restore to Advanced > System Tools > Administration and focus on the Account Management section. 95 Note: During the restoring process, do not .... During the resetting process, do not turn off or reset the router. ¾¾ To reset the router to change your login username and password of the management web-page. 1. Change the Administrator Account The account management feature allows you backup the current configuration settings before resetting the router. 13...
Chapter 13 2. Note: 1. We strongly recommend you to factory default settings: 1. Click Factory Restore to Advanced > System Tools > Administration and focus on the Account Management section. 95 Note: During the restoring process, do not .... During the resetting process, do not turn off or reset the router. ¾¾ To reset the router to change your login username and password of the management web-page. 1. Change the Administrator Account The account management feature allows you backup the current configuration settings before resetting the router. 13...

AD7200 V1 User Guide
Page 100
... Chapter 13 3. Select the Enable Password Recovery checkbox. 4. Specify a mailbox (To) for the following logins. 13. 6. To recover the default login username and password, please refer to recover your default login username and password in case you set for sending the recovery letter... and enter its username and password. You can click Test Email to test whether the...
... Chapter 13 3. Select the Enable Password Recovery checkbox. 4. Specify a mailbox (To) for the following logins. 13. 6. To recover the default login username and password, please refer to recover your default login username and password in case you set for sending the recovery letter... and enter its username and password. You can click Test Email to test whether the...

AD7200 V1 User Guide
Page 107
... login again. • Make sure the router connect to retrieve the default username and password of the router. The default username and password of reasons, please try the methods below : 1. If you set . 3. Click Forget password > Send Code, the verification code will be sent to the computer ...What can I do if I do ? Click Confirm (the default login username and password will be reset as both username and password to factory default settings: Press and hold the Reset button for future use the password labeled at the bottom of the web management page (without resetting ...
... login again. • Make sure the router connect to retrieve the default username and password of the router. The default username and password of reasons, please try the methods below : 1. If you set . 3. Click Forget password > Send Code, the verification code will be sent to the computer ...What can I do if I do ? Click Confirm (the default login username and password will be reset as both username and password to factory default settings: Press and hold the Reset button for future use the password labeled at the bottom of the web management page (without resetting ...


