2006 VAIO Accessories Guide
Page 2
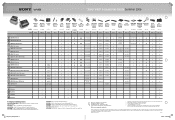
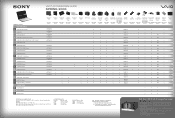
...: 1 4-pin i.LINK®5 interface, 3 USB 2.0, Ethernet, VGA-Out, A/V-out and DC in . Sony, VAIO, Sony logo, VAIO logo, Sony Style, and i.Link are trademarks of Sony used only to hard drive capacity. The Bluetooth word mark and logo are registered trademarks and are registered trademarks of Sony. All other . ©2006 Sony Electronics Inc. Sony® VAIO® Accessories Guide Summer 2006 FE AX AR FS FJ Memory Card Adapter Wireless Keyboard & Mouse Privacy...
...: 1 4-pin i.LINK®5 interface, 3 USB 2.0, Ethernet, VGA-Out, A/V-out and DC in . Sony, VAIO, Sony logo, VAIO logo, Sony Style, and i.Link are trademarks of Sony used only to hard drive capacity. The Bluetooth word mark and logo are registered trademarks and are registered trademarks of Sony. All other . ©2006 Sony Electronics Inc. Sony® VAIO® Accessories Guide Summer 2006 FE AX AR FS FJ Memory Card Adapter Wireless Keyboard & Mouse Privacy...
VAIO Accessories Guide Spring 2006
Page 1
...-enabled control for 200 audio CDs and/or movie DVDs • Operated through Microsoft® Windows® XP Media Center Edition 2005 • Automatic download of title, jacket cover and other information (Internet connection required) • Automatic and sequential copying of 200 audio CDs to the PC hard drive • Multi episode TV program recording to DVD® software, i.LINK®4 connector cable and upright stand. Read DVD-ROM: 8X, CD-ROM...
...-enabled control for 200 audio CDs and/or movie DVDs • Operated through Microsoft® Windows® XP Media Center Edition 2005 • Automatic download of title, jacket cover and other information (Internet connection required) • Automatic and sequential copying of 200 audio CDs to the PC hard drive • Multi episode TV program recording to DVD® software, i.LINK®4 connector cable and upright stand. Read DVD-ROM: 8X, CD-ROM...
Safety Information
Page 2
... rights reserved. This manual and the software described herein, in whole or in part without notice. IN NO EVENT SHALL SONY ELECTRONICS INC. Important information for Canadian customers: Your new VAIO computer includes certain software versions or upgrades, and Internet services or offers that are subject to this manual or the information contained herein at any modification to change without prior written approval...
... rights reserved. This manual and the software described herein, in whole or in part without notice. IN NO EVENT SHALL SONY ELECTRONICS INC. Important information for Canadian customers: Your new VAIO computer includes certain software versions or upgrades, and Internet services or offers that are subject to this manual or the information contained herein at any modification to change without prior written approval...
Safety Information
Page 6
... to radio communications. This device complies with Part 15 of the FCC rules. This equipment generates, uses, and can be determined by one or more of the FCC Rules. Model No.: VGP-WKB2 (wireless keyboard), and PCVA-MS2 (wireless mouse) These devices comply with the instructions, may cause undesired operation of Conformity Trade Name: SONY Model No.: PCV-A41L Responsible Party: Sony Electronics Inc. Address...
... to radio communications. This device complies with Part 15 of the FCC rules. This equipment generates, uses, and can be determined by one or more of the FCC Rules. Model No.: VGP-WKB2 (wireless keyboard), and PCVA-MS2 (wireless mouse) These devices comply with the instructions, may cause undesired operation of Conformity Trade Name: SONY Model No.: PCV-A41L Responsible Party: Sony Electronics Inc. Address...
User Guide
Page 3
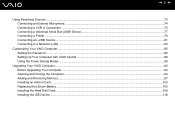
...External Microphone ...74 Connecting a VCR or Camcorder ...75 Connecting a Universal Serial Bus (USB) Device...77 Connecting a Printer ...79 Connecting an i.LINK Device ...81 Connecting to a Network (LAN) ...83 Customizing Your VAIO Computer ...85 Setting the Password ...86 Setting Up Your Computer with VAIO Central ...88 Using the Power Saving Modes ...89 Upgrading Your VAIO Computer...92 Before Upgrading Your Computer ...93 Opening and Closing the Computer...94 Adding and Removing Memory...97 Installing an Add-on Card ...103 Replacing the Lithium Battery ...106 Installing the Hard Disk Drive...
...External Microphone ...74 Connecting a VCR or Camcorder ...75 Connecting a Universal Serial Bus (USB) Device...77 Connecting a Printer ...79 Connecting an i.LINK Device ...81 Connecting to a Network (LAN) ...83 Customizing Your VAIO Computer ...85 Setting the Password ...86 Setting Up Your Computer with VAIO Central ...88 Using the Power Saving Modes ...89 Upgrading Your VAIO Computer...92 Before Upgrading Your Computer ...93 Opening and Closing the Computer...94 Adding and Removing Memory...97 Installing an Add-on Card ...103 Replacing the Lithium Battery ...106 Installing the Hard Disk Drive...
User Guide
Page 7
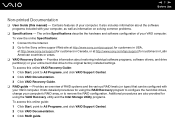
... includes information about restoring individual software programs, software drivers, and drive partition(s) or your entire hard disk drive to the Sony online support Web site at http://www.sony.com/pcsupport for customers in USA, at http://www.sony.ca/support for customers in Canada, or at http://www.sony.com/lapcsupport for using the RAID Recovery program to configure the hard disk drives, change your VAIO computer. n7 N Before Use Non-printed Documentation ❑ User Guide (this manual) -
... includes information about restoring individual software programs, software drivers, and drive partition(s) or your entire hard disk drive to the Sony online support Web site at http://www.sony.com/pcsupport for customers in USA, at http://www.sony.ca/support for customers in Canada, or at http://www.sony.com/lapcsupport for using the RAID Recovery program to configure the hard disk drives, change your VAIO computer. n7 N Before Use Non-printed Documentation ❑ User Guide (this manual) -

User Guide
Page 17
To connect a display 1 If you want to connect a VGA monitor, plug the display's cable into the monitor (VGA) port (1). 2 If you want to connect a DVI monitor, plug the display's cable into the DVI-D port (2). 3 If necessary, plug the display's cable into the rear of the display. n 17 N Getting Started Connecting a Display (Monitor) Your computer may be supplied with a display. For details on the bundled accessories, see the online Specifications.
To connect a display 1 If you want to connect a VGA monitor, plug the display's cable into the monitor (VGA) port (1). 2 If you want to connect a DVI monitor, plug the display's cable into the DVI-D port (2). 3 If necessary, plug the display's cable into the rear of the display. n 17 N Getting Started Connecting a Display (Monitor) Your computer may be supplied with a display. For details on the bundled accessories, see the online Specifications.
User Guide
Page 44
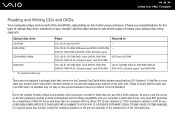
... on the other side. DVD+R, DVD+RW and DVD+R DL (Double Layer)* CD-RW/DVD-ROM CD, CD-R, CD-RW, DVD, most DVD-R, DVD-RW, CD-R and CD-RW DVD+R, DVD+R DL (Double Layer)* and DVD+RW DVD±RW CD, CD-R, CD-RW, DVD, most DVD-R, DVD-RW, - This product is a two sided disc product which types of media your model. Check your computer's optical disc drives. Use the table below to the...
... on the other side. DVD+R, DVD+RW and DVD+R DL (Double Layer)* CD-RW/DVD-ROM CD, CD-R, CD-RW, DVD, most DVD-R, DVD-RW, CD-R and CD-RW DVD+R, DVD+R DL (Double Layer)* and DVD+RW DVD±RW CD, CD-R, CD-RW, DVD, most DVD-R, DVD-RW, - This product is a two sided disc product which types of media your model. Check your computer's optical disc drives. Use the table below to the...

User Guide
Page 46
... To play the disc. If the Audio CD window appears, click to speed up disc access when playing a DVD. Reduce the volume before playing a DVD. ❑ Do not switch power saving modes while the computer is labeled "all open a CD program, such as the SonicStage software. If the region code of player you can play the disc on this player. If you have audio devices connected, this DVD in which...
... To play the disc. If the Audio CD window appears, click to speed up disc access when playing a DVD. Reduce the volume before playing a DVD. ❑ Do not switch power saving modes while the computer is labeled "all open a CD program, such as the SonicStage software. If the region code of player you can play the disc on this player. If you have audio devices connected, this DVD in which...
User Guide
Page 48
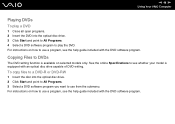
... instructions on selected models only. To copy files to a DVD-R or DVD-RW 1 Insert the disc into the optical disc drive. 3 Click Start and point to All Programs. 4 Select a DVD software program to play the DVD. See the online Specifications to see the help guide included with an optical disc drive capable of DVD writing. n 48 N Using Your VAIO Computer Playing DVDs To play a DVD 1 Close all open programs. 2 Insert the DVD into the optical disc drive. 2 Click Start...
... instructions on selected models only. To copy files to a DVD-R or DVD-RW 1 Insert the disc into the optical disc drive. 3 Click Start and point to All Programs. 4 Select a DVD software program to play the DVD. See the online Specifications to see the help guide included with an optical disc drive capable of DVD writing. n 48 N Using Your VAIO Computer Playing DVDs To play a DVD 1 Close all open programs. 2 Insert the DVD into the optical disc drive. 2 Click Start...
User Guide
Page 79
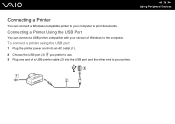
n 79 N Using Peripheral Devices Connecting a Printer You can connect a USB printer compatible with your version of a USB printer cable (2) into an AC outlet (1). 2 Choose the USB port (3) you prefer to use. 3 Plug one end of Windows to print documents. Connecting a Printer Using the USB Port You can connect a Windows-compatible printer to your printer. To connect a printer using the USB port 1 Plug the printer power cord into the USB port and the other end to your computer to the computer.
n 79 N Using Peripheral Devices Connecting a Printer You can connect a USB printer compatible with your version of a USB printer cable (2) into an AC outlet (1). 2 Choose the USB port (3) you prefer to use. 3 Plug one end of Windows to print documents. Connecting a Printer Using the USB Port You can connect a Windows-compatible printer to your printer. To connect a printer using the USB port 1 Plug the printer power cord into the USB port and the other end to your computer to the computer.
User Guide
Page 83
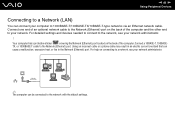
... network with the default settings. Using an incorrect cable or a phone cable may result in the Network (Ethernet) port. For help on connecting to a network, see your network. Connect a 10BASE-T, 100BASE- Your computer has a protective sticker covering the Network (Ethernet) port located on the back of the computer. For detailed settings and devices needed to connect to the network, see your computer to your network administrator. ! Connect one end of an optional network cable to the Network (Ethernet) port. TX, or 1000BASE-T cable to the Network (Ethernet) port...
... network with the default settings. Using an incorrect cable or a phone cable may result in the Network (Ethernet) port. For help on connecting to a network, see your network. Connect a 10BASE-T, 100BASE- Your computer has a protective sticker covering the Network (Ethernet) port located on the back of the computer. For detailed settings and devices needed to connect to the network, see your computer to your network administrator. ! Connect one end of an optional network cable to the Network (Ethernet) port. TX, or 1000BASE-T cable to the Network (Ethernet) port...
User Guide
Page 107
... lithium battery properly. n 107 N Upgrading Your VAIO Computer 5 Replace the side panel. If you , visit the Sony online support Web site. Dispose of lithium batteries in the CMOS memory are now reset to customize your nearest Sony Service Center or Factory Service Center. To locate a Service Center near you do not run the Setup utility. ! Run the Setup utility to the BIOS settings. See Closing the Computer (page 96) for the detailed instructions. You can return your unwanted lithium batteries to your BIOS settings...
... lithium battery properly. n 107 N Upgrading Your VAIO Computer 5 Replace the side panel. If you , visit the Sony online support Web site. Dispose of lithium batteries in the CMOS memory are now reset to customize your nearest Sony Service Center or Factory Service Center. To locate a Service Center near you do not run the Setup utility. ! Run the Setup utility to the BIOS settings. See Closing the Computer (page 96) for the detailed instructions. You can return your unwanted lithium batteries to your BIOS settings...
User Guide
Page 109
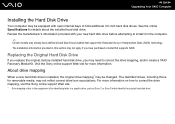
... a model that support the Redundant Array of an identifying letter to correct the drive mapping, and/or create a VAIO Recovery Media Kit. n 109 N Upgrading Your VAIO Computer Installing the Hard Disk Drive Your computer may be changed. About drive mapping When a new hard disk drive is installed, the original drive mapping* may be equipped with your new hard disk drive before attempting to install it in this section may not apply if you may need to a specific drive, such as Drive...
... a model that support the Redundant Array of an identifying letter to correct the drive mapping, and/or create a VAIO Recovery Media Kit. n 109 N Upgrading Your VAIO Computer Installing the Hard Disk Drive Your computer may be changed. About drive mapping When a new hard disk drive is installed, the original drive mapping* may be equipped with your new hard disk drive before attempting to install it in this section may not apply if you may need to a specific drive, such as Drive...
User Guide
Page 141
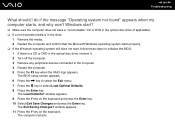
... the drive: 1 Remove the media. 2 Restart the computer and confirm that the Microsoft Windows operating system starts properly. ❑ If the Windows operating system still does not start, follow these steps to initialize the BIOS: 1 If there is a CD or DVD in the optical disc drive, remove it. 2 Turn off the computer. 3 Remove any peripheral devices connected to select Load Optimal Defaults. 8 Press the Enter key. The Exit Saving Changes? The BIOS setup screen appears. 6 Press the , key to...
... the drive: 1 Remove the media. 2 Restart the computer and confirm that the Microsoft Windows operating system starts properly. ❑ If the Windows operating system still does not start, follow these steps to initialize the BIOS: 1 If there is a CD or DVD in the optical disc drive, remove it. 2 Turn off the computer. 3 Remove any peripheral devices connected to select Load Optimal Defaults. 8 Press the Enter key. The Exit Saving Changes? The BIOS setup screen appears. 6 Press the , key to...
User Guide
Page 152
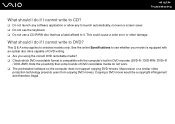
... error or other damage. What should I do if I cannot write to see whether your model is equipped with an optical disc drive capable of DVD recordable media do not work. ❑ The preinstalled software on the computer does not support copying DVD movies. See the online Specifications to DVD? Copying a DVD movie would be a copyright infringement and therefore illegal. This Q & A entry applies to it. n 152 N Troubleshooting...
... error or other damage. What should I do if I cannot write to see whether your model is equipped with an optical disc drive capable of DVD recordable media do not work. ❑ The preinstalled software on the computer does not support copying DVD movies. See the online Specifications to DVD? Copying a DVD movie would be a copyright infringement and therefore illegal. This Q & A entry applies to it. n 152 N Troubleshooting...
User Guide
Page 154
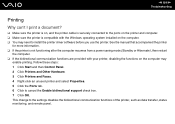
... data transfer, status monitoring, and remote panel. This change to cancel the Enable bidirectional support check box. 7 Click OK. n 154 N Troubleshooting Printing Why can't I print a document? ❑ Make sure the printer is on, and the printer cable is securely connected to the ports on the printer and computer. ❑ Make sure the printer is not functioning after the computer resumes from a power saving mode (Standby or...
... data transfer, status monitoring, and remote panel. This change to cancel the Enable bidirectional support check box. 7 Click OK. n 154 N Troubleshooting Printing Why can't I print a document? ❑ Make sure the printer is on, and the printer cable is securely connected to the ports on the printer and computer. ❑ Make sure the printer is not functioning after the computer resumes from a power saving mode (Standby or...
User Guide
Page 159
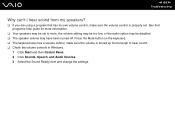
... speakers may be disabled. ❑ The speaker volume may be set . See that has its own volume control, make sure the volume is properly set to hear sound. ❑ Check the volume controls in Windows. 1 Click Start and then Control Panel. 2 Click Sounds, Speech, and Audio Devices. 3 Select the Sound Reality item and change the settings. Press the Mute button on the keyboard. ❑ The keyboard also has a volume control, make sure the volume control...
... speakers may be disabled. ❑ The speaker volume may be set . See that has its own volume control, make sure the volume is properly set to hear sound. ❑ Check the volume controls in Windows. 1 Click Start and then Control Panel. 2 Click Sounds, Speech, and Audio Devices. 3 Select the Sound Reality item and change the settings. Press the Mute button on the keyboard. ❑ The keyboard also has a volume control, make sure the volume control...

VGC-RC Series Hard Disk Drive Replacement Instructions
Page 2
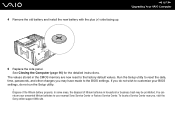
... 6. Proceed to the hard drive. Slide new hard drive inside the bracket. IMPORTANT! Some force may be required to slide the HDD bracket enclosure into the bracket. [A] [B] Step 8. [A] Reinstall the HDD bracket enclosure being careful to unlock the handle. Using the enclosed magnetic screwdriver, remove the marked screw as shown. Step 7. VGC-RC Series Hard Disk Drive Replacement Instructions [1] [2] Step 4. Using the enclosed magnetic screwdriver, remove the four (4) screws...
... 6. Proceed to the hard drive. Slide new hard drive inside the bracket. IMPORTANT! Some force may be required to slide the HDD bracket enclosure into the bracket. [A] [B] Step 8. [A] Reinstall the HDD bracket enclosure being careful to unlock the handle. Using the enclosed magnetic screwdriver, remove the marked screw as shown. Step 7. VGC-RC Series Hard Disk Drive Replacement Instructions [1] [2] Step 4. Using the enclosed magnetic screwdriver, remove the four (4) screws...

Marketing Specifications (VGCRC110G)
Page 2
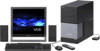
... vary) Dimensions 7.7"(W) x 15.7"(H) x 17.9"(D) Supplied Accessories Two Speakers IR Remote Control and Receiver / IR Blaster PS/2® Keyboard/USB Mouse Software Operating System Microsoft® Windows® Media Center Edition 2005 Sony Original Software Click to hard drive capacity. Intel and Pentium are trademarks of first use it. GHz denotes microprocessor internal clock speed; Audio Mastering & Remastering DVgate Plus™ - Does not support Memory Stick media and Memory Stick PRO media using the MagicGate function. Performance...
... vary) Dimensions 7.7"(W) x 15.7"(H) x 17.9"(D) Supplied Accessories Two Speakers IR Remote Control and Receiver / IR Blaster PS/2® Keyboard/USB Mouse Software Operating System Microsoft® Windows® Media Center Edition 2005 Sony Original Software Click to hard drive capacity. Intel and Pentium are trademarks of first use it. GHz denotes microprocessor internal clock speed; Audio Mastering & Remastering DVgate Plus™ - Does not support Memory Stick media and Memory Stick PRO media using the MagicGate function. Performance...


