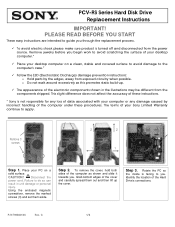
PCV-RS Series Hard Disk Drive Replacement Instructions
Page 1
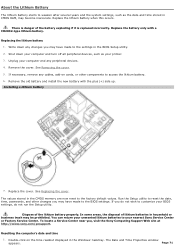
... may be different from exposed circuitry when possible. Failure to guide you begin work to the computer's case.* 9 Follow the ESD (Electrostatic Discharge) damage prevention instructions: o Hold parts by incorrect handling of the computer as this promotes static build-up the cover. Step 2. Step 3. Identify the location of the electronic components shown in unit damage or personal injury. PCV-RS Series Hard Disk Drive Replacement Instructions IMPORTANT!
... may be different from exposed circuitry when possible. Failure to guide you begin work to the computer's case.* 9 Follow the ESD (Electrostatic Discharge) damage prevention instructions: o Hold parts by incorrect handling of the computer as this promotes static build-up the cover. Step 2. Step 3. Identify the location of the electronic components shown in unit damage or personal injury. PCV-RS Series Hard Disk Drive Replacement Instructions IMPORTANT!
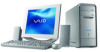
VAIO User Guide
Page 3
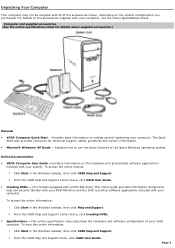
... online specification sheet describes the hardware and software configuration of the latest Windows operating system. Online Documentation VAIO® Com puter User Guide -Contains information on setting up and registering your computer. To access this online information: 1. From the VAIO Help and Support Center menu, click VAIO User Guide. Creating DVDs - (For models equipped with a DVD-RW drive) This online guide provides information designed to use the basic features of your VAIO computer. From the VAIO...
... online specification sheet describes the hardware and software configuration of the latest Windows operating system. Online Documentation VAIO® Com puter User Guide -Contains information on setting up and registering your computer. To access this online information: 1. From the VAIO Help and Support Center menu, click VAIO User Guide. Creating DVDs - (For models equipped with a DVD-RW drive) This online guide provides information designed to use the basic features of your VAIO computer. From the VAIO...

VAIO User Guide
Page 8
... 8 Additional information Your computer is amber while reading and writing data. 13 Universal Serial Bus (USB 2.0) ports (2) Connections for the drive to begin reading the CD. The light turns off when the computer is in Standby mode or turned off. 12 Hard disk drive and optical disc drive access indicator Light is equipped with two optical disc drives that have a drive eject button on . It may take a few moments for compatible high/full/low-speed USB devices.
... 8 Additional information Your computer is amber while reading and writing data. 13 Universal Serial Bus (USB 2.0) ports (2) Connections for the drive to begin reading the CD. The light turns off when the computer is in Standby mode or turned off. 12 Hard disk drive and optical disc drive access indicator Light is equipped with two optical disc drives that have a drive eject button on . It may take a few moments for compatible high/full/low-speed USB devices.

VAIO User Guide
Page 9
... may vary based on your computer contains the ports for LAN connections 5 Universal Serial Bus (USB 2.0) ports (2) Page 9 The icons on the back panel locate and identify the ports and jacks on the configuration you purchased. Back panel 1 AC Input port Connection for the supplied power cord. 2 Mouse port Connection for a PS/2® mouse. 3 Keyboard port Connection for a PS/2® keyboard. 4 Ethernet port Connection for a 10BASE-T/100BASE-TX Ethernet interface. (The port marked with only.) (Network) is for supplied and optional accessories.
... may vary based on your computer contains the ports for LAN connections 5 Universal Serial Bus (USB 2.0) ports (2) Page 9 The icons on the back panel locate and identify the ports and jacks on the configuration you purchased. Back panel 1 AC Input port Connection for the supplied power cord. 2 Mouse port Connection for a PS/2® mouse. 3 Keyboard port Connection for a PS/2® keyboard. 4 Ethernet port Connection for a 10BASE-T/100BASE-TX Ethernet interface. (The port marked with only.) (Network) is for supplied and optional accessories.

VAIO User Guide
Page 10
.../full/low-speed USB devices. 6 Monitor port Connection for a display. 7 Printer port Connection for a parallel device, such as a printer or scanner. 8 i.LINK 6-pin port (IEEE 1394) Connection for a compatible digital device. 9 Serial port Connection for a compatible serial device, such as an optical or hard disk drive, confirm their operating system compatibility and required operating conditions. Before connecting compatible i.LINK devices to the wall jack. Please refer to designate that came with each other. The i.LINK connection may not...
.../full/low-speed USB devices. 6 Monitor port Connection for a display. 7 Printer port Connection for a parallel device, such as a printer or scanner. 8 i.LINK 6-pin port (IEEE 1394) Connection for a compatible digital device. 9 Serial port Connection for a compatible serial device, such as an optical or hard disk drive, confirm their operating system compatibility and required operating conditions. Before connecting compatible i.LINK devices to the wall jack. Please refer to designate that came with each other. The i.LINK connection may not...

VAIO User Guide
Page 13
... these hardware features and the location of the controls, ports, and jacks may vary from the illustrations shown in this section. See the online specifications sheet for your system's configuration. Connecting a Display (Monitor) Connecting the Speakers Connecting the Keyboard and Mouse Connecting the Telephone and Modem Cables Connecting the Power Cords Turning On Your Computer Registering your Computer Setting Up your Dial-up Connection Turning...
... these hardware features and the location of the controls, ports, and jacks may vary from the illustrations shown in this section. See the online specifications sheet for your system's configuration. Connecting a Display (Monitor) Connecting the Speakers Connecting the Keyboard and Mouse Connecting the Telephone and Modem Cables Connecting the Power Cords Turning On Your Computer Registering your Computer Setting Up your Dial-up Connection Turning...

VAIO User Guide
Page 30
... the device. Video captures larger than 2 GB (9 minutes and 30 seconds) are recorded using DVgate software Turn off the computer when connecting the camcorder. DVgate software does not support MICROMV digital video cameras. Under the Microsoft® Windows® XP operating system, do not need to turn its power back on the Window menu. Select EXPORT - AVI file list window is called VCR or VTR mode...
... the device. Video captures larger than 2 GB (9 minutes and 30 seconds) are recorded using DVgate software Turn off the computer when connecting the camcorder. DVgate software does not support MICROMV digital video cameras. Under the Microsoft® Windows® XP operating system, do not need to turn its power back on the Window menu. Select EXPORT - AVI file list window is called VCR or VTR mode...

VAIO User Guide
Page 55
... the server computer. Select a location to Access Control Settings. 2. Verify the capacity of recognized devices. 5. When the VAIO Media software is installed on the client computer, register the client computer with the Microsoft® Windows® XP operating system installed, can copy the file to the network. 6. Click to select the client to be used as a CD-R disc or Memory Stick® media, for the client. The Using other devices connected to storage media that...
... the server computer. Select a location to Access Control Settings. 2. Verify the capacity of recognized devices. 5. When the VAIO Media software is installed on the client computer, register the client computer with the Microsoft® Windows® XP operating system installed, can copy the file to the network. 6. Click to select the client to be used as a CD-R disc or Memory Stick® media, for the client. The Using other devices connected to storage media that...
VAIO User Guide
Page 62
... port on the software applications, operating system and compatible i.LINK devices. Before connecting compatible i.LINK devices to a connected i.LINK device. The i.LINK connection may vary, depending on your system, such as an optical or hard disk drive, confirm their operating system compatibility and required operating conditions. Plug the i.LINK cable connector into the corresponding 4- Page 62 See the instructions that a product contains an IEEE 1394 connection. A 4-pin i.LINK port cannot supply power to your computer...
... port on the software applications, operating system and compatible i.LINK devices. Before connecting compatible i.LINK devices to a connected i.LINK device. The i.LINK connection may vary, depending on your system, such as an optical or hard disk drive, confirm their operating system compatibility and required operating conditions. Plug the i.LINK cable connector into the corresponding 4- Page 62 See the instructions that a product contains an IEEE 1394 connection. A 4-pin i.LINK port cannot supply power to your computer...

VAIO User Guide
Page 69
... memory slots filled. For memory replacement or upgrades, use only 2.5 V, 64-bit, PC2100 DDR-SDRAM Dual InLine Memory Modules (DIMM). See Removing the cover. 4. Rem ov ing/Installing m em ory Installing a memory module 1. Your computer may vary, depending on its side. Removing a memory module 1. Store the module in your printer. 2. Locate the memory module(s) you wish to gently eject it out. Push down your computer and turn off all peripheral devices...
... memory slots filled. For memory replacement or upgrades, use only 2.5 V, 64-bit, PC2100 DDR-SDRAM Dual InLine Memory Modules (DIMM). See Removing the cover. 4. Rem ov ing/Installing m em ory Installing a memory module 1. Your computer may vary, depending on its side. Removing a memory module 1. Store the module in your printer. 2. Locate the memory module(s) you wish to gently eject it out. Push down your computer and turn off all peripheral devices...
VAIO User Guide
Page 71
... nearest Sony Service Center or Factory Service Center. To locate a Service Center near you do not run the Setup utility. The Date and Time Properties window appears. Replace the battery only with the plus (+) side up. Remove the cover. If you , visit the Sony Computing Support Web site at http://www.sony.com/pcsupport. Page 71 Unplug your BIOS settings, do not wish to the factory default values. The values stored in the CMOS memory are now reset...
... nearest Sony Service Center or Factory Service Center. To locate a Service Center near you do not run the Setup utility. The Date and Time Properties window appears. Replace the battery only with the plus (+) side up. Remove the cover. If you , visit the Sony Computing Support Web site at http://www.sony.com/pcsupport. Page 71 Unplug your BIOS settings, do not wish to the factory default values. The values stored in the CMOS memory are now reset...

VAIO User Guide
Page 73
... computer and turn off all peripheral devices, such as your system. Configure the jumpers on the new drive as Configure-to repair your system's features. Detach the power and drive cables from the chassis by type section, enter the part number, A8113558A. Make sure you observe the proper safety precautions when you upgrade your computer and any peripheral devices. 3. Verify the part number, item description, and availability. Installing an additional hard disk drive 1. See Removing the cover. 4. Some models...
... computer and turn off all peripheral devices, such as your system. Configure the jumpers on the new drive as Configure-to repair your system's features. Detach the power and drive cables from the chassis by type section, enter the part number, A8113558A. Make sure you observe the proper safety precautions when you upgrade your computer and any peripheral devices. 3. Verify the part number, item description, and availability. Installing an additional hard disk drive 1. See Removing the cover. 4. Some models...
VAIO User Guide
Page 90
... plugged into a power source and turned on. Press the Ctrl+Alt+Delete keys. Pressing and holding the power button for details.) Confirm that the computer is not in an optical drive (unless you are using a bootable floppy disk). Confirm that a CD is not in stand by mode. Save any open . Page 90 About VAIO Computer Functions My computer does not start. Verify that the computer...
... plugged into a power source and turned on. Press the Ctrl+Alt+Delete keys. Pressing and holding the power button for details.) Confirm that the computer is not in an optical drive (unless you are using a bootable floppy disk). Confirm that a CD is not in stand by mode. Save any open . Page 90 About VAIO Computer Functions My computer does not start. Verify that the computer...
VAIO User Guide
Page 91
... Parallel Port Mode and press Enter. Click Start in the Windows taskbar and select Turn Off Computer. Select the desired setting displays, and press Enter. 7. Where can change the parallel port type to the left , right, top, and bottom edges of applications that are installed on your system by pointing to ECP, EPP, or bi-directional? Click the Settings tab. 4. From the VAIO Help and Support Center menu, click VAIO User Guide. Clear...
... Parallel Port Mode and press Enter. Click Start in the Windows taskbar and select Turn Off Computer. Select the desired setting displays, and press Enter. 7. Where can change the parallel port type to the left , right, top, and bottom edges of applications that are installed on your system by pointing to ECP, EPP, or bi-directional? Click the Settings tab. 4. From the VAIO Help and Support Center menu, click VAIO User Guide. Clear...

VAIO User Guide
Page 93
... Sony software? Click Start in the Windows® taskbar and click Help and Support. System Restore is a digital music management software that enables you to a recordable CD or DVD? Under Pick a Help topic, click Performance and maintenance. 3. Insert a blank CD-R or CD-RW disc into your computer. To access SonicStage software Help 1. On the Help menu, click SonicStage Help. To Use the System Restore Wizard 1. The VAIO Help and Support window...
... Sony software? Click Start in the Windows® taskbar and click Help and Support. System Restore is a digital music management software that enables you to a recordable CD or DVD? Under Pick a Help topic, click Performance and maintenance. 3. Insert a blank CD-R or CD-RW disc into your computer. To access SonicStage software Help 1. On the Help menu, click SonicStage Help. To Use the System Restore Wizard 1. The VAIO Help and Support window...
VAIO User Guide
Page 95
... disc on the application's CD. To view the specific hardware configuration for dirt or scratches. Why doesn't my optical drive tray open because it may not be set to access it. Confirm that are located on this section. Make sure the computer is listed on its packaging, you are preinstalled on . 2. Press the Eject button on some DVDs or CDs, but cannot see video, your computer's video...
... disc on the application's CD. To view the specific hardware configuration for dirt or scratches. Why doesn't my optical drive tray open because it may not be set to access it. Confirm that are located on this section. Make sure the computer is listed on its packaging, you are preinstalled on . 2. Press the Eject button on some DVDs or CDs, but cannot see video, your computer's video...

VAIO User Guide
Page 97
... mouse by turning the ring counter-clockwise. Why doesn't my keyboard work properly? Confirm that the mouse is plugged securely into the appropriate USB port. Save and close all open applications. Turn off your computer. 1 T he V A I set up my mouse for left-hand use an appropriate surface to easily-scratched surfaces by using an optical mouse, use ? 1. From the Buttons tab, select Switch primary and secondary buttons under the Button Configuration options...
... mouse by turning the ring counter-clockwise. Why doesn't my keyboard work properly? Confirm that the mouse is plugged securely into the appropriate USB port. Save and close all open applications. Turn off your computer. 1 T he V A I set up my mouse for left-hand use an appropriate surface to easily-scratched surfaces by using an optical mouse, use ? 1. From the Buttons tab, select Switch primary and secondary buttons under the Button Configuration options...
VAIO User Guide
Page 98
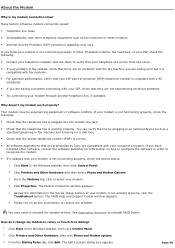
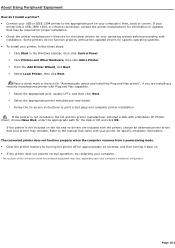
...; Check that are preinstalled by plugging in an external device such as fax machines or other modems. Internet Service Providers (ISP) connection capability may vary. Click Printers and Other Hardware, then click Phone and Modem options. 3. From the Dialing Rules tab, click Edit. You can verify the line by Sony are not experiencing technical problems. Try connecting your ISP, check the...
...; Check that are preinstalled by plugging in an external device such as fax machines or other modems. Internet Service Providers (ISP) connection capability may vary. Click Printers and Other Hardware, then click Phone and Modem options. 3. From the Dialing Rules tab, click Edit. You can verify the line by Sony are not experiencing technical problems. Try connecting your ISP, check the...
VAIO User Guide
Page 102
... updated drivers for specific operating systems. To install your c omputer's hardware c onfiguration. From the Add Printer Wizard, click Next. 4. Select the appropriate port, usually LPT1, and then click Next. 6. The connected printer does not function properly when the computer resumes from a powersaving mode. Clear the printer memory by turning the printer off for approximately 10 seconds, and then turning it back on the list...
... updated drivers for specific operating systems. To install your c omputer's hardware c onfiguration. From the Add Printer Wizard, click Next. 4. Select the appropriate port, usually LPT1, and then click Next. 6. The connected printer does not function properly when the computer resumes from a powersaving mode. Clear the printer memory by turning the printer off for approximately 10 seconds, and then turning it back on the list...
VAIO User Guide
Page 111
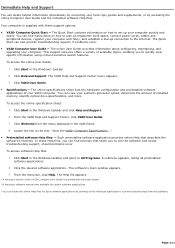
... find instructions on how to use the software and locate troubleshooting support, should problems occur. Click Help and Support. The online specifications sheet lists the hardware configuration and preinstalled software applications of your system's processor speed, determine the amount of available topics, enabling you to plan an ergonomic work space, connect power cords, cables and peripheral devices, register your computer quickly and easily. To access software Help files: 1. This support resource offers a variety of installed memory, identify optical drive specifications...
... find instructions on how to use the software and locate troubleshooting support, should problems occur. Click Help and Support. The online specifications sheet lists the hardware configuration and preinstalled software applications of your system's processor speed, determine the amount of available topics, enabling you to plan an ergonomic work space, connect power cords, cables and peripheral devices, register your computer quickly and easily. To access software Help files: 1. This support resource offers a variety of installed memory, identify optical drive specifications...


