Getting Started Guide
Page 18
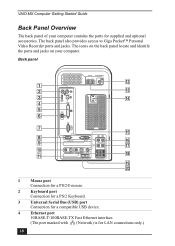
... the back panel locate and identify the ports and jacks on your computer contains the ports for LAN connections only.) 18 Back panel KEYBOARD MOUSE USB NETWORK ACT LINK PRINTER i.LINK S400 SERIAL OPTICAL FM ANTENNA (75 ) IN OUT MONITOR R L LINE DVI IN LINE OUT AUDIO S VIDEO/VIDEO AUDIO S VIDEO/VIDEO VHF... marked with (Network) is for supplied and optional accessories. The back panel also provides access to Giga Pocket™ Personal Video Recorder ports and jacks. VAIO MX Computer Getting Started Guide Back Panel Overview The back panel of your...
... the back panel locate and identify the ports and jacks on your computer contains the ports for LAN connections only.) 18 Back panel KEYBOARD MOUSE USB NETWORK ACT LINK PRINTER i.LINK S400 SERIAL OPTICAL FM ANTENNA (75 ) IN OUT MONITOR R L LINE DVI IN LINE OUT AUDIO S VIDEO/VIDEO AUDIO S VIDEO/VIDEO VHF... marked with (Network) is for supplied and optional accessories. The back panel also provides access to Giga Pocket™ Personal Video Recorder ports and jacks. VAIO MX Computer Getting Started Guide Back Panel Overview The back panel of your...
Getting Started Guide
Page 20
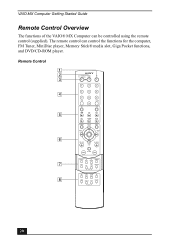
... control can be controlled using the remote control (supplied). VAIO MX Computer Getting Started Guide Remote Control Overview The functions of the VAIO® MX Computer can control the functions for the computer, FM Tuner, MiniDisc player, Memory Stick® media ...slot, Giga Pocket functions, and DVD/CD-ROM player. Remote Control OPEN/CLOSE TV VIDEO DVD 1 2 4 5 7 8 JUMP 0 TV 3 6 9 ENTER FM CD MD MS VIDEO DVD CANCEL PAUSE MENU PREV/ REW NEXT/ FF VOLUME STOP CHANNEL MUTING DISPLAY TV INPUT MX MONITOR...
... control can be controlled using the remote control (supplied). VAIO MX Computer Getting Started Guide Remote Control Overview The functions of the VAIO® MX Computer can control the functions for the computer, FM Tuner, MiniDisc player, Memory Stick® media ...slot, Giga Pocket functions, and DVD/CD-ROM player. Remote Control OPEN/CLOSE TV VIDEO DVD 1 2 4 5 7 8 JUMP 0 TV 3 6 9 ENTER FM CD MD MS VIDEO DVD CANCEL PAUSE MENU PREV/ REW NEXT/ FF VOLUME STOP CHANNEL MUTING DISPLAY TV INPUT MX MONITOR...
Getting Started Guide
Page 22
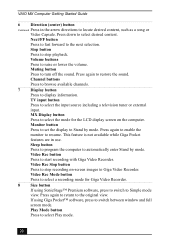
...images to Giga Video Recorder. Play Mode button Press to restore the sound. VAIO MX Computer Getting Started Guide 6 Direction (center) button Continued Press in use. Press again to select Play mode. 22 Monitor button Press to set the display to turn off the sound. Muting button ...arrow directions to switch between window and full screen mode. Video Rec Stop button Press to stop recording on the computer. Press again to enable the monitor to display information. Stop button Press to stop playback. Press down to the next selection. Next/FF button Press...
...images to Giga Video Recorder. Play Mode button Press to restore the sound. VAIO MX Computer Getting Started Guide 6 Direction (center) button Continued Press in use. Press again to select Play mode. 22 Monitor button Press to set the display to turn off the sound. Muting button ...arrow directions to switch between window and full screen mode. Video Rec Stop button Press to stop recording on the computer. Press again to enable the monitor to display information. Stop button Press to stop playback. Press down to the next selection. Next/FF button Press...
Getting Started Guide
Page 31
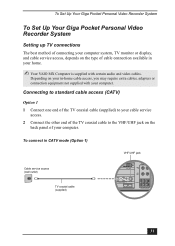
...cable to the VHF/UHF jack on the back panel of cable connection available in your home. ✍ Your VAIO MX Computer is supplied with your computer. SPEAKER 31 To Set Up Your Giga Pocket Personal Video Recorder System To Set Up Your Giga Pocket Personal ...Video Recorder System Setting up TV connections The best method of connecting your computer system, TV monitor or display, and cable service access, depends on the type of your computer...
...cable to the VHF/UHF jack on the back panel of cable connection available in your home. ✍ Your VAIO MX Computer is supplied with your computer. SPEAKER 31 To Set Up Your Giga Pocket Personal Video Recorder System To Set Up Your Giga Pocket Personal ...Video Recorder System Setting up TV connections The best method of connecting your computer system, TV monitor or display, and cable service access, depends on the type of your computer...
Getting Started Guide
Page 32
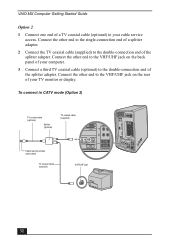
... your cable service access. Connect the other end to the VHF/UHF jack on the back panel of your computer. 3 Connect a third TV coaxial cable (optional) to the double-connection end of the splitter adapter. VAIO MX Computer Getting Started Guide Option 2 1 Connect one end of a TV coaxial cable (optional) to your TV...
... your cable service access. Connect the other end to the VHF/UHF jack on the back panel of your computer. 3 Connect a third TV coaxial cable (optional) to the double-connection end of the splitter adapter. VAIO MX Computer Getting Started Guide Option 2 1 Connect one end of a TV coaxial cable (optional) to your TV...
Getting Started Guide
Page 34
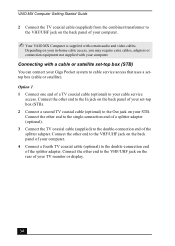
... connection equipment not supplied with certain audio and video cables. Connect the other end to the VHF/UHF jack on the back panel of your computer. 4 Connect a fourth TV coaxial cable (optional) to your cable service access. Connect the other end to the single-connection end of a splitter adapter ...-top box (STB) You can connect your Giga Pocket system to the double-connection end of the splitter adapter. Depending on your STB. VAIO MX Computer Getting Started Guide 2 Connect the TV coaxial cable (supplied) from the combiner/transformer to the VHF/UHF jack on the rear of your ...
... connection equipment not supplied with certain audio and video cables. Connect the other end to the VHF/UHF jack on the back panel of your computer. 4 Connect a fourth TV coaxial cable (optional) to your cable service access. Connect the other end to the single-connection end of a splitter adapter ...-top box (STB) You can connect your Giga Pocket system to the double-connection end of the splitter adapter. Depending on your STB. VAIO MX Computer Getting Started Guide 2 Connect the TV coaxial cable (supplied) from the combiner/transformer to the VHF/UHF jack on the rear of your ...
Getting Started Guide
Page 36
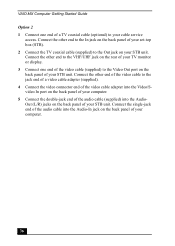
...VHF/UHF jack on the rear of your TV monitor or display. 3 Connect one end of a TV coaxial cable (optional) to your STB unit. Connect the single-jack end of the audio cable into the AudioOut (L/R) jacks on your cable service access. VAIO MX Computer Getting Started Guide Option 2 1 Connect one ...end of the video cable (supplied) to the Video Out port on the back panel of your computer. 36 Connect the other end of the video cable to the Out ...
...VHF/UHF jack on the rear of your TV monitor or display. 3 Connect one end of a TV coaxial cable (optional) to your STB unit. Connect the single-jack end of the audio cable into the AudioOut (L/R) jacks on your cable service access. VAIO MX Computer Getting Started Guide Option 2 1 Connect one ...end of the video cable (supplied) to the Video Out port on the back panel of your computer. 36 Connect the other end of the video cable to the Out ...
Getting Started Guide
Page 37
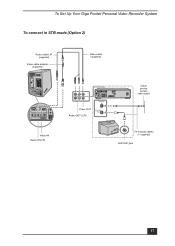
SPEAKER Video-IN Audio-IN (L/R) VHF/UHF IN Video-OUT Audio-OUT (L/R) VHF/UHF OUT Cable service access (wall outlet) TV Coaxial cables (1-supplied) VHF/UHF jack 37 To Set Up Your Giga Pocket Personal Video Recorder System To connect in STB mode (Option 2) Audio cable L/R (supplied) Video cable adapter (supplied) Video cable (supplied) MONITOR R L LINE DVI IN LINE OUT AUDIO S VIDEO/VIDEO AUDIO S VIDEO/VIDEO VHF/UHF ------ VIDEO OUTPUT VIDEO 1 INPUT ------
SPEAKER Video-IN Audio-IN (L/R) VHF/UHF IN Video-OUT Audio-OUT (L/R) VHF/UHF OUT Cable service access (wall outlet) TV Coaxial cables (1-supplied) VHF/UHF jack 37 To Set Up Your Giga Pocket Personal Video Recorder System To connect in STB mode (Option 2) Audio cable L/R (supplied) Video cable adapter (supplied) Video cable (supplied) MONITOR R L LINE DVI IN LINE OUT AUDIO S VIDEO/VIDEO AUDIO S VIDEO/VIDEO VHF/UHF ------ VIDEO OUTPUT VIDEO 1 INPUT ------
Getting Started Guide
Page 38
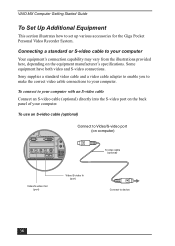
... on the equipment manufacturer's specifications. VIDEO OUTPUT VIDEO 1 INPUT ------ Sony supplies a standard video cable and a video cable adapter to enable you to make the correct video cable connections to your computer Your equipment's connection capability may vary from the illustrations provided here, ...depending on the back panel of your computer. To use an S-video cable (optional) MONITOR R L LINE DVI IN LINE OUT AUDIO S VIDEO/VIDEO AUDIO S VIDEO/VIDEO VHF/UHF ------ VAIO MX Computer Getting Started Guide To Set Up Additional Equipment This section...
... on the equipment manufacturer's specifications. VIDEO OUTPUT VIDEO 1 INPUT ------ Sony supplies a standard video cable and a video cable adapter to enable you to make the correct video cable connections to your computer Your equipment's connection capability may vary from the illustrations provided here, ...depending on the back panel of your computer. To use an S-video cable (optional) MONITOR R L LINE DVI IN LINE OUT AUDIO S VIDEO/VIDEO AUDIO S VIDEO/VIDEO VHF/UHF ------ VAIO MX Computer Getting Started Guide To Set Up Additional Equipment This section...
Getting Started Guide
Page 39
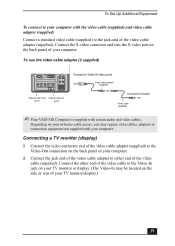
...video In (port) (port) Connect to Video/S-video ports Video cable adapter (supplied) Connect to device Video cable (supplied) ✍ Your VAIO MX Computer is supplied with the video cable (supplied) and video cable adapter (supplied) Connect a standard video cable (supplied) to the jack-end ...the video cable adapter (supplied) to the Video-Out connection on your TV monitor or display. (The Video-In may require extra cables, adapters or connection equipment not supplied with your computer. Connecting a TV monitor (display) 1 Connect the video connector end of the video cable adapter (...
...video In (port) (port) Connect to Video/S-video ports Video cable adapter (supplied) Connect to device Video cable (supplied) ✍ Your VAIO MX Computer is supplied with the video cable (supplied) and video cable adapter (supplied) Connect a standard video cable (supplied) to the jack-end ...the video cable adapter (supplied) to the Video-Out connection on your TV monitor or display. (The Video-In may require extra cables, adapters or connection equipment not supplied with your computer. Connecting a TV monitor (display) 1 Connect the video connector end of the video cable adapter (...
Getting Started Guide
Page 40
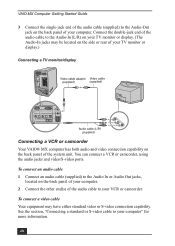
... R VID VIDEO Connecting a VCR or camcorder Your VAIO® MX computer has both audio and video connection capability on the side or rear of your TV monitor or display.) Connecting a TV monitor/display Video cable adapter Video cable (supplied) (supplied) MONITOR R L LINE DVI IN LINE OUT AUDIO S ... to the Audio-In (L/R) on your TV monitor or display. (The Audio-In jacks may have either standard video or S-video connection capability. See the section, "Connecting a standard or S-video cable to your computer. VAIO MX Computer Getting Started Guide 3 Connect the single-jack...
... R VID VIDEO Connecting a VCR or camcorder Your VAIO® MX computer has both audio and video connection capability on the side or rear of your TV monitor or display.) Connecting a TV monitor/display Video cable adapter Video cable (supplied) (supplied) MONITOR R L LINE DVI IN LINE OUT AUDIO S ... to the Audio-In (L/R) on your TV monitor or display. (The Audio-In jacks may have either standard video or S-video connection capability. See the section, "Connecting a standard or S-video cable to your computer. VAIO MX Computer Getting Started Guide 3 Connect the single-jack...
Getting Started Guide
Page 66
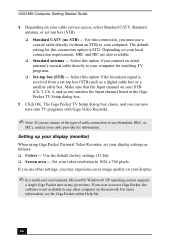
... now tune into TV programs with Giga Video Recorder. ✍ Note: If you are also available. ❑ Standard antenna - Setting up your display (monitor) When using Giga Pocket Personal Video Recorder, set -top box (STB) such as follows: ❑ Colors - If one user accesses Giga Pocket, the...resolution to use other settings, you use (Standard, HRC, or IRC), contact your display settings as a digital cable box or a satellite cable box. VAIO MX Computer Getting Started Guide 4 Depending on your STB (Ch. 3, Ch. 4, and so on) matches the Input channel listed in the Giga Pocket TV Setup...
... now tune into TV programs with Giga Video Recorder. ✍ Note: If you are also available. ❑ Standard antenna - Setting up your display (monitor) When using Giga Pocket Personal Video Recorder, set -top box (STB) such as follows: ❑ Colors - If one user accesses Giga Pocket, the...resolution to use other settings, you use (Standard, HRC, or IRC), contact your display settings as a digital cable box or a satellite cable box. VAIO MX Computer Getting Started Guide 4 Depending on your STB (Ch. 3, Ch. 4, and so on) matches the Input channel listed in the Giga Pocket TV Setup...
Getting Started Guide
Page 80
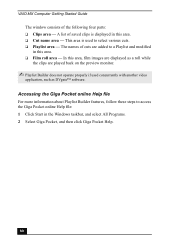
VAIO MX Computer Getting Started Guide The window consists of saved clips is used concurrently with another video application, such as a roll while the clips are added to a ... this area. ❑ Film roll area - A list of the following four parts: ❑ Clips area - The names of cuts are played back on the preview monitor. ✍ Playlist Builder does not operate properly if used to access the Giga Pocket online Help file: 1 Click Start in this area, film images are...
VAIO MX Computer Getting Started Guide The window consists of saved clips is used concurrently with another video application, such as a roll while the clips are added to a ... this area. ❑ Film roll area - A list of the following four parts: ❑ Clips area - The names of cuts are played back on the preview monitor. ✍ Playlist Builder does not operate properly if used to access the Giga Pocket online Help file: 1 Click Start in this area, film images are...
Getting Started Guide
Page 99
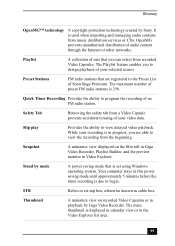
... known as cable box. Slip play Provides the ability to begin. Stand by Sony. Thumbnail A miniature view on the film roll in Giga Video Recorder, Playlist Builder, and the preview monitor in playback by Giga Video Recorder. Your computer stays in this power saving mode until approximately 5 minutes before the timer recording is...
... known as cable box. Slip play Provides the ability to begin. Stand by Sony. Thumbnail A miniature view on the film roll in Giga Video Recorder, Playlist Builder, and the preview monitor in playback by Giga Video Recorder. Your computer stays in this power saving mode until approximately 5 minutes before the timer recording is...
Getting Started Guide
Page 111
... 70 HQ 70 I i.LINK 4-pin port 8 6-pin port 11 interface 6 indicator light 8 Infrared Receiver 8 K Keyboard port 10 modem troubleshooting 87 Modem line jack 11 Monitor port 11 Mounting the FM antenna 22 Mouse port 10 MP3 90 MPEG 90 MPEG1 70 MPEG2 70 Muting button 8 N Net MD technology 90 Next.../ Fast Forward button 9 L LCD display front panel screen 8 LCD monitor port 11 Line IN jacks (R/L) 11 Line OUT jacks (R/L) 11 Long Play 70 LP 70 M MagicGate 6 MagicGate Memory Stick media slot 9 Management information 90 MDLP...
... 70 HQ 70 I i.LINK 4-pin port 8 6-pin port 11 interface 6 indicator light 8 Infrared Receiver 8 K Keyboard port 10 modem troubleshooting 87 Modem line jack 11 Monitor port 11 Mounting the FM antenna 22 Mouse port 10 MP3 90 MPEG 90 MPEG1 70 MPEG2 70 Muting button 8 N Net MD technology 90 Next.../ Fast Forward button 9 L LCD display front panel screen 8 LCD monitor port 11 Line IN jacks (R/L) 11 Line OUT jacks (R/L) 11 Long Play 70 LP 70 M MagicGate 6 MagicGate Memory Stick media slot 9 Management information 90 MDLP...

Getting Started Guide
Page 112
... 92 Timer Recording Manager 5, 63 Timer Recording Wizard 5, 66 Troubleshooting About Recording CDs 86 About the Modem 87 Giga Pocket Personal Video Re- VAIO MX Computer Getting Started Guide R Remote Control Overview 12 remote control inserting batteries 34 Reverb 51 S S/P DIF OUT/IN optical ports 11 Safety Tab 91... Serial port 11 Set-top box 26, 58 set -top box 26 TV connections 23 standard antenna 25 standard cable access 23 TV monitor 31...
... 92 Timer Recording Manager 5, 63 Timer Recording Wizard 5, 66 Troubleshooting About Recording CDs 86 About the Modem 87 Giga Pocket Personal Video Re- VAIO MX Computer Getting Started Guide R Remote Control Overview 12 remote control inserting batteries 34 Reverb 51 S S/P DIF OUT/IN optical ports 11 Safety Tab 91... Serial port 11 Set-top box 26, 58 set -top box 26 TV connections 23 standard antenna 25 standard cable access 23 TV monitor 31...
Online Help Center (VAIO User Guide)
Page 23
Video Rec button Press to automatically enter Stand by mode. Sleep button Press to program the computer to start recording with Giga Video Recorder. Page 23 Monitor button Press to set the display to select Play mode. Video Rec Mode button Press to select a recording mode for ...DVD Player software online Help file for Giga Video Recorder. 8 Size button Press to select audio mode. Press again to enable the monitor to adjust your equalizer. Subtitle button See the Media Bar DVD Player software online Help file for more information. Angle button See ...
Video Rec button Press to automatically enter Stand by mode. Sleep button Press to program the computer to start recording with Giga Video Recorder. Page 23 Monitor button Press to set the display to select Play mode. Video Rec Mode button Press to select a recording mode for ...DVD Player software online Help file for Giga Video Recorder. 8 Size button Press to select audio mode. Press again to enable the monitor to adjust your equalizer. Subtitle button See the Media Bar DVD Player software online Help file for more information. Angle button See ...
Online Help Center (VAIO User Guide)
Page 32
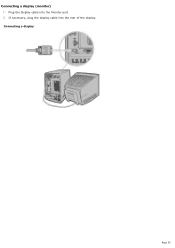
Connecting a display Page 32 If necessary, plug the display cable into the Monitor port. 2. Plug the display cable into the rear of the display. Connecting a display (monitor) 1.
Connecting a display Page 32 If necessary, plug the display cable into the Monitor port. 2. Plug the display cable into the rear of the display. Connecting a display (monitor) 1.
Online Help Center (VAIO User Guide)
Page 33
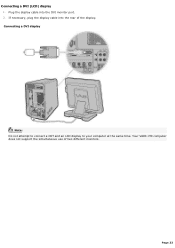
If necessary, plug the display cable into the DVI monitor port. 2. Your VAIO® MX computer does not support the simultaneous use of the display. Connecting a DVI (LCD) display 1. Connecting a DVI display Note: Do not attempt to connect a CRT and an LCD display to your computer at the same time. Plug the display cable into the rear of two different monitors. Page 33
If necessary, plug the display cable into the DVI monitor port. 2. Your VAIO® MX computer does not support the simultaneous use of the display. Connecting a DVI (LCD) display 1. Connecting a DVI display Note: Do not attempt to connect a CRT and an LCD display to your computer at the same time. Plug the display cable into the rear of two different monitors. Page 33
Online Help Center (VAIO User Guide)
Page 63
...defend against potential threats hidden inside files, e-mail, or on the Web. This image management software displays images from the DVD Player monitor as multiple angles, audio language tracks, and subtitles. You can watch TV and use the Giga Pocket Server's TV programming and ...Express is created especially for important actions, from formatting to error correction. MovieShaker Sony Electronics Inc. Your personal movies are available, such as you can rewind or fast-forward scenes from your computer, TV, VCR, and other features of working. Media Bar DVD Player is...
...defend against potential threats hidden inside files, e-mail, or on the Web. This image management software displays images from the DVD Player monitor as multiple angles, audio language tracks, and subtitles. You can watch TV and use the Giga Pocket Server's TV programming and ...Express is created especially for important actions, from formatting to error correction. MovieShaker Sony Electronics Inc. Your personal movies are available, such as you can rewind or fast-forward scenes from your computer, TV, VCR, and other features of working. Media Bar DVD Player is...


