Getting Started Guide
Page 49
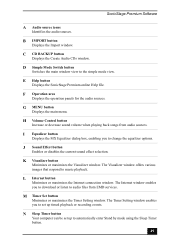
... disables the current sound effect selection. H Volume Control button Increase or decrease sound volume when playing back songs from EMD services. K Visualizer button Minimizes or maximizes the Visualizer window. The Timer Setting window enables you to automatically enter Stand by mode using the Sleep Timer button. 49 F Operation area Displays the operation panels for the audio sources. I Equalizer button Displays the MX Equalizer dialog box, enabling you to download or listen to change the equalizer options. The Internet window enables...
... disables the current sound effect selection. H Volume Control button Increase or decrease sound volume when playing back songs from EMD services. K Visualizer button Minimizes or maximizes the Visualizer window. The Timer Setting window enables you to automatically enter Stand by mode using the Sleep Timer button. 49 F Operation area Displays the operation panels for the audio sources. I Equalizer button Displays the MX Equalizer dialog box, enabling you to download or listen to change the equalizer options. The Internet window enables...
Getting Started Guide
Page 56
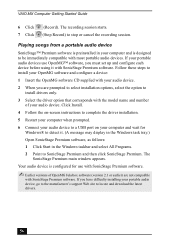
... starts. (Stop Record) to locate and download the latest drivers. 56 Click Install. 4 Follow the on-screen instructions to complete the driver installation. 5 Restart your computer when prompted. 6 Connect your audio device to a USB port on your computer and wait for use OpenMG™ software, you have difficulty installing your audio device. Follow these steps to install your OpenMG software and configure a device: 1 Insert the OpenMG software CD supplied with SonicStage Premium software. If you must set up and configure...
... starts. (Stop Record) to locate and download the latest drivers. 56 Click Install. 4 Follow the on-screen instructions to complete the driver installation. 5 Restart your computer when prompted. 6 Connect your audio device to a USB port on your computer and wait for use OpenMG™ software, you have difficulty installing your audio device. Follow these steps to install your OpenMG software and configure a device: 1 Insert the OpenMG software CD supplied with SonicStage Premium software. If you must set up and configure...
Online Help Center (VAIO User Guide)
Page 7
... information about the Internet Electronic Program Guide (iEPG) service. Describes the hardware and physical configurations of your computer. Contains information on using the audio and video functions of this new Internet-based Sony technology to contact software vendors, and solve common problems. VAIO® MX Com puter Getting Started Guide - Explains how to use this latest Windows operating system. You can use the basic features of the VAIO MX computer and accessories...
... information about the Internet Electronic Program Guide (iEPG) service. Describes the hardware and physical configurations of your computer. Contains information on using the audio and video functions of this new Internet-based Sony technology to contact software vendors, and solve common problems. VAIO® MX Com puter Getting Started Guide - Explains how to use this latest Windows operating system. You can use the basic features of the VAIO MX computer and accessories...
Online Help Center (VAIO User Guide)
Page 12
... the remote control. (For proper remote control operation, do not block the infrared receiver.) 7 Muting button Mutes the current sound output. 8 Power button and indicator light Turns the computer on the current playback of your system. 10 Headphone jack Connection for headphones. 11 Microphone jack Connection for a microphone. 12 i.LINK 4-pin port (IEEE1394) Connection for a compatible digital device. 13 DVD-RW eject button Ejects a disc from the DVD-RW drive. 14 MiniDisc media eject button...
... the remote control. (For proper remote control operation, do not block the infrared receiver.) 7 Muting button Mutes the current sound output. 8 Power button and indicator light Turns the computer on the current playback of your system. 10 Headphone jack Connection for headphones. 11 Microphone jack Connection for a microphone. 12 i.LINK 4-pin port (IEEE1394) Connection for a compatible digital device. 13 DVD-RW eject button Ejects a disc from the DVD-RW drive. 14 MiniDisc media eject button...

Online Help Center (VAIO User Guide)
Page 15
... DVD-RW drive. 14 MiniDisc media eject button Ejects a MiniDisc media from the MiniDisc drive. 15 Previous/Rewind button Skips to receive signals from the remote control. (For proper remote control operation, do not block the infrared receiver.) 7 Muting button Mutes the current sound output. 8 Power button and indicator light Turns the computer on and amber when the computer is in Stand by mode. 9 PC Card slot A PC card (also called a PCMCIA card) can be installed using...
... DVD-RW drive. 14 MiniDisc media eject button Ejects a MiniDisc media from the MiniDisc drive. 15 Previous/Rewind button Skips to receive signals from the remote control. (For proper remote control operation, do not block the infrared receiver.) 7 Muting button Mutes the current sound output. 8 Power button and indicator light Turns the computer on and amber when the computer is in Stand by mode. 9 PC Card slot A PC card (also called a PCMCIA card) can be installed using...
Online Help Center (VAIO User Guide)
Page 63
... your computer's entry point (beaming, synchronization, Internet access) to defend against potential threats hidden inside files, e-mail, or on the Web. Microsoft® Word (On selected models) Microsoft Corp. MovieShaker Sony Electronics Inc. PC-Cillin® 2000 Trend Micro, Inc. PicoPlayer Sony Electronics Inc. This image management software displays images from one location. Outlook Express and other video player devices to work done more , that enable you...
... your computer's entry point (beaming, synchronization, Internet access) to defend against potential threats hidden inside files, e-mail, or on the Web. Microsoft® Word (On selected models) Microsoft Corp. MovieShaker Sony Electronics Inc. PC-Cillin® 2000 Trend Micro, Inc. PicoPlayer Sony Electronics Inc. This image management software displays images from one location. Outlook Express and other video player devices to work done more , that enable you...
Online Help Center (VAIO User Guide)
Page 64
... DVD-R/DVD-RW media, using DVD video format. VAIO Action Setup manages the settings for Memory Stick® media. VisualFlow Sony Electronics Inc. Create professional-looking documents, such as CD players and MiniDisc players, is a special jukebox application that supports many digital media formats. Quicken works just like PictureGear , Memory Stick Slideshow and Windows® Explorer. Simple DVD Maker software enables you to capture compressed video or still images and save them to start...
... DVD-R/DVD-RW media, using DVD video format. VAIO Action Setup manages the settings for Memory Stick® media. VisualFlow Sony Electronics Inc. Create professional-looking documents, such as CD players and MiniDisc players, is a special jukebox application that supports many digital media formats. Quicken works just like PictureGear , Memory Stick Slideshow and Windows® Explorer. Simple DVD Maker software enables you to capture compressed video or still images and save them to start...
Online Help Center (VAIO User Guide)
Page 85
... without the updated drivers for specific operating systems. To install your printer may also help. Select the appropriate port, usually LPT1, and then click Next. 6. Left-click and drag away from the shortcut menu. 2. For information on . Select Local Printer, then click Next. Note: If the printer is placed over its location. 1. Clear the printer memory by turning the printer...
... without the updated drivers for specific operating systems. To install your printer may also help. Select the appropriate port, usually LPT1, and then click Next. 6. Left-click and drag away from the shortcut menu. 2. For information on . Select Local Printer, then click Next. Note: If the printer is placed over its location. 1. Clear the printer memory by turning the printer...
Online Help Center (VAIO User Guide)
Page 112
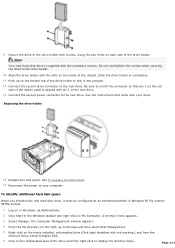
... Replace the Side Panel. 15. Click on the bottom tab of the drive and then right-click to your drive. Note: Your new hard disk drive is aligned with your computer. A shortcut menu appears. 3. The Computer Management window appears. 4. Page 112 Push up on the Unallocated area of the drive holder to the new drive. Connect the second power connector to lock it must be configured as Administrator. 2. 9. Connect the second drive connector...
... Replace the Side Panel. 15. Click on the bottom tab of the drive and then right-click to your drive. Note: Your new hard disk drive is aligned with your computer. A shortcut menu appears. 3. The Computer Management window appears. 4. Page 112 Push up on the Unallocated area of the drive holder to the new drive. Connect the second power connector to lock it must be configured as Administrator. 2. 9. Connect the second drive connector...
System Reference Manual
Page 10
... (DDR-DIMM) Slots 52 Power Supply and Aux Power Headers 53 CLR CMOS Jumper 55 Chapter 5 - Removing, Installing, and Replacing Components 25 Removing the Side Panel 26 Replacing the Side Panel 27 Removing a PCI Add-in Card 28 Installing a PCI Add-In Card 30 Replacing the Lithium Battery 32 Removing a Memory Module 35 Installing System Memory 37 Removing a Slot Cover 41 Covering an Open I /O Address Map 73 Memory Map 75 IRQ Summary 77 Miscellaneous Technical Information ......... 67 User and Supervisor Passwords 68 Beep Code Error Messages 69 PCI Configuration Status and...
... (DDR-DIMM) Slots 52 Power Supply and Aux Power Headers 53 CLR CMOS Jumper 55 Chapter 5 - Removing, Installing, and Replacing Components 25 Removing the Side Panel 26 Replacing the Side Panel 27 Removing a PCI Add-in Card 28 Installing a PCI Add-In Card 30 Replacing the Lithium Battery 32 Removing a Memory Module 35 Installing System Memory 37 Removing a Slot Cover 41 Covering an Open I /O Address Map 73 Memory Map 75 IRQ Summary 77 Miscellaneous Technical Information ......... 67 User and Supervisor Passwords 68 Beep Code Error Messages 69 PCI Configuration Status and...

System Reference Manual
Page 71
CMOS Setup Options 59 Main Screen System Time [00:00:00] System Date [01/01/2001] Primary Master (see "IDE Sub-Menus" on page 60) Primary Slave (see "IDE Sub-Menus" on page 60) Secondary Master (see "IDE Sub-Menus" on page 60) Secondary Slave (see "IDE Sub-Menus" on page 60) Supervisor Password [Disabled] User Password [Disabled] Installed Memory See Specifications sheet for details.* BIOS Revision/Version 1003 (depends on model) * The Specifications sheet is supplied with your computer's original documentation.
CMOS Setup Options 59 Main Screen System Time [00:00:00] System Date [01/01/2001] Primary Master (see "IDE Sub-Menus" on page 60) Primary Slave (see "IDE Sub-Menus" on page 60) Secondary Master (see "IDE Sub-Menus" on page 60) Secondary Slave (see "IDE Sub-Menus" on page 60) Supervisor Password [Disabled] User Password [Disabled] Installed Memory See Specifications sheet for details.* BIOS Revision/Version 1003 (depends on model) * The Specifications sheet is supplied with your computer's original documentation.
System Reference Manual
Page 98
...See display monitor connector 12 mouse connector 10 O optical drive specifications 82 P passwords, user and supervisor 68 PCI add-in , headphones 13 monitor 12 printer port 11 serial port 1 11 telephone and line 13 USB ports 10 I/O slot covering 42 I /O connectors i.LINK 14 keyboard and mouse 10 mic, line in card installing 30 removing 28 PCI bus specifications 79 power connector 53 power management, configuring 19 processor specifications 79 R RAM - See Also communications monitor - 86 VAIO MX Computer System Reference Manual G Giga Pocket specifications 81 graphics controller -
...See display monitor connector 12 mouse connector 10 O optical drive specifications 82 P passwords, user and supervisor 68 PCI add-in , headphones 13 monitor 12 printer port 11 serial port 1 11 telephone and line 13 USB ports 10 I/O slot covering 42 I /O connectors i.LINK 14 keyboard and mouse 10 mic, line in card installing 30 removing 28 PCI bus specifications 79 power connector 53 power management, configuring 19 processor specifications 79 R RAM - See Also communications monitor - 86 VAIO MX Computer System Reference Manual G Giga Pocket specifications 81 graphics controller -
VAIO User Guide (primary manual)
Page 8
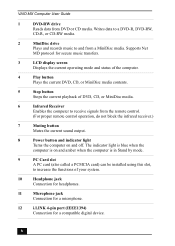
... to a DVD-R, DVD-RW, CD-R, or CD-RW media. 2 MiniDisc drive Plays and records music to receive signals from the remote control. (For proper remote control operation, do not block the infrared receiver.) 7 Muting button Mutes the current sound output. 8 Power button and indicator light Turns the computer on and amber when the computer is in Stand by mode. 9 PC Card slot A PC card (also called a PCMCIA card) can be installed using this slot, to...
... to a DVD-R, DVD-RW, CD-R, or CD-RW media. 2 MiniDisc drive Plays and records music to receive signals from the remote control. (For proper remote control operation, do not block the infrared receiver.) 7 Muting button Mutes the current sound output. 8 Power button and indicator light Turns the computer on and amber when the computer is in Stand by mode. 9 PC Card slot A PC card (also called a PCMCIA card) can be installed using this slot, to...
VAIO User Guide (primary manual)
Page 10
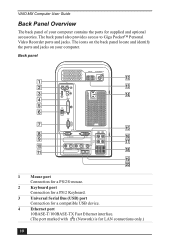
... (75 ) IN OUT MONITOR R L LINE DVI IN LINE OUT AUDIO S VIDEO/VIDEO AUDIO S VIDEO/VIDEO VHF/UHF ------ VIDEO OUTPUT VIDEO 1 INPUT ------ The icons on the back panel locate and identify the ports and jacks on your computer contains the ports for LAN connections only.) 10 VAIO MX Computer User Guide Back Panel Overview The back panel of your computer. SPEAKER 1 Mouse port Connection for a PS/2® mouse. 2 Keyboard port Connection for a PS/2 Keyboard. 3 Universal Serial Bus (USB) port Connection for a compatible USB device. 4 Ethernet port 10BASE-T/100BASE-TX...
... (75 ) IN OUT MONITOR R L LINE DVI IN LINE OUT AUDIO S VIDEO/VIDEO AUDIO S VIDEO/VIDEO VHF/UHF ------ VIDEO OUTPUT VIDEO 1 INPUT ------ The icons on the back panel locate and identify the ports and jacks on your computer contains the ports for LAN connections only.) 10 VAIO MX Computer User Guide Back Panel Overview The back panel of your computer. SPEAKER 1 Mouse port Connection for a PS/2® mouse. 2 Keyboard port Connection for a PS/2 Keyboard. 3 Universal Serial Bus (USB) port Connection for a compatible USB device. 4 Ethernet port 10BASE-T/100BASE-TX...
VAIO User Guide (primary manual)
Page 14
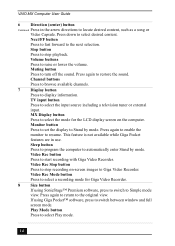
.... Sleep button Press to program the computer to automatically enter Stand by mode. Press down to raise or lower the volume. MX Display button Press to switch between window and full screen mode. If using SonicStage™ Premium software, press to switch to resume. Stop button Press to stop recording on the computer. Channel buttons Press to browse available channels. 7 Display button Press to restore the sound. Monitor button Press to set the display to...
.... Sleep button Press to program the computer to automatically enter Stand by mode. Press down to raise or lower the volume. MX Display button Press to switch between window and full screen mode. If using SonicStage™ Premium software, press to switch to resume. Stop button Press to stop recording on the computer. Channel buttons Press to browse available channels. 7 Display button Press to restore the sound. Monitor button Press to set the display to...
VAIO User Guide (primary manual)
Page 68
... application or device driver may not need to Original Factory Defaults All data and partitions are removed from the hard disk drive. The factory default settings and software applications are restored. Change Partition Size All partitions, custom installations, and changes are removed from the hard disk drive. All original factory settings, operating system, and preinstalled software is deleted. Your computer is returned to an external media. 68 The System Recovery utility does not back up to the original factory settings. VAIO MX Computer User Guide To Use the System Recovery CD...
... application or device driver may not need to Original Factory Defaults All data and partitions are removed from the hard disk drive. The factory default settings and software applications are restored. Change Partition Size All partitions, custom installations, and changes are removed from the hard disk drive. All original factory settings, operating system, and preinstalled software is deleted. Your computer is returned to an external media. 68 The System Recovery utility does not back up to the original factory settings. VAIO MX Computer User Guide To Use the System Recovery CD...

VAIO User Guide (primary manual)
Page 70
... your computer's optical drive. If your computer is already on the software application you wish to restore. Reinstalling an individual software application may not need to reinstall the entire contents of your hard drive. ✍ If you need to reinstall all open applications. 2 When the Windows desktop appears, insert the Application Recovery CD into your computer or specific application. VAIO MX Computer User Guide To Use the Application Recovery CD(s) The Application Recovery CD utility enables...
... your computer's optical drive. If your computer is already on the software application you wish to restore. Reinstalling an individual software application may not need to reinstall the entire contents of your hard drive. ✍ If you need to reinstall all open applications. 2 When the Windows desktop appears, insert the Application Recovery CD into your computer or specific application. VAIO MX Computer User Guide To Use the Application Recovery CD(s) The Application Recovery CD utility enables...
VAIO User Guide (primary manual)
Page 93
... port 11 Video/S-video In port 11 Video/S-video Out port 11 battery disposal 86 C cable connection precautions 87 cables 87 CD cleaning media 90 handling media 89 media problems 77 CD-RW recording problems 77 Change the parallel port type 75 cleaning computer 86 computer adjusting voltage settings 85 cleaning 86 condensation 87 configuring 63 disposing of battery 86 hard disk drive partition 63 HDD defragmenting 63 operating system locks 74 optical drive tray eject 75 recover applications 73 recover drivers 73 removing cover...
... port 11 Video/S-video In port 11 Video/S-video Out port 11 battery disposal 86 C cable connection precautions 87 cables 87 CD cleaning media 90 handling media 89 media problems 77 CD-RW recording problems 77 Change the parallel port type 75 cleaning computer 86 computer adjusting voltage settings 85 cleaning 86 condensation 87 configuring 63 disposing of battery 86 hard disk drive partition 63 HDD defragmenting 63 operating system locks 74 optical drive tray eject 75 recover applications 73 recover drivers 73 removing cover...
VAIO User Guide (primary manual)
Page 94
... using a digital video device 37 DVI monitor port 11 E electronic equipment 86 electrostatic discharge 88 Ethernet port 10 F floppy disks 89 FM antenna port 11 Front Panel display button 9 DVD-RW drive 8 DVD-RW eject button 9 function button 9 headphone jack 8 i.LINK (4-pin) port 8 Infrared receiver 8 LCD display screen 8 Memory Stick access light 9 memory stick media slot 9 microphone jack 8 MiniDisc drive 8 MiniDisc eject button 9 Muting button 8 next/fast forward button 9 Overview 7 PC card slot 8 Play button 8 Power button 8 previous/rewind button 9 Stop button 8 USB port 9 volume control...
... using a digital video device 37 DVI monitor port 11 E electronic equipment 86 electrostatic discharge 88 Ethernet port 10 F floppy disks 89 FM antenna port 11 Front Panel display button 9 DVD-RW drive 8 DVD-RW eject button 9 function button 9 headphone jack 8 i.LINK (4-pin) port 8 Infrared receiver 8 LCD display screen 8 Memory Stick access light 9 memory stick media slot 9 microphone jack 8 MiniDisc drive 8 MiniDisc eject button 9 Muting button 8 next/fast forward button 9 Overview 7 PC card slot 8 Play button 8 Power button 8 previous/rewind button 9 Stop button 8 USB port 9 volume control...
VAIO User Guide (primary manual)
Page 96
.../DVD media problems 77 change parallel port type 75 DVD playback 76 microphone 81 modem operation 80 modem speed 79 mouse 82 operating system 74 optical drive tray eject 75 printer 83 recover applications 73 recover drivers 73 software 77 software stopped responding 74 starting the computer 73 system response 82 system stopped responding 74 Troubleshooting 73 turning off your computer 85 TV interference 87 U Uninterruptible Power Supply 85 Universal Serial Bus (USB) port 9, 10 upgrading your computer...
.../DVD media problems 77 change parallel port type 75 DVD playback 76 microphone 81 modem operation 80 modem speed 79 mouse 82 operating system 74 optical drive tray eject 75 printer 83 recover applications 73 recover drivers 73 software 77 software stopped responding 74 starting the computer 73 system response 82 system stopped responding 74 Troubleshooting 73 turning off your computer 85 TV interference 87 U Uninterruptible Power Supply 85 Universal Serial Bus (USB) port 9, 10 upgrading your computer...


