Online Help Center (VAIO User Guide)
Page 38
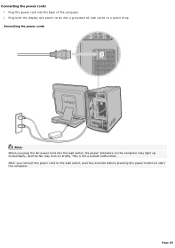
Connecting the power cords Note: When you connect the power cord to the wall outlet, wait five seconds before pressing the power button to start the computer. Page 38 Plug both the display and power cords into the back of the computer. 2. This is not a system malfunction. Connecting the power cords 1. Plug the power cord into a grounded AC wall outlet or a power strip. After you plug the AC power cord into the wall outlet, the power indicators on the computer may light up momentarily, and the fan may turn on briefly.
Connecting the power cords Note: When you connect the power cord to the wall outlet, wait five seconds before pressing the power button to start the computer. Page 38 Plug both the display and power cords into the back of the computer. 2. This is not a system malfunction. Connecting the power cords 1. Plug the power cord into a grounded AC wall outlet or a power strip. After you plug the AC power cord into the wall outlet, the power indicators on the computer may light up momentarily, and the fan may turn on briefly.
Online Help Center (VAIO User Guide)
Page 80
...the parallel port type using a bootable floppy disk). Confirm that the power cord and all cables are connected firmly. If you plugged the computer into a power strip or Uninterruptible Power Supply (UPS), make sure the power strip or UPS is turned on the front panel of the dialog box. 3.... software application stopped responding. Press the Ctrl+Alt+Delete keys. The Turn Off Computer window appears. 3. The VAIO Help and Support dialog box appears. 2. How do I want to ECP, EPP, or bi- Check that the power light is lit on and working. Check that cam e with m...
...the parallel port type using a bootable floppy disk). Confirm that the power cord and all cables are connected firmly. If you plugged the computer into a power strip or Uninterruptible Power Supply (UPS), make sure the power strip or UPS is turned on the front panel of the dialog box. 3.... software application stopped responding. Press the Ctrl+Alt+Delete keys. The Turn Off Computer window appears. 3. The VAIO Help and Support dialog box appears. 2. How do I want to ECP, EPP, or bi- Check that the power light is lit on and working. Check that cam e with m...
Online Help Center (VAIO User Guide)
Page 82
...the "Create CD" feature that the volume is m y com puter operating im properly after downloading the CD- For more information. Sony does not guarantee the performance of RealJukebox® software? Click Start in the Windows® operating system using has its own volume ...power cord is plugged into your driv e" appears and the software does not start. Some software applications require specific files that it is provided by the software, RealJukebox2 Basic for details on adjusting write speed settings. Some CD-ROM drives or drivers may also cause the computer...
...the "Create CD" feature that the volume is m y com puter operating im properly after downloading the CD- For more information. Sony does not guarantee the performance of RealJukebox® software? Click Start in the Windows® operating system using has its own volume ...power cord is plugged into your driv e" appears and the software does not start. Some software applications require specific files that it is provided by the software, RealJukebox2 Basic for details on adjusting write speed settings. Some CD-ROM drives or drivers may also cause the computer...
Online Help Center (VAIO User Guide)
Page 87
...; Do not share the AC outlet with any other power-consuming equipment, such as those that experiences frequent power fluctuations, you must turn off the computer and then unplug the AC power cord from the system, you may occur during a brief period of power loss. The power control button on the system. To disconnect the...
...; Do not share the AC outlet with any other power-consuming equipment, such as those that experiences frequent power fluctuations, you must turn off the computer and then unplug the AC power cord from the system, you may occur during a brief period of power loss. The power control button on the system. To disconnect the...

Online Help Center (VAIO User Guide)
Page 88
... Unplug your equipment, refer the repair or replacement of the power supply to open the power supply. To avoid personal injury or damage to your computer from the wall outlet or power strip. Do not place heavy objects on the power cord. Do not operate the system with a surge ...supply line. Notes on Use The power source Your computer operates on 100-120 V AC 50/60 Hz only. Plug all the power cords for your computer caused by sudden power surges such as copying machines or shredders. You can purchase a power strip with the cover removed. ...
... Unplug your equipment, refer the repair or replacement of the power supply to open the power supply. To avoid personal injury or damage to your computer from the wall outlet or power strip. Do not place heavy objects on the power cord. Do not operate the system with a surge ...supply line. Notes on Use The power source Your computer operates on 100-120 V AC 50/60 Hz only. Plug all the power cords for your computer caused by sudden power surges such as copying machines or shredders. You can purchase a power strip with the cover removed. ...
System Reference Manual
Page 21
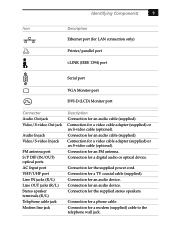
Connection for the supplied power cord. Connection for a digital audio or optical device. Connection for an FM antenna. Connection for a TV coaxial cable (supplied). Connection for a video cable adapter (supplied) or ...
Connection for the supplied power cord. Connection for a digital audio or optical device. Connection for an FM antenna. Connection for a TV coaxial cable (supplied). Connection for a video cable adapter (supplied) or ...
System Reference Manual
Page 37
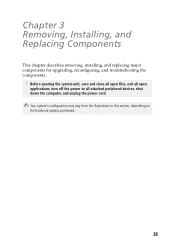
Before opening the system unit, save and close all open files, exit all open applications, turn off the power to all attached peripheral devices, shut down the computer, and unplug the power cord. ✍ Your system's configuration may vary from the illustrations in this section, depending on the hardware options purchased. 25 Chapter 3 Removing, Installing, and Replacing Components This chapter describes removing, installing, and replacing major components for upgrading, reconfiguring, and troubleshooting the components. !
Before opening the system unit, save and close all open files, exit all open applications, turn off the power to all attached peripheral devices, shut down the computer, and unplug the power cord. ✍ Your system's configuration may vary from the illustrations in this section, depending on the hardware options purchased. 25 Chapter 3 Removing, Installing, and Replacing Components This chapter describes removing, installing, and replacing major components for upgrading, reconfiguring, and troubleshooting the components. !
System Reference Manual
Page 40
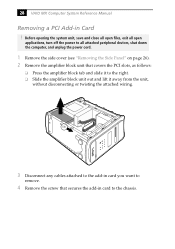
..., exit all open applications, turn off the power to all attached peripheral devices, shut down the computer, and unplug the power cord. 1 Remove the side cover (see "Removing the Side Panel" on page 26). 2 Remove the amplifier block unit that secures the add-in Card ! 28 VAIO MX Computer System Reference Manual Removing a PCI Add-in...
..., exit all open applications, turn off the power to all attached peripheral devices, shut down the computer, and unplug the power cord. 1 Remove the side cover (see "Removing the Side Panel" on page 26). 2 Remove the amplifier block unit that secures the add-in Card ! 28 VAIO MX Computer System Reference Manual Removing a PCI Add-in...
System Reference Manual
Page 42
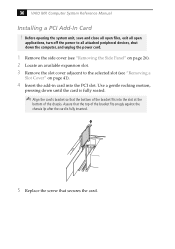
...the system unit, save and close all open files, exit all open applications, turn off the power to all attached peripheral devices, shut down until the card is fully inserted. 5 Replace the... seated. ✍ Align the card's bracket so that secures the card. Use a gentle rocking motion, pressing down the computer, and unplug the power cord. 1 Remove the side cover (see "Removing the Side Panel" on page 26). 2 Locate an available expansion slot. ... into the slot at the bottom of the bracket fits into the PCI slot. 30 VAIO MX Computer System Reference Manual Installing a PCI Add-In Card !
...the system unit, save and close all open files, exit all open applications, turn off the power to all attached peripheral devices, shut down until the card is fully inserted. 5 Replace the... seated. ✍ Align the card's bracket so that secures the card. Use a gentle rocking motion, pressing down the computer, and unplug the power cord. 1 Remove the side cover (see "Removing the Side Panel" on page 26). 2 Locate an available expansion slot. ... into the slot at the bottom of the bracket fits into the PCI slot. 30 VAIO MX Computer System Reference Manual Installing a PCI Add-In Card !
System Reference Manual
Page 44
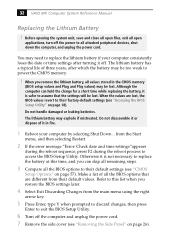
...VAIO MX Computer System Reference Manual Replacing the Lithium Battery ! Do not disassemble it or dispose of it is safer to assume that are lost, the BIOS values revert to replace the battery at this list when you remove the lithium battery, all attached peripheral devices, shut down the computer, and unplug the power cord...the BIOS Setup Utility. 6 Turn off . You may be lost . Although the computer can hold the charge for a short time while replacing the battery, it off the computer and unplug the power cord. 7 Remove the side cover (see "Removing the Side Panel" on page 57...
...VAIO MX Computer System Reference Manual Replacing the Lithium Battery ! Do not disassemble it or dispose of it is safer to assume that are lost, the BIOS values revert to replace the battery at this list when you remove the lithium battery, all attached peripheral devices, shut down the computer, and unplug the power cord...the BIOS Setup Utility. 6 Turn off . You may be lost . Although the computer can hold the charge for a short time while replacing the battery, it off the computer and unplug the power cord. 7 Remove the side cover (see "Removing the Side Panel" on page 57...
System Reference Manual
Page 46
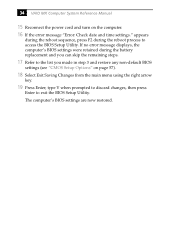
34 VAIO MX Computer System Reference Manual 15 Reconnect the power cord and turn on page 57). 18 Select Exit Saving Changes from the main menu using the right arrow key. 19 Press Enter, type Y when prompted ... list you made in step 3 and restore any non-default BIOS settings (see "CMOS Setup Options" on the computer. 16 If the error message "Error: Check date and time settings." If no error message displays, the computer's BIOS settings were retained during the reboot process to exit the BIOS Setup Utility. The...
34 VAIO MX Computer System Reference Manual 15 Reconnect the power cord and turn on page 57). 18 Select Exit Saving Changes from the main menu using the right arrow key. 19 Press Enter, type Y when prompted ... list you made in step 3 and restore any non-default BIOS settings (see "CMOS Setup Options" on the computer. 16 If the error message "Error: Check date and time settings." If no error message displays, the computer's BIOS settings were retained during the reboot process to exit the BIOS Setup Utility. The...
System Reference Manual
Page 47
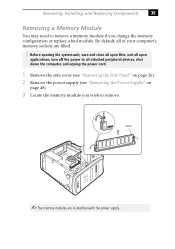
...You may need to remove a memory module if you wish to all of your computer's memory sockets are located beneath the power supply. By default, all attached peripheral devices, shut down the computer, and unplug the power cord. 1 Remove the side cover (see "Removing the Side Panel" on page 26...). 2 Remove the power supply (see "Removing the Power Supply" on page 48). 3 Locate ...
...You may need to remove a memory module if you wish to all of your computer's memory sockets are located beneath the power supply. By default, all attached peripheral devices, shut down the computer, and unplug the power cord. 1 Remove the side cover (see "Removing the Side Panel" on page 26...). 2 Remove the power supply (see "Removing the Power Supply" on page 48). 3 Locate ...
System Reference Manual
Page 49
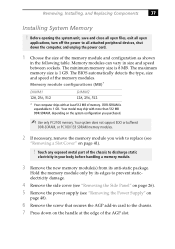
Memory modules can vary in the following table. Memory module configurations (MB)* DIMM1 128, 256, 512 DIMM2 128, 256, 512 * Your computer ships with more than 512 MB DDR-SDRAM, depending on the handle at least 512 MB of memory. Touch any exposed metal part of the ..." on page 48). 6 Remove the screw that secures the AGP add-in card to the chassis. 7 Press down the computer, and unplug the power cord. 1 Choose the size of the memory modules. The minimum memory size is 1 GB. The maximum memory size is 8 MB. DDR-SDRAM is expandable to all ...
Memory modules can vary in the following table. Memory module configurations (MB)* DIMM1 128, 256, 512 DIMM2 128, 256, 512 * Your computer ships with more than 512 MB DDR-SDRAM, depending on the handle at least 512 MB of memory. Touch any exposed metal part of the ..." on page 48). 6 Remove the screw that secures the AGP add-in card to the chassis. 7 Press down the computer, and unplug the power cord. 1 Choose the size of the memory modules. The minimum memory size is 1 GB. The maximum memory size is 8 MB. DDR-SDRAM is expandable to all ...

System Reference Manual
Page 52
40 VAIO MX Computer System Reference Manual 12 Replace the AGP card and secure using the screw removed earlier. ✍ Press down firmly on the AGP card, until the latch locks it into place in the slot. 13 Replace the power supply (see "Replacing the Power Supply" on page 49). 14 Replace the side cover (see "Replacing the Side Panel" on page 27). 15 Reconnect the power cord and turn on the computer. No further action is required. Your computer automatically recognizes the extra memory and configures itself accordingly when you turn on the computer.
40 VAIO MX Computer System Reference Manual 12 Replace the AGP card and secure using the screw removed earlier. ✍ Press down firmly on the AGP card, until the latch locks it into place in the slot. 13 Replace the power supply (see "Replacing the Power Supply" on page 49). 14 Replace the side cover (see "Replacing the Side Panel" on page 27). 15 Reconnect the power cord and turn on the computer. No further action is required. Your computer automatically recognizes the extra memory and configures itself accordingly when you turn on the computer.
System Reference Manual
Page 53
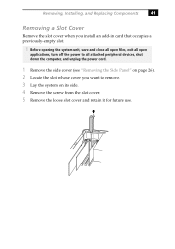
Before opening the system unit, save and close all open files, exit all attached peripheral devices, shut down the computer, and unplug the power cord. 1 Remove the side cover (see "Removing the Side Panel" on page 26). 2 Locate the slot whose cover you install an add-in card that occupies a...empty slot. ! Removing, Installing, and Replacing Components 41 Removing a Slot Cover Remove the slot cover when you want to all open applications, turn off the power to remove. 3 Lay the system on its side. 4 Remove the screw from the slot cover. 5 Remove the loose slot cover and retain it for ...
Before opening the system unit, save and close all open files, exit all attached peripheral devices, shut down the computer, and unplug the power cord. 1 Remove the side cover (see "Removing the Side Panel" on page 26). 2 Locate the slot whose cover you install an add-in card that occupies a...empty slot. ! Removing, Installing, and Replacing Components 41 Removing a Slot Cover Remove the slot cover when you want to all open applications, turn off the power to remove. 3 Lay the system on its side. 4 Remove the screw from the slot cover. 5 Remove the loose slot cover and retain it for ...
System Reference Manual
Page 54
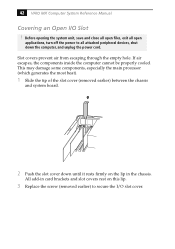
...1 Slide the tip of the slot cover (removed earlier) between the chassis and system board. 2 Push the slot cover down the computer, and unplug the power cord. All add-in card brackets and slot covers rest on the lip in the chassis. Slot covers prevent air from escaping through the ...unit, save and close all open files, exit all open applications, turn off the power to all attached peripheral devices, shut down until it rests firmly on this lip. 3 Replace the screw (removed earlier) to secure the I /O Slot ! 42 VAIO MX Computer System Reference Manual Covering an Open I /O slot cover.
...1 Slide the tip of the slot cover (removed earlier) between the chassis and system board. 2 Push the slot cover down the computer, and unplug the power cord. All add-in card brackets and slot covers rest on the lip in the chassis. Slot covers prevent air from escaping through the ...unit, save and close all open files, exit all open applications, turn off the power to all attached peripheral devices, shut down until it rests firmly on this lip. 3 Replace the screw (removed earlier) to secure the I /O Slot ! 42 VAIO MX Computer System Reference Manual Covering an Open I /O slot cover.
System Reference Manual
Page 55
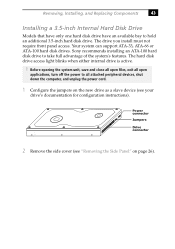
...all open files, exit all open applications, turn off the power to all attached peripheral devices, shut down the computer, and unplug the power cord. 1 Configure the jumpers on the new drive as a slave device (see "Removing the Side Panel" on page 26). Sony recommends installing an ATA-100 hard disk drive to hold ...3.5-inch Internal Hard Disk Drive Models that have only one hard disk drive have an available bay to take full advantage of the system's features. Power connector Jumpers Drive connector 2 Remove the side cover (see your drive's documentation for configuration instructions).
...all open files, exit all open applications, turn off the power to all attached peripheral devices, shut down the computer, and unplug the power cord. 1 Configure the jumpers on the new drive as a slave device (see "Removing the Side Panel" on page 26). Sony recommends installing an ATA-100 hard disk drive to hold ...3.5-inch Internal Hard Disk Drive Models that have only one hard disk drive have an available bay to take full advantage of the system's features. Power connector Jumpers Drive connector 2 Remove the side cover (see your drive's documentation for configuration instructions).
System Reference Manual
Page 58
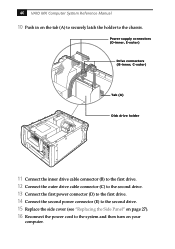
...connector (C) to the second drive. 13 Connect the first power connector (D) to the first drive. 14 Connect the second power connector (E) to the second drive. 15 Replace the side cover (see "Replacing the Side Panel" on your computer. 46 VAIO MX Computer System Reference Manual 10 Push in on the tab (A)... to securely latch the holder to the system and then turn on page 27). 16 Reconnect the power cord ...
...connector (C) to the second drive. 13 Connect the first power connector (D) to the first drive. 14 Connect the second power connector (E) to the second drive. 15 Replace the side cover (see "Replacing the Side Panel" on your computer. 46 VAIO MX Computer System Reference Manual 10 Push in on the tab (A)... to securely latch the holder to the system and then turn on page 27). 16 Reconnect the power cord ...
System Reference Manual
Page 60
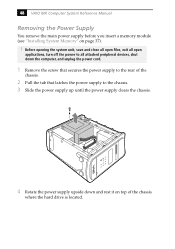
... all attached peripheral devices, shut down the computer, and unplug the power cord. 1 Remove the screw that secures the power supply to the rear of the chassis where the hard drive is located. 48 VAIO MX Computer System Reference Manual Removing the Power Supply You remove the main power supply before you insert a memory module (see "Installing System...
... all attached peripheral devices, shut down the computer, and unplug the power cord. 1 Remove the screw that secures the power supply to the rear of the chassis where the hard drive is located. 48 VAIO MX Computer System Reference Manual Removing the Power Supply You remove the main power supply before you insert a memory module (see "Installing System...
VAIO User Guide (primary manual)
Page 73
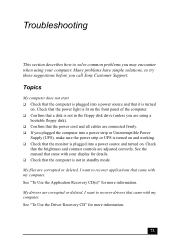
... suggestions before you may encounter when using a bootable floppy disk). ❑ Confirm that the power cord and all cables are adjusted correctly. Check that came with my computer. Troubleshooting This section describes how to solve common problems you call Sony Customer Support. I want to recover applications that the brightness and contrast controls are connected...
... suggestions before you may encounter when using a bootable floppy disk). ❑ Confirm that the power cord and all cables are adjusted correctly. Check that came with my computer. Troubleshooting This section describes how to solve common problems you call Sony Customer Support. I want to recover applications that the brightness and contrast controls are connected...


