Operating Instructions
Page 4
... and servicing of the polarized or grounding-type plug. Follow the instructions below: For the set or described in any way, such as power-supply cord or plug is used, use caution when moving the cart/apparatus combination to avoid injury from the apparatus. 11) Only use attachments/...and the point where they exit from tip-over. 13) Unplug this apparatus during lightning storms or when unused for long periods of electrical power supplied to fit, contact your outlet, consult an electrician for the set is a safety feature. Servicing is required when the apparatus has been damaged...
... and servicing of the polarized or grounding-type plug. Follow the instructions below: For the set or described in any way, such as power-supply cord or plug is used, use caution when moving the cart/apparatus combination to avoid injury from the apparatus. 11) Only use attachments/...and the point where they exit from tip-over. 13) Unplug this apparatus during lightning storms or when unused for long periods of electrical power supplied to fit, contact your outlet, consult an electrician for the set is a safety feature. Servicing is required when the apparatus has been damaged...
Operating Instructions
Page 11
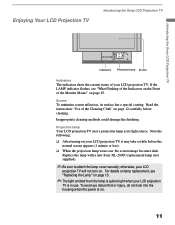
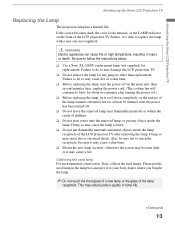
... when your LCD projection TV will not turn on. Replace the lamp with a new Sony XL-2000U replacement lamp (not supplied). ✍ Be sure to attach the lamp cover securely; To avoid eye discomfort or injury, do not look into the housing when the power is in use. Projection lamp Your LCD projection TV uses a projection lamp as its...
... when your LCD projection TV will not turn on. Replace the lamp with a new Sony XL-2000U replacement lamp (not supplied). ✍ Be sure to attach the lamp cover securely; To avoid eye discomfort or injury, do not look into the housing when the power is in use. Projection lamp Your LCD projection TV uses a projection lamp as its...
Operating Instructions
Page 12
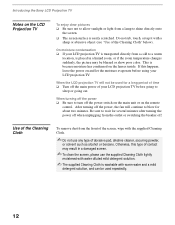
... Cleaning Cloth To remove dust from the front of the screen, wipe with the supplied Cleaning Cloth. ✍ Do not use the supplied Cleaning Cloth lightly moistened with water diluted mild detergent solution. ✍ The supplied Cleaning Cloth is placed in a damaged screen. ✍ To clean the screen,...or going to wait for about two minutes. When the LCD projection TV will continue to turn off the power switch on the main unit or on the remote control. Introducing the Sony LCD Projection TV Notes on the LCD Projection TV To enjoy clear pictures ❑ Be sure not to allow ...
... Cleaning Cloth To remove dust from the front of the screen, wipe with the supplied Cleaning Cloth. ✍ Do not use the supplied Cleaning Cloth lightly moistened with water diluted mild detergent solution. ✍ The supplied Cleaning Cloth is placed in a damaged screen. ✍ To clean the screen,...or going to wait for about two minutes. When the LCD projection TV will continue to turn off the power switch on the main unit or on the remote control. Introducing the Sony LCD Projection TV Notes on the LCD Projection TV To enjoy clear pictures ❑ Be sure not to allow ...
Operating Instructions
Page 13
... the LCD projection TV after the power has been turned off on the front of the lamp receptacle. Also, be sure not to replace the lamp with a new one (not supplied). Collecting the used lamp For environmental conservation, Sony collects the used lamp in injury or death. Introducing the Sony LCD Projection TV Introducing the Sony LCD Projection TV Replacing the...
... the LCD projection TV after the power has been turned off on the front of the lamp receptacle. Also, be sure not to replace the lamp with a new one (not supplied). Collecting the used lamp For environmental conservation, Sony collects the used lamp in injury or death. Introducing the Sony LCD Projection TV Introducing the Sony LCD Projection TV Replacing the...
Operating Instructions
Page 15
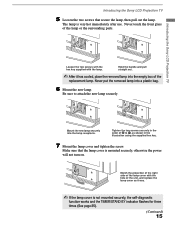
... bag. 6 Mount the new lamp. Never put the removed lamp into the lamp receptacle. Tighten the two screws securely in the illustration using the supplied hex key. 7 Mount the lamp cover and tighten the screw. Hold the handle and pull straight out. ✍ After it was. ✍...function works and the TIMER/STAND BY indicator flashes for three times (See page 85). (Continued) 15 Introducing the Sony LCD Projection TV 5 Loosen the two screws that the lamp cover is mounted securely, otherwise the power will not turn on. Never touch the front glass of the replacement lamp.
... bag. 6 Mount the new lamp. Never put the removed lamp into the lamp receptacle. Tighten the two screws securely in the illustration using the supplied hex key. 7 Mount the lamp cover and tighten the screw. Hold the handle and pull straight out. ✍ After it was. ✍...function works and the TIMER/STAND BY indicator flashes for three times (See page 85). (Continued) 15 Introducing the Sony LCD Projection TV 5 Loosen the two screws that the lamp cover is mounted securely, otherwise the power will not turn on. Never touch the front glass of the replacement lamp.

Operating Instructions
Page 29
...power sources before making any connections. 1 Connect the cable TV cable to the VCR's IN jack. 2 Using a coaxial cable, connect the VCR's OUT jack to the LCD projection TV's VHF/UHF jack. 3 Using AUDIO and S VIDEO cables, connect the VCR's Audio and S Video OUT jacks to the LCD projection TV's AUDIO and S VIDEO IN jacks. Rear... of LCD projection TV Coaxial cable S VIDEO VIDEO (yellow) AUDIO-L (white) AUDIO-R (red) VCR VMC-810S/820S (not supplied) Cable YC-15V/30V (not supplied) ✍ If your VCR is not...
...power sources before making any connections. 1 Connect the cable TV cable to the VCR's IN jack. 2 Using a coaxial cable, connect the VCR's OUT jack to the LCD projection TV's VHF/UHF jack. 3 Using AUDIO and S VIDEO cables, connect the VCR's Audio and S Video OUT jacks to the LCD projection TV's AUDIO and S VIDEO IN jacks. Rear... of LCD projection TV Coaxial cable S VIDEO VIDEO (yellow) AUDIO-L (white) AUDIO-R (red) VCR VMC-810S/820S (not supplied) Cable YC-15V/30V (not supplied) ✍ If your VCR is not...
Operating Instructions
Page 32
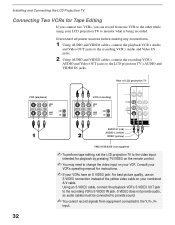
... You cannot record signals from one VCR to the other while using your LCD projection TV to monitor what is being recorded. Rear of the yellow video cable on your combined A/V cable. Disconnect all power sources before making any connections. 1 Using AUDIO and VIDEO cables, connect the ...(white) VIDEO (yellow) VMC-810S/820S (not supplied) ✍ To perform tape editing, set the LCD projection TV to the video input intended for playback by pressing TV/VIDEO on the remote control. ✍ You may need to the LCD projection TV's AUDIO and VIDEO IN jacks. Installing and Connecting the...
... You cannot record signals from one VCR to the other while using your LCD projection TV to monitor what is being recorded. Rear of the yellow video cable on your combined A/V cable. Disconnect all power sources before making any connections. 1 Using AUDIO and VIDEO cables, connect the ...(white) VIDEO (yellow) VMC-810S/820S (not supplied) ✍ To perform tape editing, set the LCD projection TV to the video input intended for playback by pressing TV/VIDEO on the remote control. ✍ You may need to the LCD projection TV's AUDIO and VIDEO IN jacks. Installing and Connecting the...
Operating Instructions
Page 33
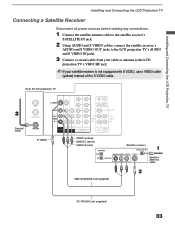
Rear of the S VIDEO cable. Installing and Connecting the LCD Projection TV Installing and Connecting the LCD Projection TV Connecting a Satellite Receiver Disconnect all power sources before making any connections. 1 Connect the satellite antenna cable to the satellite receiver's SATELLITE IN jack. ... to the LCD projection TV's VHF/UHF jack. ✍ If your satellite receiver is not equipped with S VIDEO, use a VIDEO cable (yellow) instead of LCD projection TV Coaxial cable S VIDEO VIDEO (yellow) AUDIO-L (white) AUDIO-R (red) VMC-810S/820S (not supplied) Satellite receiver Satellite...
Rear of the S VIDEO cable. Installing and Connecting the LCD Projection TV Installing and Connecting the LCD Projection TV Connecting a Satellite Receiver Disconnect all power sources before making any connections. 1 Connect the satellite antenna cable to the satellite receiver's SATELLITE IN jack. ... to the LCD projection TV's VHF/UHF jack. ✍ If your satellite receiver is not equipped with S VIDEO, use a VIDEO cable (yellow) instead of LCD projection TV Coaxial cable S VIDEO VIDEO (yellow) AUDIO-L (white) AUDIO-R (red) VMC-810S/820S (not supplied) Satellite receiver Satellite...
Operating Instructions
Page 34
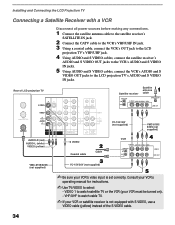
...LCD Projection TV Connecting a Satellite Receiver with a VCR Disconnect all power ...Rear of the S VIDEO cable. Consult your VCR's operating manual for instructions. ✍ Use TV/VIDEO to watch cable TV. ✍ If your VCR or satellite receiver is not equipped with S VIDEO, use a VIDEO cable (yellow) instead of LCD projection TV... Satellite receiver Satellite antenna cable AUDIO-R (red) AUDIO-L (white) VIDEO (yellow) VMC-810S/820S (not supplied) 34 YC-15V/30V (not supplied) S VIDEO Coaxial cable Cable VCR VMC-810S/ 820S (not supplied) YC-15V/30V (not supplied...
...LCD Projection TV Connecting a Satellite Receiver with a VCR Disconnect all power ...Rear of the S VIDEO cable. Consult your VCR's operating manual for instructions. ✍ Use TV/VIDEO to watch cable TV. ✍ If your VCR or satellite receiver is not equipped with S VIDEO, use a VIDEO cable (yellow) instead of LCD projection TV... Satellite receiver Satellite antenna cable AUDIO-R (red) AUDIO-L (white) VIDEO (yellow) VMC-810S/820S (not supplied) 34 YC-15V/30V (not supplied) S VIDEO Coaxial cable Cable VCR VMC-810S/ 820S (not supplied) YC-15V/30V (not supplied...
Operating Instructions
Page 35
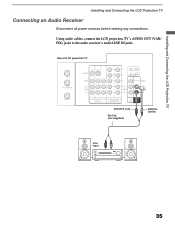
Installing and Connecting the LCD Projection TV Installing and Connecting the LCD Projection TV Connecting an Audio Receiver Disconnect all power sources before making any connections. Using audio cables, connect the LCD projection TV's AUDIO OUT (VAR/ FIX) jacks to the audio receiver's audio LINE IN jacks. Rear of LCD projection TV AUDIO-R (red) RK-74A (not supplied) AUDIO-L (white) Line input 35
Installing and Connecting the LCD Projection TV Installing and Connecting the LCD Projection TV Connecting an Audio Receiver Disconnect all power sources before making any connections. Using audio cables, connect the LCD projection TV's AUDIO OUT (VAR/ FIX) jacks to the audio receiver's audio LINE IN jacks. Rear of LCD projection TV AUDIO-R (red) RK-74A (not supplied) AUDIO-L (white) Line input 35
Operating Instructions
Page 36
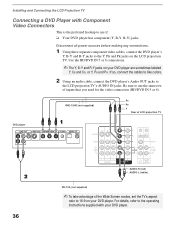
...instructions supplied with Component Video Connectors This is the preferred hookup to use the same row of the Wide Screen modes, set the TV's aspect ratio to the Y, PB and PR jacks on your DVD player are sometimes labeled Y, CB and CR, or Y, PB and PR. Disconnect all power ...Audio OUT jacks to use if: ❑ Your DVD player has component (Y, B-Y, R-Y) jacks. VMC-10HG (not supplied) PR PB Y Rear of LCD projection TV DVD player 36 AUDIO-R (red) AUDIO-L (white) RK-74A (not supplied) ✍ To take advantage of inputs that you used for the video connection (HD/DVD IN 5 or 6)....
...instructions supplied with Component Video Connectors This is the preferred hookup to use the same row of the Wide Screen modes, set the TV's aspect ratio to the Y, PB and PR jacks on your DVD player are sometimes labeled Y, CB and CR, or Y, PB and PR. Disconnect all power ...Audio OUT jacks to use if: ❑ Your DVD player has component (Y, B-Y, R-Y) jacks. VMC-10HG (not supplied) PR PB Y Rear of LCD projection TV DVD player 36 AUDIO-R (red) AUDIO-L (white) RK-74A (not supplied) ✍ To take advantage of inputs that you used for the video connection (HD/DVD IN 5 or 6)....
Operating Instructions
Page 37
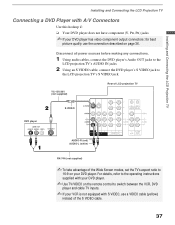
...) instead of the Wide Screen modes, set the TV's aspect ratio to the LCD projection TV's S VIDEO jack. YC-15V/30V (not supplied) Rear of LCD projection TV DVD player S VIDEO AUDIO-R (red) AUDIO-L (white) RK-74A (not supplied) ✍ To take advantage of the S VIDEO cable. 37 Disconnect all power sources before making any connections. 1 Using audio cables...
...) instead of the Wide Screen modes, set the TV's aspect ratio to the LCD projection TV's S VIDEO jack. YC-15V/30V (not supplied) Rear of LCD projection TV DVD player S VIDEO AUDIO-R (red) AUDIO-L (white) RK-74A (not supplied) ✍ To take advantage of the S VIDEO cable. 37 Disconnect all power sources before making any connections. 1 Using audio cables...
Operating Instructions
Page 38
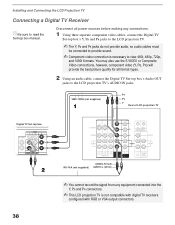
...to the LCD projection TV's AUDIO IN jacks. Installing and Connecting the LCD Projection TV Connecting a Digital TV Receiver z Be sure to view 480i, 480p, 720p, and 1080i formats. VMC-10HG (not supplied) PR PB Y Rear of LCD projection TV Digital TV Set-top box 38 AUDIO-R (red) RK-74A (not supplied) AUDIO-L (... Composite Video connections, however, component video (Y, PB, PR) will provide the best picture quality for all power sources before making any equipment connected into the Y, PB and PR connectors. ✍ This LCD projection TV is necessary to read the Set-top box manual.
...to the LCD projection TV's AUDIO IN jacks. Installing and Connecting the LCD Projection TV Connecting a Digital TV Receiver z Be sure to view 480i, 480p, 720p, and 1080i formats. VMC-10HG (not supplied) PR PB Y Rear of LCD projection TV Digital TV Set-top box 38 AUDIO-R (red) RK-74A (not supplied) AUDIO-L (... Composite Video connections, however, component video (Y, PB, PR) will provide the best picture quality for all power sources before making any equipment connected into the Y, PB and PR connectors. ✍ This LCD projection TV is necessary to read the Set-top box manual.
Operating Instructions
Page 40
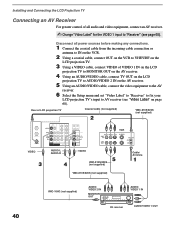
..." (see "Video Label" on page 68). Installing and Connecting the LCD Projection TV Connecting an AV Receiver For greater control of all power sources before making any connections. 1 Connect the coaxial cable from the incoming ...projection TV. 3 Using a VIDEO cable, connect VIDEO of LCD projection TV Coaxial cable (not supplied) VMC-810S/820S (not supplied) VCR VIDEO AUDIO-L AUDIO-R VIDEO VMC-810S/820S (not supplied) VMC-810S/820S (not supplied) Cable/ Antenna 40 VMC-10HG (not supplied) AUDIO/ VIDEO 2 IN MONITOR OUT AUDIO/ VIDEO 1 IN AV receiver AUDIO/VIDEO 1 OUT Rear...
..." (see "Video Label" on page 68). Installing and Connecting the LCD Projection TV Connecting an AV Receiver For greater control of all power sources before making any connections. 1 Connect the coaxial cable from the incoming ...projection TV. 3 Using a VIDEO cable, connect VIDEO of LCD projection TV Coaxial cable (not supplied) VMC-810S/820S (not supplied) VCR VIDEO AUDIO-L AUDIO-R VIDEO VMC-810S/820S (not supplied) VMC-810S/820S (not supplied) Cable/ Antenna 40 VMC-10HG (not supplied) AUDIO/ VIDEO 2 IN MONITOR OUT AUDIO/ VIDEO 1 IN AV receiver AUDIO/VIDEO 1 OUT Rear...

