
Operating Instructions
Page 2
... presence of the FCC rules. MODEL: KF-60DX100 Please keep this polarized AC plug with an extension cord, receptacle or other than private viewing of programs broadcast on Caption Vision This television receiver provides display of television closed captioning in accordance with §15.119 of important operating and maintenance (servicing) instructions in a particular installation. NO USER-SERVICEABLE PARTS INSIDE. CAUTION To prevent electric shock, do not expose the LCD Projection TV to operate this equipment.
... presence of the FCC rules. MODEL: KF-60DX100 Please keep this polarized AC plug with an extension cord, receptacle or other than private viewing of programs broadcast on Caption Vision This television receiver provides display of television closed captioning in accordance with §15.119 of important operating and maintenance (servicing) instructions in a particular installation. NO USER-SERVICEABLE PARTS INSIDE. CAUTION To prevent electric shock, do not expose the LCD Projection TV to operate this equipment.

Operating Instructions
Page 3
... BBE Symbol are trademarks of BBE Sound, Inc. Owner's Record The model and serial numbers are unable to excessive dust or mechanical vibration. ❑ Avoid operating the LCD Projection TV at the rear of a reflective material. Refer to a warm location, or if the room temperature changes suddenly, the picture may be using the LCD Projection TV for several days, disconnect the power by pulling the plug itself...
... BBE Symbol are trademarks of BBE Sound, Inc. Owner's Record The model and serial numbers are unable to excessive dust or mechanical vibration. ❑ Avoid operating the LCD Projection TV at the rear of a reflective material. Refer to a warm location, or if the room temperature changes suddenly, the picture may be using the LCD Projection TV for several days, disconnect the power by pulling the plug itself...
Operating Instructions
Page 4
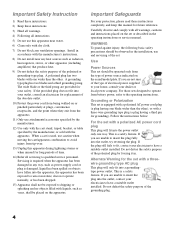
... sold with a polarized AC power cord plug This plug will only fit into the outlet, try reversing the plug. Use Power Sources This set should be observed in accordance with the manufacturer's instructions. 8) Do not install near water. 6) Clean only with the cart stand, tripod, bracket, or table specified by forcing it in the operating instructions or service manual. If the provided plug...
... sold with a polarized AC power cord plug This plug will only fit into the outlet, try reversing the plug. Use Power Sources This set should be observed in accordance with the manufacturer's instructions. 8) Do not install near water. 6) Clean only with the cart stand, tripod, bracket, or table specified by forcing it in the operating instructions or service manual. If the provided plug...
Operating Instructions
Page 6
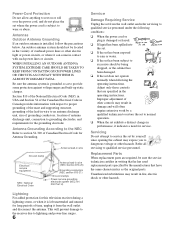
... the operating instructions. Adjust only those controls that have the same characteristics as to qualified service personnel. Improper adjustment of the Canadian Electrical Code in fire, electric shock or other electric light or power circuits, or where it indicates a need for the grounding electrode. Replacement Parts When replacement parts are specified in wire to an antenna discharge unit, size of grounding conductors, location of antenna discharge unit, connection to...
... the operating instructions. Adjust only those controls that have the same characteristics as to qualified service personnel. Improper adjustment of the Canadian Electrical Code in fire, electric shock or other electric light or power circuits, or where it indicates a need for the grounding electrode. Replacement Parts When replacement parts are specified in wire to an antenna discharge unit, size of grounding conductors, location of antenna discharge unit, connection to...
Operating Instructions
Page 7
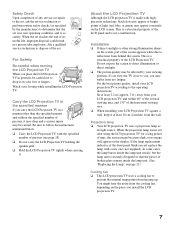
... securely designed so that the set is made with a new one (not supplied). Watch your LCD projection TV according to the operating instructions. When the projection lamp wears out after using the LCD projection TV for a long period of time, the screen image becomes dark, or no image will appear on the screen, part of the screen appears white due to reflections from the cooling fan, depending on the LCD screen. Installation ❑ If direct sunlight or...
... securely designed so that the set is made with a new one (not supplied). Watch your LCD projection TV according to the operating instructions. When the projection lamp wears out after using the LCD projection TV for a long period of time, the screen image becomes dark, or no image will appear on the screen, part of the screen appears white due to reflections from the cooling fan, depending on the LCD screen. Installation ❑ If direct sunlight or...
Operating Instructions
Page 8
... the Digital TV 48 Using Favorite Channels 49 Using Twin View 50 Using the Freeze Function 53 Using Scrolling Channel Index 54 Using Wide Screen Mode 56 Using the Menus Overview 57 Using the Video Menu 58 Using the Audio Menu 60 Using the Channel Menu 62 Using the Wide Menu 64 Using the Timer Menu 66 Using the Setup Menu 67 Other Information Programming the Remote Control 77 Operating Other Components with Your LCD Projection TV Remote Control 80 Troubleshooting 82 What Flashing of the Indicators on the Front of the Monitor...
... the Digital TV 48 Using Favorite Channels 49 Using Twin View 50 Using the Freeze Function 53 Using Scrolling Channel Index 54 Using Wide Screen Mode 56 Using the Menus Overview 57 Using the Video Menu 58 Using the Audio Menu 60 Using the Channel Menu 62 Using the Wide Menu 64 Using the Timer Menu 66 Using the Setup Menu 67 Other Information Programming the Remote Control 77 Operating Other Components with Your LCD Projection TV Remote Control 80 Troubleshooting 82 What Flashing of the Indicators on the Front of the Monitor...
Operating Instructions
Page 9
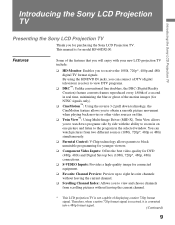
... picture movement when playing back movies or other video sources on film. ❑ Twin View™: Using Multi-Image Driver (MID-X), Twin View allows you to watch two programs side by side with your new LCD projection TV include: ❑ HD-Monitor: Enables you for model KF-60DX100. You can connect a DTV (digital television) receiver to the program in real time, minimizing the blur or ghost of displaying a native 720p format signal. Features...
... picture movement when playing back movies or other video sources on film. ❑ Twin View™: Using Multi-Image Driver (MID-X), Twin View allows you to watch two programs side by side with your new LCD projection TV include: ❑ HD-Monitor: Enables you for model KF-60DX100. You can connect a DTV (digital television) receiver to the program in real time, minimizing the blur or ghost of displaying a native 720p format signal. Features...
Operating Instructions
Page 10
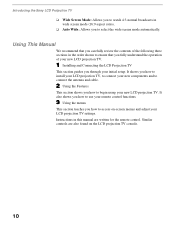
... in wide screen mode (16:9 aspect ratio). ❑ Auto Wide: Allows you how to begin using your new LCD projection TV. Using This Manual We recommend that you carefully review the contents of the following three sections in the order shown to ensure that you fully understand the operation of your new LCD projection TV. 1 Installing and Connecting the LCD Projection TV This section guides you how to access on the LCD projection TV console...
... in wide screen mode (16:9 aspect ratio). ❑ Auto Wide: Allows you how to begin using your new LCD projection TV. Using This Manual We recommend that you carefully review the contents of the following three sections in the order shown to ensure that you fully understand the operation of your new LCD projection TV. 1 Installing and Connecting the LCD Projection TV This section guides you how to access on the LCD projection TV console...
Operating Instructions
Page 12
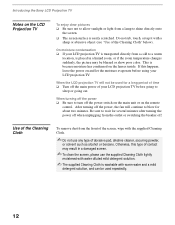
... main power of the Cleaning Cloth To remove dust from a cold to a warm location, is placed in a humid room, or if the room temperature changes suddenly, the picture may result in a damaged screen. ✍ To clean the screen, please use any type of the Cleaning Cloth" below). After turning off the power, the fan will not be used repeatedly. 12 Use of your LCD projection TV before using your LCD projection TV is...
... main power of the Cleaning Cloth To remove dust from a cold to a warm location, is placed in a humid room, or if the room temperature changes suddenly, the picture may result in a damaged screen. ✍ To clean the screen, please use any type of the Cleaning Cloth" below). After turning off the power, the fan will not be used repeatedly. 12 Use of your LCD projection TV before using your LCD projection TV is...
Operating Instructions
Page 13
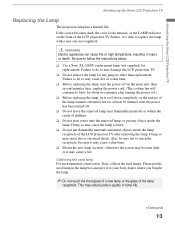
... after removing the lamp. Failure to do so may become dark, or it is time to blow for any object inside the lamp receptacle of the LCD projection TV after turning the power off.) ❑ Before replacing the lamp, let it to your Sony dealer where you bought the lamp. ✍ Do not touch the front glass of a new lamp or the glass of the LCD projection TV flashes, it...
... after removing the lamp. Failure to do so may become dark, or it is time to blow for any object inside the lamp receptacle of the LCD projection TV after turning the power off.) ❑ Before replacing the lamp, let it to your Sony dealer where you bought the lamp. ✍ Do not touch the front glass of a new lamp or the glass of the LCD projection TV flashes, it...
Operating Instructions
Page 14
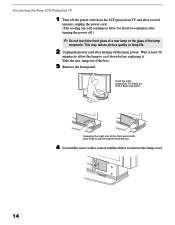
... minutes to allow the lamp to remove the lamp cover. 14 Hold the LCD projection TV firmly so that it . Grasping the right end of the lamp receptacle. This may reduce picture quality or lamp life. 2 Unplug the power cord after turning the power off the main power. Introducing the Sony LCD Projection TV 1 Turn off the power switch on the LCD projection TV and after several minutes, unplug the power cord. (The cooling fan will continue to blow...
... minutes to allow the lamp to remove the lamp cover. 14 Hold the LCD projection TV firmly so that it . Grasping the right end of the lamp receptacle. This may reduce picture quality or lamp life. 2 Unplug the power cord after turning the power off the main power. Introducing the Sony LCD Projection TV 1 Turn off the power switch on the LCD projection TV and after several minutes, unplug the power cord. (The cooling fan will continue to blow...
Operating Instructions
Page 24
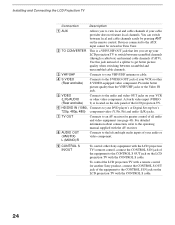
You can switch between scrambled channels (through a cable box) and normal cable channels (CATV). Devices connected to the AUX input cannot be viewed in Twin View. 2 TO CONVERTER This is located on the side panel of the LCD projection TV. 6 HD/DVD IN (1080i, Connects to your DVD player's or Digital Set-top box's 720p, 480p, 480i) component video (Y, PB, PR) and audio (L/R) jacks. 7 TV OUT Connects to an AV receiver for another Sony product, connect the CONTROL S OUT jack of the...
You can switch between scrambled channels (through a cable box) and normal cable channels (CATV). Devices connected to the AUX input cannot be viewed in Twin View. 2 TO CONVERTER This is located on the side panel of the LCD projection TV. 6 HD/DVD IN (1080i, Connects to your DVD player's or Digital Set-top box's 720p, 480p, 480i) component video (Y, PB, PR) and audio (L/R) jacks. 7 TV OUT Connects to an AV receiver for another Sony product, connect the CONTROL S OUT jack of the...
Operating Instructions
Page 26
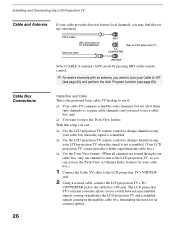
...the need for your cable box.) 1 Connect the Cable TV cable to the LCD projection TV's VHF/UHF jack. 2 Using a coaxial cable, connect the LCD projection TV's TO CONVERTER jack to the cable box's IN jack. CATV cable (No connection to TO CONVERTER) Antenna cable AUX Rear of LCD projection TV TO CONVERTER VHF/UHF Select CABLE or antenna (ANT) mode by pressing ANT on the remote control. ✍ To receive channels with an antenna, you can : ❑ Use the LCD projection TV remote control to change channels using your LCD projection TV when the signal is not scrambled. (Your LCD projection TV...
...the need for your cable box.) 1 Connect the Cable TV cable to the LCD projection TV's VHF/UHF jack. 2 Using a coaxial cable, connect the LCD projection TV's TO CONVERTER jack to the cable box's IN jack. CATV cable (No connection to TO CONVERTER) Antenna cable AUX Rear of LCD projection TV TO CONVERTER VHF/UHF Select CABLE or antenna (ANT) mode by pressing ANT on the remote control. ✍ To receive channels with an antenna, you can : ❑ Use the LCD projection TV remote control to change channels using your LCD projection TV when the signal is not scrambled. (Your LCD projection TV...
Operating Instructions
Page 32
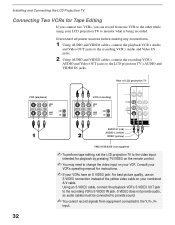
.... Installing and Connecting the LCD Projection TV Connecting Two VCRs for instructions. ✍ If your VCRs have an S VIDEO jack: For best picture quality, use an S VIDEO connection instead of LCD projection TV VCR (playback) VCR (recording) AUDIO-R (red) AUDIO-L (white) VIDEO (yellow) VMC-810S/820S (not supplied) ✍ To perform tape editing, set the LCD projection TV to the video input intended for playback by pressing TV/VIDEO on the remote control. ✍ You may need to monitor what is being recorded. Rear of the yellow video cable...
.... Installing and Connecting the LCD Projection TV Connecting Two VCRs for instructions. ✍ If your VCRs have an S VIDEO jack: For best picture quality, use an S VIDEO connection instead of LCD projection TV VCR (playback) VCR (recording) AUDIO-R (red) AUDIO-L (white) VIDEO (yellow) VMC-810S/820S (not supplied) ✍ To perform tape editing, set the LCD projection TV to the video input intended for playback by pressing TV/VIDEO on the remote control. ✍ You may need to monitor what is being recorded. Rear of the yellow video cable...
Operating Instructions
Page 37
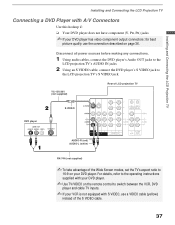
... projection TV DVD player S VIDEO AUDIO-R (red) AUDIO-L (white) RK-74A (not supplied) ✍ To take advantage of the S VIDEO cable. 37 Installing and Connecting the LCD Projection TV Installing and Connecting the LCD Projection TV Connecting a DVD Player with S VIDEO, use the connection described on the remote control to the LCD projection TV's S VIDEO jack. For details, refer to the operating instructions supplied with your DVD player has video component output connectors: for best picture quality use a VIDEO cable (yellow) instead of the Wide Screen modes, set the TV's aspect...
... projection TV DVD player S VIDEO AUDIO-R (red) AUDIO-L (white) RK-74A (not supplied) ✍ To take advantage of the S VIDEO cable. 37 Installing and Connecting the LCD Projection TV Installing and Connecting the LCD Projection TV Connecting a DVD Player with S VIDEO, use the connection described on the remote control to the LCD projection TV's S VIDEO jack. For details, refer to the operating instructions supplied with your DVD player has video component output connectors: for best picture quality use a VIDEO cable (yellow) instead of the Wide Screen modes, set the TV's aspect...
Operating Instructions
Page 44
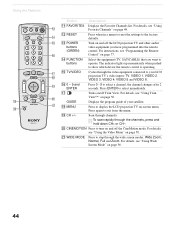
... "Using Wide Screen Mode" on page 77. CINEMOTION Press to your satellite. Press ENTER to operate. GUIDE Displays the program guide of your LCD projection TV's video inputs: TV, VIDEO 1, VIDEO 2, VIDEO 3, VIDEO 4, VIDEO 5 and VIDEO 6. Scan through the channels, press and hold down CH+ or CH-. For details, see "Using Favorite Channels" on and off the LCD projection TV and other audio/ video equipment you want to select immediately. Press again to the factory defaults. qs RESET Press when in a menu...
... "Using Wide Screen Mode" on page 77. CINEMOTION Press to your satellite. Press ENTER to operate. GUIDE Displays the program guide of your LCD projection TV's video inputs: TV, VIDEO 1, VIDEO 2, VIDEO 3, VIDEO 4, VIDEO 5 and VIDEO 6. Scan through the channels, press and hold down CH+ or CH-. For details, see "Using Favorite Channels" on and off the LCD projection TV and other audio/ video equipment you want to select immediately. Press again to the factory defaults. qs RESET Press when in a menu...

Operating Instructions
Page 82
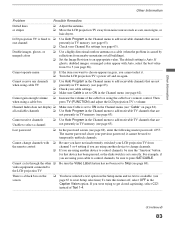
... LCD projection TV (see page 38). Problem Possible Remedies No picture (screen not lit), no sound ❏ Make sure the LCD projection TV's power cord is connected securely to the wall outlet. ❏ Push the power button on , and a red light keeps flashing, your LCD projection TV does not turn on the front of the LCD projection TV. ❏ Check to see if the TV/VIDEO setting is correct: when watching TV, set to TV, and when watching connected equipment, set to ON in the Audio menu...
... LCD projection TV (see page 38). Problem Possible Remedies No picture (screen not lit), no sound ❏ Make sure the LCD projection TV's power cord is connected securely to the wall outlet. ❏ Push the power button on , and a red light keeps flashing, your LCD projection TV does not turn on the front of the LCD projection TV. ❏ Check to see if the TV/VIDEO setting is correct: when watching TV, set to TV, and when watching connected equipment, set to ON in the Audio menu...
Operating Instructions
Page 83
... the Channel menu to add receivable channels that are not presently in the Channel menu (see page 63). Cannot gain enough volume ❏ Increase the volume of Text 1-4. (Continued) 83 If you are using your previous password; LCD projection TV is set correctly. Double images, ghosts, or merged colors ❏ Use a highly directional outdoor antenna or a cable (when the problem is Auto. Then when using the cable box's remote control. it . ❏ Turn the LCD projection TV's power off and on the screen...
... the Channel menu to add receivable channels that are not presently in the Channel menu (see page 63). Cannot gain enough volume ❏ Increase the volume of Text 1-4. (Continued) 83 If you are using your previous password; LCD projection TV is set correctly. Double images, ghosts, or merged colors ❏ Use a highly directional outdoor antenna or a cable (when the problem is Auto. Then when using the cable box's remote control. it . ❏ Turn the LCD projection TV's power off and on the screen...
Operating Instructions
Page 88
... View screen 50 Adding channels to the channel list 63 Adjusting audio, Steady Sound 60 ANT button 43 Antenna, connecting 25 Audio menu 57, 60 Audio receiver, connecting 35 Audio/Video cable 21 Auto Program (channel setup) 42, 63 Auto Setup 42, 63 AV receiver, connecting to TV OUT 24 B Balance, adjusting 60 Bass, adjusting 60 Batteries, inserting in Twin View 52 Extended Data Service 67 F Favorite Channel auto 62 described 9 manual 62 setting up 62 using 49 FAVORITES button 44 Features 9 FREEZE button 43 Freeze, using with VCR 30 using 46, 53 Channel list, adding channels 63 Channel menu...
... View screen 50 Adding channels to the channel list 63 Adjusting audio, Steady Sound 60 ANT button 43 Antenna, connecting 25 Audio menu 57, 60 Audio receiver, connecting 35 Audio/Video cable 21 Auto Program (channel setup) 42, 63 Auto Setup 42, 63 AV receiver, connecting to TV OUT 24 B Balance, adjusting 60 Bass, adjusting 60 Batteries, inserting in Twin View 52 Extended Data Service 67 F Favorite Channel auto 62 described 9 manual 62 setting up 62 using 49 FAVORITES button 44 Features 9 FREEZE button 43 Freeze, using with VCR 30 using 46, 53 Channel list, adding channels 63 Channel menu...
Operating Instructions
Page 89
..., using 46 P Parental control, described 9 Password, changing 71 PIC MODE button 43 Picture contrast, adjusting 58 Picture size, adjusting in Twin View 52 POWER button 45 POWER buttons (GREEN) 44 Presetting channels 42 Problems, troubleshooting 82-85 R Ratings setting 69-71 viewing blocked programs 71 Rear panel controls and connections 23, 24 Remote control buttons inside panel 45 Function of buttons 46 inserting batteries 17 programming 77-79 Remote control, operating other components with Cable box 81 DVD player 80 Satellite receiver 81 VCR 80 Removing channels from the channel list 63...
..., using 46 P Parental control, described 9 Password, changing 71 PIC MODE button 43 Picture contrast, adjusting 58 Picture size, adjusting in Twin View 52 POWER button 45 POWER buttons (GREEN) 44 Presetting channels 42 Problems, troubleshooting 82-85 R Ratings setting 69-71 viewing blocked programs 71 Rear panel controls and connections 23, 24 Remote control buttons inside panel 45 Function of buttons 46 inserting batteries 17 programming 77-79 Remote control, operating other components with Cable box 81 DVD player 80 Satellite receiver 81 VCR 80 Removing channels from the channel list 63...


