Operating Instructions
Page 7
... your viewing position. This is a structural property of the LCD panel and is a structural property of the LCD Projection TV. When the projection lamp wears out after using the LCD projection TV for a long period of time, the screen image becomes dark, or no image will appear on the screen, part...designed so that the pieces of broken glass remain inside the lamp unit noisily, but the lamp unit is in a picture tube implosion. If you view the TV close to prevent the internal temperature from your LCD projection TV, and within 60° of the vertical viewing area, and 130° ...
... your viewing position. This is a structural property of the LCD panel and is a structural property of the LCD Projection TV. When the projection lamp wears out after using the LCD projection TV for a long period of time, the screen image becomes dark, or no image will appear on the screen, part...designed so that the pieces of broken glass remain inside the lamp unit noisily, but the lamp unit is in a picture tube implosion. If you view the TV close to prevent the internal temperature from your LCD projection TV, and within 60° of the vertical viewing area, and 130° ...
Operating Instructions
Page 8
Contents Introducing the Sony LCD Projection TV Presenting the Sony LCD Projection TV 9 Using This Manual 10 Enjoying Your LCD Projection TV 11 Replacing the Lamp 13 Installing and Connecting the LCD Projection TV Contents 17 Inserting Batteries into the Remote Control ..........17 Carrying Your LCD Projection TV 18 To Prevent the LCD Projection TV from Falling Down 19 When Installing Your LCD Projection TV Against a Wall 19...
Contents Introducing the Sony LCD Projection TV Presenting the Sony LCD Projection TV 9 Using This Manual 10 Enjoying Your LCD Projection TV 11 Replacing the Lamp 13 Installing and Connecting the LCD Projection TV Contents 17 Inserting Batteries into the Remote Control ..........17 Carrying Your LCD Projection TV 18 To Prevent the LCD Projection TV from Falling Down 19 When Installing Your LCD Projection TV Against a Wall 19...
Operating Instructions
Page 11
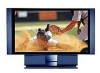
Replace the lamp with a new Sony XL-2000U replacement lamp (not supplied). ✍ Be sure to attach the lamp cover securely; Enjoying Your LCD Projection TV Introducing the Sony LCD Projection TV Introducing the Sony LCD Projection TV Indicators Projection lamp Screen Indicators The indicators show the current status of the Cleaning Cloth" on page 85. Projection lamp Your LCD projection TV uses a projection lamp as its surface has a special coating...
Replace the lamp with a new Sony XL-2000U replacement lamp (not supplied). ✍ Be sure to attach the lamp cover securely; Enjoying Your LCD Projection TV Introducing the Sony LCD Projection TV Introducing the Sony LCD Projection TV Indicators Projection lamp Screen Indicators The indicators show the current status of the Cleaning Cloth" on page 85. Projection lamp Your LCD projection TV uses a projection lamp as its surface has a special coating...
Operating Instructions
Page 12
... powder, or solvent such as alcohol or benzene. Be sure to wait for several minutes after turning the power off when unplugging from a lamp to shine directly onto the screen. ❑ The screen surface is because moisture has condensed on the lenses inside. This is easily scratched.... result in a damaged screen. ✍ To clean the screen, please use any type of the Cleaning Cloth" below). Introducing the Sony LCD Projection TV Notes on the LCD Projection TV To enjoy clear pictures ❑ Be sure not to allow sunlight or light from the outlet or switching the breaker off.
... powder, or solvent such as alcohol or benzene. Be sure to wait for several minutes after turning the power off when unplugging from a lamp to shine directly onto the screen. ❑ The screen surface is because moisture has condensed on the lenses inside. This is easily scratched.... result in a damaged screen. ✍ To clean the screen, please use any type of the Cleaning Cloth" below). Introducing the Sony LCD Projection TV Notes on the LCD Projection TV To enjoy clear pictures ❑ Be sure not to allow sunlight or light from the outlet or switching the breaker off.
Operating Instructions
Page 13
... Sony LCD Projection TV Introducing the Sony LCD Projection TV Replacing the Lamp The projection lamp has a limited life. Doing so may reduce picture quality or lamp life. (Continued) 13 Please put the used lamps. Also, be sure not to touch the receptacle, because it may cause a skin burn. ❑ Mount the new lamp securely, otherwise the screen may damage the LCD projection TV...
... Sony LCD Projection TV Introducing the Sony LCD Projection TV Replacing the Lamp The projection lamp has a limited life. Doing so may reduce picture quality or lamp life. (Continued) 13 Please put the used lamps. Also, be sure not to touch the receptacle, because it may cause a skin burn. ❑ Mount the new lamp securely, otherwise the screen may damage the LCD projection TV...
Operating Instructions
Page 14
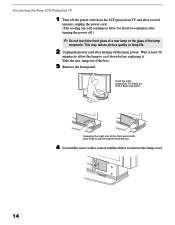
Hold the LCD projection TV firmly so that it . Introducing the Sony LCD Projection TV 1 Turn off the power switch on the LCD projection TV and after several minutes, unplug the power cord. (The cooling fan will continue to remove the lamp cover. 14 Take the new lamp out of the lamp receptacle. Grasping the right end of the front panel... the screw with a coin or similar object to blow for about two minutes after turning off .) ✍ Do not touch the front glass of a new lamp or the glass of the box. 3 Remove the front panel. Wait at least 30 minutes to allow the...
Hold the LCD projection TV firmly so that it . Introducing the Sony LCD Projection TV 1 Turn off the power switch on the LCD projection TV and after several minutes, unplug the power cord. (The cooling fan will continue to remove the lamp cover. 14 Take the new lamp out of the lamp receptacle. Grasping the right end of the front panel... the screw with a coin or similar object to blow for about two minutes after turning off .) ✍ Do not touch the front glass of a new lamp or the glass of the box. 3 Remove the front panel. Wait at least 30 minutes to allow the...
Operating Instructions
Page 15
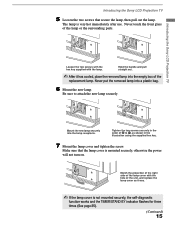
... screw. Hold the handle and pull straight out. ✍ After it was. ✍ If the lamp cover is mounted securely, otherwise the power will not turn on. Introducing the Sony LCD Projection TV 5 Loosen the two screws that the lamp cover is not mounted securely, the self-diagnostic function works and the TIMER/STAND BY...
... screw. Hold the handle and pull straight out. ✍ After it was. ✍ If the lamp cover is mounted securely, otherwise the power will not turn on. Introducing the Sony LCD Projection TV 5 Loosen the two screws that the lamp cover is not mounted securely, the self-diagnostic function works and the TIMER/STAND BY...
Operating Instructions
Page 16
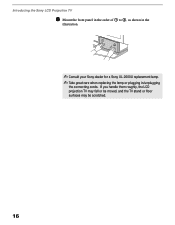
If you handle them roughly, the LCD projection TV may fall or be moved, and the TV stand or floor surfaces may be scratched. 16 Introducing the Sony LCD Projection TV 8 Mount the front panel in the order of 1 to 2, as shown in the illustration. ✍ Consult your Sony dealer for a Sony XL-2000U replacement lamp. ✍ Take great care when replacing the lamp or plugging in/unplugging the connecting cords.
If you handle them roughly, the LCD projection TV may fall or be moved, and the TV stand or floor surfaces may be scratched. 16 Introducing the Sony LCD Projection TV 8 Mount the front panel in the order of 1 to 2, as shown in the illustration. ✍ Consult your Sony dealer for a Sony XL-2000U replacement lamp. ✍ Take great care when replacing the lamp or plugging in/unplugging the connecting cords.
Operating Instructions
Page 42
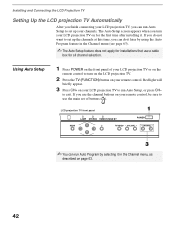
... control. Using Auto Setup 1 Press POWER on the front panel of buttons ( ). If you turn on the LCD projection TV. 2 Press the TV (FUNCTION) button on your LCD projection TV to run Auto Setup, or press CH- LCD projection TV front panel LAMP STEREO TIMER/STAND BY ✍ You can run Auto Setup to set of your LCD...
... control. Using Auto Setup 1 Press POWER on the front panel of buttons ( ). If you turn on the LCD projection TV. 2 Press the TV (FUNCTION) button on your LCD projection TV to run Auto Setup, or press CH- LCD projection TV front panel LAMP STEREO TIMER/STAND BY ✍ You can run Auto Setup to set of your LCD...
Operating Instructions
Page 85
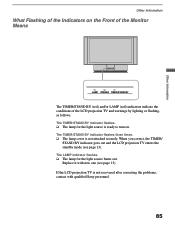
... new one (see page 13). Replace it with qualified Sony personnel. 85 The TIMER/STAND BY indicator flashes. ❑ The lamp for the light source burns out. When you correct, the TIMER/ STAND BY indicator goes out and the LCD projection TV enters the standby mode (see page 13). If the LCD... projection TV is ready to turn on the Front of the Monitor Means LAMP STEREO TIMER/STAND BY The TIMER/STAND BY (red) and/or LAMP (red) indicators indicate the conditions of the LCD projection TV and warnings by ...
... new one (see page 13). Replace it with qualified Sony personnel. 85 The TIMER/STAND BY indicator flashes. ❑ The lamp for the light source burns out. When you correct, the TIMER/ STAND BY indicator goes out and the LCD projection TV enters the standby mode (see page 13). If the LCD... projection TV is ready to turn on the Front of the Monitor Means LAMP STEREO TIMER/STAND BY The TIMER/STAND BY (red) and/or LAMP (red) indicators indicate the conditions of the LCD projection TV and warnings by ...
Operating Instructions
Page 86
Other Information Specifications Projection System LCD Panel Projection Lens Antenna Lamp Television System Screen Size (measured diagonally) Channel Coverage VHF UHF CATV Power Requirements Number of Inputs/Outputs Video (IN) S Video (IN) Audio (IN) AUDIO (VAR/FIX) TV Out CONTROL S (IN/OUT) Component Video Input RF Inputs ...1 lens projection system 1.35 inch TFT LCD panel Approx. 3.15 million dots (1,049,088 pixels) High Performance, large diameter hybrid lens F2.4 75 ohm external terminal for VHF/UHF UHP lamp, 100W XL-2000U NTSC, American TV Standard 60 inches 2-13 14-69 1-125 120V, 60 Hz ...
Other Information Specifications Projection System LCD Panel Projection Lens Antenna Lamp Television System Screen Size (measured diagonally) Channel Coverage VHF UHF CATV Power Requirements Number of Inputs/Outputs Video (IN) S Video (IN) Audio (IN) AUDIO (VAR/FIX) TV Out CONTROL S (IN/OUT) Component Video Input RF Inputs ...1 lens projection system 1.35 inch TFT LCD panel Approx. 3.15 million dots (1,049,088 pixels) High Performance, large diameter hybrid lens F2.4 75 ohm external terminal for VHF/UHF UHP lamp, 100W XL-2000U NTSC, American TV Standard 60 inches 2-13 14-69 1-125 120V, 60 Hz ...

Operating Instructions
Page 87
Other Information Supplied Accessories Remote Control AA Batteries Cleaning Cloth Hex key wrench Brackets with screws Optional Accessories TV Stand Lamp AV Cable Audio Cable Control S Cable Component Video Cable AV Receiver RM-Y910 2 supplied for remote control 1 1 2 SU-60DX XL-2000U VMC-810/820/830 HG RKC-515HG RK-G69HG VMC-10/30 HG STR-V555ES or equivalent Design and specifications are subject to change without notice. Other Information 87
Other Information Supplied Accessories Remote Control AA Batteries Cleaning Cloth Hex key wrench Brackets with screws Optional Accessories TV Stand Lamp AV Cable Audio Cable Control S Cable Component Video Cable AV Receiver RM-Y910 2 supplied for remote control 1 1 2 SU-60DX XL-2000U VMC-810/820/830 HG RKC-515HG RK-G69HG VMC-10/30 HG STR-V555ES or equivalent Design and specifications are subject to change without notice. Other Information 87
Operating Instructions
Page 89
...58 I Image Revision 68 Inputs, labeling 68 Installation of the projection TV 25-41 J JUMP button 43 Jump, using 46 L Label channels 63 video inputs 68 Lamp, replacing 13-16 M MENU button 44 MENU button (inside panel) 45 Menus Audio 57, 60 Channel 57, 62 Setup 57, 67 Timer 57, 66 Video...52 POWER button 45 POWER buttons (GREEN) 44 Presetting channels 42 Problems, troubleshooting 82-85 R Ratings setting 69-71 viewing blocked programs 71 Rear panel controls and connections 23, 24 Remote control buttons inside panel 45 Function of buttons 46 inserting batteries 17 programming 77-79 Remote control, ...
...58 I Image Revision 68 Inputs, labeling 68 Installation of the projection TV 25-41 J JUMP button 43 Jump, using 46 L Label channels 63 video inputs 68 Lamp, replacing 13-16 M MENU button 44 MENU button (inside panel) 45 Menus Audio 57, 60 Channel 57, 62 Setup 57, 67 Timer 57, 66 Video...52 POWER button 45 POWER buttons (GREEN) 44 Presetting channels 42 Problems, troubleshooting 82-85 R Ratings setting 69-71 viewing blocked programs 71 Rear panel controls and connections 23, 24 Remote control buttons inside panel 45 Function of buttons 46 inserting batteries 17 programming 77-79 Remote control, ...


